Posts with «arduino» label

A 3D-printed lunar phase clock for your nightstand
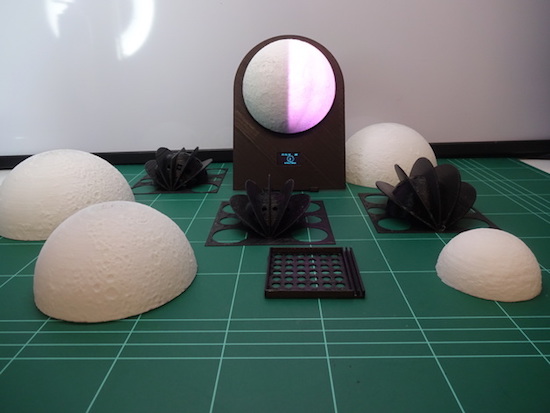
“Since there isn’t a supermoon everyday, make one for your bedside table!” This is exactly what G4lile0 set out to do using a 3D printer, an Arduino and some open-source tools.

The result was a moon phase clock consisting of a 3D-printed model and an LED strip to create the lunar phases. The lights are driven by an Arduino that precisely calculates which phase to show, as well as controls a 0.96″ OLED display revealing the date and time. Other electronics include an RTC module, a DTH11 sensor, a buzzer, and three push buttons.

The clock also features several modes, including an alarm, a wake-up light, a lamp, a thermometer, and a hygrometer. It can even help set the mood or start your next lunar rave with its relaxation and party-like special effects.

You can read all about this project on Thingiverse and find its code over on GitHub.

Create your own Red Dwarf Talkie Toaster replica

In the Red Dwarf TV series, Talkie Toaster is a monomaniacal talking toaster that tries to steer every conversation to the subject of toast. Now, YouTuber “slider2732″ has gone ahead and built a chatty appliance of his own.

To accomplish this, the Maker embedded a PIR sensor into the toaster’s lever that communicates with an Arduino Pro Mini whenever someone is nearby. The Arduino then reads sound files loaded onto an SD card and plays them through a 3W amplifier out to a speaker underneath. The replica is also complete with a circular panel on front, made out of “laptop screen material” with a sour cream tub’s lid, and equipped with a couple LEDs.

The Arduino code uses the TMRpcm library and is a simple case of responding to the PIR sensor going high or low. The samples are loaded from the SD card. The front grill area has the speaker underneath, with two white 5mm LEDs that are connected to the Pin 9 output from the Arduino. The former laptop screen material was cut out and then fitted. The main surround is from the lid of a sour cream tub, sprayed with a Krylon brown rattle can paint. The our legs are from a window blind, cut to the right sizes and similarly sprayed, then glued with Fix-All.

The samples were recorded in Audacity, normalized and saved out as 11025Hz, 8-bit WAVs due to buffer constraints of the Arduino Pro Mini.

slider2732 walks through the entire build and shows it off in the video below!

The Orbitalochka is a solar-powered satellite synth

This model satellite is both strange and mesmerizing with folding solar panels and a FM transmitter.

Media artist Dmitry Morozov, aka ::vtol::, is back with his latest kinetic sound object, this one resembling a satellite. The Orbitalochka hangs from the ceiling and broadcasts sound via an FM transmitter and a built-in speaker. These noises are based on the position of the satellite in space, and it can even transmit a pre-recorded lecture by Sergev Kasich, who appears to reside in the satellite’s clear bubble.

::vtol:: bases the sound signals on the generative sound processes created with Patchblocks, a modular mini-synth kit. The signals also react to a light intensity sensor, which responds to how the satellite’s position in space changes.

This happens due to mass redistribution as the solar cell changes location. The solar cells operate as sensors and produce CV (control voltage) to change sound program parameters.

Aside from its unusual sounds, what is really interesting about this synthesizer are the solar panels, which autonomously move around via four servo motors. The Orbitalochka is equipped with an Arduino Nano as well.

You can see the apparatus in action below, and read all about it on ::vtol::’s page here.

(Photos: ::vtol::)

Red Dwarf’s Talkie Toaster Tests Tolerance

In the Red Dwarf TV series, Talkie Toaster wants to know if you want toast, and if not toast, then maybe a muffin or waffle, and it will pester you incessantly until you smash it with a 14lb lump hammer and throw it in a waste disposal. Now [slider2732] has actually gone and made one of the infernal machines!

He’s hidden a PIR sensor in the toaster handle to tell an Arduino Pro Mini when someone is unfortunate enough to be passing by. The Arduino then reads sound files from an SD card reader and plays them through a 3 watt amplifier out to a speaker. For that he uses the TMRpcm library available on github.

[slider2732] cleverly mounted the speaker to the side of the toaster along with some appropriately shaped bits and pieces, and some LEDs to make it appear and work much like the circular panel that lights up on the real Talkie Toaster. We dare you to watch the video after the break, unless you really are looking for toast. As a consolation, the video also walks through making it.

These links will take you to clips of Talkie Toaster in the TV series before he was smashed and after he was repaired.

And what else can you do with a toaster? Why not make a flying one. Of course what seems to be most popular here on Hackaday is making reflow ovens from toaster ovens.


Filed under: Arduino Hacks

EMG Tutorial Lets You Listen to Your Muscles

What with wearable tech, haptic feedback, implantable devices, and prosthetic limbs, the boundary between man and machine is getting harder and harder to discern. If you’re going to hack in this space, you’re going to need to know a little about electromyography, or the technique of sensing the electrical signals which make muscles fire. This handy tutorial on using an Arduino to capture EMG signals might be just the thing.

In an article written mainly as a tutorial to other physiatrists, [Dr. George Marzloff] covers some ground that will seem very basic to the seasoned hacker, but there are still valuable tidbits there. His tutorial build centers around a MyoWare Muscle Sensor and an Arduino Uno. The muscle sensor has snap connectors for three foam electrodes of the type used for electrocardiography, and outputs a rectified and integrated waveform that represents the envelope of the electrical signal traveling to a muscle. [Dr. Marzloff]’s simple sketch just reads the analog output of the sensor and lights an LED if it detects a muscle contraction, but the sky’s the limit once you have the basic EMG interface. Prosthetic limbs, wearable devices, diagnostic tools, virtual reality — the possibilities are endless.

We’ve seen a few EMG interfaces before, mainly of the homebrew type like this audio recorder recruited for EMG measurements. And be sure to check out [Bil Herd]’s in-depth discussion of digging EMG signals out of the noise.


Filed under: Arduino Hacks, Medical hacks

MIDI Guitar Pedals

Ever since Jimi Hendrix brought guitar distortion to the forefront of rock and roll, pedals to control the distortion have been a standard piece of equipment for almost every guitarist. Now, there are individual analog pedals for each effect or even digital pedals that have banks of effects programmed in. Distortion is just one of many effects, and if you’ve built your own set of pedals for each of these, you might end up with something like [Brian]: a modular guitar pedal rack.

Taking inspiration from modular synthesizers, [Brian] built a rack out of wood to house the pedal modules. The rack uses 16U rack rails as a standard, with 3U Eurorack brackets. It looks like there’s space for 16 custom-built effects pedals to fit into the rack, and [Brian] can switch them out at will with a foot switch. Everything is tied together with MIDI and is programmed in Helix. The end result looks very polished, and helped [Brian] eliminate his rat’s nest of cables that was lying around before he built his effects rack.

MIDI is an extremely useful protocol for musicians and, despite being around since the ’80s, doesn’t show any signs of slowing down. If you want to get into it yourself, there are all kinds of ways that you can explore the studio space, even if you play an instrument that doesn’t typically use MIDI.


Filed under: musical hacks
Hack a Day 20 Nov 21:01

Scrap Bin Mods Move Science Forward

A first-time visitor to any bio or chem lab will have many wonders to behold, but few as captivating as the magnetic stirrer. A motor turns a magnet which in turn spins a Teflon-coated stir bar inside the beaker that sits on top. It’s brilliantly simple and so incredibly useful that it leaves one wondering why they’re not included as standard equipment in every kitchen range.

But as ubiquitous as magnetic stirrers are in the lab, they generally come in largish packages. [BantamBasher135] needed a much smaller stir plate to fit inside a spectrophotometer. With zero budget, he retrofitted the instrument with an e-waste, Arduino-controlled magnetic stirrer.

The footprint available for the modification was exceedingly small — a 1 cm square cuvette with a flea-sized micro stir bar. His first stab at the micro-stirrer used a tiny 5-volt laptop fan with the blades cut off and a magnet glued to the hub, but that proved problematic. Later improvements included beefing up the voltage feeding the fan and coming up with a non-standard PWM scheme to turn the motor slow enough to prevent decoupling the stir bar from the magnets.

[BantamBasher135] admits that it’s an ugly solution, but one does what one can to get the science done. While this is a bit specialized, we’ve featured plenty of DIY lab instruments here before. You can make your own peristaltic pump or even a spectrophotometer — with or without the stirrer.

[via r/Arduino]


Filed under: chemistry hacks, tool hacks

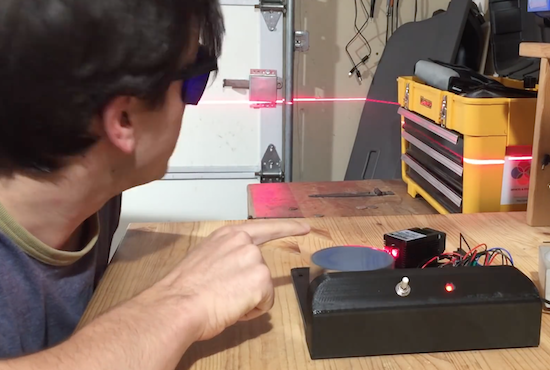
Building a “laser sky” effect generator with Arduino

Bouncing a laser off of a spinning mirror creates an amazing effect with smoke and fog, but YouTuber “Normal Universe” made it even better with an Arduino.

This video starts out by introducing the concept of “laser sky,” which seems like a fun idea. There is, however, a chance that the mirrors wouldn’t spin, potentially pointing a laser continuously at a bystander, possibly damaging his or her eyes. To prevent this, the YouTuber added a photoresistor and LED to sense the spinning mirrors, then programmed an Arduino Uno to cut off the laser if it’s stopped for whatever reason.

Normal Universe goes on to explain the electronic concept behind it as well as the Arduino code involved, so even if this effect isn’t your cup of tea, the photoresistor/voltage divider setup could still be quite useful.

You can find a detailed breakdown of the project in the video below!

3D Printed Moon Phase Clock

Someone once observed that the moon is a harsh mistress. But that doesn’t mean you can’t keep track of her, specially with this awesome moon phase clock that [G4lile0] designed and built.

It uses a 3D printed moon model combined with a series of LEDs to create the phases. These LEDs are driven by an Arduino that calculates the phase to show, as well as driving a small OLED display that shows the date and time. There is even a party mode for all of those lunar raves that you host.

[G4lile0] has done an excellent job of documenting the code that drives the lamp, so it would be easy to add features, or adapt this design to show the phases of another moon or add other features. It’s an excellent overall design, and kudos to [G4lile0] for doing it all with open source tools like FreeCAD.


Filed under: Arduino Hacks, clock hacks
Hack a Day 19 Nov 09:01

Only One Button? No Problem!

Sometimes less is more. This is especially true when dealing with microcontrollers with limited I/O pins. Even if you have lots of I/O, sometimes you are need to pack a lot into a little space. [Hugatry] was inspired by the simple interface found on a lot of flashlights: one button. Push it and it turns on. Push it again, and it switches modes. You cycle through the modes until you finally turn it back off. One button provides mutliple functions. The question is how can you use a power switch as an I/O device? After all, when you turn the power off, the microprocessor stops operating, right?

[Hugatry’s] answer is quite simple. He connects a resistor/capacitor network to an I/O pin (or multiple pins). When the processor turns on initially, the pin will read low and the capacitor will charge up. If you turn the power off, the CPU voltage will fall rapidly to zero, but the voltage on the capacitor will discharge slower. If you wait long enough and turn the power on, there’s no difference from that first power on event. But if you turn the power on quickly, the capacitor voltage will still be high enough to read as a logic one.

What that means is that the processor as part of its start up can detect that it was recently turned off and take some action. If it remembers the previous state in nonvolatile memory, you can have the code cycle through multiple states, just like a flashlight. You can see a video of the setup, below.

[Hugatry] included some simple Arduino code that illustrates the concept. However, the technique is simple enough that you can adapt it to other projects easily.

Think one button isn’t enough to do anything interesting? Think again. Then again, Amazon probably has a patent on things with one button.


Filed under: Arduino Hacks, Microcontrollers