10 Merry Circuits to Illuminate Your Holiday
 This holiday season there are so many ways to customize your lights with DIY electronics.
The post 10 Merry Circuits to Illuminate Your Holiday appeared first on Make: DIY Projects and Ideas for Makers.


This holiday season there are so many ways to customize your lights with DIY electronics.
The post 10 Merry Circuits to Illuminate Your Holiday appeared first on Make: DIY Projects and Ideas for Makers.
The time for putting up festive lights all around your house is nigh, and this is a very popular time for those of us who use the holiday season as an excuse to buy a few WiFi chips and Arduinos to automate all of our decorations. The latest in this great tradition is [Real Time Logic]’s cloud-based Christmas light setup.
In order to give public access to the Christmas light setup, a ESP8266 WiFi Four Relay board was configured with NodeMCU. This allows for four channels for lights, which are controlled through the Light Controller Server software. Once this is setup through a domain, all anyone has to do to change the lighting display is open up a web browser and head to the website. The creators had homeowners, restaurants, and church displays in mind, but it’s not too big of a leap to see how this could get some non-holiday use as well.
The holidays are a great time to get into the hacking spirit. From laser-projected lighting displays to drunk, animatronic Santas, there’s almost no end to the holiday fun, and you’ve still got a week! (Or 53!)


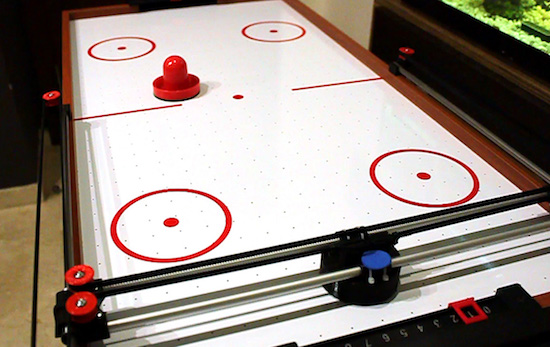
Air hockey is a classic arcade game consisting of two players, two paddles, a puck, and a low-friction table. But what happens if you don’t have an opponent? If you’re Jose Julio, you build a robotic one out of 3D printer parts.
An updated version of his earlier design from 2014, Julio upgraded the Air Hockey Robot’s original camera and vision system to a smartphone for its eyes and brain. Other components include an Arduino, an ESP8266-based shield, NEMA 17 stepper motors, stepper motor drivers, as well as some belts, bearings, rods, and a few more 3D-printed pieces.
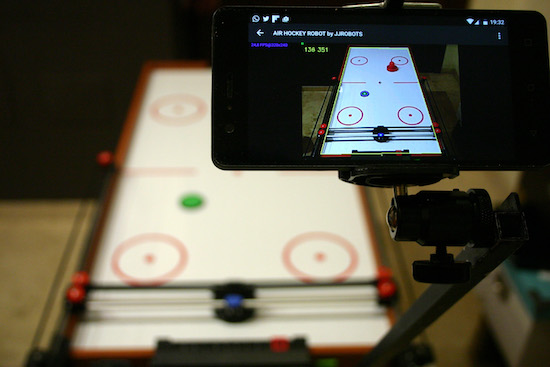
As you can see in Julio’s video below, the robot moves along two different axes with a paddle to cover its half of the table. An Android phone running the Air Hockey Robot EVO app monitors the playing surface, and makes real-time decisions by tracking the puck’s location and predicting its trajectories.
The smartphone’s camera is looking at the playing court. The camera’s captured data is processed in real-time by the smartphone. Detecting the position of the puck and the “pusher robot” (and according to the current location of all the elements on the court), your smartphone makes decisions and commands the robot what to do via Wi-Fi.
Your smartphone will become an augmented reality device, showing predicted trajectories and position of all the objects involved in this game.
Want your own? Julio has made both the instructions and code available to everyone.

[Please excuse my English]
[Please excuse my English]
[Please excuse my English]

[Please excuse my English]
Space. The final frontier. Unfortunately, the vast majority of us are planet-locked until further notice. If you are dedicated hobbyist astronomer, you probably already have the rough positions of the planets memorized. But what if you want to know them exactly from the comfort of your room and educate yourself at the same time? [Shubham Paul] has gone the extra parsec to build a Real-Time Planet Tracker that calculates their locations using Kepler’s Laws with exacting precision.
An Arduino Mega provides the brains, while 3.5-turn-pan and 180-degree-tilt servos are the brawn. A potentiometer and switch allow for for planet and mode selection, while a GPS module and an optional MPU9250 gyroscope/magnetometer let it know where you are. Finally a laser pointer shows the planet’s location in a closed room. And then there’s code: a lot of code.
The hardware side of things — as [Shubham Paul] clarifies — looks a little unfinished because the focus of the project is the software with the intent to instruct. They have included all the code they wrote for the RTPT, providing a breakdown in each section for those who are looking to build their own.
There is an extra step to auto-align the RTPT to north, otherwise you’ll have to do so manually. But [Shubham Paul] has designed it so that even if you move the tracker about, the RTPT will readjust its calculations in real time. Each part of the project includes a wealth of related information beyond simple instructions to adequately equip any prospective builders.
This hack gets the job done. If it’s looks you’re after, an artistic expression of maker skills and astronomy can be seen in this planetary map that relies on persistence of vision.


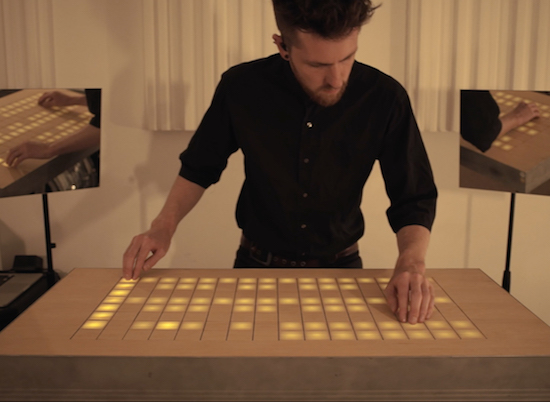
Manuel Lukas, a student at the University of Applied Science Mainz, and Sascha Lukas, a student at Cologne University of Music, together make up the German pop band Wyoming. As part of an interdisciplinary project, the duo decided to combine their love for both design and music into one live MIDI controller that’s bigger than commonly available commercial devices, but due to its size, more comprehensible for the audience.
The result? A DJ table, dubbed “Stage Bench,” that doubles as an instrument.
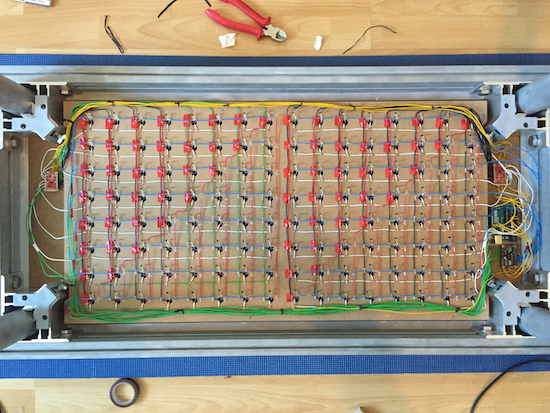
Stage Bench is based on an Arduino Uno which interacts with two matrices, a 128-LED matrix and a 128-button matrix, via a pair of shields. The connection to the computer is managed by serial communication and corresponds with a self-programmed patch in Max/MSP, which also sends MIDI data to any preferred DAW to play instruments or samplers.
Check out Stage Bench in Wyoming’s music video below!

Some useful updates on the Arduino Web Editor!
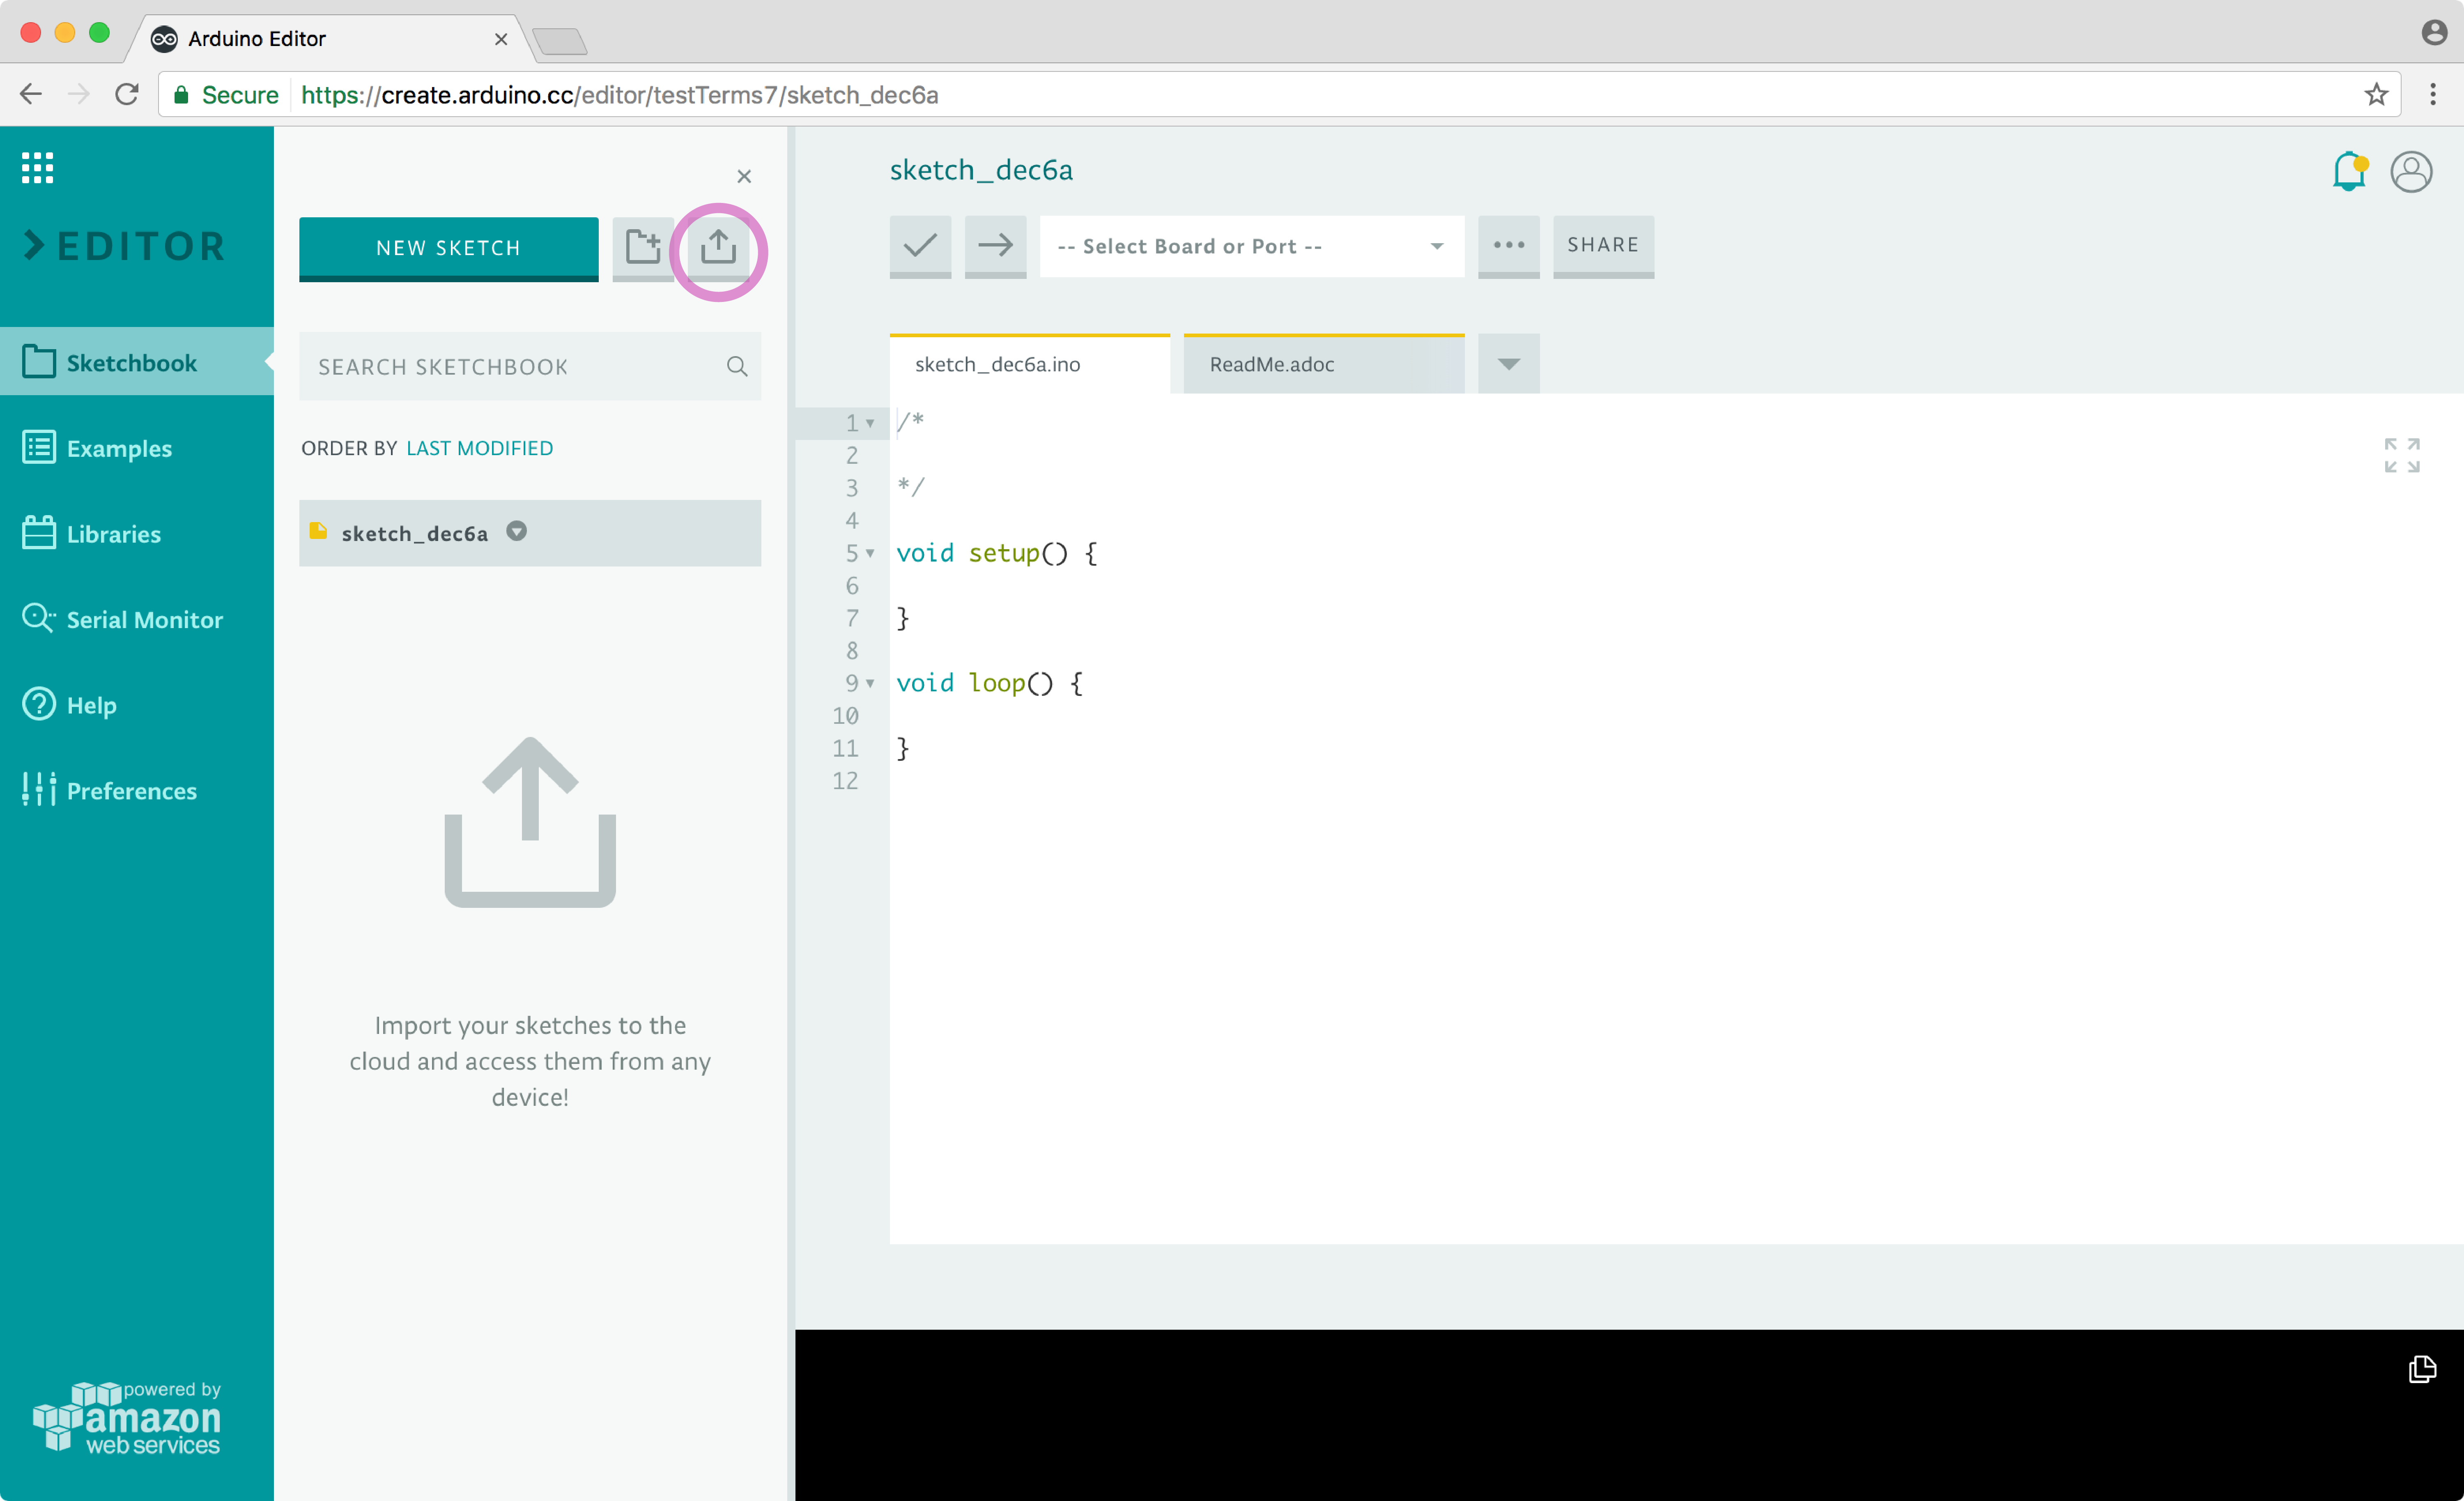
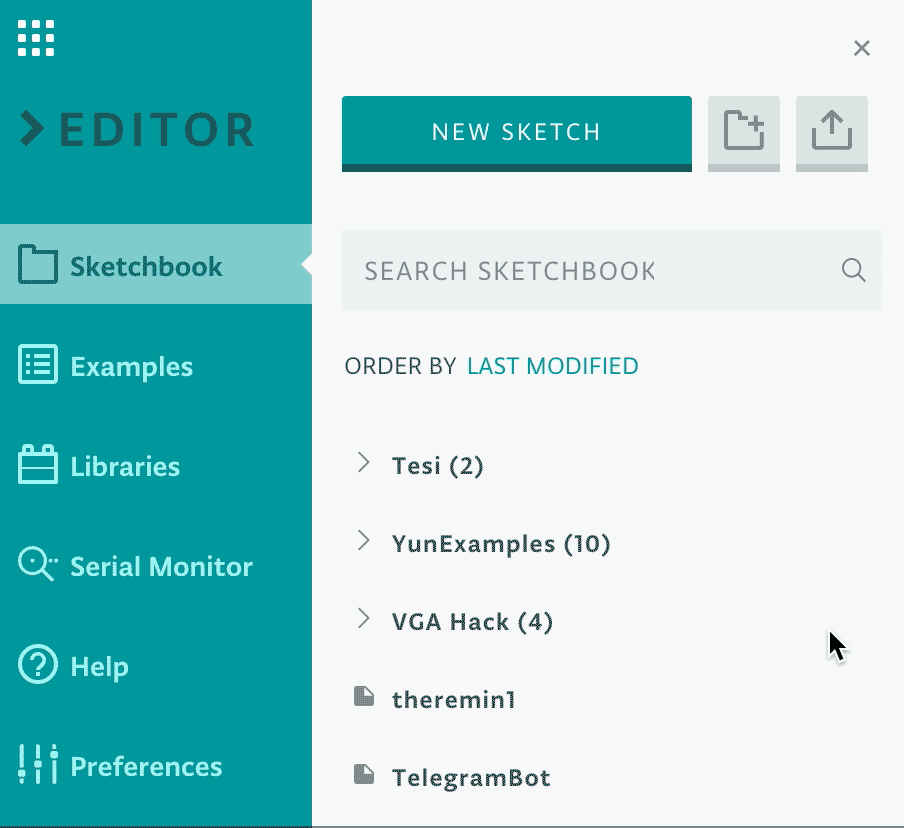
Are you sticking to the desktop Arduino IDE because all your work is saved locally? That’s no longer a problem! Our brand new import tool enables you to upload your entire sketchbook with just a few clicks on the Arduino Web Editor. It is particularly handy because it lets you move all your sketches and libraries to the cloud in a single flow.
Once your sketches and libraries are online, they will be available on any device and backed up. For details on how to migrate all your code online, check out this tutorial.
Sadly, Codebender is shutting down. You can use the import feature also to easily migrate to the Web Editor. (More details here.)
If you have a big sketchbook, you may want to clean up or categorize things once in awhile. With our bulk action tool, you can delete, move, or download multiple sketches at the same time. Go to the Sketchbook panel, hover on the sketch icon, and select all the files you want to act on. Doubts on how this will work? Learn more in this guide.
What’s coming next?
We are currently working on a super streamlined way to edit your libraries within the Web Editor, and looking for the best way to implement the Chromebook plugin. Stay tuned!