Posts with «arduino» label

The Best of Both Worlds: Arduino + 555 Should Confuse Commenters

Hardly a week goes by that some Hackaday post doesn’t elicit one of the following comments:

That’s stupid! Why use an Arduino when you could do the same thing with a 555?

And:

That’s stupid! Why use a bunch of parts when you can use an Arduino?

However, we rarely see those two comments on the same post. Until now. [ZHut] managed to bring these two worlds together by presenting how to make an Arduino blink an LED in conjunction with a 555 timer. We know, we know. It is hard to decide how to comment about this. You can consider it while you watch the video, below.

On the plus side, there probably is a use case for this. The LED will blink with absolutely no intervention from the Arduino. You could put the Arduino in deep sleep, if you wanted to and that LED will still blink. With a little work, you could probably adapt this idea to any number of circuits out of the 555 playbook, like a PWM generator, for example.

There’s almost nothing a 555 can’t do. If you want to see what’s under its expressionless face, this teardown is an interesting read. We just hope the comment section doesn’t overload like a Star Trek computer being asked by Captain Kirk to compute every digit of pi.


Filed under: Arduino Hacks
Hack a Day 03 Mar 03:00

Making a Mega LED Desk

Few things beat a sturdy, home-built desk — especially when it’s jam-packed with over 1200 WS2812 LEDs.

[nolobot] and his bother struggled with setting up and squaring-off the t-slotted, extruded aluminium frame which makes up the desk. He recommends practicing with a smaller frame for anyone else attempting a similar build. The surface of the desk has a few inches between the polycarbonate top and the 1/4″ plywood painted black serving as the substrate for the LEDs. Those LEDs come in strip form but still required several hundred solders, and wiring headaches in an attempt to make future upgrades manageable. Dozens of support bolts with adjustable feet support the desk surface throughout. These all had to be individually adjusted and can be made out if you look closely at the demo videos.

An Arduino Mega controls the LEDs with the help of the FastLED library. Custom code was necessary because one of the major issues [nolobot] faced was the power draw. 1200 LEDs at 5V draw quite a bit of current, so the LEDs were coded to peak at about 50% brightness. The matrix was split into different banks, while also limiting the 40A PSU to only 15A.

Regarding the final product, all we can say is: woah.

Not a fan of putting this much work into a piece of furniture? There are also ultra-minimalist options at your disposal.

[via /r/arduino]


Filed under: Android Hacks, led hacks
Hack a Day 02 Mar 12:01

Netflix becomes your personal trainer with its new DIY device

Working out can be tough, but inversely, watching Netflix is super easy. The streaming giant doesn't want to distract you from your fitness goals, though. Netflix would much rather be your workout buddy, which is why it posted instructions for making a DIY personal trainer gadget.

Netflix becomes your personal trainer with its new DIY device

Working out can be tough, but inversely, watching Netflix is super easy. The streaming giant doesn't want to distract you from your fitness goals, though. Netflix would much rather be your workout buddy, which is why it posted instructions for making a DIY personal trainer gadget.

Source: Netflix

Laptop control box provides speedy access to apps

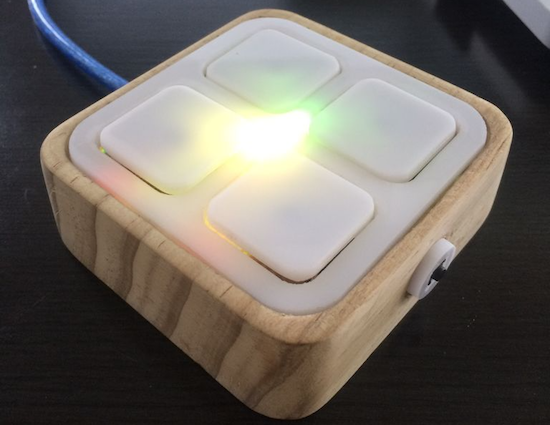
If you need to quickly launch certain apps on your MacBook Pro, Carl Gordon has your solution using an Arduino Nano.

Although the TV ads for your notebook computer would perhaps have you believe that everyone who uses it is a DJ, artist, or rock climber, chances are you just use it for a handful of programs and folders over and over. If this sounds like you, you can at least speed up access to them using Gordon’s “Laptop Control Box.”

As seen below, the box acts as a grid of shortcuts to your favorite applications, with a button to select sets of programs and an embedded RGB LED module to show you which set is active without having to look at the screen. Control on the computer side is accomplished with Processing, and though it might look like its window needs to be active in the video, it can work in the background as well.

This version currently gives me to access 24 different functions which are divided into six categories of four functions for ease of use, these categories include: tools, media, browser, utilities, social and lifestyle. Categories can be navigated through using the small button on the side and each category is visualized with a unique color by an RGB LED within the device, illuminating the plastic buttons from underneath.

Check out how to make this handy little gadget in Gordon’s Instructables write-up here.

Reverse Engineering the Smart ForTwo CAN Bus

The CAN bus has become a defacto standard in modern cars. Just about everything electronic in a car these days talks over this bus, which makes it fertile ground for aspiring hackers. [Daniel Velazquez] is striking out in this area, attempting to decode the messages on the CAN bus of his Smart ForTwo.

[Daniel] has had some pitfalls – first attempts with a Beaglebone Black were somewhat successful in reading messages, but led to strange activity of the car and indicators. This is par for the course in any hack that wires into an existing system – there’s a high chance of disrupting what’s going on leading to unintended consequences.

Further work using an Arduino with the MCP_CAN library netted [Daniel] better results, but  it would be great to understand precisely why the BeagleBone was causing a disturbance to the bus. Safety is highly important when you’re hacking on a speeding one-ton metal death cart, so it pays to double and triple check everything you’re doing.

Thus far, [Daniel] is part way through documenting the messages on the bus, finding registers that cover the ignition and turn signals, among others. Share your CAN hacking tips in the comments. For those interested in more on the CAN bus, check out [Eric]’s great primer on CAN hacking – and keep those car hacking projects flowing to the tip line!


Filed under: car hacks

Remotely control a sumo bot with a gaming wheel

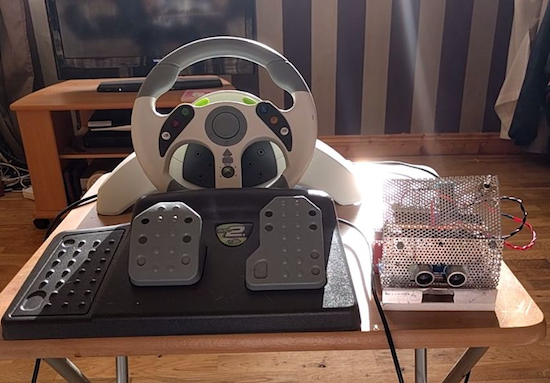
Using an Arduino Uno, Nano, and two Bluetooth modules, engineering student “Roboro” can now remotely control his sumo robot.

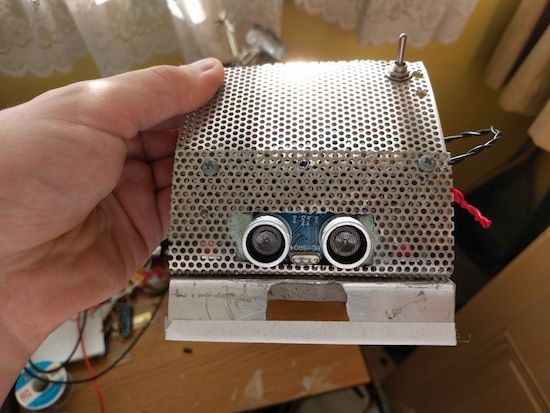
Like many hackers, Roboro had an old gaming controller that he wasn’t using, in this case an Xbox steering wheel and pedals. Naturally, he converted it into a controller for his sumo robot, which can now be driven manually. This involved wiring the wheel controls into an Uno; the smaller Nano was used onboard the bot.

Rewiring a controller is nothing new, but what is also quite interesting from a hack point of view is that the Arduinos communicate over Bluetooth. When initiated, the controller connects itself to the robot, which can then be driven around (as long as it doesn’t get stuck in the hardwood).

You can see more details of this build on Roboro’s project page.

Heat Pump Gets Brain Transplant; Such is Life in Latvia

If you buy a used heat pump that was made in China and try to use it in Northern Europe, there are bound to be issues. If your heat pump ends up encased in a block of ice that renders it ineffective, you’ve got two choices: give up and pump a proper heater, or hack a new ice-busting brain board into the heat pump and get back to life.

A little too icy.

[Evalds] chose the latter course, obviously, and in the process he gives us a pretty good look at how heat pumps work and how to overcome their deficiencies. In [Evalds]’ Latvia, winters can be both cold and humid, which can worsen an inherent problem with air-coupled heat pumps: they tend to ice up. As the outside coil is cooled to pick up as much heat as possible from the outside air, water vapor condenses out on the coils and freezes. Most heat pumps account for this by occasionally running in reverse, heating the outdoor coils to clear the ice buildup. [Evalds]’  had nothing more than a simple timer to kick off the defrost cycle, and it wasn’t keeping up with the Latvian winter. An Arduino replaced the OEM controller, and wired up to temperature sensors and an IR sensor that watches for ice buildup on the lower part of the coil, the heat pump is now much better behaved.

Of course it wasn’t as smooth as all that — [Evalds] has some hoops to jump through, including EMI problems and a dodgy Arduino clone. But he stuck with it and brought the heat pump back online, likely at far less expense than HVAC techs would charge for a service call.


Filed under: home hacks
Hack a Day 28 Feb 18:00

Log high-altitude balloon data with this Arduino device

Wanting to see data from their high school’s HAB launch, 9th grader “Spaceshark” and a few of his classmates decided to build their own data tracker.

According to the project’s write-up, Spaceshark’s school has an astronomy club which sends HABs to the edge of space. Although the 360-degree video embedded here would be enough to satisfy most people’s curiosity, this team wanted more data!

Spaceshark’s group proceeded to create a data logger using an Arduino Uno, along with sensors to collect data on the satellite’s latitude and longitude coordinates. Altitude, wind speeds, time, and the satellites in view can also be recorded, saving readings on a microSD card for later analysis.

Since these type of balloons can reach heights of 100,000 feet, the fact that the boards used could get quite cold, as well as the question of whether or not the GPS used would work at that altitude, had to be considered. You can find more details of this build on its Instructables page here.

Arduino Day Turin: Call for projects and volunteers!

As recently announced, Arduino Day 2017 will be celebrated on April 1st. (If you want to organize an event of your own, please submit your proposal by March 11th.) Though festivities will be taking place worldwide, the Arduino team will be holding this year’s official event at Toolbox Coworking in Turin–which happens to be in the same building as Arduino’s new Italian headquarters.

The Arduino Day Turin program (11am – 6pm), organized in collaboration with Fablab Torino, will include an exhibition area with boards and projects, a talk area with speeches by Massimo Banzi and other Arduino co-founders, a workshop/demo area with free activities for kids–with the Fablab for Kids team–and adults, as well as an Arduino store with special prices and offers.

We are currently seeking projects for Arduino Day Turin’s exhibition space: if you are an individual or team of Makers and would like to show off  your creations, feel free to fill out this form by March 18th. If you are an Arduino enthusiast and want to help out, we are also looking for volunteers (application here) to welcome guests, document the event, and assist the Arduino crew.

Over the next few weeks, we’ll be sharing more news and updates on Arduino Day Turin’s agenda and activities. In the meantime, don’t forget to post and invite your friends via ia social media using the hashtag #ArduinoD17!