Posts with «uno» label

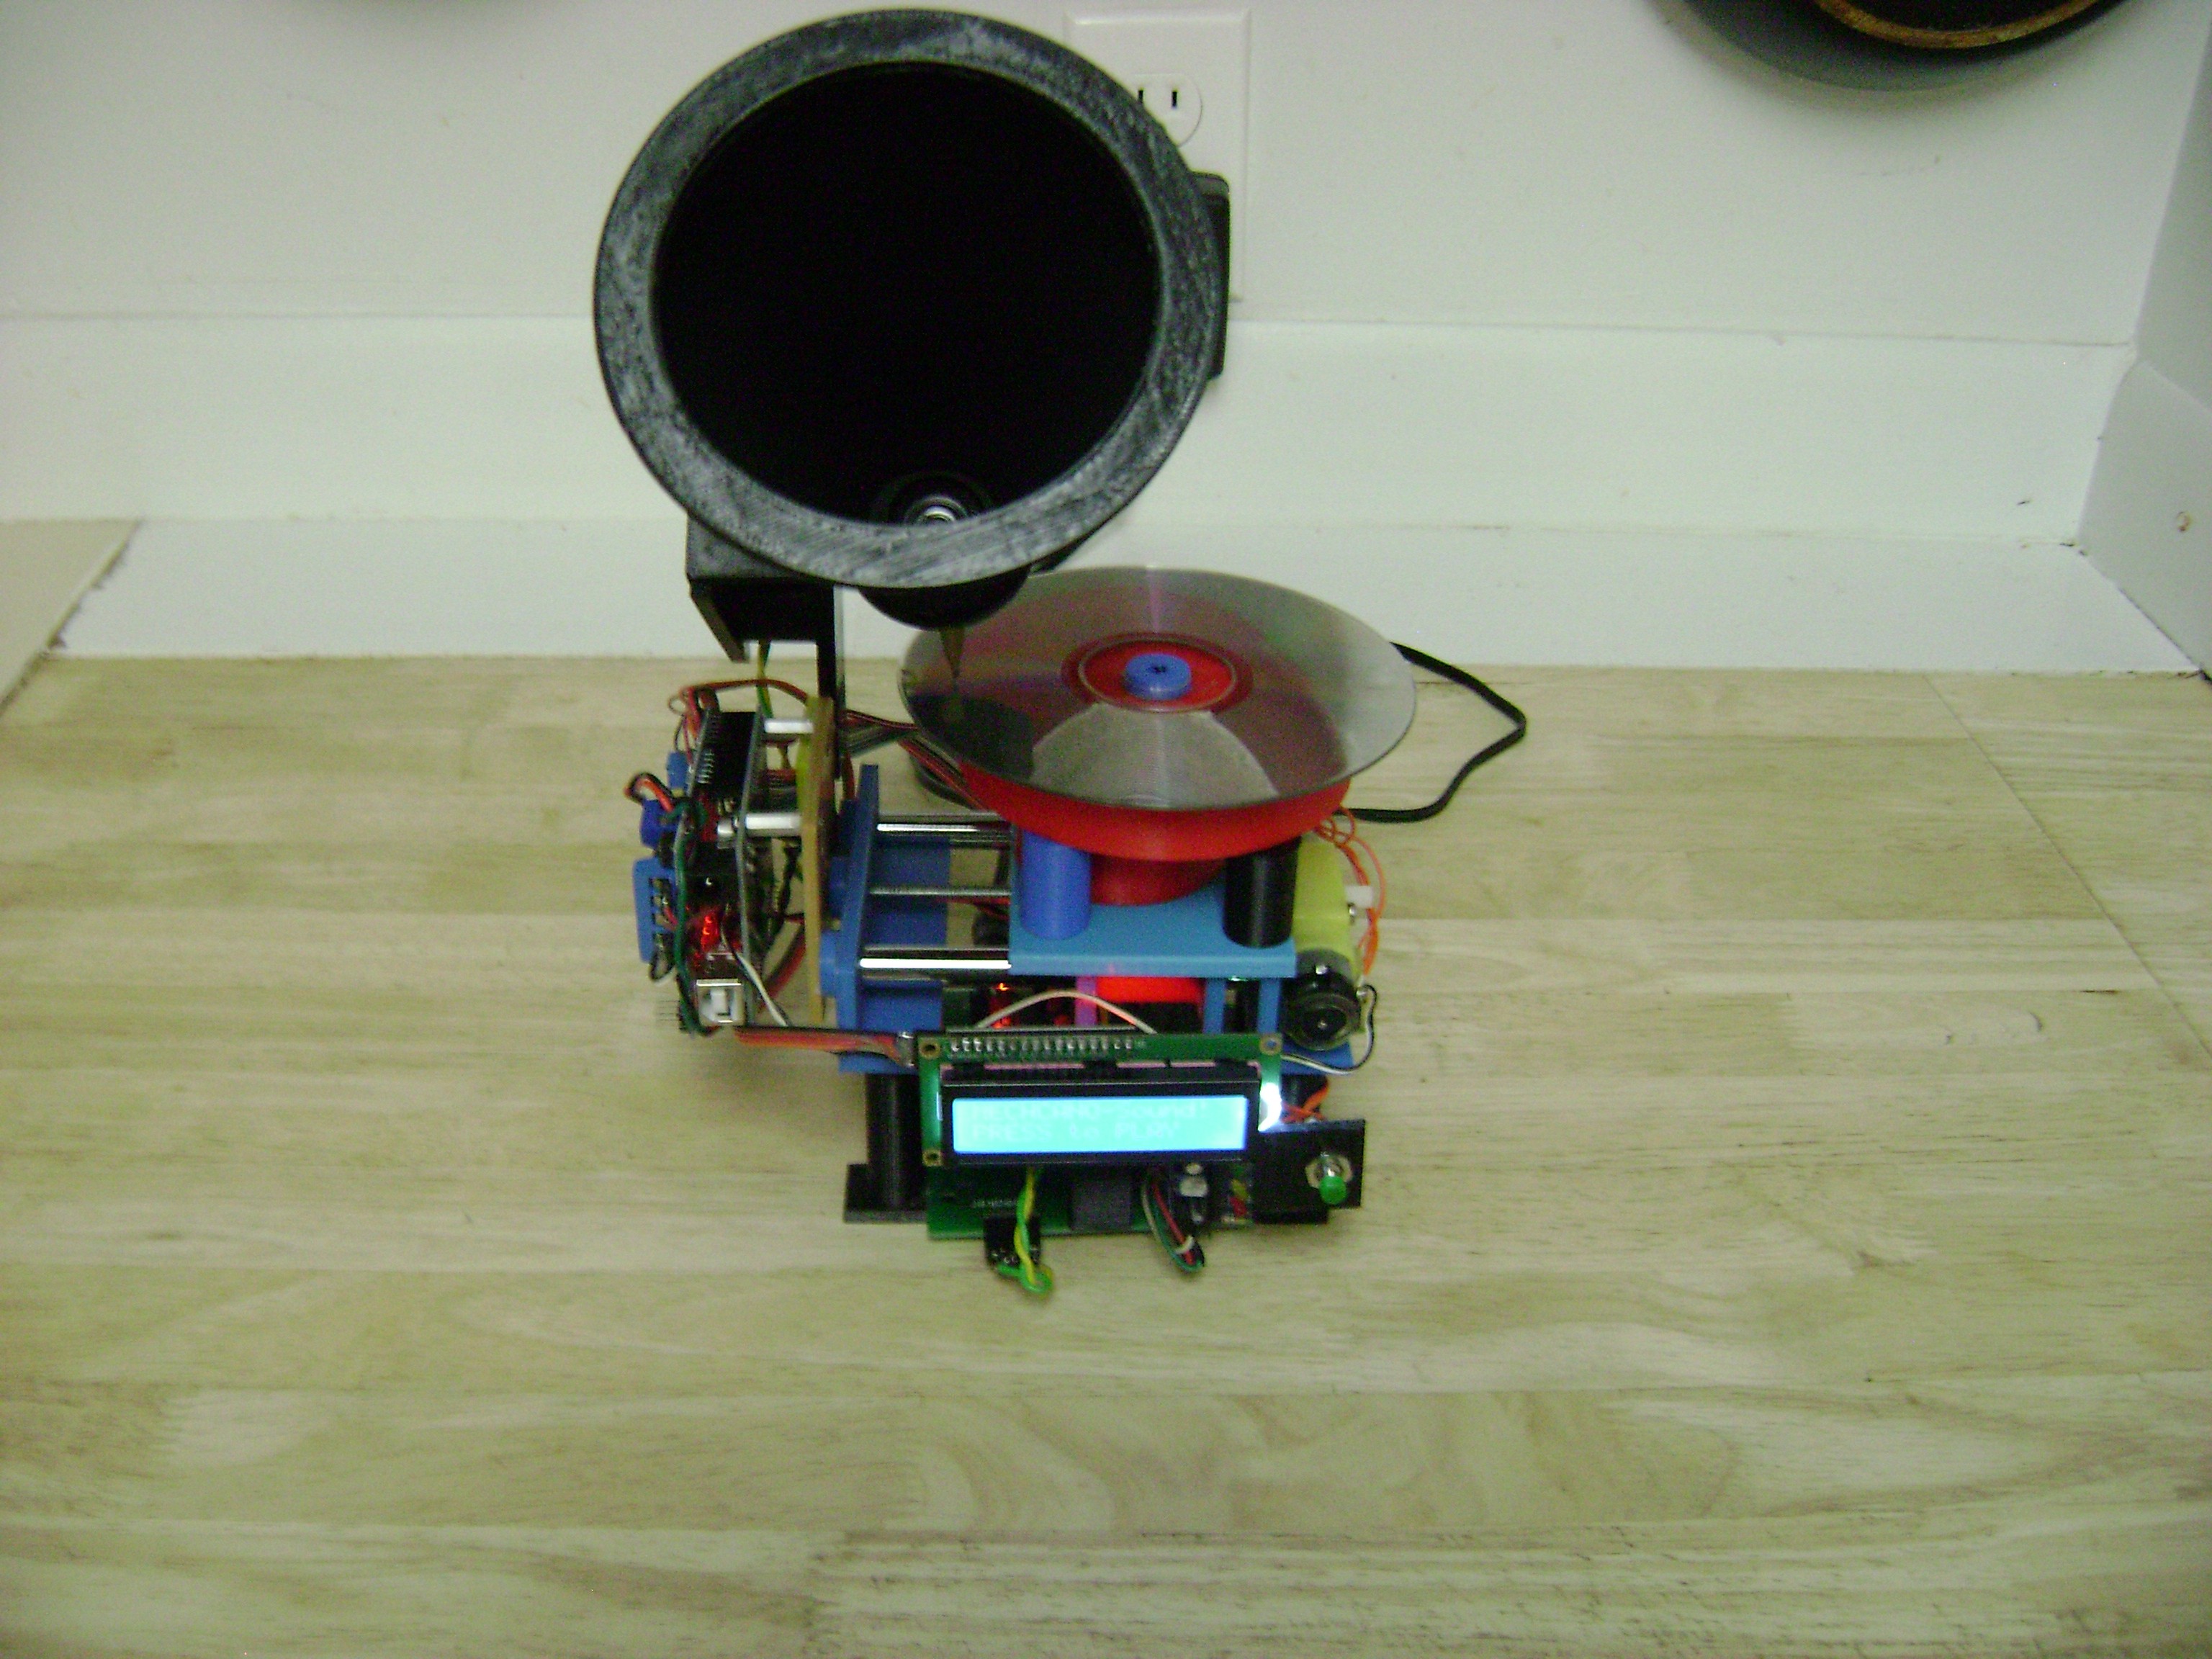
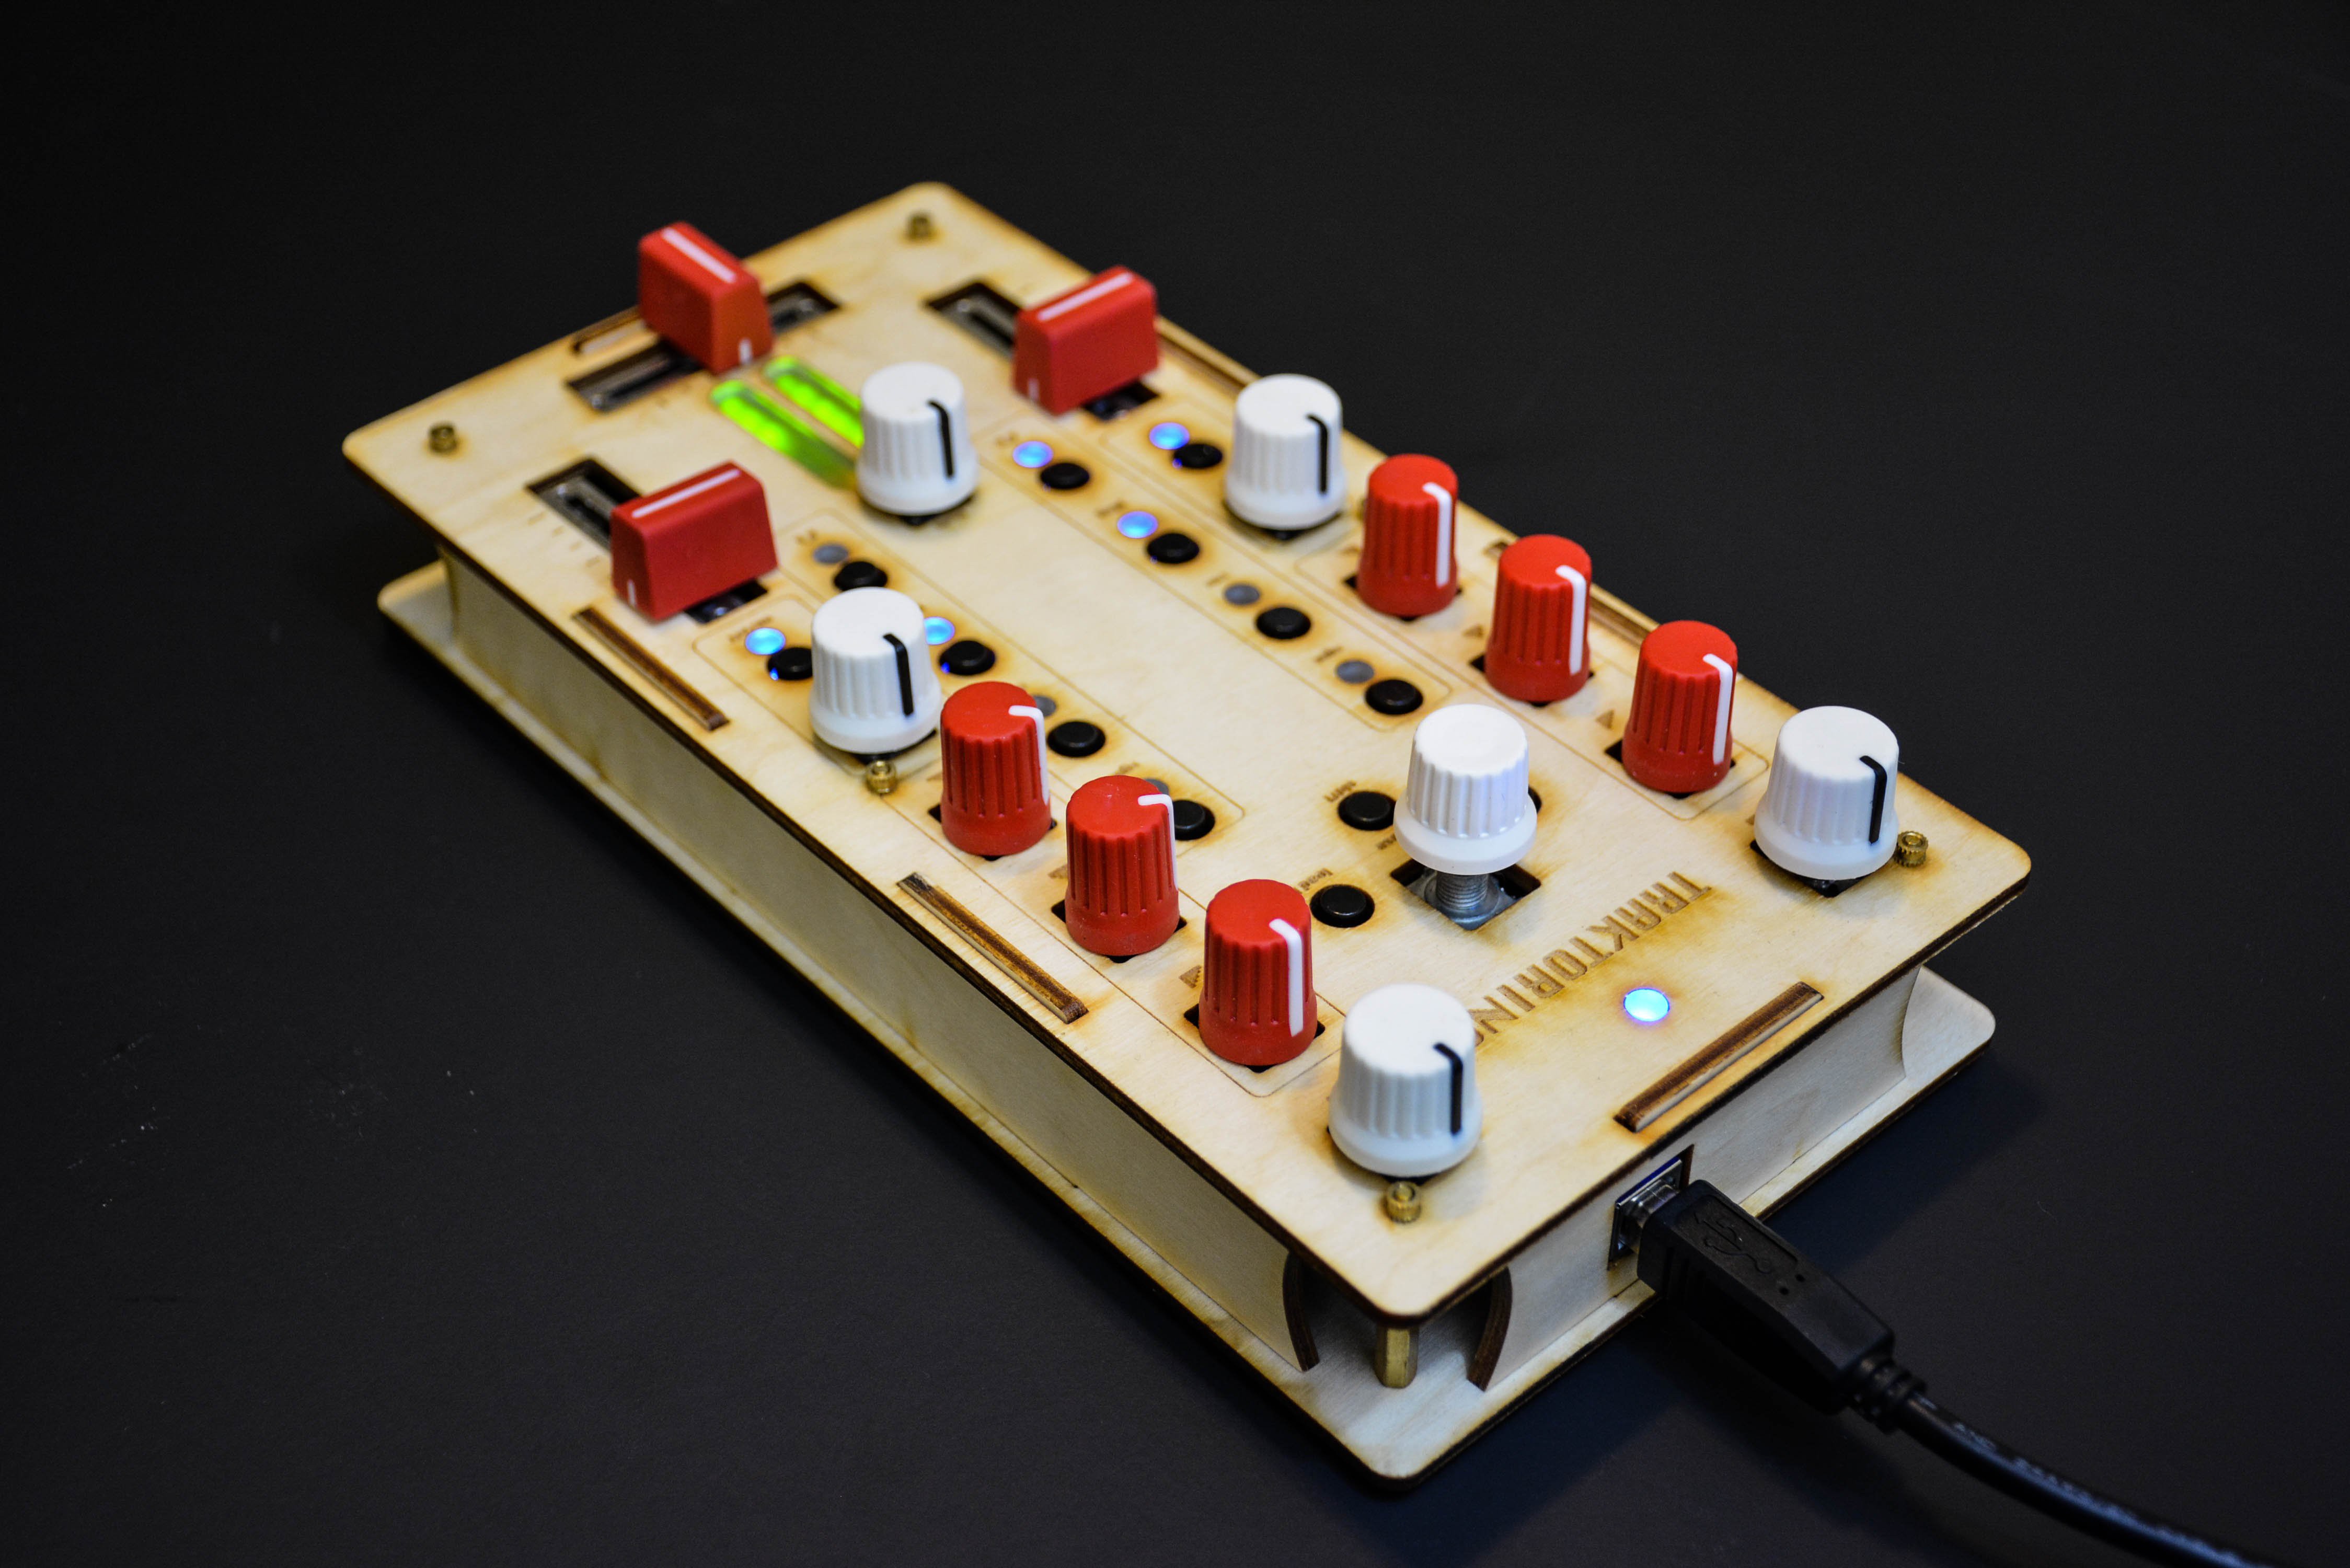
Tracktorino Shields You From Poor Interfaces

On-screen controls in a digital audio workstation expand the power of a DJ or musician, but they are not intuitive for everyone. The tactility of buttons, knobs, sliders and real-world controls feels nothing like using a mouse, trackpad, or even a touchscreen. Unfortunately, devices meant to put control into a DJs hands can be unavailable due to location or cost. [Gustavo Silveira] took charge of the situation so he could help other DJs and musicians take control of their workstations with a customized MIDI interface for Traktor DJ software.

MIDI is a widely used serial protocol which has evolved from a DIN connector to USB, and now it is also wireless. This means that the Traktorino is not locked to Traktor despite the namesake. On the Hackaday.io page, there’s even a list of other workstations it will work with, but since many workstations, all the good ones anyway, accept MIDI hardware like this, the real list is a lot longer.

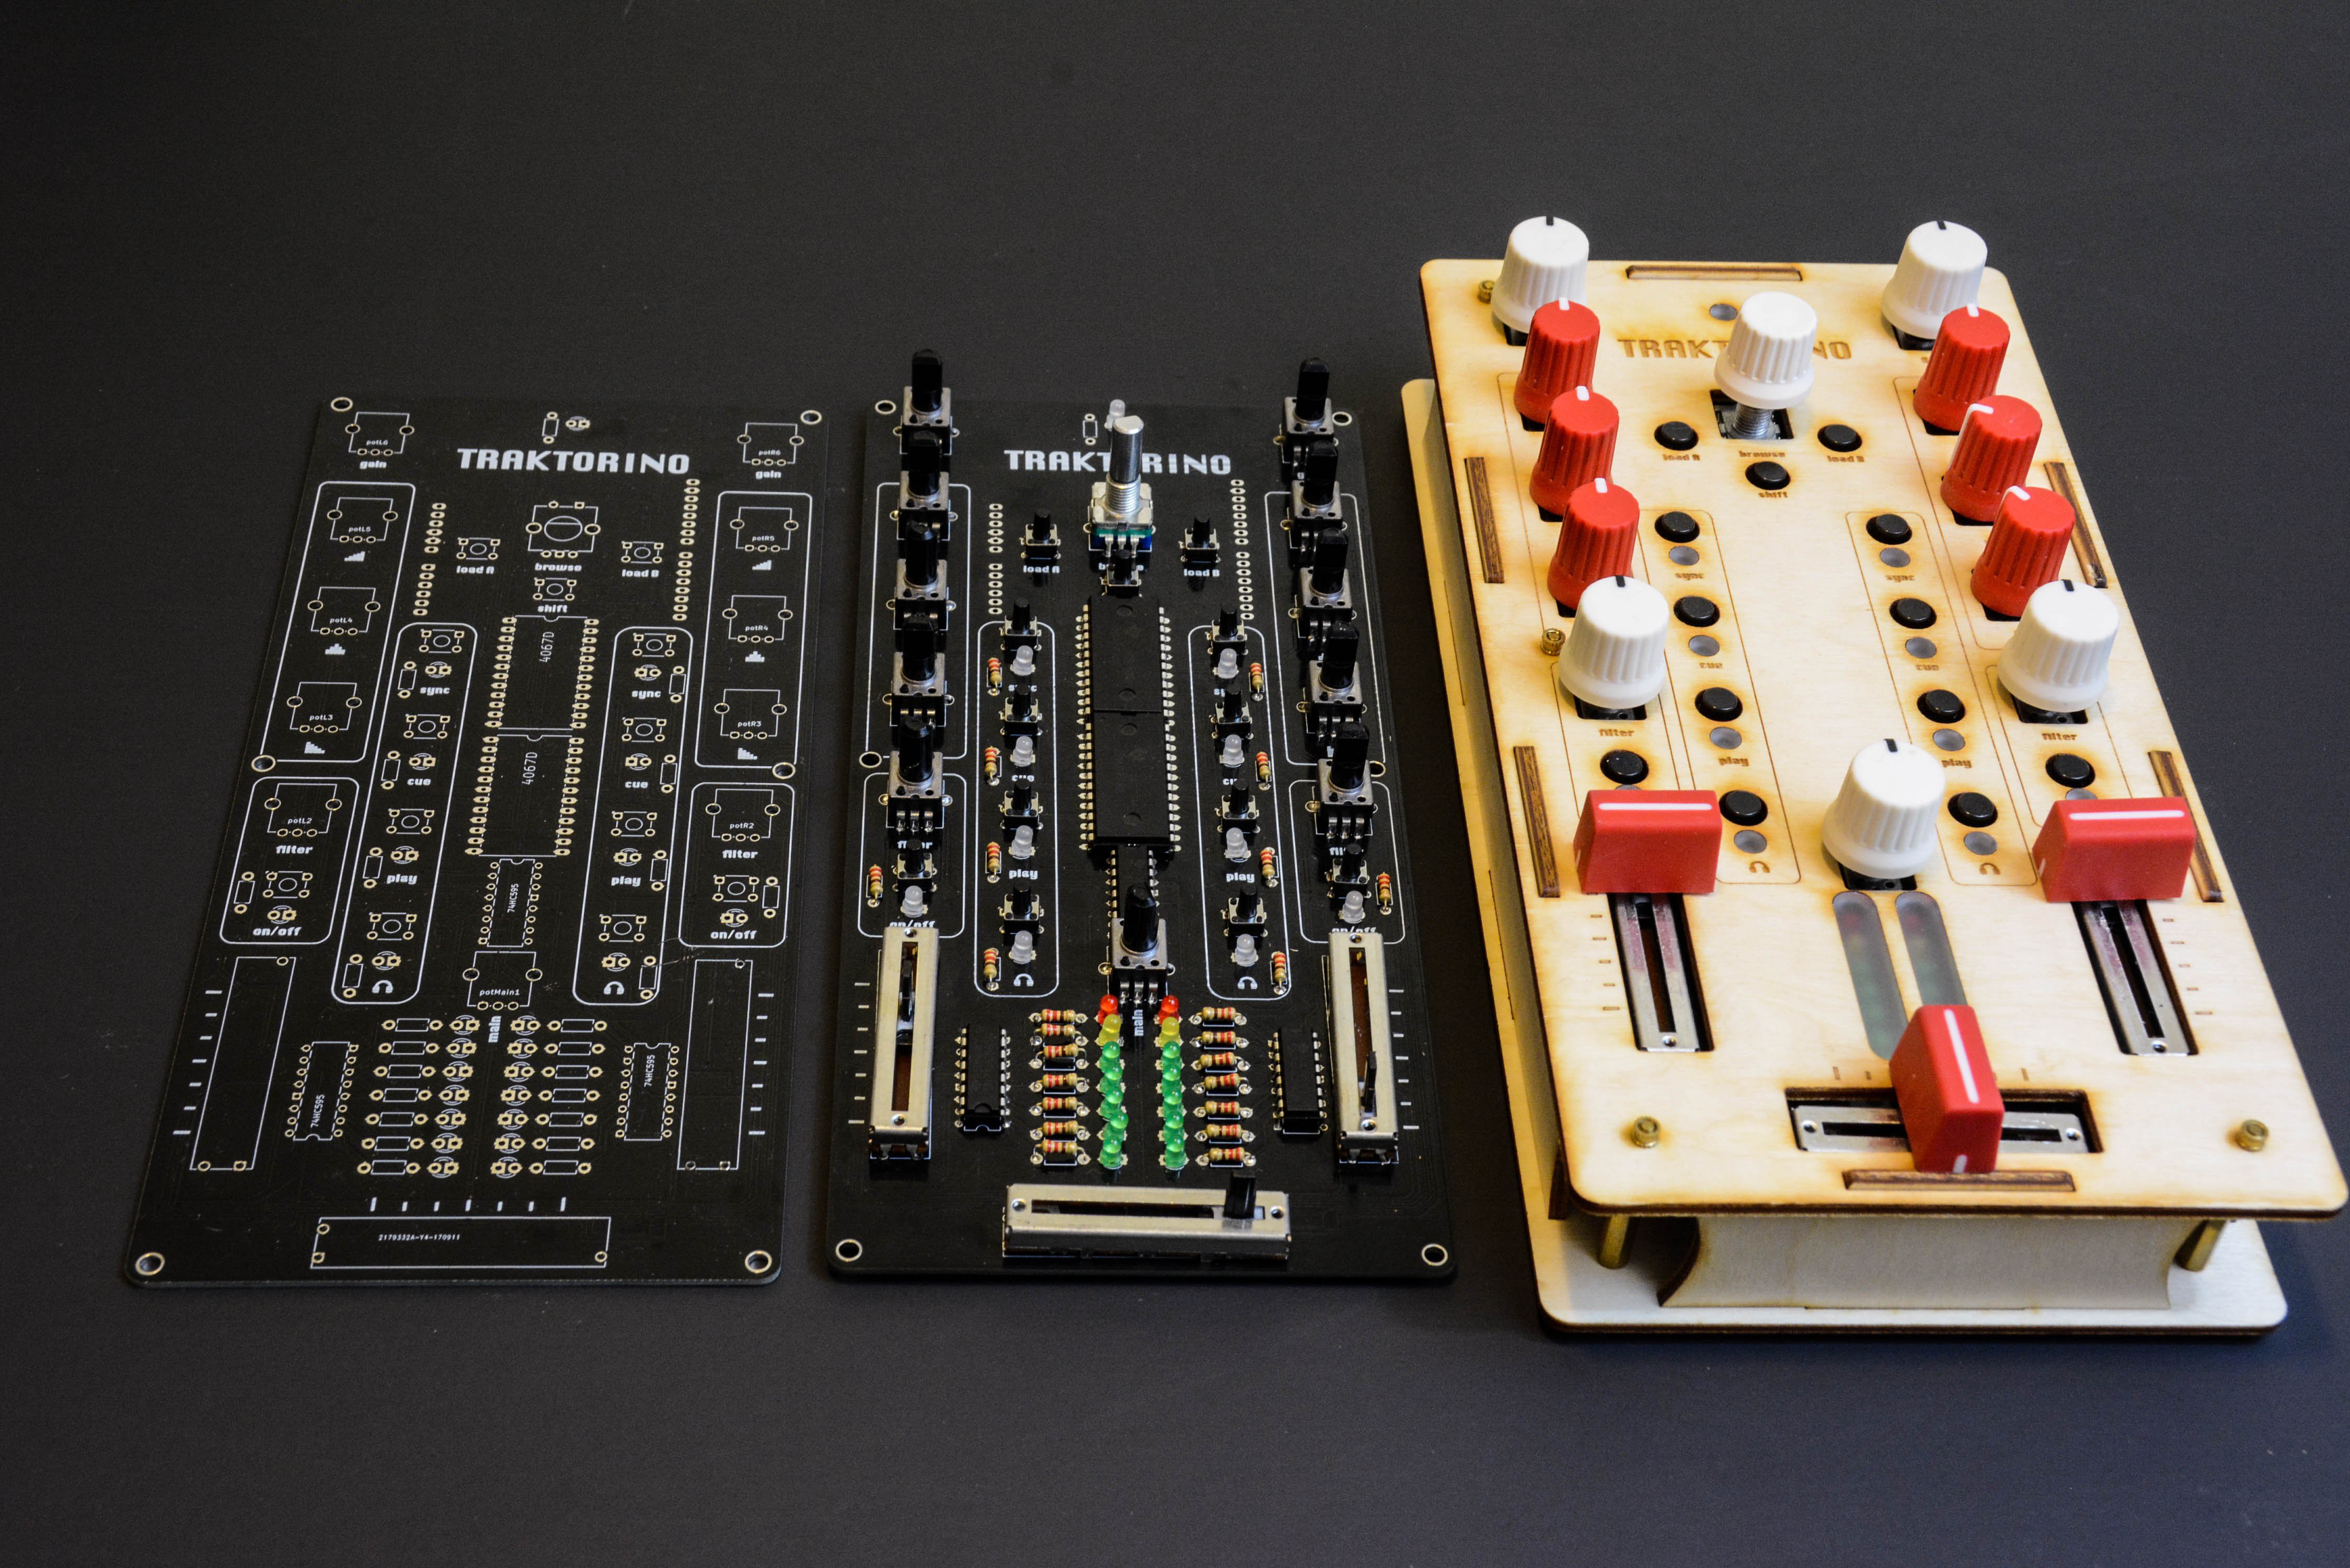
The custom circuit board is actually a shield. Using an Arduino UNO, the current poster child of the Arduino world, opens up the accessibility for many people who don’t know specialized software. A vector drawing for a lasercut enclosure is also included. This means that even the labeling on the buttons are not locked into English language.

Here’s another project which combined laser cutting and MIDI to make some very clever buttons or turn your DIN MIDI connector into USB.

PID temperature control with Arduino

If you want to keep something at a certain temperature, say a block of aluminum, you’ll need a thermocouple and some sort of heating element. While you could turn a heater on and off abruptly in a sequence appropriately known as “bang-bang,” a more refined method can be used called PID, or proportional-integral-derivative control. This takes into account how much the temperature is outside of a threshold, and also how it’s changing over time.

As shown in this example by Electronoobs, PID control can be accomplished using an Arduino Uno, along with a type K thermocouple and a MAX6675 module for sensing. The Arduino sketch reads the data and sends the proper amount power to a heating element via a MOSFET in order to maintain the desired temperature without excessive oscillations.

What I want, is the aluminum block below to have let’s say, exactly 100 degrees. I’ll control the real temperature using a K type thermocouple. To read the data I’ll use the MAX6675 breakout module and control the PID algorithm with and Arduino. Finally, to apply power we will make a small circuit using a MOSFET or maybe a TRIAC in case of high AC voltages. This will be a close loop. The thermocouple measures the real values, the Arduino creates the signal applied to the MOSFET and this transistor will control the power of a heating element inside of the aluminum block and once again the thermocouple will measure the value, that’s why it’s a close loop.

Be sure to check it out for an introduction to this powerful control scheme!

MP3 player “reads” CDs like a vintage Victrola

Digital music—which gives us access to a virtually unlimited amount of media at our fingertips—is an amazing innovation. On the other hand, if you get nostalgic for something a bit more tangible, this “Victrola for the 21st century” may just fill that gap.

The device, by maker “castvee8,” plays digital music with the help of an Arduino Uno. Instead of simply emitting the tunes, however, the speaker is augmented with 3D-printed parts to make a horn assembly, and pushed over a CD spinning on a turntable using a worm drive. This creates the illusion that it’s playing digital music in a strange mashup of ‘90s tech and vintage vinyl record players.

My goal was make a music player with a mechanism that simulated a phonograph design but actually was just for aesthetics, and use modern digital media for the actual music. The combination of nostalgia with the modern components like an LCD screen, microcontroller and SD song storage would round this out as a unique build.

The main features of the build are a large cone type speaker supported on a moving axis that scans it across the cd simulating a tonearm pickup, an LCD module that gives instructions such as “press to play” and “select song” with pushbuttons that match, an LED analog level indicator and volume control, a rotating table to turn the cd as if it were being played, and of course the electronics to make it all work. At the end of the song the axis returns home so everything is reset for the next song to be played.

Check it out in the short clip below!

A 3D-printed personal weather station

If you need to know the forecast, generally you can look outside, listen to a weather report, or take advantage of the wide range of online services available. For something local to your dwelling place, however, this 3D-printed weather measurement device gives a great way to see what’s going on.

The system features a 3D-printed rain gauge, anemometer, and weather vane, along with a barometer and temperature sensor. Information from these sensors is piped to an Arduino Uno and displayed on a 4×20 character LCD.

While meant as a demonstration for an arts/science exhibition and would need to be calibrated for real world use, it is a perfect starting point if you’d like to build your own personal station!

The thrust bearings should be a tight fit and not require glue. The 5mm brass tube for the axles though will benefit from some cyanoacrylate on the ABS to hold them in place. Rough the tube up a bit with sandpaper or a file to help adhesion. The temperature and barometric pressure does not need calibrating. However rainfall (it is fairly close) and wind speed will need calibration. As long as the magnet in the wind direction sensor is close enough to trigger two adjacent reed switches when half way between the two reeds, it will allow 8 reed switches to reliably indicate 16 directions.

The reed switches in the direction indicator are vertical and are not trimmed, just the top end curled over to allow easy soldering to the common earth wire ring. Extra spacing maybe required, eg a small ring of heat shrink tubing to keep the moving parts of the anemometer and wind speed separated and seated on the bearings in the stationary base. This was too fine to print.

All the magnets N-S poles should be aligned along the line of the reed switch. The magnet lines of force between N-S have the best switching effect, not one of the poles, N or S, on its own. This also helps eliminate bounce, or multiple triggering.

More details on the project can be found on Thingiverse.

Build a light painting device with Arduino and LEDs

Graffiti with spray paint is generally impolite and illegal, but as hacker “Reven” shows in his write-up, you can get a very similar effect with long exposure photography and carefully-timed LEDs.

Instead of blindly moving a light point about to make this effect, he built his own handheld light painter using an Arduino Uno and a custom enclosure—shared on Thingiverse—to hold everything.

The project’s Arduino sketch can be found here, and adds a 16×2 LCD display to a light painting device conceived of by Phil Burgess for Adafruit, which enables to control the brightness of the LED strip as well as select and load various images from a micro SD card.

This has been done before, many, many times; and even commercially. But I wanted to build my own, both to learn in the process and because commercial options were out of my budget. I chose adafruit’s implementation as a starting point, because it worked on the hardware I already had and they have provided detailed instructions. I also wanted some additional features: I wanted to add a display and a menu system to be able to choose the image to display and adjust the settings (like brightness or speed). I also wanted to be able to turn off the brightness balancing that adafruit’s sketch did, because frame or animation painting wasn’t something I really needed. And most importantly, I adjusted the project to the materials I had at hand.

With this fantastic build in hand, Reven can now produce beautiful light graffiti wherever it’s needed!

Designing a fake dynamic price tag

Wile we know on some level that prices adjust to market conditions, with Amazon now owning Whole Foods, one could perhaps see a day when this happens electronically and instantaneously.

To get a preview of what this might look like, maker “msbirfday” decided to create a random price generator based on an Arduino Uno and a 16×2 LED display. This was then disguised as an official price tag, and set up in a store to observe how shoppers reacted.

The unit blends in nicely, and while employees might get annoyed at the device, it’s certainly an ingenious prank.

Amazon’s recent acquisition of Whole Foods Market made us wonder: what’s stopping dynamic pricing from stepping into the physical world of retail? What if the prices in a supermarket were just as flexible as those online?

Check out how it was made here, and see it in action in the video below!

Quadruped robot made entirely out of cardboard

Walking robots can be a lot of fun, but many people would logically think that they need CNC equipment or a 3D printer to make this sort of bot. Creator “Raz85,” however, shows that this isn’t actually required, and built a quadruped using a structure comprised entirely out of corrugated cardboard.

Each of the four legs are driven using 9g micro servos, controlled by an Arduino Nano. A human operates the spider-inspired robot with a remote consisting of an Arduino Uno and a small joystick module, while pair of NRF24L01 radio transceivers provide a link between the robot and controller.

Despite its simple construction, the quadruped moves around impressively well…

Traktorino is an open-source DIY MIDI controller for DJs

A keyboard and mouse is a great user interface system for general computing tasks, but in other situations custom knobs, sliders, and lights would certainly be more fun. If you enjoy making digital music, then you should check out this low-cost, Arduino-based MIDI controller by Nerd Musician.

The Traktorino gives you access to a plethora of knobs and sliders, as well as LEDs for custom feedback in a laser-cut package. Internally, the device acts as an Arduino Uno shield, and is designed to control Traktor DJ software by default. It also supports other MIDI programs, and perhaps could even be adapted to work with other applications as well.

The Traktorino is a MIDI class compliant device, designed for controlling Traktor. It has several features and custom made mappings, so you can take the most of the software. However, it can do much more than that. The Traktorino can control any software that accepts MIDI, like Ableton Live, Serato, FL Studio, Logic, etc.

More information and build files can be found here and on GitHub. You can see it in action in the video below!

This window blinds controller follows the sun

Blinds let you see out and let the light into your dwelling, then flip them down when you need privacy or darkness. They do, however, have their disadvantages in that the cords constantly get mixed up and tangled, and—most importantly—they’re not automated!

While we’ve seen several mods to the holder assembly for automation, cmp3mt’s device puts a different spin on things, holding the control rod with a sleeve made out of polymer clay, allowing it to turn with a continuous rotation servo.

The setup is powered by an Arduino Uno and features an LCD display for user feedback. A button is used for manual control, or it can operate via a timer or even based on a light-dependent resistor that enables it to open and close with the sun.

Check the time on a glow-in-the-dark UV LED clock

If you thought plot clocks that write on a tiny whiteboard were cool, this project takes things to the next level, jotting down the time not with a dry-erase marker, but with a UV LED on a glow-in-the-dark sticker.

The device itself uses an Arduino Uno for control, along with a RTC module for timekeeping, and a pair of servos that move the LED with custom linkages.

In addition to an awesome looking glow-surface, the clock has been upgraded with a full 3D-printed enclosure. For a quick overview of the project, you can check it out on Imgur. If you’d like to build your own, all the Arduino code and print files are available on Thingiverse.