Posts with «uno» label

Ultrasonic Arduino-to-Arduino Communication

In the video below, Brazilian maker Eduardo Zola shows us that you don’t necessarily need radio waves to pass messages between Arduino boards; instead, he’s using ultrasonics. 

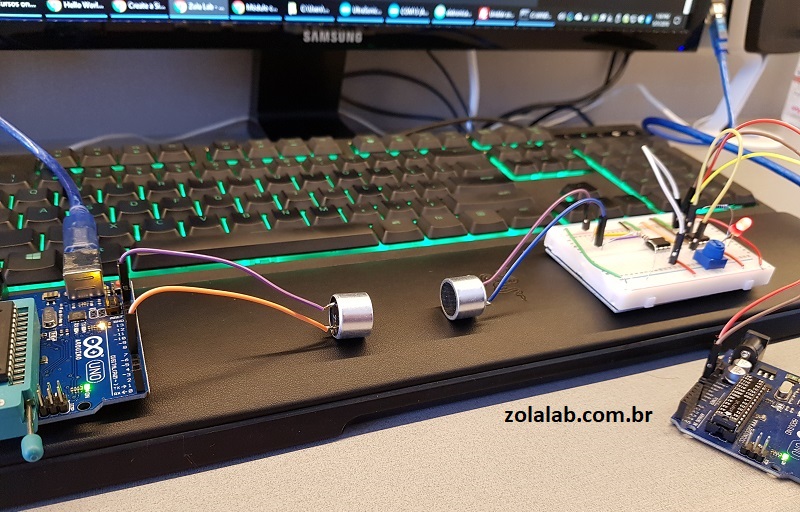
Zola’s setup features TX and RX transducers desoldered from an HC-SR04 module along with a pair of Unos to transmit text short distances. An LM386 amplifier and LM393 comparator are also used for the receiver.

While the transmission can easily be interrupted by putting a hand between the TX and RX, this configuration would certainly have some useful applications. So, how does it work exactly? As Hackaday explains:

Looking through the source code for the transmitter and receiver, we can see it’s about as basic as it gets. The transmitter Arduino breaks down a given string into individual characters, and then further converts the ASCII to eight binary bits. These bits are sent out as tones, and are picked up on the receiving end. Once the receiver has collected a decent chunk of tones, it works through them and turns the binary values back into ASCII characters which get dumped over serial. It’s slow, but it’s simple.

If you’d like to try it yourself, code and a full parts list can be found on the Zola’s website.

DIY submersible ROV flies through the water

If you’d like to check out your pool or a lake without getting wet, this underwater ROV looks like a great solution. 

The DIY device features a sturdy PVC frame with six thrusters that allow it to move through water like a drone through the air (complete with depth and heading hold), and uses the same kind of controller configuration as its airborne cousin.

Onboard control is handled by an Arduino Mega along with an FPV camera, which transmit signals back to a base station via an Ethernet cable stuffed inside of a length of polypropylene rope. The driver can then see what the ROV sees on a small display, supplemented with data from the base station’s Arduino Uno and an onscreen display (OSD) shield.

Arduino Blog 31 May 15:07

Ukulele LEDs light the way!

Ukuleles can be a lot of fun to play, and since cheap yet very playable versions can be had for under $50, they make a great target for hacking. And what better way to decorate an instrument by adding LEDs?

Elaine Chow did just that to her uke, adding six LEDs in the fingerboard along with another five embedded in the headstock. Each of these LEDs are controlled with an Arduino Uno, which light up to indicate the four most important chords: C, G, Am, and F. 

This can be set up to sequence through noted in a pre-defined path, and she’s working on a system that will detect when the correct finger positions are pressed, then moving on to the next note.

ZIPY is a homebrew inverted pendulum

Graduate students Ben Wiener and Philip Zucker have been working on a classic controls problem for quite some time called an “inverted pendulum.” This type of device balances a stick on an axis, and in this implementation, a motor pulls the axis assembly that the pendulum—a paint stirrer—is sitting on to keep it stable.

Control is handled by an Arduino Uno, which measures the angle of the stirrer as well as the position of the axis via a pair of encoders.

The inverted pendulum or cart pole is a classic problem in control theory. It’s in OpenAI Gym of course, but we wanted to see it work in real life, not some lame simulation. 

It took a few iterations, but we eventually found a system that works well. Our cart is 3D printed PLA driven by a DC motor via a toothed belt. The pole itself is a paint stirrer. One of the longer type, about 24″. A rotary encoder opposite the motor acts as a pulley for the belt and allows us to track the motion of the cart, while a second rotary encoder on the cart is a pivot for the pole and measures its angle. The motor is controlled by a 32 amp Sabertooth motor controller. It’s overkill, and pretty expensive at about $120, but we already had it for another project. We monitored the encoders with an Arduino. The foundation of the system is a piece of extruded aluminum rail called V-Slot, on which the cart slides and the motor and encoder are mounted. Our rail is 1.5 m long, from a company called  .

Code for the setup can be found on GitHub and be sure to see it in action in the video below, as it swings the wooden stick from rest into a vertical position.

Arduino Blog 23 May 16:31

Automate your chicken coop’s door with Arduino

Farmers have long been known for their ingenuity, able to accomplish urgent repairs with whatever is on hand. Now with the help of an Arduino, maker “rscholten” has even figured out how to automate his chicken coop.

The device uses an Uno and a real-time clock module to schedule his automated coop door’s movement, while a servo and linkage system physically flips the door open and closed. A solenoid then locks the door in place when not in motion so that the servo doesn’t have to constantly maintain a position. 

User interface is provided by a 7-segment LED, along with dials to set the current time and when it should be opened and closed. As shown in the video below, the coop can also be activated with a keyfob style remote when needed.

I built this automatic chicken door to save me the twice daily task of opening and closing the door in the morning and evening. Chickens are great providers of eggs, manure and entertainment, but getting up early to let them out the coop – especially in winter – was drudgery. And then making sure I was home in time to close them in really restricted my freedom to come home late.

Chickens follow a daily routine of returning to a coop around sunset and waking up around sunrise. The times they go in and out is not exact and is influenced on the weather of the day and ambient light. Should a chicken be seen to be too late to enter after the door closed, the door can be remotely opened then closed. The door can be closed during the day should the owner need to stop broody chickens from entering.

As sunrise and sunset times vary throughout the year and depend on the latitude, any door controller needs to track the time of day, the day of the year and know the latitude of the location. This requirement can be accomplished with software or a sun tracker, but in this design uses manually adjustable open and close time settings to keep things simpler.

Restrict access to tools with this card reader power switch

If you need a way to restrict access to power tools to only authorized users, Casey Horton’s magnetic card reader setup, shown in the video below, looks like a great solution. 

When you swipe the correct card through a reader mounted in an 8”x8”x4” electrical enclosure, the Arduino Uno mounted inside turns on power to the equipment via a relay.

The system uses a USB host shield to interface with the reader, and a datalogger shield to handle file manipulation and record who swipes in at what time. Admin mode is accessed by holding the device’s single button by swiping the correct card, at which time another magnetic card can be swiped and added. 

Full instructions and code is available here.

An Arduino-based RFID tag system perfect for escape rooms

As seen here, “Annaane!” has come up with what could form the guts of a very interesting escape room puzzle. 

Her build features four RFID card readers, which cause an Arduino Uno to release a door lock or other device via a 5V relay, only when the corresponding tags are arranged correctly.

From the looks of the video below, the design is very much a prototype, but could easily be morphed into an arrangement to frustrate and entertain participants. As noted, the project uses all but the TX and RX pins on the Uno, but this could be expanded by using a Mega or an I2C port expander. 

Code for the system can be found on GitHub.

Get a feel for your computing energy usage with this setup

Norbert Heinz, aka “HomoFaciens,” is no stranger to making versions of modern-day equipment in unusual ways, but what about the way that this equipment is actually powered? It’s not something that we normally consider if an AC adapter is nearby; you simply plug it into the wall and “free” power flows to your device.

Heinz’s project, however, runs processing systems including an Arduino Uno, a Raspberry Pi, and a SIMATIC IOT2020 using not wall power or even a battery, but via chemical energy converted by himself through a hand crank, along with a model airplane engine. The setup uses geared DC motors acting as generators, while the eye-opening results are displayed on a 16×2 LCD screen.

Check out the video below and the project’s write-up to see how its done. And by all means, make sure you do your experiments in a well-ventilated area if you’re going to use a combustion engine!

Arduino Blog 10 May 16:28
arduino  featured  uno  

RC truck packs Arduino control system… and an electromagnetic accelerator turret!

While some toy vehicles perform quite well out of the box, others are just begging to be equipped with supplemental electronics. This was the case for YouTuber Tanner Tech, who after receiving a capable 4WD truck in the mail with no control system, outfitted it with a transmitter and receiver, along with an Arduino Uno.

That’s interesting enough by itself, highlighting the fact that Arduino boards can take in PWM signals from a normal RC receiver. What really sets this build apart is the coil gun that he constructed in the bed. This device is powered by three capacitors, and a servo pan/tilt assembly aims it. While the projectile isn’t particularly dangerous in its current configuration, one would need to use caution when dealing with capacitors here, as they can be charged to the “shockingly” high potential of 400 volts.

More info on the project can be found here or in the video below!

1961 rotary phone gets a 2018 cellular upgrade

While it’s hard to beat today’s mobile devices functionality-wise, if you need a phone built like a tank and designed for voice communication and voice communication only, you can’t go wrong with the Western Electric Model 500 rotary telephone. As maker “bicapitate” shows on Imgur, these models include a generous amount of space inside, enough room in fact for an Arduino Uno along with a tiny Adafruit FONA module for cellular capabilities.

While build details are slim, it appears that the Uno takes pulses from the rotary input, then makes calls via the FONA. A DC motor drives the bell to indicate a call is being made, and the original headset, possibly modified with a new speaker and mic, is used for audio. It now also includes a LiPo battery, allowing you to use this wherever convenient—while still slamming the headset down with authority!