Posts with «uno» label

Dual ultrasonic sensors combine for 2D echolocation

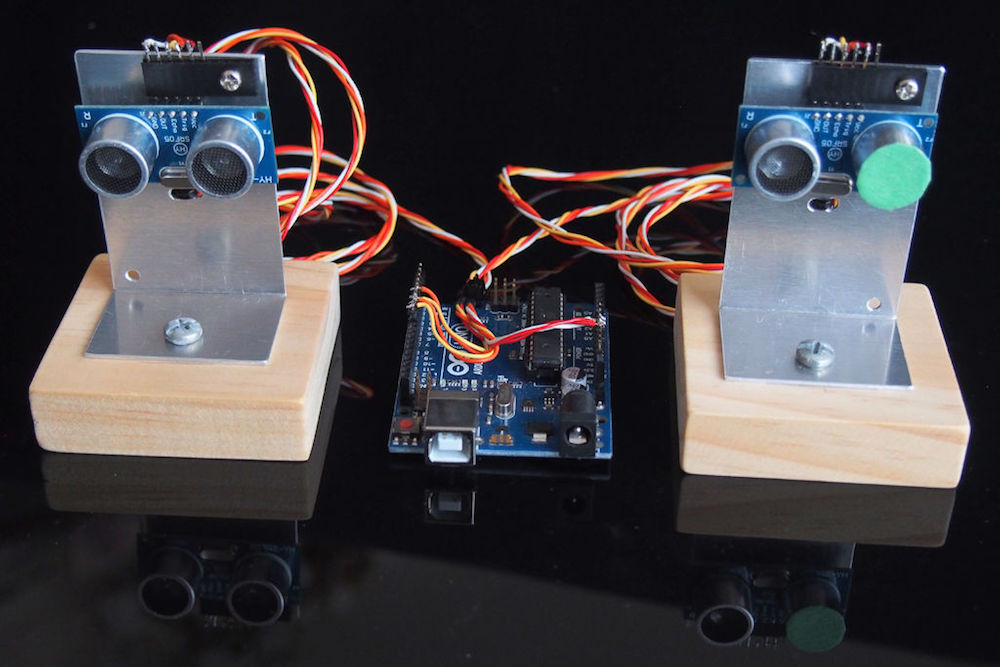
Ultrasonic sensors are great tools for measuring linear distance or object presence. As shown in this experiment by “lingib,” two sensors can also be combined to determine not just linear distance to a sensor, but its position in an X/Y plane.

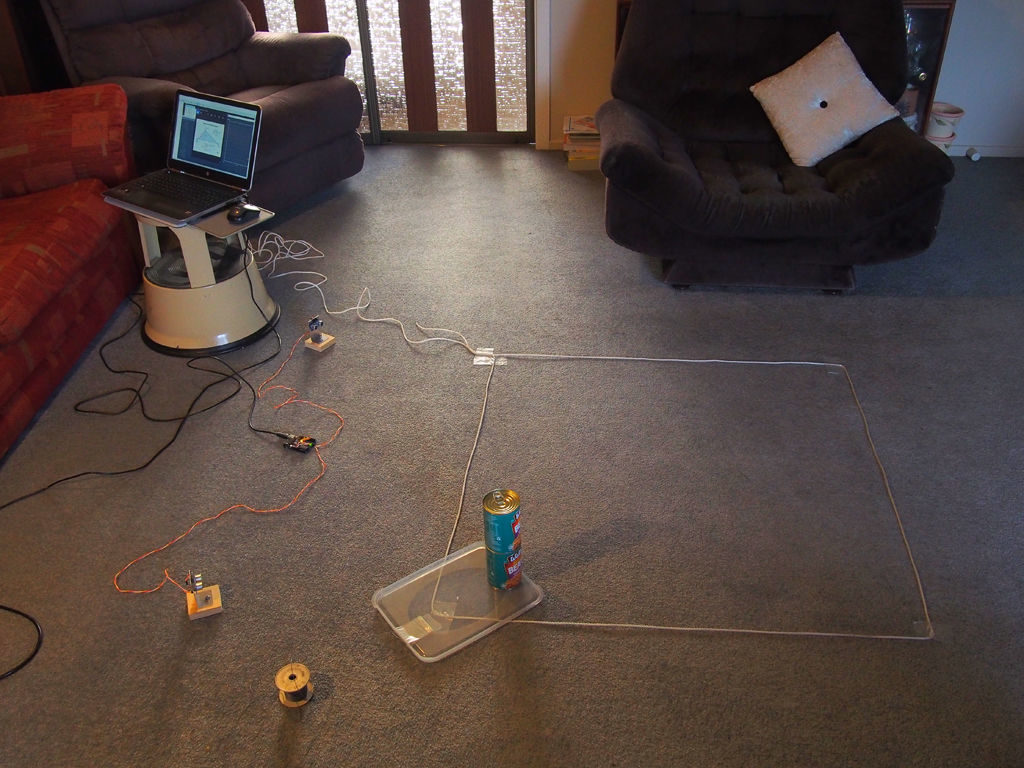
For his experiment, he hooked two of these units up to an Arduino Uno at a known distance from each other, with one emitter blanked out with masking tape. The non-blanked emitter pulses an ultrasonic signal, which is bounced back to it as well as the second sensor by the measured object. From the time it takes to receive the return signal, distance to each sensor can be inferred, giving a triangle with each side known. Trigonometry is then used to pinpoint the item’s position, and a Processing sketch displays coordinates on lingib’s computer.

This Instructable explains how to pinpoint the location of an object using an Arduino, two ultrasonic sensors, and Heron’s formula for triangles. There are no moving parts.

Heron’s formula allows you to calculate the area of any triangle for which all sides are known. Once you know the area of a triangle, you are then able to calculate the position of a single object (relative to a known baseline) using trigonometry and Pythagoras.

The accuracy is excellent. Large detection areas are possible using commonly available HC-SR04, or HY-SRF05, ultrasonic sensors.

Construction is simple … all you require is a sharp knife, two drills, a soldering iron, and a wood saw.

Camera questions user, saves photographic response

Cultural probes aim to elicit unique responses by asking people to respond to a question, many times in the form of a photograph. While disposable cameras once worked quite nicely for this purpose, their relative rarity today meant a new digital alternative was needed. For this, Interaction Research Studio came up with a series of ProbeTools cameras that anyone can make and customize.

The most basic type in this series of cameras is known as the TaskCam, which features a 3D-printed frame and an Arduino Uno at its core. A shield with several snap-off sections provides user interface, including a trio of buttons, and a display that shows questions that are read off of a micro SD card. Users then respond to queries with photographs, saved with the corresponding question for future analysis.

TaskCams recreate the proven Cultural Probe technique of relabelling disposable cameras with requests for pictures. The 3D Printed TaskCam is the basic workhorse of the collection, robust and flexible enough to use across multiple studies.

The 3D Printed TaskCam has a small screen on the back that shows a scrollable list of requests for pictures.  Researchers can load their own list of requests onto the camera to prepare for a study. When users take a picture, the image is tagged with the current request, and stored on a standard flash drive that can be removed for downloading.

The casing for the 3D Printed TaskCam can be printed successfully without support materials even on low-end printers. The device requires a custom Arduino shield,  buy online at cost price, or follow the open-source plans to make yourself. Smart power management mean that two AA batteries provide more than enough power for an entire user study.

You can find more details on ProbeTools here, as well as in Designboom’s recent article. 

Audio preamplifier with tiny OLED display and unique case

As spotted here, Sam Izdat decided to make a preamplifier for a friend who provides voice talent for audiobooks and the like. The primary audio circuitry for the build is provided by a purchased PCB based on the INA217 chip from TI, but from there things get a bit more interesting.

To complete the project, Izdat added a tiny Arduino-powered OLED display. This shows a VU meter, along with a variety of other animations, seen through a window in the enclosure made from a broken wristwatch. 

The device was prototyped using an Arduino Uno, while a Nano was embedded in the final product, allowing everything to fit into the unique compartmentalized enclosure that he constructed.

The amplifier is based on the Texas Instruments INA217 chip, with an Arduino Nano and 128×64 OLED display providing the visualization. [Sam] was able to find a bare PCB for a typical INA217 implementation on eBay for a few bucks (see what we mean?), which helped get him started and allowed him to spend more time on the software side of things. His visualization code offers a number of interesting display modes, uses Fast Hartley Transforms, and very nearly maxes out the Arduino.

Novel lathe control method with Arduino

If you want to work with round parts, a lathe is the tool to have, but takes some time to master. A full CNC version takes even more time and skill to understand, but mechanical engineer “Wade’o Design” has come up with something in between. Instead of running his machine with code directly, his device allows the operator to input numbers into an Arduino Uno-based controller pulled off of a mechanical drawing.

The machine then uses this information to automatically move the cutter with a pair of servos, turning out a perfect part. As an added feature, it maintains full manual control, but uses an encoder on each crank to read inputs and turn the servos in a kind of machine-by-wire setup. Cutter position is displayed on the interface screen in this mode, assisting the user even when making parts manually. 

You can see everything in action below, while more build details are available here.

Arduino Blog 11 Jul 16:50
arduino  cnc lathe  featured  uno  

Robotic Connect Four lets you play remotely

In order to restore some tactile feeling to remotely-played board games, maker “lyudatan” created a pair of Arduino Uno-based Connect Four robots. 

When a player makes a move by dropping a disc into a slot, this is recorded by an IR proximity sensor on the first board. The data is then transmitted via an Ethernet shield to a web server.

The second board uses a stepper motor to position discs above the correct slot, and drops them using a servo motor. This process is repeated until the game is done, allowing two players to play the game at a distance.

Code for the project is available here.

An auto-curing chamber for SLA prints

If you have a 3D printer, it’s probably the fused deposition modeling (FDM) type that deposits melted material onto a bed, eventually building up whatever you had in mind. Stereolithography (SLA) printers, however, work in the opposite way using light to solidify liquid material, which is then pulled out of a vat. 

While an interesting process, one consideration is that after generating the print, materials, especially those that are biocompatible, must be left alone under the proper light and temperature conditions in order to solidify fully.

To help with this task, makers at Fablab Irbid designed their own Arduino Uno-based “Post-Curing Box.” It features UV LEDs and a rotating platform, along with a temperature sensor for monitoring conditions. Brightness, rotation, and cure time are set with a simple user interface consisting of an LCD screen, knobs, and buttons. 

This project not only produces ideal conditions for finished parts, but certainly helps with the temptation to poke around—especially since you can see in with its partially translucent viewing window!

Earth Clock brilliantly tracks the sun’s light

While we understand that the Earth rotates to produce day and night, and tilts on its axis to vary the day’s length, how is the planet positioned in relation to the sun right now? Unless you’re well-attuned to our solar system’s rotational dance, this is difficult to visualize. To help with this, hacker “SimonRob” came up with a clock that shows how the sun shines in real-time at all points on the Earth.

An array of LEDs provides artificial lighting for the device, which rotates a nicely painted physical globe around a daily axis, along with a much larger rotational axis that controls the Earth’s tilt. Both are controlled via stepper motors, which are in turn controlled by an Arduino Uno and a bevy of supporting electronics.

It’s a clever concept, and a well-executed build, so be sure to check out the project write-up for more information!

Arduino Blog 25 Jun 14:34

MESOMIX is an automated paint mixing machine

If you’re an artist who works with paint, getting your colors right is critical, and somewhat of an art form in itself. For those that need a little assistance, the MESOMIX paint mixing machine is here to help using four 3D-printed peristaltic pumps to pull the right amount of cyan, magenta, yellow, and black (or key) to produce your desired color.

An Arduino Uno along with a GRBL shield is implemented to coordinate each pump’s stepper motors, and MESOMIX features a design* reminiscent of a well-built 3D-printer. 

Are you a designer, an artist or a creative person who loves to throw colors on your canvas, but it’s often a struggle when it comes to making the desired shade.

So, this art-tech instruction will vanish that struggle into thin air. As this device, uses off the shelf components to makes the desired shade by mixing the right amount of CMYK (Cyan-Magenta-Yellow-Black) pigments automatically, which will drastically reduce the time spent on mixing the colors or money spent on purchasing different pigments. And will provide you that extra time for your creative.

For more information, you can check out MakerBash’s excellent project here.

*Frame parts were laser-cut out of vinyl material, generally not recommended per safety concerns.

Teddy Ruxpin answers queries with Arduino and Google Assistant

If you have an unused Teddy Ruxpin lying around, you’re in luck. This hack from “Jayden17” turns the iconic ’80s toy from a fancy tape player into your own talking bear assistant!

The build started out with obtaining one of these vintage bears and fixing up the internals, as well as equipping it with a new speaker. An old smartphone was then added, running Google Assistant to take and answer queries. An Arduino Uno is tasked with translating the amplitude of incoming sound into mouth movements with the help of a motor shield.

If you can get your hands on one of these animatronics toys, it’s a relatively simple hack and something that could work with any sort of voice assistant or audio input. Check it out in the video below! 

Making music with your muscles!

After being inspired by an Old Spice commercial where actor Terry Crews plays music with his muscles and EMG sensors, hacker Julio David Barriga decided to do the same thing using an Arduino. 

While Crews’ setup involves an entire one-man band, Barriga’s system is greatly simplified, detecting the amplitude of the electrical signals emanating from his bicep. An Arduino Uno is then used to translate this signal into output notes on a small speaker, either as varying frequencies in the first video below, or as actual notes on the C major scale in the second.

The project write-up outlines a simple to implementation with a pre-built MyoWare sensor assembly, as well as a way to build own if you’d like to learn more about this technology.