Posts with «uno» label

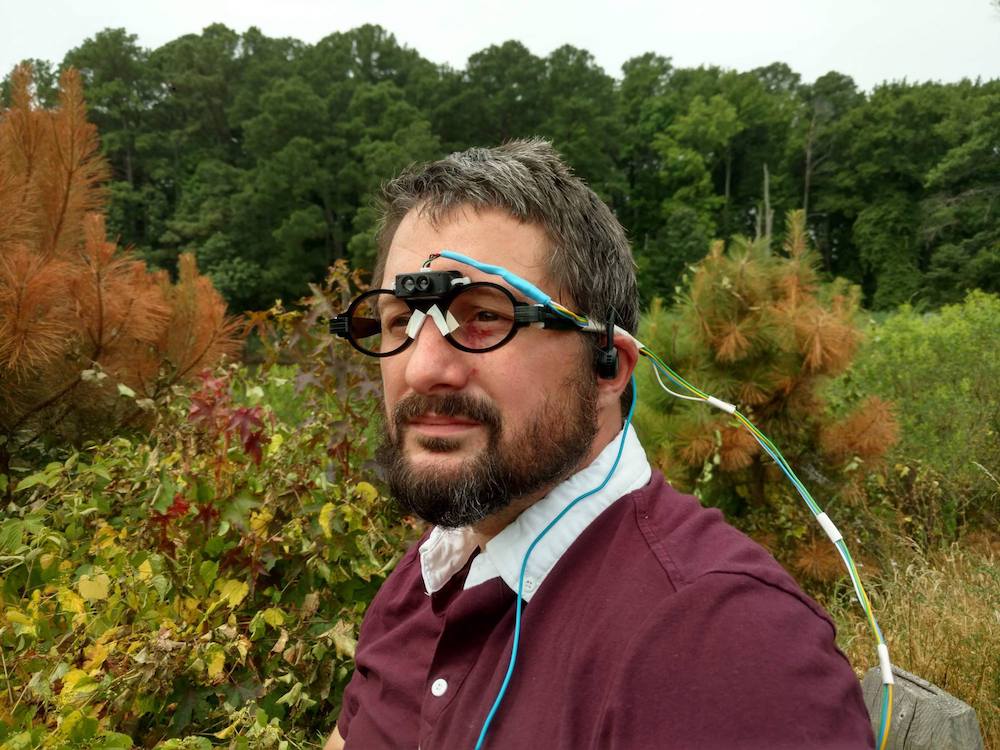
DeepWay helps the visually impaired navigate with a tap

In order to help those with visual impairments navigate streets, college student Satinder Singh has come up with an innovative solution that literally pokes the user in the right direction. 

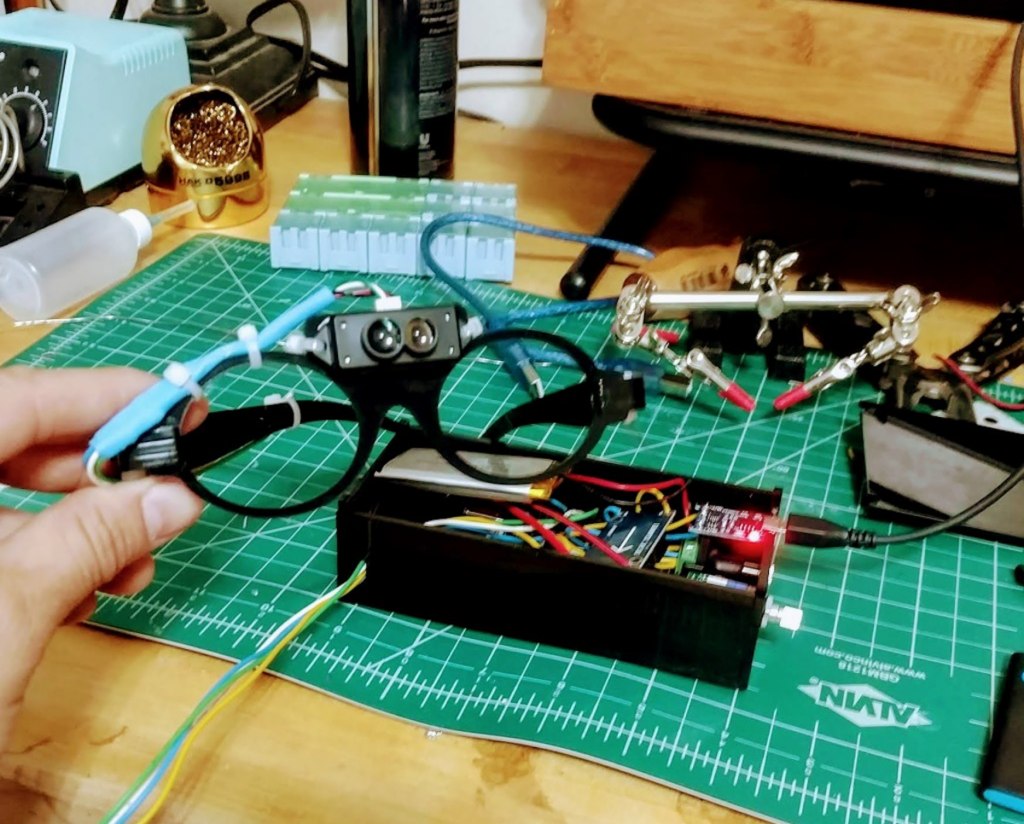
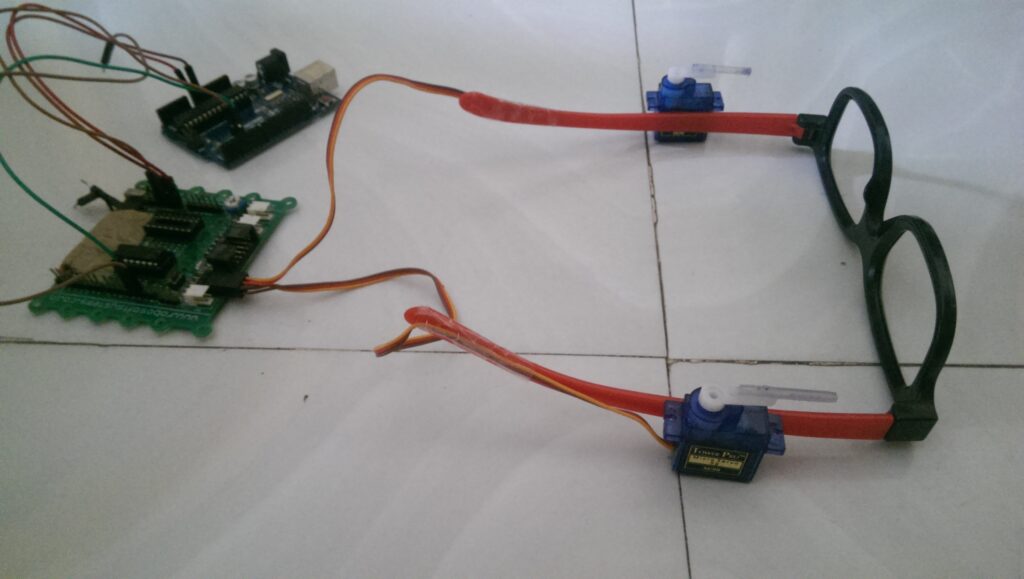
Singh’s system, called DeepWay, uses a chest-mounted camera to take images of the road that a wearer is walking down, then feeds this information to a laptop for processing. 

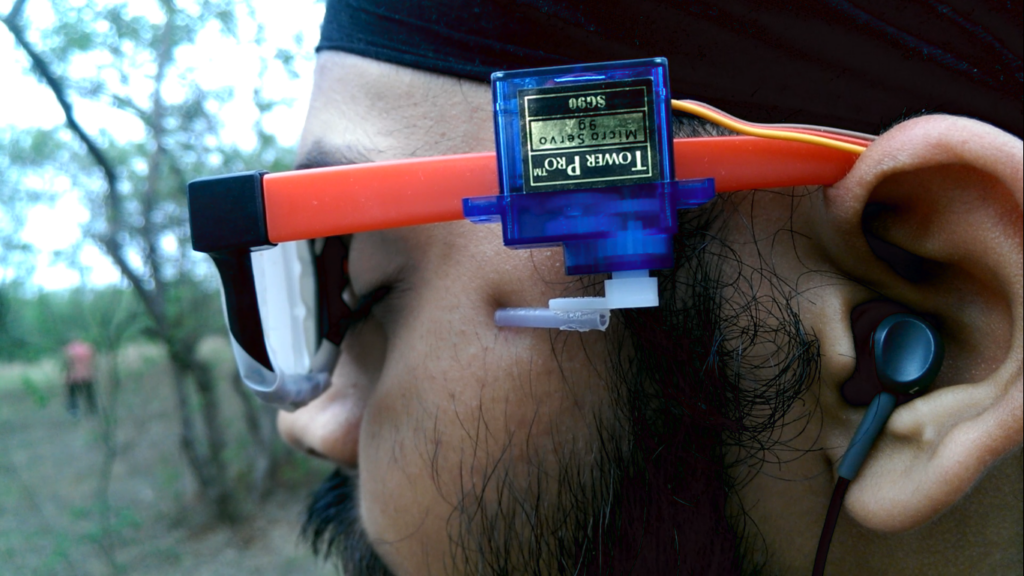
If the deep learning algorithm determines that the user needs to move left or right to stay on the path, a serial signal is sent to an Arduino Uno, which in turn commands one of two servos mounted to a pair of glasses to tap the person to indicate which way to walk. Additional environmental feedback is provided through a pair of earphones.

This project is an aid to the blind. Till date there has been no technological advancement in the way the blind navigate. So I have used deep learning particularly convolutional neural networks so that they can navigate through the streets.

My project is an implementation of CNNs, and we all know that they require a large amount of training data. So the first obstruction in my way was a correclty labeled dataset of images. So I went around my college and recorded a lot of videos (of all types of roads and also off-roads). Then I wrote a basic Python script to save images from the video (I saved 1 image out of every 5 frames, because the consecutive frame are almost identical). I collected almost 10,000 such images almost 3,300 for each class (i.e. left right and center).

I made a collection of CNN architectures and trained the model. Then I evaluated the performance of all the models and chose the one with the best accuracy. I got a training accuracy of about 97%. I got roughly same accuracy for all the trained model but I realized that the model in which implemented regularization performed better on the test set.

The next problem was how can I tell the blind people in which direction to move. So I connected my Python program to an Arduino. I connected the servo motors to Arduino and fixed the servo motors to the sides of a spectacle. Using serial communication I can tell the Arduino which servo motor to move which would then press to one side of the blind person’s head and would indicate him in which direction to move.

A demo of DeepWay can be seen in the video below, while code for this open source project is available on GitHub.

An Arduino-controlled turntable for 3D scanning

Many DSLR cameras can be operated with a simple infrared signal, making them perfect targets for Arduino control. Travis Antoniello took advantage of this with his brilliantly simple 3D scanning rig.

Electronics are handled by an Arduino Uno, which commands a stepper motor to rotate a scanning platform 10 degrees per photo. After rotation, it stops for a set amount of time to let scanned objects settle, and triggers the camera, a Nikon D3200, via an infrared LED. It then repeats this process over and over until a full set of photos is taken. 

Code for the build can be found on GitHub, and the device’s 3D-printed components are available on Thingiverse. The project video seen here gives a good overview of how it works, and the scanned object on display just after 2:30 looks absolutely brilliant.

Monopoly transformed into the world of Skyrim with LEDs and Arduino

While “Boardwalk” and “Park Place” may not mean anything to you outside of the game of Monopoly, there is a plethora of custom versions to suit your particular interest. If you enjoy the world of Skyrim, then you need to check out this board by Charles Ledford. 

The build features an anodized aluminum playfield coated in epoxy, along with a wooden frame that conceals electronics including an Arduino Uno inside. This enables a set of programmable LED strips to light up a dragon and lettering in the middle, as well as properties in the correct Monopoly color. 

Custom coins, playing cards, characters, and even farms and castles (houses and hotels) complete the project, allowing for fully Skyrim-themed gameplay!

You can find more details in Ledford’s write-up, and see a quick demo of it below! 

Notable Board Books are an Arduino-powered way to enjoy music

Annelle Rigsby found that her mother, who suffers from Alzheimer’s, is delighted to hear familiar songs. While Annelle can’t always be there to help her enjoy music, she and her husband Mike came up with what they call the Notable Board Book that automatically plays tunes.

The book itself is well laid-out, with song text and familiar photos printed on the pages. Electronics for the book are in a prototype state using an Arduino Uno and an Adafruit Sound Board to store and replay the audio bits.

Page detection is handled by an array of photocells, and it is meant to turn on automatically when picked up via a series of tilt switches. When a switch is triggered, a relay can then hold the book on until the song that is playing is done, or for a predetermined amount of time.

Ingenious marble clock runs on Arduino

Arduino boards and custom clock builds seem to be a great match, as illustrated by Görkem Bozkurt’s recent project. 

His 3D-printed marble clock uses a stepper-driven gear mechanism to lift 11mm steel spheres to the device’s top chute. The spheres then roll down to a five-minute rail, which empties when filled and transfers a single marble to another minute rail, graduated in five-minute increments up to 60. This then fills the hour rail in a similar process, letting you tell the time of day, or simply be mesmerized by its movement.

The main gear mechanism is powered by a small stepper motor, controlled by an Arduino Uno for timekeeping.

If you’d like to build your own, code is available on Bozkurt’s write-up, as well as the needed print files.

DolphinView headset lets you see the world like Flipper!

Dolphins are not only amazing swimmers and extremely intelligent, but can also observe their surroundings using echolocation. While extremely useful in murky water, Andrew Thaler decided to make a device that would enable him to him observe his (normally dry) surroundings with a similar distance-indicating audio setup.

While he first considered using an ultrasonic sensor, he eventually settled on LiDAR for its increased range, and uses an Arduino to translate distance into a series of audio clicks. Sound is transferred to Thaler through bone conduction speakers, mimicking the way dolphins hear without external ears. 

He notes that while using the “DolphinView” headset is initially disorienting, he was eventually able correlate his surroundings with the system’s audio feedback. Arduino code and parts list is available on GitHub, and the mechanical frame design can be found on Thingiverse if you’d like to build your own!

Arduino Blog 26 Jul 15:31

Two CD-ROM drives combined into fledging drawbot

Even if you don’t have access to fancy tools like a 3D printer or CNC router, that doesn’t mean you can’t make something interesting. James, using only a “hot glue gun, some scissors, and a screwdriver,” was able to construct a rudimentary drawing robot that marks paper with a sharpie.

2 CD drives were creatively modified to form X, Y, and Z axes, letting him lower his writing instrument and draw. An Arduino Uno along with an Adafruit Motor Shield forms the controls for the device, and the structure is built out of LEGO bricks. 

As of now it’s described as more of an “Etch A Sketch type thing,” but it looks like a great starting point for more advanced drawbots in the future! Code for the build is available on GitHub.

Ping pong ball bounces forever under Arduino control

As spotted on Reddit, maker “tkuhn” of Electron Dust decided to make a machine “with the sole goal of keeping a ping pong ball bouncing for as long as possible.” 

To accomplish this, he turned to audio feedback using the time difference between when four electret microphones sense the sound of the bouncing ball. Audio processing is accomplished with the help of a simple flip-flop circuit, while an Arduino Nano is used to reset it after each cycle.

Data is then passed along to an Arduino Uno, which employs four steppers motors/drivers and a linkage system to keep the ball in play. This impressive setup can be seen in the video below, and code is available on GitHub.

Arduino Blog 25 Jul 16:11
arduino  featured  nano  uno  

imPulse is an energy harvesting alternative for bicycles

Javier Betancor is developing a system which collects power as you ride a bike, with the goal of powering data collection and lighting. “imPulse” uses a stepper motor for power generation, along with a geared hub to make the motor spin at multiples of the wheel speed.

While the project is still a prototype, the headlights and rear lighting assemblies already look very good, and CAD files as well as Arduino code are available here.

The aim of this project is to provide a cost-effective alternative to power generation on bikes using conventional stepper motors while adding other capabilities, such as: 

– An integrated data logging system to monitor power generated on each trip.

– A smart lighting system with addressable LEDs, working as indicators, braking lights and headlights, incorporating Light Dependant Resistors (LDRs) to sense the environment and to reduce the risk of glare.

– Power Distribution Board (PDB) to charge two different/generic powerbanks. While one powerbank is charged, the other one is used to supply energy to the system.

You can see a prototype of the lighting system in the video below, using an Arduino Uno for control as a turn signal and brake light, as well as a constant beam for visibility. Find additional information and follow along with Betancor’s progress in his Hackaday log. 

Arduino Blog 16 Jul 20:06

Stepper motor utilized as a rotary encoder with Arduino

Stepper motors work by alternating a series of magnets in order to rotate its shaft by a certain angle. When the shaft is manually twisted, these magnets produce an electrical signal in a predictable pattern, which as shown in the video below, can be used as an encoder with the help of an Arduino Uno.

More information, including a circuit diagram and the Arduino code used for the stepper-NeoPixel and stepper-stepper examples can be found here. While the write-up notes that this stepper-encoder won’t work reliably if turned too slowly, it seems to work quite well at the fairly low speed shown in the demonstrations.

I want to tell you how to make incremental encoder from stepper motor. When we turning shaft of stepper motor it works like generator. It generates certain impulses on its coils. After some signal processing, we get same impulses as incremental encoder. This encoder has one problem, it can drop steps if you turning very slowly. But for many applications, it doesn’t matter.