Posts with «uno» label

Open source microfluidics platform uses Arduino CNC control

Microfluidics deals with the manipulation of tiny amounts of liquid, and as such, specialized equipment must be used for any sort of measurable experimentation. While you could purchase an expensive commercial solution, the Poseidon system—developed by students at the California Institute of Technology—presents an excellent open source option which can be built for a fraction of the cost. 

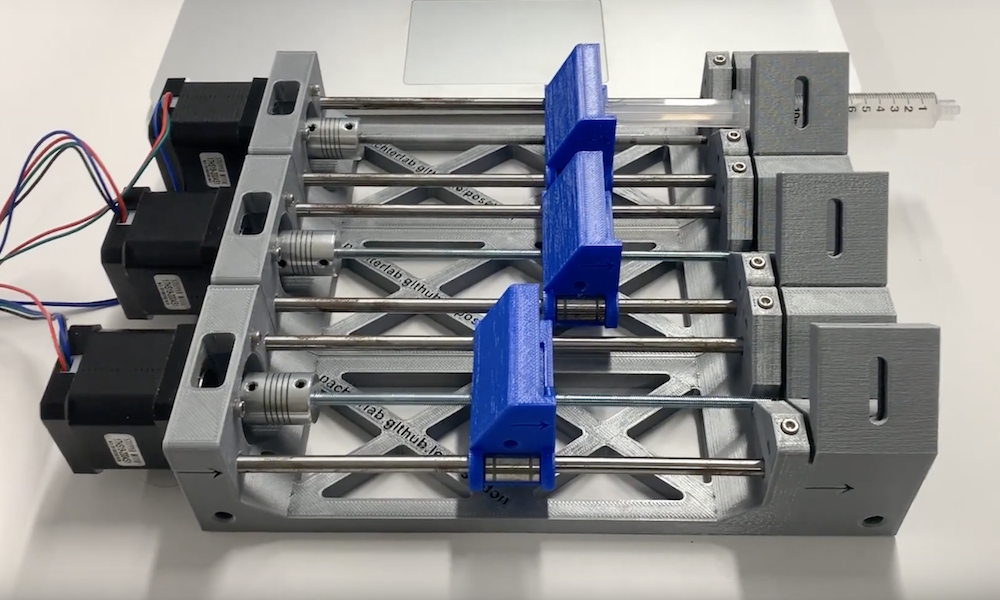
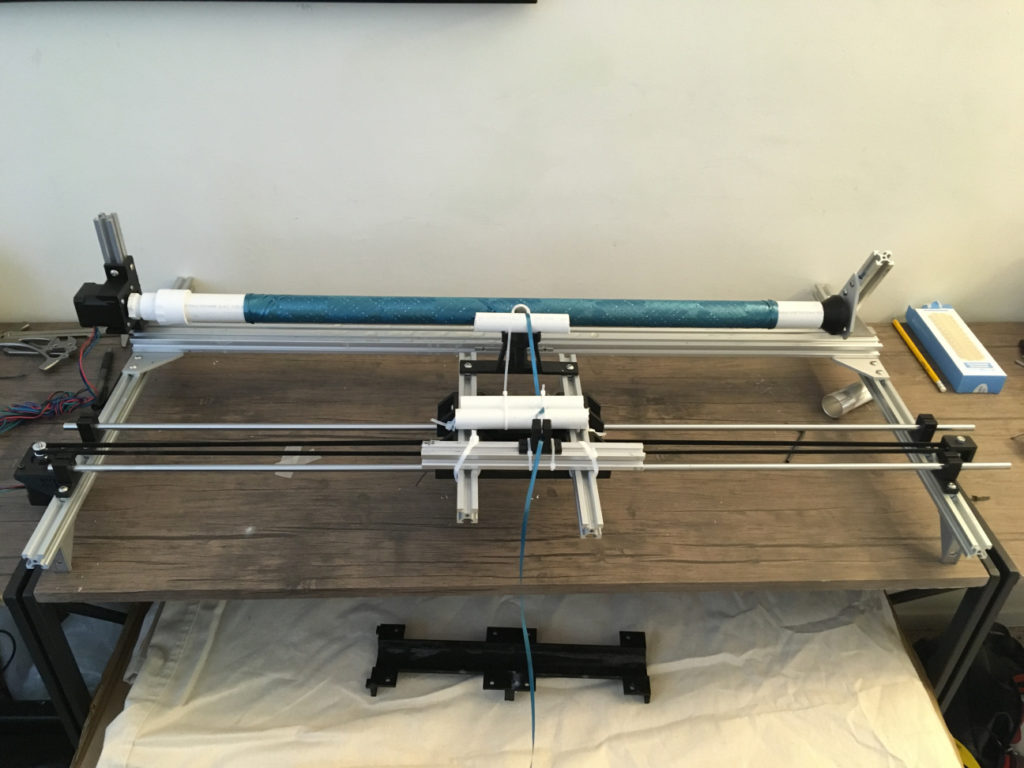
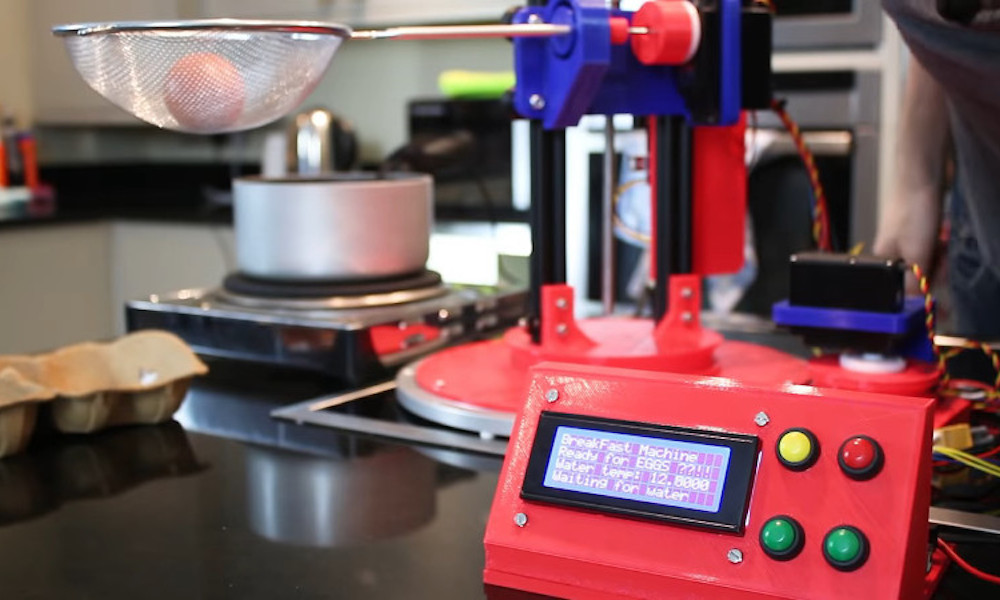
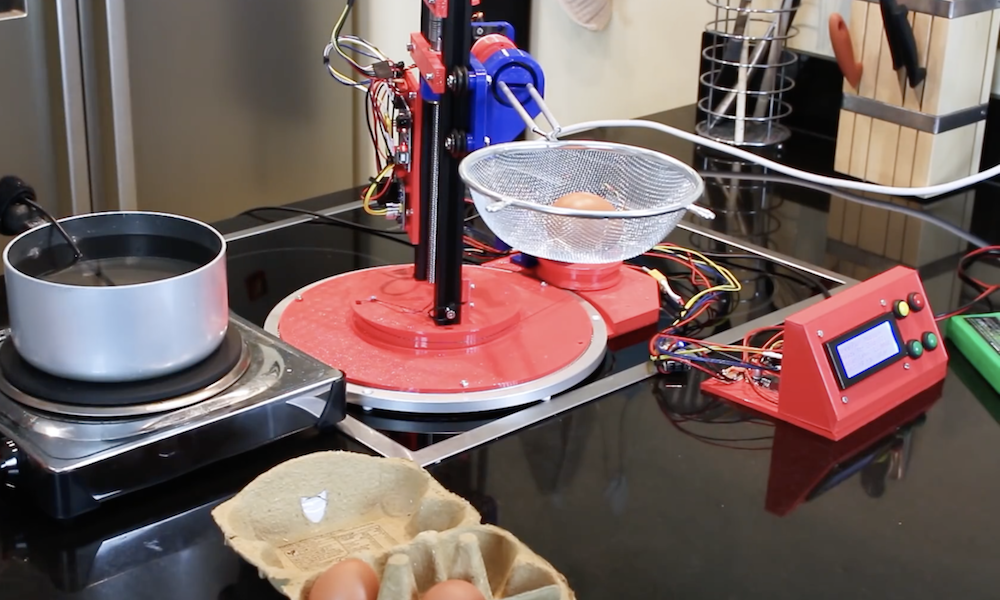
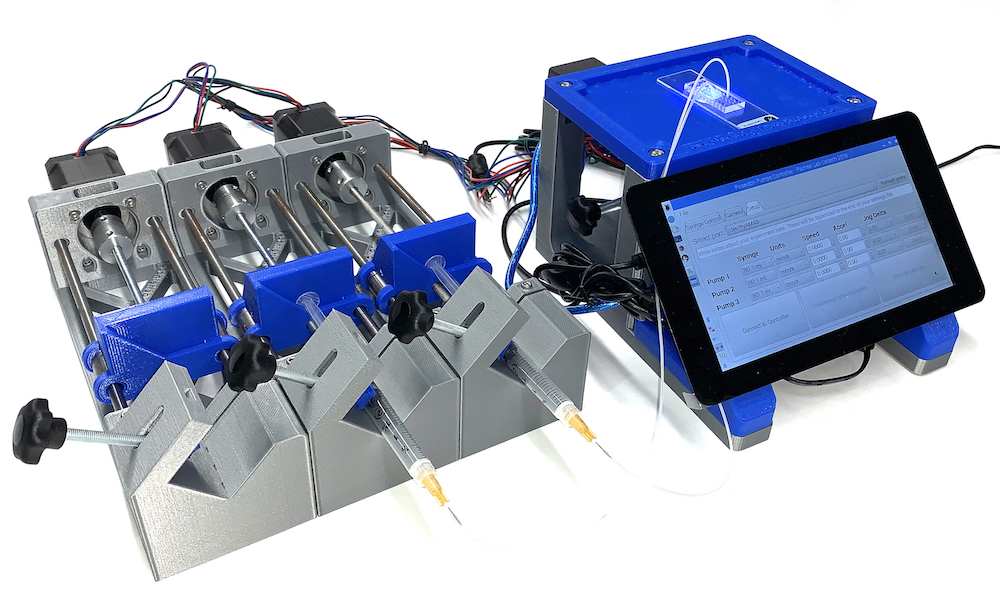
Fluid distribution is managed by a computer GUI or via a terminal window. Steppers handle each of the system’s three “axes,” and push fluid out of syringes under control of an Arduino Uno and CNC shield. A microscope is also available for a full experimental setup. 

Specific information on the project can be found on GitHub, and a number of videos on Poseidon team member Sina Booeshaghi’s YouTube page explain things further.

The Poseidon syringe pump and microscope system is an open source alternative to commercial systems. It costs less than $400 and can be assembled in an hour. It uses 3D-printed parts and common components that can be easily purchased either from Amazon or other retailers. The microscope and pumps can be used together in microfluidics experiments, or independently for other applications. The pumps and microscope can be run from a Windows, Mac, Linux, or Raspberry Pi computer with an easy to use GUI.

The Poseidon system was designed to be customizable. It uses the Raspberry Pi and Arduino electronics boards, which are supported by a strong ecosystem of open source hardware and software, facilitating the implementation of new functionalities.

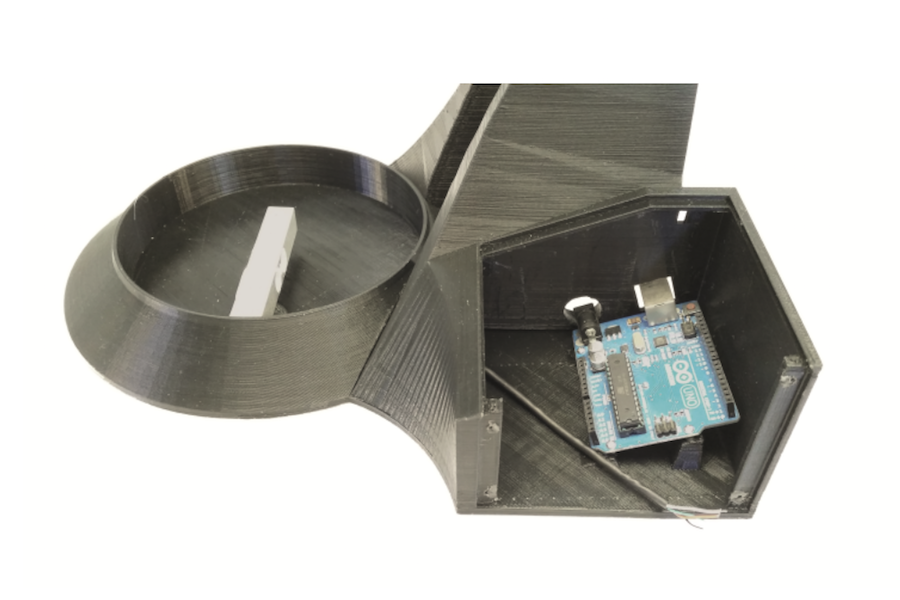
The pump driver uses an Arduino with a CNC shield to run up to three pumps. Each pump has a stepper motor that drives lead screw which in turn moves a sled that is mounted on linear bearings. The displacement of the sled moves the syringe forward or backward allowing the user to dispel or intake liquid.

The controller station uses a Raspberry Pi with a touchscreen to connect to the Arduino and microscope via USB. Because the microscope and Arduino use USB connections, they can alternatively be connected to a computer instead of a Raspberry Pi.

Augment your tongue’s senses with the Cthulhu Shield

Whether one of your senses is weak or non-existent, or you would simply like a way to augment your perception and control options, the Cthulhu Shield can be applied in either situation

The device takes the form of an Arduino Uno or Mega shield, with a strange flexible electrode setup that is placed directly on the user’s tongue.

When these electrodes are fired, they activate nerve fibers on the tongue, producing a feeling like that of carbonated bubbles popping. This can then be used to convey information to the user, whether this is visual, sound, or even Internet updates or other non-traditional stimuli. Importantly, it can also be utilized as an interface for tongue computer control. 

The Cthulhu Shield lets anyone experiment and make devices that can expand your sensory experience!

We’ve made android apps and example programs that will let you use the Cthulhu Shield and your smartphone to ‘see’ and ‘hear’ with your tongue without needing to write a single line of code!

For those of you interested in making your own projects, we’ve written an easy to use Arduino library and provided example code to get you started on projects including tongue-heat-vision, tongue-based GPS directions, and soon, tongue-ultrasonic hearing. But don’t limit yourselves to the examples we’ve provided, the only limit to what you can make is your imagination!

Finally, we designed the Cthulhu to be used as a tongue based computer interface (because if you already have something in your mouth, why not use it to control your computer)? Write your own code to hotkey video game actions, send text messages, or control a wheelchair or mobility device with your tongue. 

If you’d like to get your hands on one, the Cthulhu Shield is now being funded on Kickstarter, while code and board schematic are available on GitHub.

Arduino Blog 31 Jan 19:34

Wake up with this mobile robot alarm!

Waking up before 9am can be a challenge for Nikodem Bartnik, but he also hates to waste time sleeping when he could instead make something.

In order to help him with this “joyous” task, he assembled a line-following robot that scoots his phone out of the room in the morning, forcing him to get out of bed and chase it down.

The device utilizes a pair of gearmotors in a standard tank-like configuration for movement, and sensors to follow a black line on the floor. A sound sensor allows its Arduino Uno controller to pick up on alarm sounds coming from his phone, which is mounted on the robot with a 3D-printed holder. When activated, it follows the path out of his room, waiting for Bartnik’s bleary eyed—but awake—arrival. 

A carbon fiber bike filament winder controlled by Arduino

Bryan Kevan wanted to build his own bicycle, but wasn’t satisfied with purchasing a frame—or even ready-made tubing. He instead chose to create the frame from raw strands of carbon fiber

The overall bike build is shown here, which necessitated him designing a variety of jigs, including a CNC wrapping machine.

His device uses an Arduino Uno, along with a pair of driver boards, to carefully roll strands of carbon fiber on a PVC mandrel in an overlapping pattern. Epoxy was dripped on the assembly during the process, resulting in CF rods that were lighter and much cheaper than purchased rods. 

After quite a bit more work assembling everything together, Kevan now has a bike frame that is truly made to his specs!

This robot is eggsactly what you need to cook breakfast

Normally, boiling an egg involves heating water in a saucepan, then dropping an egg inside to be properly heated. James Bruton, however, now has a bit of help in the form of his breakfast-making robot. 

The device uses two servos, along with a motor/encoder/screw assembly to rotate and lower the egg into place. It then takes it out after six minutes, and tips it out into a secondary container.

As of now, temperature is manually controlled, but it’s tracked with a DS18B20 temperature sensor to initiate the egg lowering procedure. An Arduino Uno takes care of the lifting screw assembly, while an Arduino Mega handles everything else.

This Arduino-powered piano can play just about any MIDI file

After letting his Arduino languish in a drawer for some time, Brandon Switzer decided to take it out and start experimenting. While he could have started off small, Switzer chose to instead create his own player piano system, completing it at a cost of around $650.

While the details of the project aren’t explicitly spelled out, you can see a time-lapse of this amazing build in the video below. As you can imagine, it took a massive amount of breadboard space to get all the electronics laid out, and a similarly impressive number of solenoids to activate all of the keys. 

Additionally, he had to do plenty of mechanical work, including the cringeworthy job of actually drilling into a what appears to be a functional piano!

In early August 2017 I was looking to partake in some kind of engineering project that would be fun and also help me learn new things. For a long time I had an Arduino Uno that had been sitting in a drawer, and for the first time I took it out to experiment with it and create something new.

For a long time I had been inspired by player pianos — it’s something about the way the keys move on their own that make them so wonderful. I wanted to create something like that — something that didn’t only work but also impressed the viewer — for a cheap cost.

One of my goals in creating this was to show that it’s possible to replicate amazing things for little money, and I think I proved this. While a player system from Yamaha or Pianodisc cost upwards of $10,000, I built my own system for a measly $650. Not only that, but once you buy your $10,000 player piano, you have to purchase extra apps and songs if you actually want to play something on it. Overall I’m very satisfied with the way the piano turned out, and I’m excited to use it in the future.

An Arduino-powered mini turntable with magnetic attachments

If you need a motorized turntable for filming or simply to display your latest project, here’s an easy 3D-printable option from Ali of Potent Printables

The design takes two forms—one using a full-sized hobby servo, and a smaller version that employs a micro servo for motion, both of which are set up for continuous rotation.

Electronics for the project are fairly straightforward, with an Arduino Uno powering the tables via an Adafruit Motor Shield. While this could be expanded for different I/O or sensor use, the clever bit of this configuration is its interchangeable design. A master circle is connected to the servo horn, while the swappable plates attach to it with magnets, accommodating a flat surface, mounting holes, or even LEGO bricks.

A semi-autonomous circular robot for escape rooms

If you’ve ever been to an escape room, you’ve undoubtedly had to deal with a wide variety of puzzles that you have to solve in order to get out of the “prison” that you’ve willingly thrown yourself into. Beyond the puzzle that you’re trying to decode, the mechanisms used can be extremely clever, and coming up with a new device to use in these scenarios was a perfect challenge for this team of Belgian college students.

Based on the project requirements, they created a Roomba-like circular robot controlled by an Arduino Uno and motor shield that drives a pair of DC motors. The idea, while not fully implemented due to time constraints, is that it can be remotely operated only after solving a riddle and within a certain time period, then drive itself back to a designated spot once the game is over. 

Here is a summary of what happens in the robot:

– The non-autonomous part: a remote controller is linked to Arduino through a receiver. Players control the remote and therefore control the Arduino which controls the motors. The Arduino is turned on before the game starts, but it enters the main function when players solve a riddle on the remote controller. An IR wireless camera is already turned on (turned on at the same time as the “whole” (controlled by the Arduino) when switch on/off turned on). Players guide the car with remote controller: they control the speed and the direction. When the timer that starts when the main function is entered is equal to 30 minutes, the control from the controller is disabled.

– The autonomous part: the control is then managed by the Arduino. After 30 minutes, the IR line tracker sensor starts following a line on the ground to finish the parcours.

For inspiration on building your own, check out the team’s write-up (including code) and a clip of the prototype below.

FelixMatic automatically feeds your cat at preset times

For busy people with unpredictable schedules, keeping one’s feline friend fed in a timely manner can be a challenge. Fortunately, there are automatic cat food dispensers available, or you can even build one yourself.

Open Electronics’ 3D-printed device, called “FelixMatic,” claims to be more complex and complete than average off-the-shelf solutions. Not only can it be programmed to supply up to nine meals a day using a spiral-action rotary feeder, but it also measures food levels with a load cell for dispensing feedback. 

Control is via an Arduino Uno along with an RTC shield for meal timing, while the user interface consists of an LCD display and five buttons.

Having a pet involves big responsibilities, first of all granting them food; unfortunately, a hectic lifestyle and imposed work hours do not go hand-in-hand with the needs of our four-legged friends, and surely anyone living on their own will have a hard time providing the pets meals on schedule. In order to solve a problem that is surely dear to any pet owner, and especially cat and dog owners, we have designed a device we called FelixMatic: it is a practical automatic dispenser of dry food for cats (or small dogs) equipped with a high-capacity container that can easily be opened from the top and a bowl to collect the kibble when it is supplied. We know we can already find automatic dispensers on the market, however, our example is unique because it can be programmed with 9 meals a day in order to supply very precise quantities of dry food.

The way the dispenser works is more complex and complete than the average available product on the market, in fact, it does not only supply food but it also gives exact doses as decided by us; basically, at a preset time, a cochlea at the base of the container will turn, and drop a certain amount of kibble in the bowl, regulated by a dedicated weight sensor.

Wind your thread automatically with this Arduino-powered machine

If you ever wondered how thread could be wound on spools without human intervention, this build by Mr. Innovative will show you one option. 

The YouTuber’s DIY machine features a motor to rotate a small roller, pulling thread off a larger “feeder” spool. An encoder disk and photoelectric sensor are used to measure how much thread has been dispensed, and a servo-powered arm swings back and forth to allow the thread to feed evenly.

The device is controlled by an Arduino Uno and custom PCB shield, while an encoder and OLED display serve as the user interface.

I have made a thread coil winding machine, using Arduino and 3D-printed parts. For GUI I have used 0.96 OLED display, and for user input I have used a rotary encoder knob. A photoelectric speed sensor is used to measure the length of thread.

The machine has two modes of operation. 1st is manual mode in which thread starts to wind on coil until stop is not pressed. In 2nd mode, auto mode, the machine will wind the thread as per the user predefined length.

Parts, code, and print files can be found in the video description if you’d like to construct something similar.