Posts with «teensy» label

The Rabbit H1 is a Stationary Mouse Replacement

[Dave] has some big plans to build himself a 1980′s style computer. Most of the time, large-scale projects can be made easier by breaking them down into their smaller components. [Dave] decided to start his project by designing and constructing a custom controller for his future computer. He calls it the Rabbit H1.

[Dave] was inspired by the HOTAS throttle control system, which is commonly used in aviation. The basic idea behind HOTAS is that the pilot has a bunch of controls built right into the throttle stick. This way, the pilot doesn’t ever have to remove his hand from the throttle. [Dave] took this basic concept and ran with it.

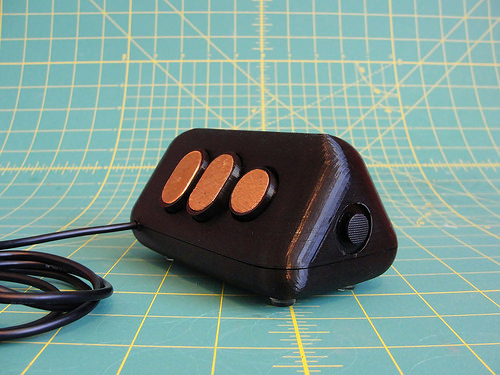
He first designed a simple controller shape in OpenSCAD and printed it out on his 3D printer. He tested it out in his hand and realized that it didn’t feel quite right. The second try was more narrow at the top, resulting in a triangular shape. [Dave] then found the most comfortable position for his fingers and marked the piece with a marker. Finally, he measured out all of the markings and transferred them into OpenSCAD to perfect his design.

[Dave] had some fun with OpenSCAD, designing various hinges and plywood inlays for all of the buttons. Lucky for [Dave], both the 3D printer software as well as the CNC router software accept STL files. This meant that he was able to design both parts together in one program and use the output for both machines.

With the physical controller out of the way, it was time to work on the electronics. [Dave] bought a couple of joysticks from Adafruit, as well as a couple of push buttons. One of the joysticks controls the mouse cursor. The other joystick controls scrolling vertically and horizontally, and includes a push button for left-click. The two buttons are used for middle and right-click. All of these inputs are read by a Teensy Arduino. The Teensy is compact and easily capable of emulating a USB mouse, which makes it perfect for this job.

[Dave] has published his designs on Thingiverse if you would like to try to build one of these yourself.


Filed under: Arduino Hacks

Custom Electronics and LED Panels Brighten Up a Nightclub

When [Robert] is presented with a challenge, he doesn’t back down. His friend dreamed of reusing some old LED panels by mounting them to the ceiling of the friend’s night club. Each panel consists of a grid of five by five red, green, and blue LEDs for a total of 75 LEDs per panel. It sounded like a relatively simple task but there were a few caveats. First, the controller box that came with the panels could only handle 16 panels and the friend wanted to control 24 of them. Second, the only input device for the controller was an infrared remote. The friend wanted an easy way for DJ’s to control the color of the panels and the infrared remote was not going to cut it. Oh yea, he also gave [Robert] just three weeks to make this happen.

[Robert] started out by building a circuit that could be duplicated to control each panel. The brain of this circuit is an ATtiny2313. For communication between panels, [Robert] chose to go with the DMX protocol. This was a good choice considering DMX is commonly used to control stage lighting effects. The SN75176 IC was chosen to handle this communication. In his haste to get this PCB manufactured [Robert] failed to realize that the LED panels were designed common cathode, as opposed to his 25 shiny new PCB’s which were designed to work with a common anode design. To remedy this, he switched out all of the n-channel MOSFET with p-channel MOSFET. He also spent a couple of hours manually cutting through traces and rewiring the board. After all of this, he discovered yet another problem. The LED’s were being powered from the same 5V source as the microcontroller. This lead to power supply issues resulting in the ATtiny constantly resetting. The solution was to add some capacitors.

Click past the break for more on [Robert's] LED panels.

As for software, [Robert] completely filled the ATtiny’s memory. He used three channels to control red, green, and blue. He added a fourth channel to control pre-designed animation effects such as fading, strobe, and random color. The DIP switches are normally used to set the address of the panel, but there is a second option to put the panel into standalone mode. In this mode, the switches are used to program the panel to perform specific effects with no DMX controller required.

Now that the panels were all designed and functioning, [Robert] still needed a way to control them. He used the laser cutter at Shackspace hackerspace to design the actual panel face and then mounted a bunch of buttons, switches, and potentiometers to it. All of those things were connected to a Teensy3 using perfboard and a hand wired circuit. Another SN75176 IC was used for the DMX communication from the control panel. The control panel allows the DJ to change between different pre-built animation effects, color effects, and also change the speed of the animations to match the speed of the music.


Filed under: led hacks
Hack a Day 31 May 12:00

3D Printed Binary Clock

Let's Make Robots 03 Aug 21:43
2  3d  3mm  arduino  binary  clock  cube  inches  ldr  powered  print  printed  teensy  usb  

New in the Maker Shed: Arduino Leonardo

We had a small stock of Arduino Leonardos in the Maker Shed for their announcement at Maker Faire but they sold nearly as fast as we could put them out. We finally got them back in stock so you can buy one right now in the Maker Shed (while they last!)

At first glance, the Arduino Leonardo looks just like an SMD version of the Arduino Uno with a micro USB port. It’s blue, has the same foot print, same pin-out, and the same layout as its brother. The internals are also very similar. It features nearly the same RAM, flash, and clock speed as the ATmega328 processor found in the Uno. So why is the Leonardo different? Because it uses the ATmega32u4. This processor has built in USB communication which eliminates the need for a secondary USB to serial converter. The ATmega32u4 creates a virtual (CDC) COM port on your computer every time it runs its bootloader. Since it’s virtual, it can also behave like an HID (Human Interface Device) meaning the Leonardo can “act” like a keyboard or mouse, opening it up to a whole new range of projects. This processor also has additional I/O capabilities, allowing pins 4, 6, 8, 9, 10, and 12 to be used as analog inputs (12 total vs. the UNO’s 6). In addition, the Leonardo has one additional PWM pin (13) and all 20 I/O pins can be used as digital pins.

Of course, this new functionality doesn’t come without a price (although the price is only $20!) Since the Leonardo uses a virtual COM port, it can make certain tasks a bit more complicated (see the Getting Started Guide.) For this reason, we recommend this board to makers with some Arduino experience. Also, some of the pin assignments are slightly different so while the Leonardo is compatible with most shields, it may not be compatible with all. Advanced shields that use I2C or SPI (such as Ethernet shields) will work so long as they were updated to match the new Arduino Uno layout that was released last year. For full shield compatibility and ease of use, see the tried and true Arduino Uno.

Features

  • Microcontroller ATmega32u4
  • Operating Voltage 5V
  • Input Voltage (recommended) 7-12V
  • Input Voltage (limits) 6-20V
  • Digital I/O Pins 20
  • PWM Channels 7
  • Analog Input Channels 12
  • DC Current per I/O Pin 40 mA
  • DC Current for 3.3V Pin 50 mA
  • Flash Memory 32 KB (ATmega32u4) of which 4 KB used by bootloader
  • SRAM 2.5 KB (ATmega32u4)
  • EEPROM 1 KB (ATmega32u4)
  • Clock Speed 16 MHz

Add lasers to a tennis ball, drive your dog crazy (video)

It's a "programmable disco ball," a "cat toy for humans," and a "personal laser light show," all rolled into one. That's how one Matt Leone describes his latest creation, aptly known as the Laser Ball. To realize his dream, Leone drilled a set of holes into a garden variety tennis ball, and inserted about 14 laser diodes, each with an attached strip of diffraction grating. Said diodes were then synced up with an Arduino-equipped Teensy microcontroller nestled within the ball, alongside a rechargeable battery. As a cherry on top of this DIY sundae, Leone then incorporated an infrared remote package from Adafruit, allowing him to remotely jump start his next house party. The result is a cyborg-like ball that makes any LED cube look... square. Check it out for yourself, in the video after the break.

Continue reading Add lasers to a tennis ball, drive your dog crazy (video)

Add lasers to a tennis ball, drive your dog crazy (video) originally appeared on Engadget on Mon, 14 Nov 2011 14:34:00 EST. Please see our terms for use of feeds.

Permalink | Email this | Comments