Posts with «software» label

Sneak peak on the new, web-based Arduino Create

We always stress the fact that Arduino is not only a matter of hardware. Arduino has two other important pieces, the software and the community. We recently wrote about an improved Arduino Software (IDE) and how we moved from nightly builds to hourly builds, thanks to the help of our programmers and contributors. Now we want to add more power to the community and its capacity to create amazing projects.

In the past year we have been incredibly busy designing a new Arduino web-based tool, Arduino Create. It’s an important step in the Arduino ecosystem that (we hope) is going to change the way you interact with your projects and the community.

Over the years we gathered a lot of feedback both when running workshops in schools and maker spaces, and when reading comments on the Forum and other social networks. We understood we needed to provide the Arduino community with a more modern and flexible tool to write code, a more integrated way of accessing content and learning while doing, an easier way to setup and configure tools and boards, and a better way to share Arduino projects.

More and more products traditionally delivered as desktop apps are being moved to online platforms, and we see an opportunity in this. Arduino Create is a set of online tools that will make working with Arduino even more seamless and smooth.

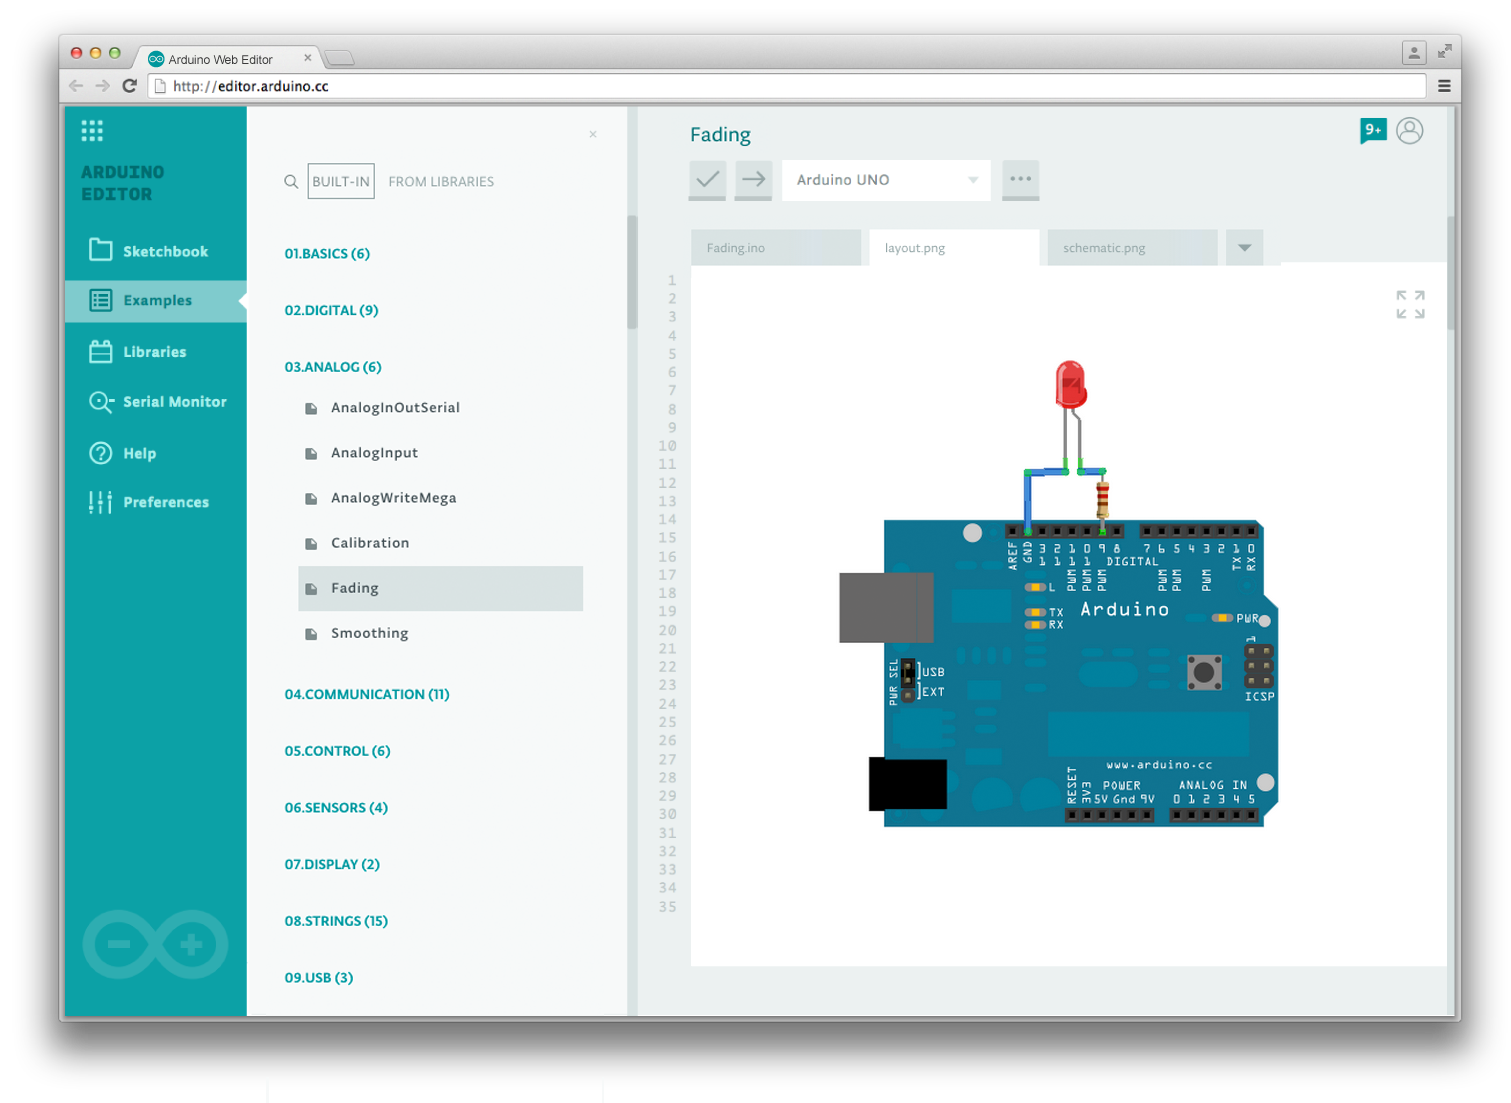
First of all you will be able to write code and upload sketches to any Arduino board directly from the browser with the Arduino Web Editor (IDE), without having to install anything. Your Sketchbook will be stored on the Arduino Cloud and will be accessible from any device. The Getting Started app will allow you to easily configure and setup tools and boards available around you. Services provided by partners such as Temboo will be just one click away and better integrated with your workflow.


Arduino Create will simplify building a project as a whole, without having to switch between many different tools to manage the all the aspects of whatever you are making.
In this past year we focused our effort mainly in the Arduino Web Editor, but we really want to concentrate on content next, providing you with a curated set of projects and tutorials to get you inspired.

Our team, together with ToDo, developed a pilot version of Arduino Create for the Arduino TRE board.
We did a lot of research to design and develop this new web-platform right. We started with paper prototyping and co-creation sessions in the local Fablab, 6-months later we had around 150 Arduino TRE beta-testers giving us feedback on both the software, and the overall user experience of the product. 8 months into the project, in the Arduino Workshop area within Maker Faire Rome, we conducted about 25 user-testing sessions to refine some usability details. Talking with a great variety of people is always key in our design and development process, since Arduino has to fit the needs of users with a big skill-set range, from total beginners to experts.

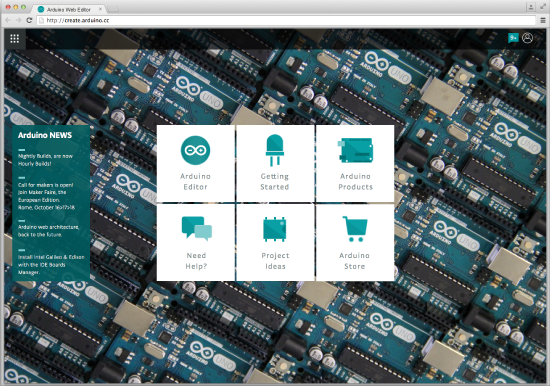
We are now in the process of making Arduino Create reachable by anyone on a browser via www.arduino.cc. This post is a sneak peak on this effort.

Here some of the features of Arduino Create (some still in the works*):

  • Integration with the Arduino account, just sign in to access the web IDE
  • Your Sketchbook on the Arduino Cloud, available anytime from any device
  • A guided walkthrough to setup and configure Arduino Create for the first time
  • Latest version of the Arduino Web Editor (based on ACE), the board cores, and the libraries, always available without having to install anything
  • Auto-discovery of boards and ports available around you, selectable in one single dropdown
  • Examples presented with Schematics and Layout details
  • A Readme tab included in each sketch so that you can add some project’s details, if comments on your code gets too verbose
  • Ability to add custom Schematics and Layout PNGs to your sketch, so that you have in one place the all basic elements of your project
  • Better integration with Language Reference* and Glossary
  • Ability to share a sketch and embed it in your webpage or blog*
  • Notification area to be always up-to-date with the latest news (new library or core, new feature available, etc)*
  • Video tutorials and Help resources available directly within the Editor*

Of course we will continue to develop and improve the desktop Arduino IDE, this online version will give us an opportunity to test new features and provide users with a more cohesive experience when making projects with Arduino.

In mid June we plan to start a beta-testing program of Arduino Create, stay tuned for updates!


Arduino Blog 05 May 19:13

MIT's light-up robot garden teaches you how to code

If you're teaching kids how to code, what do you do to show that software makes an impact in the real world? MIT has a clever idea: a robot garden. The project lets you control a grid of Arduino-linked "plants" through programming that makes them blossom and light up in pretty (and occasionally mesmerizing) ways. It'll even teach the virtues of distributed computing -- you can tell these leafy robots to bloom or change color in algorithm-driven sequences. The garden is just a demo for now, but it'll eventually turn into an easy-to-replicate curriculum for students who'd otherwise have to settle for seeing their results on-screen.

[Image credit: Jason Dorfman, CSAIL]

Filed under: Science, Software

Comments

Source: MIT News

Tags: algorithm, arduino, code, distributedcomputing, education, garden, kids, mit, programming, school, video

Engadget 18 Feb 21:58
science  software  

Arduino IDE 1.6 Released

After two years in the making, the new Arduino development environment comes with a laundry list of new features.

Read more on MAKE

Arduino IDE 1.6 is released! Download it now


After almost two years “in the making” we’re thrilled to announce the availability of the Arduino IDE 1.6.0. The latest version of the development environment used by millions of people across the globe brings about a lot of improvements.

Since the day we started developing the first 1.5 version we have received a lot of feedback, suggestions and contributions from our vibrant community and we would like to thank you all for your passion and good will: thank you everyone, you rock!

We are glad to say that 1.6.0 includes a lot of new features. Here is a not so brief list of them:

  • Support for multiple platforms
  • Boards are detected and listed on “ports list” menu together with the serial port
  • Drivers and IDE are now signed for Windows and MacOSX
  • Improved speed of build process
  • Autosave when compiling/uploading sketch
  • A lot of improvements of the serial monitor (faster, backed by modern JSSC serial library instead of old RXTX)
  • Find/replace over multiple tabs
  • Improved lots of Arduino API libraries (String, Serial, Print, etc.)
  • Tools & toolchains upgrades (avr-gcc, arm-gcc, avrdude, bossac)
  • Command line interface
  • IDE reports both sketch size and static RAM usage
  • Editor shows line numbers
  • Scrollable menus when many entries are listed
  • Upload via network (Yún)
  • HardwareSerial has been improved
  • USB has got some stability and performance improvements
  • SPI library now supports “transactions” for better interoperability when using multiple SPI devices at the same time
  • Better support to 3rd party hardware vendors with configuration files (platform.txt and boards.txt)
  • Submenus with board configuration can now be defined
  • Fix for upload problems on Leonardo, Micro and Yún.
  • Libraries bundled with Arduino have been improved and bugfixed, in particular: Bridge, TFT, Ethernet, Robot_Control, SoftwareSerial, GSM
  • A lot of minor bugs of the user interface have been fixed

There is still lots of room for improvement, of course. Don’t forget to report any issue you find, either on Github or on the Arduino forum: your help is very much appreciated. It doesn’t matter if you are not a tech specialist: every feedback adds value.

We are already working on release 1.6.1, with some very cool features we will announce in the coming weeks.

The IDE is available from the newly redesigned Download page.


Arduino Blog 09 Feb 11:44

OLED clock with Pacman mode

This large 2.42" OLED I2C module can be used as a replacement for the smaller 0.96" display for which I originally designed the ProMini OLED clock shield. It is built around the same SSD1306 chip, and it only comes in yellow (for now).

MikeM wrote this great Pacman clock sketch for it (available for download here), shown in the video below.


To display on the OLED, Mike used U8glib graphic library. Initially tested on the 0.96" OLED, the sketch froze after some time, for a yet to be explained reason. The same sketch works perfectly with the 2.42" display. Mike spent a lot of time trying to figure out if the culprit is software (bug in the U8glib) or hardware.
(Any feedback on this issue is greatly appreciated.)

The clock can also display the time as HH:MM:SS on the whole screen, as shown in the photo below, also courtesy of Mike.


My next step would be to design an enclosure for it. For that I will probably need some more help :)


Wise time with Arduino 24 Oct 02:41
i2c  oled  software  

Fritzing is out with a new release including Arduino Yún microcontroller!

Fritzing is an open-source hardware initiative that makes electronics accessible as a creative material for anyone. You can easily learn how to build a circuit for you project and also design your own PCB.

Last week, the Fritzing team announced the new release with a number of new parts, especially a number of popular microcontrollers, among which also Arduino Yún:

We have upgraded to their latest version Qt5, which brings stability and speed improvements (especially for Mac OS X users). This also enables us to port fritzing to Android, iOS, etc.

You can download Fritzing 0.9.0b at this link.


Arduino Blog 28 Jul 16:39

July 2014 release of Wise Clock 4 software

This latest code release includes:
  1. introduction of the two-faced (Kandinsky) feature, on 2 or 4 displays;
  2. fixes related to screen centering for 3 or 4 displays (Big, Stopwatch etc);
  3. fix for Pacman app on 3/4 displays;
  4. fix for Words app on 3/4 displays (so the text does not start scrolling in the middle of the screen);
  5. improved the font definition for digits (effectively making them 5x7 pixels; see photo below);
  6. fix for Score app (swapped button functions);


I am sure that there are still a few bugs to fix.
As well, some improvements would be nice, the most notable being the better use of a screen with 3 or 4 displays, especially for the Big mode, where the time is still shown on the (center) 2 displays. (This would call for spreading out of the digits, or even the definition of a wider font.)

Wise Clock chronometer completed

As I briefly mentioned in my previous post, I re-started working on the Wise Clock chronometer. That old version only displayed the time from the RTC, and lacked basic user functions like setting the time from buttons. Even though it was called "chronometer" it did not have a proper timer functionality (besides showing the time with seconds).

I implemented the new software as a state machine, easy to describe, understand and upgrade. Below is the diagram with the states and transitions.


This clock uses the same board as Wise Clock 4, but a jumper connects SQW of DS3231 to D2 (INT2 interrupt pin of ATmega1284). This allows the software to take advantage of an ISR being called every second, which in turn updates the time on the display. Because this approach is in contrast to the existing Wise Clock 4 software (which did polling on RTC to update the time on the screen), its integration into the main trunk would be difficult, if not impossible.

In any case, the state machine "framework" can be replicated to most devices that can be described as a set of states with transitions between them. For example, for a device with 3 buttons like Wise Clock, the "framework" consists in 5 important functions:

1. the main loop() that checks the actions on the buttons;

void loop()
{
  int userAction = plusButton.checkButton();
  if (userAction != NO_ACTION)
  {
    // SET button was pressed;
    processPlusButton(userAction);
  }
  else
  {
    userAction = setButton.checkButton();
    if (userAction != NO_ACTION)
    {
      // SET button was pressed;
      processSetButton(userAction);
    }
    else
    {
      userAction = menuButton.checkButton();
      if (userAction != NO_ACTION)
      {
        // MENU button was pressed;
        processMenuButton(userAction);
      }
    }
  }
  executeState();
}

2. the function executeState(), which implements the functionality of each individual state;

void executeState()
{
  switch (crtState)
  {
    case STATE_SHOW_TIME:
      if (bUpdate)
      {
        bUpdate = false;
        getTimeFromRTC();
        displayDynamicTime(hours, minutes, seconds, &lastHour, &lastMin, &lastSec);
      }
      break;

    case STATE_COUNTDOWN:
      if (bUpdate)
      {
        bUpdate = false;
        if (isCountdownInProgress)
        {
          calculateTimeLeft();  // set cHours, sMinutes, cSeconds;
          displayDynamicCountdown(cHours, cMinutes, cSeconds, &lastCHour, &lastCMin, &lastCSec);

          if (cHours==0 && cMinutes==0 && cSeconds==0)
          {
            // countdown ends;
            isCountdownInProgress = false;
            showStaticTime(0, RED, 0, RED, 0, RED);
            beep();
          }
        }
      }
      break;

    case STATE_SET_TIME_HOUR:
      showStaticTime(hours, RED, minutes, crtColor, seconds, crtColor);
      break;

    case STATE_SET_TIME_MIN:
      showStaticTime(hours, crtColor, minutes, RED, seconds, crtColor);
      break;

    case STATE_SET_TIME_SEC:
      showStaticTime(hours, crtColor, minutes, crtColor, seconds, RED);
      break;

    case STATE_SET_CNTDWN_HOUR:
      showStaticTime(cHours, RED, cMinutes, ORANGE, cSeconds, ORANGE);
      break;

    case STATE_SET_CNTDWN_MIN:
      showStaticTime(cHours, ORANGE, cMinutes, RED, cSeconds, ORANGE);
      break;

    case STATE_SET_CNTDWN_SEC:
      showStaticTime(cHours, ORANGE, cMinutes, ORANGE, cSeconds, RED);
      break;
  }
}

3. one processing function per button (hence 3 functions: processPlusButton(), processMenuButton(), processSetButton()), each describing the transitions from every state based on user input;

void processPlusButton(int userAction)
{
  switch (crtState)
  {
    case STATE_SET_TIME_HOUR:
      if (userAction == BTN_PUSH)
      {
        hours++;
        if (hours>23) hours = 0;
      }
      break;

    case STATE_SET_TIME_MIN:
      if (userAction == BTN_PUSH)
      {
        minutes++;
        if (minutes>59) minutes = 0;
      }
      else if (userAction == BTN_DBL_PUSH)
      {
        minutes = minutes + 10;
        if (minutes>59) minutes = 0;
      }
      break;

    case STATE_SET_TIME_SEC:
      if (userAction == BTN_PUSH)
      {
        seconds++;
        if (seconds>59) seconds = 0;
      }
      else if (userAction == BTN_DBL_PUSH)
      {
        seconds = seconds + 10;
        if (seconds>59) seconds = 0;
      }
      break;

    case STATE_SET_CNTDWN_HOUR:
      if (userAction == BTN_PUSH)
      {
        cHours++;
        if (cHours>23) cHours = 0;
      }
      break;

    case STATE_SET_CNTDWN_MIN:
      if (userAction == BTN_PUSH)
      {
        cMinutes++;
        if (cMinutes>59) cMinutes = 0;
      }
      else if (userAction == BTN_DBL_PUSH)
      {
        cMinutes = cMinutes + 10;
        if (cMinutes>59) cMinutes = 0;
      }
      break;

    case STATE_SET_CNTDWN_SEC:
      if (userAction == BTN_PUSH)
      {
        cSeconds++;
        if (cSeconds>59) cSeconds = 0;
      }
      else if (userAction == BTN_DBL_PUSH)
      {
        cSeconds = cSeconds + 10;
        if (cSeconds>59) cSeconds = 0;
      }
      break;

    case STATE_SHOW_TIME:
      if (userAction == BTN_PUSH)
      {
        // change brightness;
        incrementBrightness();
      }
  }
}

void processMenuButton(int userAction)
{
  ht1632_clear();
  switch (crtState)
  {
    case STATE_SHOW_TIME:
      if (userAction == BTN_PUSH)
      {
// push MENU button to start setting up the start time for countdown;
        crtState = STATE_SET_CNTDWN_HOUR;
      }
      else if (userAction == BTN_HOLD)
      {
        crtState = STATE_SET_TIME_HOUR;
      }
      break;

    case STATE_SET_TIME_HOUR:
    case STATE_SET_TIME_MIN:
    case STATE_SET_TIME_SEC:
      if (userAction == BTN_PUSH)
      {
//----------------------------------------------------------------
// pressed the MENU button while setting the time;
// exit setting the time and resume time showing;
//----------------------------------------------------------------
        // save the time;
        setRtcTime();
        // return to the main screen (showing the time);
        crtColor = GREEN;
crtState = STATE_SHOW_TIME;
        showStaticTime((is24Hmode? hours : hours%12), crtColor, minutes, crtColor, seconds, crtColor);
        // also update the lastSec (for smooth rolling);
        lastSec = seconds;
      }
      break;

    case STATE_SET_CNTDWN_HOUR:
    case STATE_SET_CNTDWN_MIN:
    case STATE_SET_CNTDWN_SEC:
      if (userAction == BTN_PUSH)
      {
//----------------------------------------------------------------
// pressed the MENU button while setting the countdown time;
// exit setting the countdown time and start the countdown now;
//----------------------------------------------------------------
        isCountdownInProgress = true;
// total number of seconds for countdown;
cntDownTime = (long)((cHours * 3600l) + (cMinutes * 60) + cSeconds);
        // start displaying the countdown;
        crtColor = ORANGE;
        showStaticTime(cHours, crtColor, cMinutes, crtColor, cSeconds, crtColor);
        crtState = STATE_COUNTDOWN;
      }
      break;

    case STATE_COUNTDOWN:
      // pressing MENU while counting down will revert to normal clock mode;
      isCountdownInProgress = false;
      cHours = cMinutes = cSeconds = 0;
      // return to the main screen (showing the time);
      crtColor = GREEN;
      crtState = STATE_SHOW_TIME;
      showStaticTime((is24Hmode? hours : hours%12), crtColor, minutes, crtColor, seconds, crtColor);
      break;
  }
}

void processSetButton(int userAction)
{
  switch (crtState)
  {
    case STATE_SET_TIME_HOUR:
      if (userAction == BTN_PUSH)
      {
        crtState = STATE_SET_TIME_MIN;
      }
      break;

    case STATE_SET_TIME_MIN:
      if (userAction == BTN_PUSH)
      {
        crtState = STATE_SET_TIME_SEC;
      }
      break;

    case STATE_SET_TIME_SEC:
      if (userAction == BTN_PUSH)
      {
        crtState = STATE_SET_TIME_HOUR;
      }
      break;

    case STATE_SET_CNTDWN_HOUR:
      if (userAction == BTN_PUSH)
      {
        crtState = STATE_SET_CNTDWN_MIN;
      }
      break;

    case STATE_SET_CNTDWN_MIN:
      if (userAction == BTN_PUSH)
      {
        crtState = STATE_SET_CNTDWN_SEC;
      }
      break;

    case STATE_SET_CNTDWN_SEC:
      if (userAction == BTN_PUSH)
      {
        crtState = STATE_SET_CNTDWN_HOUR;
      }
      break;

    case STATE_SHOW_TIME:
      if (userAction == BTN_DBL_PUSH)
      {
        // change from 24H to 12H mode and viceversa;
        is24Hmode = !is24Hmode;
      }
      else if (userAction == BTN_PUSH)
      {
        // change font while showing time;
        crtFont++;
        if (crtFont >= NUMBER_OF_FONTS) crtFont=0;
        ht1632_clear();
      }
      else if (userAction == BTN_HOLD)
      {
        // change display mode between rolling and replace;
        displayMode++;
        if (displayMode > 1) displayMode=0;
      }
      // force screen refresh;
      showStaticTime((is24Hmode? hours : hours%12), crtColor, minutes, crtColor, seconds, crtColor);
      break;
  }
}


Wise time with Arduino 22 Jun 20:11
software