Posts with «robots hacks» label

Open-Source Robotic Arm for All Purposes

A set of helping hands is a nice tool to have around the shop, especially if soldering or gluing small components is a common task. What we all really want, though, is a robotic arm. Sure, it could help us set up glue or solder but it can do virtually any other task it is assigned as well. A general-purpose tool like this might be out of reach of most of us, unless we have a 3D printer to make this open-source robotic arm at home.

The KAUDA Robotic Arm from [Giovanni Lerda] is a five-axis arm with a gripping tool and has a completely open-source set of schematics so it can be printed on any 3D printer. The robot arm uses three stepper motors and two servo motors, and is based on the Arduino MEGA 2560 for control. The electrical schematics are also open-source, so getting this one up and running is just an issue of printing, wiring, and implementing some software. To that end there are software examples available, and they can easily be modified to fit one’s robotic needs.

A project like this could be helpful for any number of other projects, or also just as a lesson in robotics for yourself or even in a classroom, since many schools now have their own 3D printers. With everything being open-source, this is a much simpler endeavor now than other projects we’ve seen that attempted to get robotic arms running again.

Miles the Spider Robot

Who doesn’t love robotic spiders? Today’s biomimetic robot comes in the form of Miles, the quadruped spider robot from [_Robox].

Miles uses twelve servos to control its motion, three on each of its legs, and also includes a standard HC-SR04 ultrasonic distance sensor for some obstacle avoidance capabilities. Twelve servos can use quite a bit of power, so [_Robox_] had to power Miles with six LM7805 ICs to get sufficient current. [_Robox_] laser cut acrylic sheets for Miles’s body but mentions that 3D printing would work as well.

Miles uses inverse kinematics to get around, which we’ve seen in a previous project and is a pretty popular technique for controlling robotic motion. The Instructable is a little light on the details, but the source code is something to take a look at. In addition to simply moving around [_Robox_] developed code to make Miles dance, wave, and take a bow. That’s sure to be a hit at your next virtual show-and-tell.

By now you’re saying “wait, spiders have eight legs”, and of course you’re right. But that’s an awful lot of servos. Anyway, if you’d rather 3D print your four-legged spider, we have a suggestion.

Robotic Cornhole Board Does the Electric Slide

There’s a reason why bowling lanes have bumpers and golf games have mulligans. Whether you’re learning a new game or sport, or have known for years how to play but still stink at it, everyone can use some help chasing that win. You’ve heard of the can’t-miss dart board and no-brick basketball goal. Well, here comes the robot-assisted game for the rest of us: cornhole.

The game itself deceptively simple-looking — just underhand throw a square wrist rest into a hole near the top of a slightly angled box. You even get a point for landing anywhere on the box! Three points if you make it in the cornhole. In practice, the game not that easy, though, especially if you’ve been drinking (and drinking is encouraged). But hey, it’s safer than horseshoes or lawn darts.

[Michael Rechtin] loves the game but isn’t all that great at it, so he built a robotic version that tracks the incoming bag and moves the hole to help catch it. A web cam mounted just behind the hole takes a ton of pictures and analyzes the frames for changes.

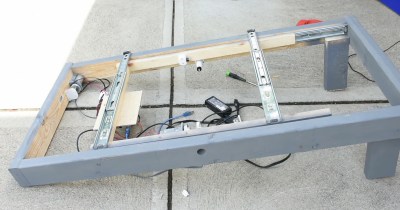
The web cam sends the bag positions it sees along with its predictions to an Arduino, which decides how it will move a pair of motors in response. Down in the cornhole there’s a pair of drawer sliders that act as the lid’s x/y gantry.

We love how low-tech this is compared to some of the other ways it could be done, even though it occasionally messes up. That’s okay — it makes the game more interesting that way. We think you should get 2 points if it lands halfway in the hole. Aim past the break to check out the build video.

Seems like there’s a robotic-assisted piece of sporting equipment for everything these days. If cornhole ain’t your thing, how’d you like to take a couple strokes off your golf game?

Thanks for the tip, [Itay]!

DIY Baby MIT Cheetah Robot

3D printers have become a staple in most makerspaces these days, enabling hackers to rapidly produce simple mechanical prototypes without the need for a dedicated machine shop. We’ve seen many creative 3D designs here on Hackaday and [jegatheesan.soundarapandian’s] Baby MIT Cheetah Robot is no exception. You’ve undoubtedly seen MIT’s cheetah robot. Well, [jegatheesan’s] hack takes a personal spin on the cheetah robot and his results are pretty cool.

The body of the robot is 3D printed making it easy to customize the design and replace broken parts as you go. The legs are designed in a five-bar linkage with two servo motors controlling each of the four legs. An additional servo motor is used to rotate an HC-SR04, a popular ultrasonic distance sensor, used in the autonomous mode’s obstacle avoidance mechanism. The robot can also be controlled over Bluetooth using an app [jegatheesan] developed in MIT App Inventor.

Overall, the mechanics could use a bit of work — [jegatheesan’s] baby cheetah probably won’t outpace MIT’s robot any time soon — but it’s a cool hack and we’re looking forward to a version 3. Maybe the cheetah would make a cool companion bot?

Robotic Biped Walks On Inverse Kinematics

Robotics projects are always a favorite for hackers. Being able to almost literally bring your project to life evokes a special kind of joy that really drives our wildest imaginations. We imagine this is one of the inspirations for the boom in interactive technologies that are flooding the market these days. Well, [Technovation] had the same thought and decided to build a fully articulated robotic biped.

Each leg has pivot points at the foot, knee, and hip, mimicking the articulation of the human leg. To control the robot’s movements, [Technovation] uses inverse kinematics, a method of calculating join movements rather than explicitly programming them. The user inputs the end coordinates of each foot, as opposed to each individual joint angle, and a special function outputs the joint angles necessary to reach each end coordinate. This part of the software is well commented and worth your time to dig into.

In case you want to change the height of the robot or its stride length, [Technovation] provides a few global constants in the firmware that will automatically adjust the calculations to fit the new robot’s dimensions. Of all the various aspects of this project, the detailed write-up impressed us the most. The robot was designed in Fusion 360 and the parts were 3D printed allowing for maximum design flexibility for the next hacker.

Maybe [Technovation’s] biped will help resurrect the social robot craze. Until then, happy hacking.

Switch Tester Servo-Slaps Them ’til they Fail

[James] is designing an open-source 3D printed keyboard switch, with the end goal of building a keyboard with as many printed parts as possible. Since keyswitches are meant to be pressed quite often, the DIY switches ought to be tested just as rigorously as their commercial counterparts are at the factory. Maybe even more so.

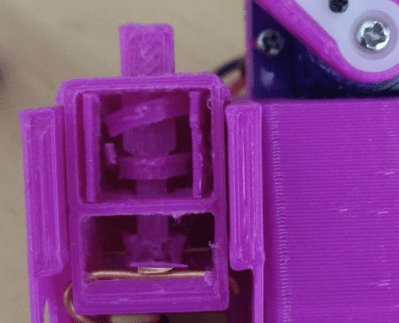
The broken spring after 13,000+ automated boings.

Rather than wear out his fingers with millions of actuations, [James] built a robot to test switches until they fail. All he has to do is plug a switch in, and the servo-driven finger slowly presses the slider down until the contacts close, which lights the LED.

The system waits 100ms for the contacts to stop any tiny vibrations before releasing the slider. That Arduino on the side tracks the contact and release points and sends them to the PC to be graphed. If the switch fails to actuate or release, the tester stops altogether.

We love that this auto-tester works just fine for commercial switches, too — the bit that holds the switch is separate and attaches with screws, so you could have one for every footprint variant. [James] recently did his first test of a printed switch and it survived an astonishing 13,907 presses before the printed coil spring snapped.

One could argue that this doubles as a servo tester. If you want a dedicated device for that, this one can test up to sixteen at a time.

Via @Microchip_Makes

Spherical Quadruped Arduino Robot

[Greg06] started learning electronics the same way most of us did: buy a few kits, read a few tutorials, and try your hardest to put a few things together. Sound familiar? After a while, you noticed your skills started increasing, and your comfort level with different projects improved as well. Eventually, you try your hand at making your own custom projects and publishing your own tutorials.

Few are lucky to have a first-project as elaborate as [Greg06’s] quadruped robot. We don’t know about you, but for some of us, we were satisfied with blinking two LEDs instead of just one.

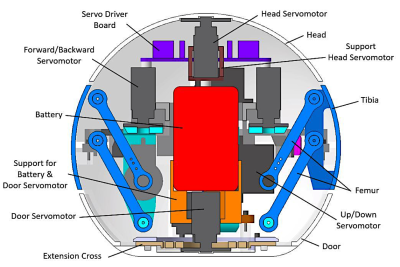
[Greg06’s] robot has a quadruped based, housed within a 3D printed spherical body. The legs are retractable and are actuated by tiny servo motors inside the body. [Greg06] even included an ultrasonic distance sensor for the obstacle avoidance mechanism. Honestly, if it weren’t for the ultrasonic distance sensor protruding from the spherical body, you might think that the entire robot was just a little Wiffle ball. This reminds us of another design we’ve seen before.

If that weren’t enough, the spherical head can rotate, widening the range of the ultrasonic distance sensor and obstacle avoidance mechanism. This is accomplished by attaching another servo motor to the head.

Pretty neat design if you ask us. Definitely one of the coolest quadrupeds we’ve seen.

Building D-O, The Cone Face Droid

For many of us, movies are a great source of inspiration for projects, and the Star Wars films are a gift that just keeps giving. The D-O droid featured and the Rise of Skywalker is the equivalent of an abandoned puppy, and with the help of 3D printing, [Matt Denton] has brought it to life. (Video, embedded below.)

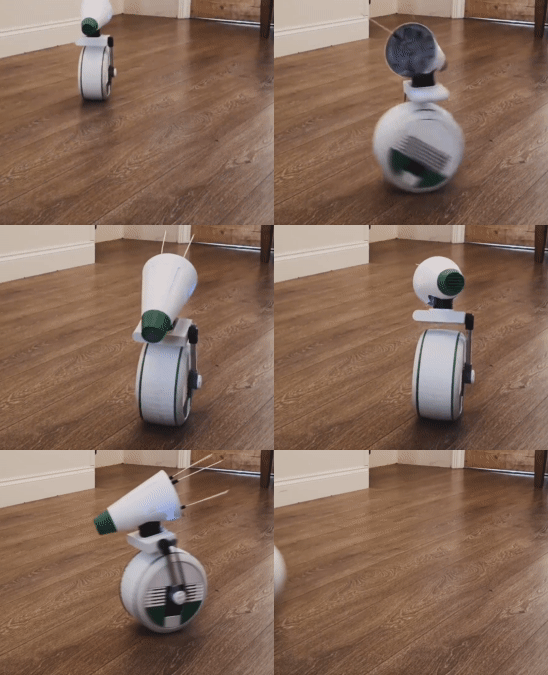
D-O is effectively a two-wheeled self-balancing robot, with two thin drive wheels on the outer edges of the main body. A wide flexible tire covers the space between the two wheels, where the electronics are housed, without actually forming part of the drive mechanism. The main drive motors are a pair of geared DC motors with encoders to allow closed-loop control down to very slow speeds. The brains of the operation is an Arduino MKR-W1010 GET on a stack that consists of a motor driver, shield, IMU shields, and prototyping shield. [Matt] did discover a design error on the motor driver board, which caused the main power switching MOSFET to burst into flames from excessive gate voltage. Fortunately he was able to work around this by simply removing the blown MOSFET and bridging the connection with a wire.

The head-on D-O is very expressive and [Matt] used four servos to control its motion, with another three to animate the three antennas on the back of its head. Getting all the mechanics to move smoothly without any slop took a few iterations to get right, and the end result looks and moves very well.

[Matt] worked on the film himself, so he based his build on a design by [Michael Baddeley], another prolific droid builder, to avoid breaching his NDA. He covers the entire development and testing process in a series of videos, and will be releasing the design files and instructions when it’s done.

Alexa, Shoot Me Some Chocolate

[Harrison] has been busy finding the sweeter side of quarantine by building a voice-controlled, face-tracking M&M launcher. Not only does this carefully-designed candy launcher have control over the angle, direction, and velocity of its ammunition, it also locates and locks on to targets by itself.

Here comes the science: [Harrison] tricked Alexa into thinking the Raspberry Pi inside the machine is a smart TV named [Chocolate]. He just tells an Echo to increase the volume by however many candy-colored projectiles he wants launched at his face. Simply knowing the secret language isn’t enough, though. Thanks to a little face-based security, you pretty much have to be [Harrison] or his doppelgänger to get any candy.

The Pi takes a picture, looks for faces, and rotates the turret base in that direction using three servos driven by Arduino Nanos. Then the Pi does facial landmark detection to find the target’s mouth hole before calculating the perfect parabola and firing. As [Harrison] notes in the excellent build video below, this machine uses a flywheel driven by a DC motor instead of being spring-loaded. M&Ms travel a short distance from the chute and hit a flexible, spinning disc that flings them like a pitching machine.

We would understand if you didn’t want your face involved in a build with Alexa. It’s okay — you can still have a voice-controlled candy cannon.

Nightmare Fuel Telepresence ‘Bot May Become Your Last Friend

After this pandemic thing is all said and done, historians will look back on this period from many different perspectives. The one we’re most interested in of course will concern the creativity that flourished in the petri dish of anxiety, stress, and boredom that have come as unwanted side dishes to stay-at-home orders.

[Hunter Irving] and his brother were really missing their friends, so they held a very exclusive hackathon and built a terrifying telepresence robot that looks like a mash-up of Wilson from Castaway and that swirly-cheeked tricycle-riding thing from the Saw movies. Oh, and to make things even worse, it’s made of glow-in-the-dark PLA.

Now when they video chat with friends, TELEBOT is there to make it feel as though that person is in the room with them. The Arduino Uno behind its servo-manipulated vintage doll eyes uses the friend’s voice input to control the wind-up teeth based on their volume levels. As you might imagine, their friends had some uncanny valley issues with TELEBOT, so they printed a set of tiny hats that actually do kind of make it all better. Check out the build/demo video after the break if you think you can handle it.

Not creepy enough for you? Try building your own eyes from the ground up.