Posts with «robot» label

The Dar es Salaam Hacker Scene and Gamut Detection

We’re on a sort of vacation in Tanzania at the moment and staying in a modest hotel away from the tourist and government district. It’s a district of small shops selling the same things and guys repairing washing machines out on the sidewalk. The guys repairing washing machines are more than happy to talk. Everybody’s amazingly friendly here, the hotel guy grilled us for an hour about our home state. But I really didn’t expect to end up in a conversation about computer vision.

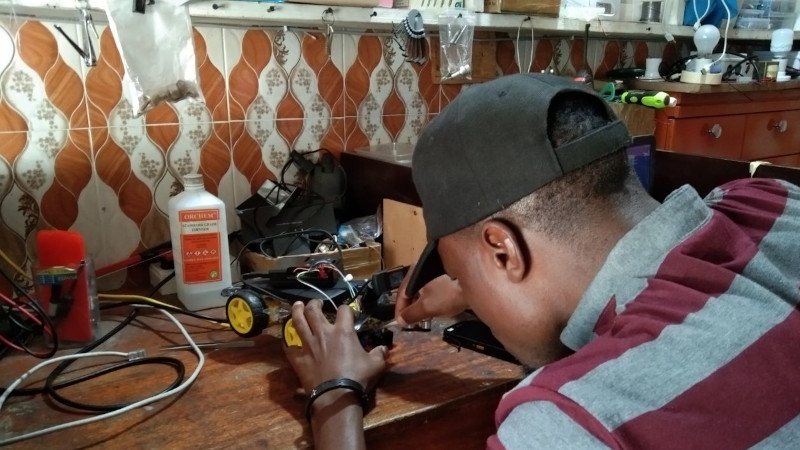
In search of some yogurt and maybe something cooler to wear, we went on a little walk away from the hotel. With incredible luck we found a robotics shop a few blocks away. Mecktonix is a shop about two meters each way, stuffed full of Arduinos, robots, electronics components, servos, and random computer gear, overseen by [Yohanna “Joe” Harembo]. Nearby is another space with a laser engraver and 3D printer. The tiny space doesn’t stop them from being busy. A constant stream of automotive tech students from the nearby National Institute of Transport shuffle in for advice and parts for class assigned projects.

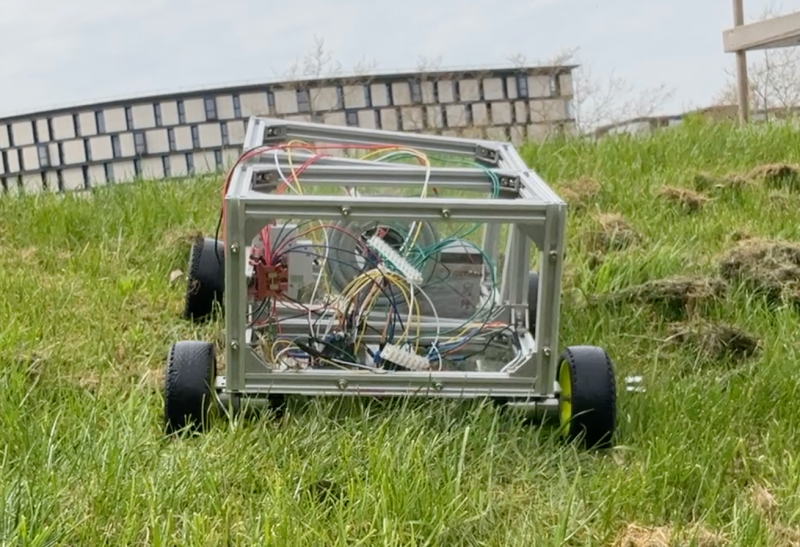
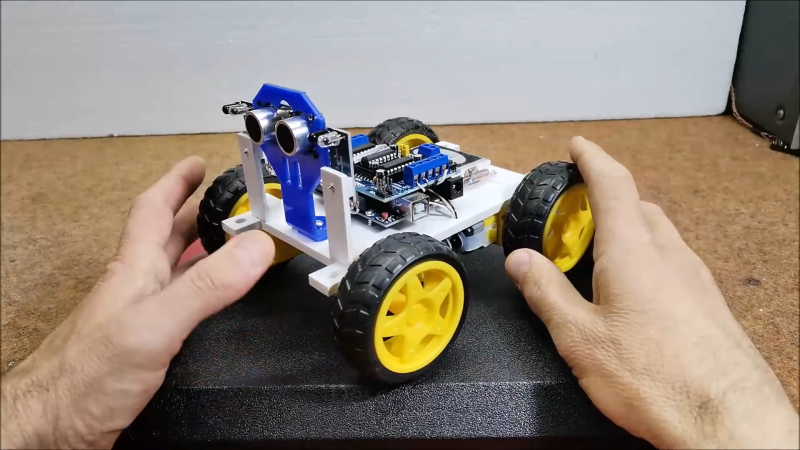
In between students, Joe demos an autonomous car he’s working on. In classic hacker fashion, he first has to reattach the motor driver board and various sensors, but then he demos the car and its problem –  the video frame rate is very slow. We dive in with him and try to get some profiling using time.monotonic_ns(). He’s never done profiling before, so this is a big eye opener. He’s only processing one video frame every 4.3 seconds, using YOLO on a Pi 3, and yup, that’s the problem.  I suggest he change to gamut detection or a Pi 4.

Gamut Detection

If you’re not familiar with gamut detection, it’s one of the simplest of all computer vision techniques, so it’s easy to implement on slow processors and almost trivial to code. Basically, it’s “look for a color”.  If you want your robot to follow you, wear a lime green T shirt. Now the robot just has to look for lime green. Same for catching a ball or following a line. The algorithm is simple – convert each pixel to HSV, where hue corresponds to the direction around the color wheel,  saturation corresponds to how concentrated the color is, and value how bright. Brightness depends on the lighting, so you can throw value away and just set limits for H and S. Anything within those limits is part of our target. The box formed by those limits is our “gamut”.

There are a couple speedups you can apply as well. First, ask yourself how much resolution you need from the camera. If you only want to track a green T shirt that’s never less than 24 pixels on screen, turn the resolution down by a factor of six each way and look for four-pixel T shirts. You now have 1/36th as much data to process and your algorithm runs 36 times faster. If you can’t control the camera resolution, you can shrink the image or just sample every nth pixel. Second, you can often ask for a YUV or YIQ image from the camera. Discard Y and set your limits in IQ or UV coordinates. It’s about the same as HSV.

Joe’s eating this up – he’s had limited chances to talk with somebody else who is into computer vision. As we write this, he’s still trying with YOLO, but at lower resolution. If it doesn’t work he’ll try gamut detection. And it’s not his only project. Passenger carrying motorcycles called pikipikis are common here. A student has a project to enforce passengers wearing a helmet, and we fiddle with the student’s project.

The Dar es Salaam Scene

There’s other tech happening in Tanzania too. A few blocks away is [Ruta Electronics], a similar sugar cube sized shop developing smart meters. Everything from cases to PCB etching happens in the tiny shop. Downtown there are a few tech startups. There’s a fab lab, mostly oriented towards children. And on a quiet side street off the main drag, there’s a tiny shop with three guys who are hacking like crazy.

For us, we’ve had a chance to make a friend from a different culture and play with a robot car together — what could be better?  When you’re traveling, are you on the lookout for other hackers or hackerspaces? It’s worth the effort and brings our community together in a way that even the internet can’t.

A Guard Bot For Your Home Assistant

While fixed sensors, relays, and cameras can be helpful in monitoring your home, there are still common scenarios you need to physically go and check something. Unfortunately, this is often the case when you’re away from home. To address this challenge, [PriceLessToolkit] created a guardian bot that can be controlled through Home Assistant.

The robot’s body is made from 3D-printed components designed to house the various modules neatly. The ESP32 camera module provides Wi-Fi and video capabilities, while the Arduino Pro Mini serves as the bot’s controller. Other peripherals include a light and radar sensor, an LED ring for status display, and a speaker for issuing warnings to potential intruders. The motor controllers are salvaged from two 9-gram servos. The onboard LiPo battery can be charged wirelessly with an integrated charging coil and controller by driving the bot onto a 3D-printed dock.

This build is impressive in its design and execution, especially considering how messy it can get when multiple discrete modules are wired together. The rotating castor wheels made from bearings add an elegant touch.

If you’re interested in building your own guard bot, you can find the software, CAD models, and schematics on Github.

Thanks for the tip [Bernard]!

Home Assistant is a popular software tool around, and we’ve seen it connect to boilers, blinds, beds and 433 MHz sensors.

Gesture Controlled Filming Gear Works Super Intuitively

Shooting good video can be an arduous task if you’re working all by yourself. [Pave Workshop] developed a series of gesture-responsive tools to help out, with a focus on creating a simple intuitive interface.

The system is based around using a Kinect V2 to perceive gestures made by the user, which can then control various objects in the scene. For instance, a beckoning motion can instruct a camera slider to dolly forward or backwards, and a halting gesture will tell it to stop. Bringing the two hands together or apart in special gestures indicate that the camera should zoom in or out. Lights can also be controlled by pulling a fist towards or away from them to change their brightness.

The devil is in the details with a project that works this smoothly. [Pave Workshop] lays out the details on how everything Node.JS was used to knit together everything from the custom camera slider to Philips Hue bulbs and other Arduino components.

The project looks really impressive in the demo video on YouTube. We’ve seen some other impressive automated filming rigs before, too.

Robotic Platform Is Open Sourced And User Friendly

Having a 3D printer or a CNC machine available for projects is almost like magic. Designing parts in software and having them appear on the workbench is definitely a luxury. But for a lot of us, these tools aren’t easily available and projects that use them can be out-of-reach. That’s why one of the major design goals of this robotics platform was to use as many off-the-shelf components as possible.

The robot is called the OpenScout and, as its name implies, intends to be a fully open-source robotics platform for a wide range of use cases. It uses readily-available aluminum extrusion as a frame, which bolts together without any other specialized tools like welders. The body of the robot is articulating, helping it navigate uneven terrain outdoors. The specifications also call for using an Arduino to drive the robot, although there is plenty of space in the robot body to house any robotics platform you happen to have on hand.

For anyone looking to get right into the useful work of what robots can do, rather than spending time building up a platform from scratch, this is an excellent project. It’s straightforward and easy to build without many specialized tools. The unique articulating body design should make it effective in plenty of environments. If you do have a 3D printer, though, that opens up a lot of options for robotics platforms.

2022 Sci-Fi Contest: A Hand-Following Robot, Powered by Arduino

If there’s one thing audiences love in sci-fi, it’s a cute robot companion that follows the heroes around. If you want one of your own, starting with this build from [mircemk] could be just the ticket.

The build relies on the classic Arduino Uno microcontroller, which talks to a HC-SR04 ultrasonic sensor module and two infrared sensors in order to track a human target and follow it around. Drive is thanks to four DC gear motors, driven by a L293D motor driver, with a two-cell lithium battery providing power for everything onboard.

The robot works in a simple manner, following a hand placed in front of the robot’s sensors. First, the robot checks for the presence of an object in front using the ultrasonic sensor. If something is detected, the twin infrared sensors mounted left and right are used to guide the robot, following the hand.

It’s not a sophisticated algorithm, and it won’t really let your robot follow you down a crowded street. However, it’s a great project to learn on for beginners and could serve as a great entry into more advanced projects using face tracking or other techniques. Video after the break.


Hack a Day 13 Apr 21:00

Little Quadruped Uses Many Servos

Walking robots were once the purview of major corporations spending huge dollars on research programs. Now, they’re something you can experiment with at home. [Technovation] has been doing just that with his micro quadruped build.

The build runs twelve servos – three per leg – to enable for a great range of movement for each limb. The servos are all controlled by an Arduino Uno fitted with an Arduino Sensor Shield. Everything is fitted together with a 3D printed chassis and limb segments that bolt directly on to the servo output shafts. This is a common way of building quick, easy, lightweight assemblies with servos, and it works great here. Inverse kinematics is used to calculate the required motions of each joint, and the robot can take steps from 1 to 4cm long in a variety of gaits.

We’d love to see a few sensors and a battery pack added on to allow the ‘bot to explore further in an untethered fashion. [Technovation] has left some provision to mount extra hardware, so we look forward to seeing what comes next.

We’ve seen bigger quadrupeds do great things, too. Video after the break.

Hack a Day 26 Jul 19:30

Why Make Coffee When You’re Tired? Let a Robot Do It for You

Like us, [Alberto] doesn’t compromise when it comes to a good cup of coffee. We figure that if he went to an office in the Before Times, he was the type of coworker to bring in their own coffee equipment so as not to suffer the office brew. Or perhaps he volunteered to order the office supplies and therefore got to decide for everyone else. Yep, that’s definitely one way to do it.

But like many of us, he is now operating out of a home office. Even so, he’s got better things to do than stand around pouring the perfect cup of coffee every morning. See, that’s where we differ, [Alberto]. But we do love Cafeino, your automated pour-over machine. It’s so sleek and lovely, and we’re sure it does a much better job than we do by hand — although we enjoy doing the pouring ourselves.

Cafeino is designed to mimic the movements of a trained barista’s hand, because evidently you’re supposed to pour the water in slow, deliberate swirls to evenly cover the grounds. (Our kettle has a chunky spout, so we just sort of wing it.) Cafeino does this by pumping water from an electric kettle and pouring a thin stream of it in circles with the help of two servos.

The three buttons each represent a different recipe setting, which specifies the amount of water, the hand pouring pattern, and the resting times between blooming the grounds and actually pouring the bulk of the water. These recipes are set using the accompanying web app via an ESP32, although the main brain barista is an Arduino Nano. Grab a cup and check out the demo after the break.

Got an old but modern coffee robot lying around? You could turn it into a planter with automated watering.

The HackadayPrize2021 is Sponsored by:

Dr. Squiggles: An AI Rhythm Robot

Build a smart octopus drumbot that listens, learns, and plays along with you

Read more on MAKE

The post Dr. Squiggles: An AI Rhythm Robot appeared first on Make: DIY Projects and Ideas for Makers.

Nightmare Robot Only Moves When You Look Away

What could be more terrifying than ghosts, goblins, or clowns? How about a shapeless pile of fright on your bedroom floor that only moves when you’re not looking at it? That’s the idea behind [Sciencish]’s nightmare robot, which is lurking after the break. The Minecraft spider outfit is just a Halloween costume.

In this case, “looking at it” equates to you shining a flashlight on it, trying to figure out what’s under the pile of clothes. But here’s the thing — it never moves when light is shining on it. It quickly figures out the direction of the light source and lies in wait. After you give up and turn out the flashlight, it spins around to where the light was and starts moving in that direction.

The brains of this operation is an Arduino Uno, four light-dependent resistors, and a little bit of trigonometry to find the direction of the light source. The robot itself uses two steppers and printed herringbone gears for locomotion. Its chassis has holes in it that accept filament or wire to make a cage that serves two purposes — it makes the robot into more of an amorphous blob under the clothes, and it helps keep clothes from getting twisted up in the wheels. Check out the demo and build video after the break, because this thing is freaky fast and completely creepy.

While we usually see a candy-dispensing machine or two every Halloween, this year has been more about remote delivery systems. Don’t just leave sandwich bags full of fun size candy bars all over your porch, build a candy cannon or a spooky slide instead.

Via r/duino

Open-Source Robotic Arm for All Purposes

A set of helping hands is a nice tool to have around the shop, especially if soldering or gluing small components is a common task. What we all really want, though, is a robotic arm. Sure, it could help us set up glue or solder but it can do virtually any other task it is assigned as well. A general-purpose tool like this might be out of reach of most of us, unless we have a 3D printer to make this open-source robotic arm at home.

The KAUDA Robotic Arm from [Giovanni Lerda] is a five-axis arm with a gripping tool and has a completely open-source set of schematics so it can be printed on any 3D printer. The robot arm uses three stepper motors and two servo motors, and is based on the Arduino MEGA 2560 for control. The electrical schematics are also open-source, so getting this one up and running is just an issue of printing, wiring, and implementing some software. To that end there are software examples available, and they can easily be modified to fit one’s robotic needs.

A project like this could be helpful for any number of other projects, or also just as a lesson in robotics for yourself or even in a classroom, since many schools now have their own 3D printers. With everything being open-source, this is a much simpler endeavor now than other projects we’ve seen that attempted to get robotic arms running again.