Posts with «robot» label

Switch Tester Servo-Slaps Them ’til they Fail

[James] is designing an open-source 3D printed keyboard switch, with the end goal of building a keyboard with as many printed parts as possible. Since keyswitches are meant to be pressed quite often, the DIY switches ought to be tested just as rigorously as their commercial counterparts are at the factory. Maybe even more so.

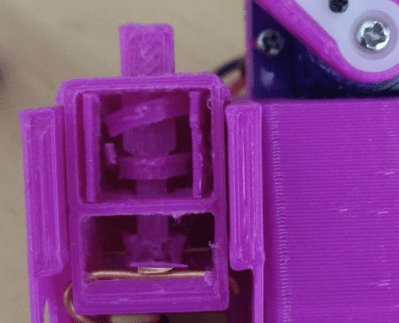
The broken spring after 13,000+ automated boings.

Rather than wear out his fingers with millions of actuations, [James] built a robot to test switches until they fail. All he has to do is plug a switch in, and the servo-driven finger slowly presses the slider down until the contacts close, which lights the LED.

The system waits 100ms for the contacts to stop any tiny vibrations before releasing the slider. That Arduino on the side tracks the contact and release points and sends them to the PC to be graphed. If the switch fails to actuate or release, the tester stops altogether.

We love that this auto-tester works just fine for commercial switches, too — the bit that holds the switch is separate and attaches with screws, so you could have one for every footprint variant. [James] recently did his first test of a printed switch and it survived an astonishing 13,907 presses before the printed coil spring snapped.

One could argue that this doubles as a servo tester. If you want a dedicated device for that, this one can test up to sixteen at a time.

Via @Microchip_Makes

Little Flash Charges In 40 Seconds Thanks to Super Capacitors

We’ve all committed the sin of making a little arduino robot and running it off AA batteries. Little Flash is better than that and runs off three 350 F capacitors.

In fact, that’s the entire mission of the robot. [Mike Rigsby] wants people to know there’s a better way. What’s really cool is that 10 A for 40 seconds lets the robot run for over 25 minutes!

The robot itself is really simple. The case is 3D printed with an eye towards simplicity. The brains are an Arduino nano and the primary input is a bump sensor. The robot runs around randomly, but avoids getting stuck with the classic reverse-and-turn on collision.

It’s cool to see how far these capacitors have come. We remember people wondering about these high priced specialty parts when they first dropped on the hobby scene, but they’re becoming more and more prevalent compared to other solutions such as coin-cells and solder tab lithium batteries for PCB power solutions.

The HackadayPrize2019 is Sponsored by:

Badland Brawler Lets Arduino Tackle Terrain

For an electronics person, building the mechanics of a robot — especially a robust robot — can be somewhat daunting. [Jithin] started with an off-the-shelf 4 wheel drive chassis to build an off-road Arduino robot he calls the Badland Brawler. The kit was a bit over $100, but as you can see in the video below, it is pretty substantial, with an enclosed frame and large mud tires.

The remaining parts include an Arduino, a battery, and a motor driver IC. The Arduino is one with WiFi (an MKR 1000, in fact) and there’s a phone app for controlling the robot.

Honestly, once you have the chassis taken care of, the rest is pretty easy. Of course, the phone app is a bit more effort, but you could replace it in a number of ways. Blynk, comes to mind, for example.

The motor drivers are easy to figure out. This would be a great platform for some sensors to allow for more autonomy. We liked how the frame had mount points for a lot of different boards and sensors and could hold everything, for the most part, inside. That’s probably a good idea for a robot which will be traversing rugged terrain.

If you do decide to roll your own app with Blynk, we’ve done it with a very different kind of robot. Four-wheel drive robots don’t have to be big, as we’ve seen in the past.

Arduino Fights Fire with… Water?

We don’t think we’d want to trust our fire safety to a robot carrying a few ounces of water, but as a demonstration or science project, [Tinker Guru’s] firefighting robot was an entertaining answer to the question: “What do I do with that flame sensor that came in the big box of Arduino sensors I bought from China?” You can see a video of the device below.

You can see, it is a pretty standard two-wheel robot with the drive wheels to the rear and a skid plate up front. There are a flame sensor and a water pump up forward, as well. You can probably guess, the device notices a flame and rushes to squirt water on it.

That got us thinking, though. What would it take to build a real robot fireman? Turns out you don’t have to look hard to find out there are several out there already. The Thermite robot seems to have a lot of traction — in the market, that is, although its oversized treads probably give it good traction in that way, too. Most of the robots don’t carry their own water, and there’s even one — THOR — that looks like a human. Well, as much as a pie looks like a cake, anyway.

Interestingly, none seem to carry any sort of chemical fire extinguisher. Of course, we’ve seen cases where water was the best, anyway. If you want a slightly more practical home build — but only slightly — check out [Ivan’s] robot that holds a liter of water.

A Star-Trek-Inspired Robot With Raspberry Pi and AI

When [314Reactor] got a robot car kit, he knew he wanted to add some extra things to it. At about the same time he was watching a Star Trek episode that featured exocomps — robots that worked in dangerous areas. He decided to use those fictional devices to inspire his modifications to the car kit. Granted, the fictional robots were intelligent and had a replicator. So you know he won’t make an actual working replica. But then again, the ones on the TV show didn’t have all that either.

A Raspberry Pi runs Tensorflow using the standard camera.  This lets it identify objects of interest (assuming it gets them right) and sends the image back to the operator along with some identifying information. The kit already had an Arduino onboard and the new robot talks to it via a serial port. You can see a video about the project, below.

The design is complicated a bit by the fact that the original kit uses a Bluetooth adapter to send and receive serial commands from a mobile device. However, the controller software with the kit, though, allows for extra buttons, so the Arduino can receive command and send them to the Pi.

The code for the robot — known as Scorpion — is available on GitHub. The extra commands relate to the camera and also some servos that move pincers to mimic the TV robot. Images return to the operator via the Telegram cloud service.

We have to admit, the Scorpion isn’t quite the same as an exocomp. But we can see the influence on the design. It wasn’t smart enough to identify itself in the mirror, so we don’t think it achieved sentience.

We’ve seen smart robots using Tensorflow before. If you prefer, you can always try OpenCV.

Welcome Our New Insect Overlords With Arduino-Powered Ant Bot

Walking robots come in many forms, and each presents their own unique challenges. Bipedal style locomotion is considered particularly difficult to do well, however designs with more legs offer certain advantages. Hexapods offer the possibility of keeping several legs on the ground while others move, providing a useful degree of stability. [How To Mechatronics] developed this ant robot, which is an excellent example of the form.

The hexapod has as the name suggests, six legs, each of which consist of 3 joints. This necessitates 3 servos per leg, for 18 servos total just for locomotion. Further servos are then used to control the abdomen, head, and mandibles. This gives the robot strong ant credentials, above and beyond being simply a 3D printed lookalike.

Brains come courtesy of an Arduino Mega, chosen for its ability to control a large number of servos. A custom PCB is printed as a shield to ease the connection of all the necessary hardware. An HC-05 Bluetooth module is used for communication with an Android app, which controls the ant. The piece de resistance is the ultrasonic sensors in the head, which allow the ant to automatically defend itself against predators that get too close.

It’s an involved build, requiring plenty of 3D printing and over 200 fasteners. Fundamentally though, it’s a fully working and tested hexapod build with full plans available for download, ready to toil in your underground sugar caves.

If your hexapod tastes skew more anime than insectoid, check out this Ghost in the Shell build. Video after the break.

[Thanks to Baldpower for the tip!]

Hack a Day 18 Dec 00:00

A Robotic Arm For Those Who Like Their Kinematics Both Ways

A robotic arm is an excellent idea if you’re looking to get started with electromechanical projects. There’s linkages to design, and motors to drive, but there’s also the matter of control. This is referred to as “kinematics”, and can be considered in both the forward and inverse sense. [aerdronix] built a robotic arm build that works in both ways.

The brains of the build is an Arduino Yun, which receives commands over the USB interface. Control is realised through the Blynk app, which allows IoT projects to easily build apps for smartphones that can be published to the usual platforms.

The arm’s position is controlled in two fashions. When configured to use inverse kinematics, the user commands an end effector position, and the arm figures out the necessary position of the linkages to make it happen. However, the arm can also be used in a forward kinematics mode, where the individual joint positions are commanded, which then determine the end effector’s final position.

Overall, it’s a well-documented build that lays out everything from the basic mechanical design to the software and source code required to control the system. It’s an excellent learning resource for the newcomer, and such an arm could readily be used in more complex projects.

We see plenty of robotic arms around these parts, like this fantastic build based on an IKEA lamp. If you’ve got one, be sure to hit up the tip line. Video after the break.

Hack a Day 19 Oct 12:00

An Unmanned Ground Vehicle, Compatable With An Arduino

Building your own robot is something everyone should do, and [Ahmed] has already built a few robots designed to be driven around indoors. An indoor robot is easy, though: you have flat surfaces to roll around on, and the worst-case scenario you have a staircase to worry about. An outdoor robot is something else entirely, which makes this project so spectacular. It’s the M1 Rover, an unmanned ground vehicle, built around the Arduino platform.

The design goal of the M1 Rover isn’t just to be a remote-controlled car that can be driven around indoors. This robot is meant for rough terrain, and is a robot that can be programmed, can also be driven around by a computer, a video game controller, or custom joysticks.

To this end, the M1 rover is designed around high-quality laser cut plywood, powered by a few DC motors controlled through a dual H-bridge, and loaded up with sensors, including a front-mounted ultrasonic sensor. All the electronics are tucked away in the chassis, and the software is just fantastic. In fact, with the addition of a smartphone skillfully mounted to the top of the chassis, this little robot can became an autonomous rover, complete with a webcam. It’s one of the better robotic rover projects we’ve seen, and amazing addition to this year’s Hackaday Prize.

Watch the Snappy, Insect-like Moves of this DIY Quadruped Robot

Some legged robots end up moving with ponderous deliberation, or wavering in unstable-looking jerks. A few unfortunates manage to do both at once. [MusaW]’s 3D Printed Quadruped Robot, on the other hand, moves in rapid motions that manage to look sharp and insect-like instead of unstable. Based on an earlier design he made for a 3D printable quadruped frame, [MusaW] has now released this step-by-step guide for building your own version. All that’s needed is the STL files and roughly $50 in parts from the usual Chinese resellers to have the makings of a great weekend project.

The robot uses twelve SG90 servos and an Arduino nano with a servo driver board to control them all, but there’s one additional feature: Wi-Fi control is provided thanks to a Wemos D1 Mini (which uses an ESP-8266EX) acting as a wireless access point to serve up a simple web interface through which the robot can be controlled with any web browser.

Embedded below is a brief video. The first half is assembly, and the second half demonstrates the robot’s fast, sharp movements.

We love it when robots show some personality, like this adorable little quadruped robot that can make small jumps.

Thanks to [Baldpower] for the tip!

Robot Maps Rooms with Help From iPhone

The Unity engine has been around since Apple started using Intel chips, and has made quite a splash in the gaming world. Unity allows developers to create 2D and 3D games, but there are some other interesting applications of this gaming engine as well. For example, [matthewhallberg] used it to build a robot that can map rooms in 3D.

The impetus for this project was a robotics company that used a series of robots around their business. The robots navigate using computer vision, but couldn’t map the rooms from scratch. They hired [matthewhallberg] to tackle this problem, and this robot is a preliminary result. Using the Unity engine and an iPhone, the robot can perform in one of three modes. The first is a user-controlled mode, the second is object following, and the third is 3D mapping.

The robot seems fairly easy to construct and only carries and iPhone, a Node MCU, some motors, and a battery. Most of the computational work is done remotely, with the robot simply receiving its movement commands from another computer. There’s a lot going on here, software-wise, and a lot of toolkits and software packages to install and communicate with one another, but the video below does a good job of showing what you’ll need and how it all works together. If that’s all too much, there are other robots with a form of computer vision that can get you started into the world of computer vision and mapping.