Posts with «robot» label

Roboshield Helps Your Robot Walk and Talk

The joy of building robots comes from being able to imbue them with as much or as little personality and functionality as you wish during the design and build process. While creative flair and originality is always a good thing, there’s a lot of basic needs many robots have in common with each other, so where possible it’s good to avoid reinventing the wheel so more time can be spent on more advanced features. Roboshield aims to help make the basics easy so you can let your robot freak flag fly!

At its core, it’s an Arduino shield that packs in a host of hardware to get your robot up and running. As far as motion is concerned, a PCA9685 module is used to allow the control of 8 servos, plus there’s a TB6621FNG dual motor speed controller that offers both speed control and forward/reverse. That’s enough to get your electronic buddy scooting about the floor and waving its arms in the air.

The party piece, however, is the Vstamp text-to-speech module. This device produces a beautiful cliche electronic voice, which your robot is legally required to use to recite Asimov’s Laws of Robotics. Overall, it’s a tidy project that can take the hassle out of getting your robot design up and running, leaving you to focus on the fun bits like death rays and tractor beams. We can’t wait to see it powering the next wave of sassy DIY robots.

Wiping Robots and Floors: STM32duino Cleans up

Ever find yourself with nineteen nameless robot vacuums lying around? No? Well, [Aaron Christophel] likes to live a different life, filled with zebra print robots (translated). After tearing a couple down, only ten vacuums remain — casualties are to be expected. Through their sacrifice, he found a STM32F101VBT6 processor acting as the brains for the survivors. Coincidentally, there’s a project called STM32duino designed to get those processors working with the Arduino IDE we either love or hate. [Aaron Christophel] quickly added a variant board through the project and buckled down.

Of course, he simply had to get BLINK up and running, using the back-light of the LCD screen on top of the robots. From there, the STM32 processors gave him a whole 80 GPIO pins to play with. With a considerable amount of tinkering, he had every sensor, motor, and light under his control. Considering how each of them came with a remote control, several infra-red sensors, and wheels, [Aaron Christophel] now has a small robotic fleet at his beck and call. His workshop must be immaculate by now. Maybe he’ll add a way for the vacuums to communicate with each other next. One robot gets the job done, but a whole team gets the job done in style, especially with a zebra print cleaner at the forefront.

If you want to see more of his work, he has quite a few videos on his website demonstrating the before and after of the project — just make sure to bring a translator. He even has a handy pinout for those looking to replicate his work. If you want to dive right in to STM32 programming, we have a nice article on how to get it up and debugged. Otherwise, enjoy [Aaron Christophel]’s demonstration of the eight infra-red range sensors and the custom firmware running them.

Opening A Ford With A Robot and the De Bruijn Sequence

The Ford Securicode, or the keyless-entry keypad available on all models of Ford cars and trucks, first appeared on the 1980 Thunderbird. Even though it’s most commonly seen on the higher-end models, it is available as an option on the Fiesta S — the cheapest car Ford sells in the US — for $95. Doug DeMuro loves it. It’s also a lock, and that means it’s ready to be exploited. Surely, someone can build a robot to crack this lock. Turns out, it’s pretty easy.

The electronics and mechanical part of this build are pretty simple. An acrylic frame holds five solenoids over the keypad, and this acrylic frame attaches to the car with magnets. There’s a second large protoboard attached to this acrylic frame loaded up with an Arduino, character display, and a ULN2003 to drive the resistors. So far, everything you would expect for a ‘robot’ that will unlock a car via its keypad.
The real trick for this build is making this electronic lockpick fast and easy to use. This project was inspired by [Samy Kamkar]’s OpenSesame attack for garage door openers. In this project, [Samy] didn’t brute force a code the hard way by sending one code after another; (crappy) garage door openers only look at the last n digits sent from the remote, and there’s no penalty for sending the wrong code. In this case, it’s possible to use a De Bruijn sequence to vastly reduce the time it takes to brute force every code. Instead of testing tens of thousands of different codes sequentially, this robot only needs to test 3125, something that should only take a few minutes.

Right now the creator of this project is putting the finishing touches on this Ford-cracking robot. There was a slight bug in the code that was solved by treating the De Bruijn sequence as circular, but now it’s only a matter of time before a 1993 Ford Taurus wagon becomes even more worthless.

A HID For Robots

Whether with projects featured here or out in the real world, we have a tendency to focus most upon the end product. The car, solar panel, or even robot. But there’s a lot more going on behind the scenes that needs to be taken care of as well, whether it’s fuel infrastructure to keep the car running, a semiconductor manufacturer to create silicon wafers, or a control system for the robot. This project is one of the latter: a human interface device for a robot arm that is completely DIY.

While robots are often automated, some still need human input. The human input can be required all the time, or can be used to teach the robot initially how to perform a task which will then be automated. This “keyboard” of sorts built by [Ahmed] comes with a joystick, potentiometer, and four switch inputs that are all fully programmable via an Arduino Due. With that, you can perform virtually any action with whatever type of robot you need, and since it’s based on an Arduino it would also be easy to expand.

The video below and project page have all the instructions and bill of materials if you want to roll out your own. It’s a pretty straightforward project but one that might be worth checking out since we don’t often feature controllers for other things, although we do see them sometimes for controlling telescopes rather than robots.


Hack a Day 02 Jun 06:00

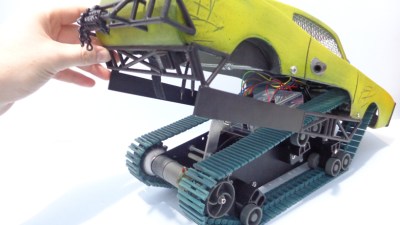
Glorious Body of Tracked ‘Mad Mech’ Started as Cardboard

[Dickel] always liked tracked vehicles. Taking inspiration from the ‘Peacemaker’ tracked vehicle in Mad Max: Fury Road, he replicated it as the Mad Mech. The vehicle is remote-controlled and the tank treads are partly from a VEX robotics tank tread kit. Control is via a DIY wireless controller using an Arduino and NRF24L01 modules. The vehicle itself uses an Arduino UNO with an L298N motor driver. Power is from three Li-Po cells.

The real artistic work is in the body. [Dickel] used a papercraft tool called Pepakura (non-free software, but this Blender plugin is an alternative free approach) for the design to make the body out of thin cardboard. The cardboard design was then modified to make it match the body of the Peacemaker as much as possible. It was coated in fiberglass for strength, then the rest of the work was done with body filler and sanding for a smooth finish. After a few more details and a good paint job, it was ready to roll.

There’s a lot of great effort that went into this build, and [Dickel] shows his work and process on his project page and in the videos embedded below. The first video shows the finished Mad Mech being taken for some test drives. The second is a montage showing key parts of the build process.

Paper and cardboard are very versatile and accessible materials for making things. It’s what was used to do some target practice with this working paper and cardboard gun. With the right techniques foam core can be worked into an astonishing variety of shapes, and we also made a case for the value of a desktop vinyl cutter on any well-equipped hacker’s workbench.

The Sensor Array That Grew Into a Robot Cat

Human brains evolved to pay extra attention to anything that resembles a face. (Scientific term: “facial pareidolia”) [Rongzhong Li] built a robot sensor array with multiple emitters and receivers augmenting a Raspberry Pi camera in the center. When he looked at his sensor array, he saw the face of a cat looking back at him. This started his years-long Petoi OpenCat project to build a feline-inspired body to go with the face.

While the name of the project signals [Rhongzhong]’s eventual intention, he has yet to release project details to the open-source community. But by reading his project page and scrutinizing his YouTube videos (a recent one is embedded below) we can decipher some details. Motion comes via hobby remote-control servos orchestrated by an Arduino. Higher-level functions such as awareness of environment and Alexa integration are handled by a Raspberry Pi 3.

The secret (for now) sauce are the mechanical parts that tie them all together. From impact-absorption spring integrated into the upper leg to how its wrists/ankles articulate. [Rongzhong] believes the current iteration is far too difficult to build and he wants to simplify construction before release. And while we don’t have much information on the software, the sensor array that started it all implies some level of sensor fusion capabilities.

We’ve seen lots of robotic pets, and for some reason there have been far more robotic dogs than cats. Inspiration can come from Boston Dynamics, from Dr. Who, or from… Halloween? We think the lack of cat representation is a missed opportunity for robotic pets. After all, if a robot cat’s voice recognition module fails and a command is ignored… that’s not a bug, it’s a feature of being a cat.

[via TheNextWeb]

Strumbot: The Guitar that Strums Itself

[Clare] isn’t the most musically inclined person, but she can strum a guitar. Thanks to a little help from an Arduino, she doesn’t even have to do that.

She built the strumbot, which handles the strumming hand duties of playing the guitar. While [Claire] does believe in her strumbot, she didn’t want to drill holes in her guitar, so hot glue and double-sided foam tape were the order of the day.

The business end of the strumbot is a micro servo. The servo moves two chopsticks and draws the pick across the strings. The tiny servo surprisingly does a great job getting the strings ringing. The only downside is the noise from the plastic gears when it’s really rocking out.

Strumbot’s user interface is a 3D-printed case with three buttons and three LEDs. Each button activates a different strum pattern in the Arduino’s programming. The LEDs indicate the currently active pattern. Everything is powered by a USB power pack, making this a self-contained hack.

[Clare] was able to code up some complex strum patterns, but the strumbot is still a bit limited in that it only holds three patterns. It’s good enough for her rendition of “Call Me Maybe”, which you can see in the video after the break. Sure, this is a simple project, not nearly as complex as some of the robotic guitar mods we’ve seen in the past. Still, it’s just the ticket for a fun evening or weekend project – especially if you’re introducing the Arduino to young coders. Music, hacking, and modding – what more could you ask for?


2 wheel self-balancing robot

2 wheel self-balancing robot

SimpleSumo Bots Teach More than Fighting

[MechEngineerMike] wrote in to share the enthusiasm over SimpleSumo, a series of open source, customizable robots he designed for mini-sumo battling and much more. For the unfamiliar, mini-sumo is a sport where two robots try to push each other out of a ring. [Mike]’s bots are simplified versions designed for education.

[Mike] was inspired by a video of some kids building mini-sumo bots who were doing anything and everything to personalize them. He vowed to make his own affordable, easy-to-build bots with education firmly in mind. His other major requirement? They had to be as easily customizable as that one potato-based toy that eventually came with a bucket of parts. As of this writing, there are 34 interchangeable accessories.

[Mike]’s first idea was to build the bots out of custom 3D-printed building blocks. He soon found it was too much work to print consistent blocks and switched to a modular cube-like design instead. SimpleSumo bots can do much more than just fight each other. [Mike] has written programs to make them flee from objects, follow lines, find objects and push them out of the ring, and beep with increasing frequency when an object is detected.

The bots are completely open source, but [Mike] sells kits for people who can’t print the parts themselves. He’s made a wealth of information available on his website including links to outside resources about mini-sumo, Arduino, programming, and 3D design. How about a complete series of assembly videos? First one is after the break.  Don’t know how to build a battle ring? He’s got that covered, too.

For a sumo bot that’s more brains than brawn, check out Zumo Red, the smart sumo.


Filed under: how-to, robots hacks