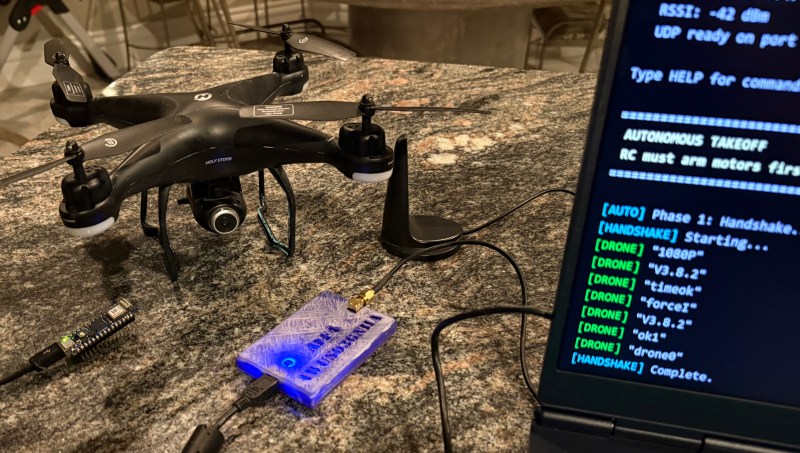
There are plenty of drones (and other gadgets) you can buy online that use proprietary control protocols. Of course, reverse-engineering one of these protocols is a hacker community classic. Today, [Zac Turner] shows us how this GPS drone can be autonomously controlled by a simple Arduino program or Python script.
What started as [Zac] sniffing some UDP packets quickly evolved into him decompiling the Android app to figure out what’s going on inside. He talks about how the launch command needs accurate GPS, how there’s several hidden features not used by the Android app, et cetera. And it’s not like it’s just another Linux SoC in there, either. No, there’s a proper Real-Time Operating System (RTOS) running, with a shell and a telnet interface. The list of small curiosities goes on.
After he finished reverse-engineering the protocol, he built some Python scripts, through which you can see the camera feed and control the drone remotely. He also went on to make an Arduino program that can do the latter using an Arduino Nano 33 IoT.
[Neumi] over on Hackaday.IO wanted a simple-to-use way to drive stepper motors, which could be quickly deployed in a wide variety of applications yet to be determined. The solution is named Ethersweep, and is a small PCB stack that sits on the rear of the common NEMA17-format stepper motor. The only physical connectivity, beside the motor, are ethernet and a power supply via the user friendly XT30 connector. The system can be closed loop, with both an end-stop input as well as an on-board AMS AS5600 magnetic rotary encoder (which senses the rotating magnetic field on the rear side of the motor assembly – clever!) giving the necessary feedback. Leveraging the Trinamic TMC2208 stepper motor driver gives Ethersweep silky smooth and quiet motor control, which could be very important for some applications. A rear-facing OLED display shows some useful debug information as well as the all important IP address that was assigned to the unit.
Control is performed with the ubiquitous ATMega328 microcontroller, with the Arduino software stack deployed, making uploading firmware a breeze. To that end, a USB port is also provided, hooked up to the uC with the cheap CP2102 USB bridge chip as per most Arduino-like designs. The thing that makes this build a little unusual is the ethernet port. The hardware side of things is taken care of with the Wiznet WS500 ethernet chip, which implements the MAC and PHY in a single device, needing only a few passives and a magjack to operate. The chip also handles the whole TCP/IP stack internally, so only needs an external SPI interface to talk to the host device.
Talking about firmware for a moment, to ease deployment, the network configuration is handled by DHCP, although some control over MAC address assignment is promised for the future. All control is via UDP over ethernet, and again the basic functionality is there, but some niceties such as motor synchronisation and state querying are again subject to further releases. Hardware design is implemented in KiCAD and FreeCAD, with Arduino covering the firmware and host control side in python. You can read all about it on the Ethersweep project GitHub, what is there not to like?
If you thought you’d seen this stepper-mounted driver setup before, you’d be correct, here’s a Hackaday Prize 2017 Entry for a CANBUS controlled driver. We also saw this on Dummy: the obscenely well made robot arm by [Zhihui Jun], which if you missed it, then do circle back and take a look, you won’t regret it!
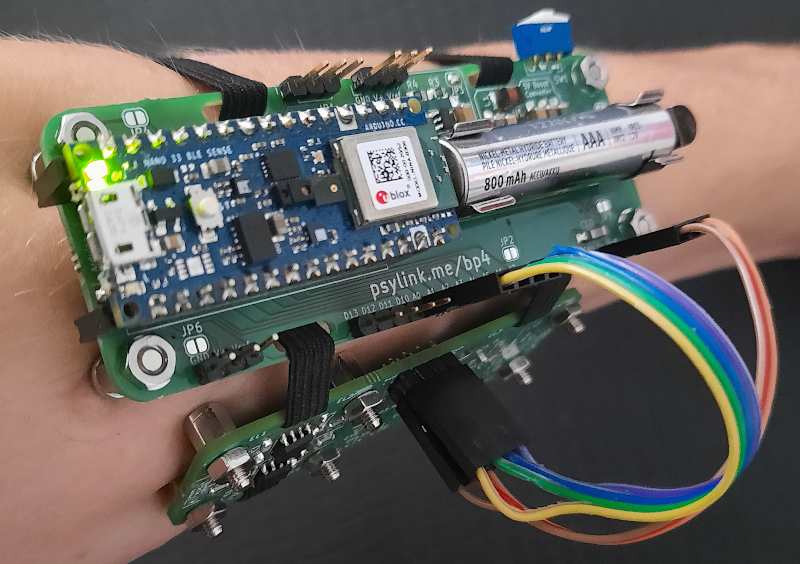
We don’t see many EMG (electromyography) projects, despite how cool the applications can be. This may be because of technical difficulties with seeing the tiny muscular electrical signals amongst the noise, it could be the difficulty of interpreting any signal you do find. Regardless, [hut] has been striving forwards with a stream of prototypes, culminating in the aptly named ‘Prototype 8’
The current prototype uses a main power board hosting an Arduino Nano 33 BLE Sense, as well as a boost converter to pump up the AAA battery to provide 5 volts for the Arduino and a selection of connected EMG amplifier units. The EMG sensor is based around the INA128 instrumentation amplifier, in a pretty straightforward configuration. The EMG samples along with data from the IMU on the Nano 33 BLE Sense, are passed along to a connected PC via Bluetooth, running the PsyLink software stack. This is based on Python, using the BLE-GATT library for BT comms, PynPut handing the PC input devices (to emit keyboard and mouse events) and tensorflow for the machine learning side of things. The idea is to use machine learning from the EMG data to associate with a specific user interface event (such as a keypress) and with a little training, be able to play games on the PC with just hand/arm gestures. IMU data are used to augment this, but in this demo, that’s not totally clear.
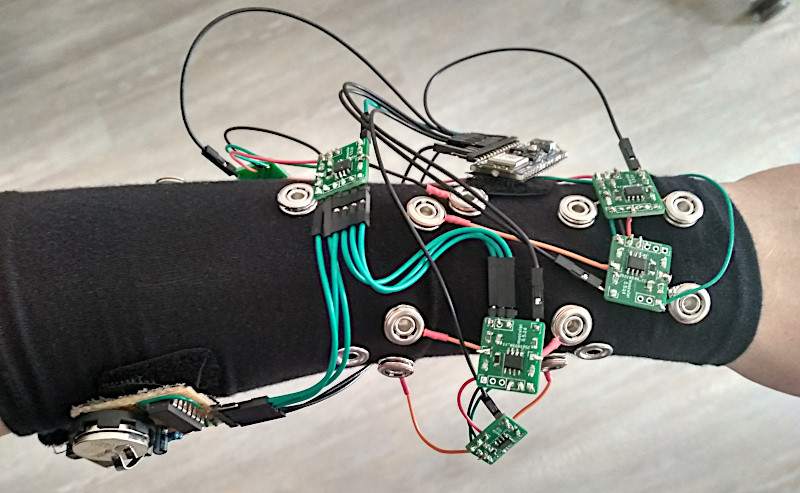
An earlier prototype of the PsyLink.
All hardware and software can be found on the project codeberg page, which did make us double-take as to why GnuRadio was being used, but thinking about it, it’s really good for signal processing and visualization. What a good idea!
Obviously there are many other use cases for such a EMG controlled input device, but who doesn’t want to play Mario Kart, you know, for science?
Checkout the demo video (embedded below) and you can see for yourself, just be aware that this is streaming from peertube, so the video might be a little choppy depending on your local peers. Finally, if Mastodon is your cup of tea, here’s the link for that. Earlier projects have attempted to dip into EMG before, like this Bioamp board from Upside Down Labs. Also we dug out an earlier tutorial on the subject by our own [Bil Herd.]
Purposely choosing obsoleted technology combines all the joy of simpler times with the comfort of knowing you’re not actually stuck with outdated (and oftentimes inferior) technology. The rotary phone is a great example here, and while rarely anyone would want to go back to the lenghty, error-prone way of dialing a number on it on an everyday basis, it can definitely add a certain charm to a project. [Caroline Buttet] thought so as well, and turned her grandma’s old rotary phone into a time-traveling, globe-trotting web radio.
The main idea is fairly simple: a Raspberry Pi connects via browser to a web radio site that plays music throughout the decades from places all over the world. [Caroline]’s implementation has a few nice twists added though. First of all, the phone of course, which doesn’t only house the Raspberry Pi, but serves both as actual listening device via handset speaker, and as input device to select the decade with the rotary dial. For a headless setup, she wrote a Chromium extension that maps key events to virtual clicks on the corresponding DOM element of the web site — like the ones that change the decade — and a Python script that turns the rotary dial pulses into those key events.
However, the phone is only half the story here, and the country selection is just as fascinating — which involves an actual world map. An audio connector is attached to each selectable country and connected to an Arduino. If the matching jack is plugged into it, the Arduino informs the Raspberry Pi via serial line about the new selection, and the same Chromium extension then triggers the country change in the underlying web site. You can check all the code in the project’s GitHub repository, and watch a demo and brief explanation in the videos after the break.
Sure, listening radio through a telephone may not be the most convenient way — unless it’s the appropriate genre — but that clearly wasn’t the goal here anyway. It’s definitely an interesting concept, and we could easily see it transferred to some travel- or spy-themed escape room setting. And speaking of spying, if [Caroline]’s name sounds familiar to you, you may remember her virtual peephole from a few months back.
No matter how clicky your keyboard is, nothing compares to the sensory experience of using a typewriter. The sounds that a typewriter makes, from the deep clunk of hitting the spacebar to the staccato of keys striking paper to the ratchety kerchunk of returning the carriage, are a delight compared to the sterile, soulless clicks of even the noisiest computer keyboard. Oh, and the bell — who doesn’t love the bell?
Unwilling to miss out on the feel of real typing, [Jatin Patel] whipped up this solenoid-powered typewriter simulator. The first version had the core functionality, with a line of six solenoids mounted to a strip of wood. The coils are connected to an Arduino through a relay board; a Python program running on his PC reads every keypress and tells the Arduino which solenoid to fire. Each one sounds different somehow, perhaps due to its position on the board, or maybe due to differences in mounting methods. Whatever the cause, the effect is a realistic variability in the sounds, just like a real typewriter.
Version two, shown in the video below, ups the simulation with a motor that moves the solenoid rack one step with each keypress, to simulate the moving carriage of a typewriter. The last solenoid rings a bell when it’s time to return the carriage, which is done with a combination wrench as a handle. Weird hex, but OK.
Of the 43 muscles that comprise the human face, only a few are actually important to speaking. And yet replicating the movements of the mouth by mechanical means always seems to end up only partly convincing. Servos and linkages can only approximate the complex motions the lips, cheeks, jaw, and tongue are capable of. Still, there are animatronics out there that make a good go at the job, of which this somewhat creepy mechanical mouth is a fine example.
Why exactly [Will Cogley] felt the need to build a mechanical maw with terrifying and fairly realistic fangs is anyone’s guess. Recalling his lifelike disembodied animatronic heart build, it just seems like he pursues these builds for the challenge of it all. But if you thought the linkages of the heart were complex, wait till you see what’s needed to make this mouth move realistically. [Will] has stuffed this pie hole with nine servos, all working together to move the jaw up and down, push and pull the corners of the mouth, raise and lower the lips, and bounce the tongue around.
It all seems very complex, but [Will] explains that he actually simplified the mechanical design to concentrate more on the software side, which is a text-to-speech movement translator. Text input is translated to phonemes, each of which corresponds to a mouth shape that the servos can create. It’s pretty realistic although somewhat disturbing, especially when the mouth is placed in an otherwise cuddly stuffed bear that serenades you from the nightstand; check out the second video below for that.
[Will] has been doing a bang-up job on animatronics lately, from 3D-printed eyeballs to dexterous mechatronic hands. We’re looking forward to whatever he comes up with next — we think.
The Consumer Electronics Show in Las Vegas is traditionally where the big names in tech show off their upcoming products, and the 2020 show was no different. There were new smartphones, TVs, and home automation devices from all the usual suspects. Even a few electric vehicles snuck in there. But mixed in among flashy presentations from the electronics giants was a considerably more restrained announcement from a company near and dear to the readers of Hackaday: Arduino is going pro.
While Arduino has been focused on the DIY and educational market since their inception, the newly unveiled Portenta H7 is designed for professional users who want to rapidly develop robust hardware suitable for industrial applications. With built-in wireless hardware and the ability to run Python and JavaScript out of the box, the powerful dual-core board comes with a similarly professional price tag; currently for preorder at $99 USD a pop, the Portenta is priced well outside of the company’s traditional DIY and educational markets. With increased competition from other low-cost microcontrollers, it seems that Arduino is looking to expand out of its comfort zone and find new revenue streams.
That’s a Lot of Pins
The Portenta H7 is obviously a far cry from the relatively dinky 8-bit Arduinos that we’ve all got filling up our parts drawers. Developed for high performance edge computing applications, the new board is powered by a 32-bit STM32H747XI that utilizes both an ARM Cortex M7 and an M4 running at 480 MHz and 240 MHz respectively. The two cores can work independently, allowing for example one core to run interpreted Python while the other runs code compiled in the Arduino IDE. When they need to work together, the cores can communicate with each other via a Remote Procedure Call (RPC) mechanism.
The new 80-pin connectors on the Portenta
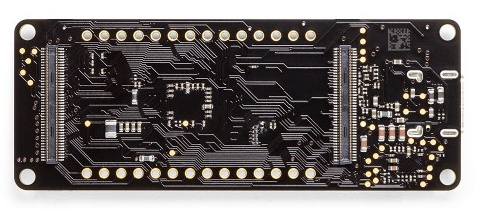
Outwardly, the new board doesn’t look far removed from the modern Arduino form factor we’re used to. The USB connector has been upgraded to a Type-C, but the Portenta still retains the dual rows of pads ready for hand-soldered headers — that’s their more recent pinout that they call the Arduino MKR form factor.
If you look on the back of the board however, you’ll see that they’ve added two 80-pin high density connectors. According to the product page, these are intended to allow the Portenta to simply be plugged into a device as a removable module. The idea being that devices in the field can easily have their Portenta swapped out for an upgraded model. Some digging into the product page documentation section turns up a schematic that lists the connectors as Hirose DF40C-80DP-0.4V(51).
The base model Portenta features 8 MB SDRAM and 16 MB NOR flash, but it can be custom ordered with up to 64 MB of memory and 128 MB of flash should you need it. It’s also possible to delete various interfaces from the board when ordering, so if you don’t want network connectivity or the NXP SE050C2 crypto chip, they can simply be left off. However as of this writing it is unclear as to what minimum order quantity is necessary to unlock this level of customization, or or how much these modifications will change the unit cost.
Year of the Arduino Desktop?
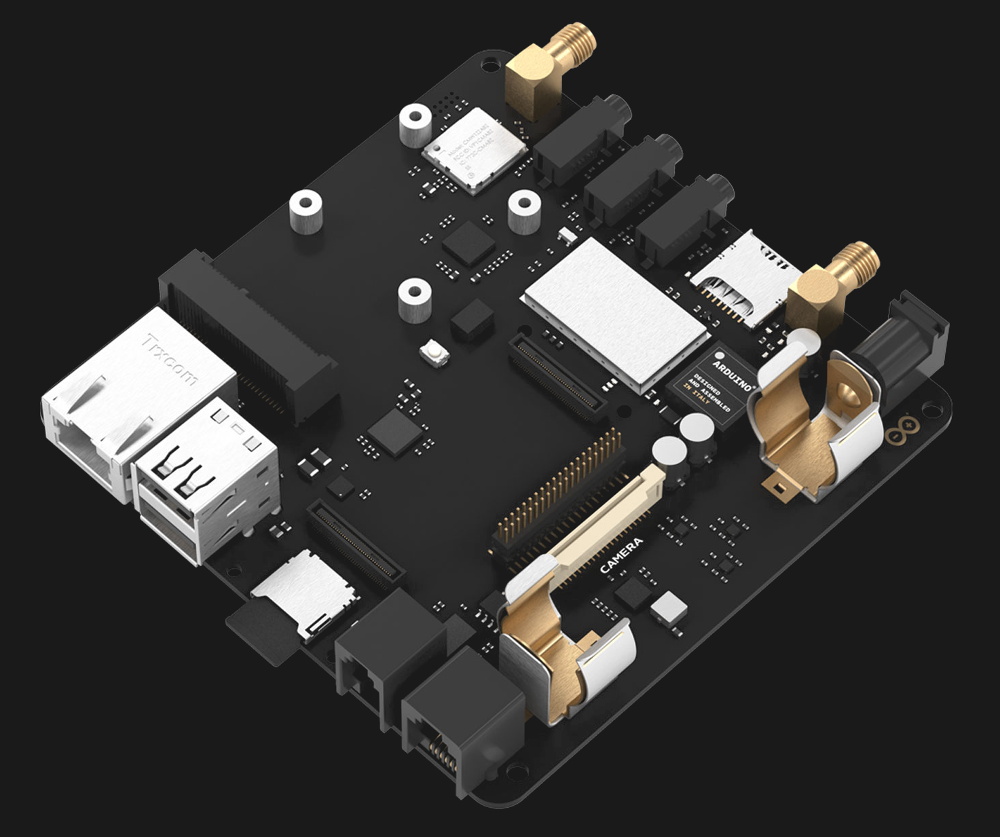
The Portenta Carrier Board
The Portenta H7 is an impressive enough piece of hardware on its own, but when it’s plugged into the optional Carrier Board, things really start to get interesting. The Carrier Board provides full size connectors for all of the onboard peripherals, and according to documentation, turns the Portenta into an eNUC-class embedded computer. There’s even support for DisplayPort to connect a monitor, and miniPCI for expansion cards.
With a fully loaded Portenta H7 slotted into the Carrier Board, it would seem you have the makings of a low-power ARM “desktop” computer. Albeit one that wouldn’t outperform the Raspberry Pi Zero, and which costs several times more.
The Arduino press release and product page doesn’t make any mention of what kind of software or operating system said computer would run, so presumably that’s left as an exercise for the customer. While not particularly well suited to it, the ARM Cortex-M family of processors is capable of running the Linux kernel, so spinning up a “real” OS image for it should be possible. Of course with a maximum of just 64 MB of RAM, you’ll want to keep your performance expectations fairly low.
Where Does Portenta Fit?
We can’t even speculate what a maxed out Portenta would cost, and there’s no pricing or release date for the Carrier Board. But even at $99, the base model Portenta H7 would be a tough sell for hackers and makers who are used to buying dual-core ESP32 boards at 1/10 of the price, or the Teensy 4.0 which has a 600 MHz Cortex-M7 at 1/4 of the price. Which is fine, since this board isn’t intended for the traditional core Arduino audience.
Seeing the carrier board, we can’t help but notice some parallels here with the Raspberry Pi Compute Module. With connections broken out to a SODIMM header, the idea of the Computer Module was to help bridge the gap between the DIY community and the commercial one by offering up a Raspberry Pi in a more rugged form factor that would be easier to integrate into end-user products. But since it wasn’t any cheaper than the stock Pi, there wasn’t a whole lot of incentive to switch over. We haven’t seen consumer products advertising “Raspberry Pi Inside!” so it’s hard to tell if there has been any meaningful adoption from industry.
One has to wonder why any company that has the resources to integrate such an expensive board into their products wouldn’t just come up with their own custom design around the Portenta’s STM32H747XI chip, which even in single quantities, can currently be had for less than $15. The difference may end up coming down to the world-renowned community that surrounds the Arduino brand, and the company’s efforts to modernize their toolchain.
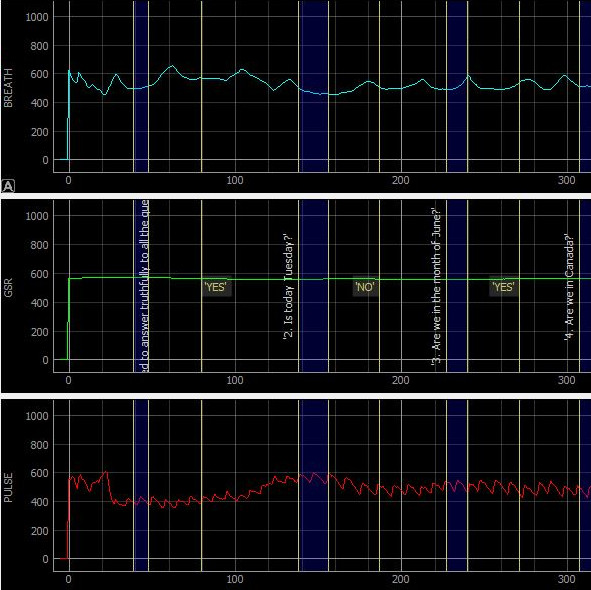
Sometimes, a project comes along that makes a good reference design for anyone doing similar work. In this particular case, it’s a DIY USB polygraph-like machine by [Juangg] using an Arduino and sensors on the hardware side, and a Python front end for data visualization. It’s even complete with 3D printed enclosure and sensor elements.
[Juangg] designed it to use three sensors: a pulse sensor, a breath sensor, and one to measure Galvanic Skin Response (GSR). The pulse sensor uses a piezo element pressed against a fingertip to detect changes in pressure resulting from blood flow. It can be picky about placement, but finding sweet spot can yield remarkably good readings. The breath sensor works on a similar principle but uses a 3D printed fixture to hold the sensor between a strap and the subject’s chest, so that breathing in and out can be detected. The GSR sensor is a voltage divider used to measure small changes in skin conductivity. How well does it all work? That depends on what one is looking to get out of it, but the documentation and design files are available from the project page and the GitHub repository if anyone wants a reference for similar work.
In this project, we are interfacing arduino with python. Arduino can be easily interfaced with python using serial communication (uart) via pyserial library. For GUI on python, we are using tkinter.
Let's start with the python script: Libraries required: pyserial
It can be esaily installed by: pip install pyserial
Python script:
import serial as s import time as t from tkinter import * from tkinter import messagebox
ser = s.Serial('COM3', 9600, timeout=0) # check your com port t.sleep(2)
def on(): ser.write(b'7')
def off(): ser.write(b'8')
def exit(): ser.close() # close serial port quit()
It is February of 2018. Do you remember what you were doing in December of 2012? If you’re [juppiter], you were starting your CNC Embroidery Machine which would not be completed for more than half of a decade. Results speak for themselves, but this may be the last time we see a first-generation Raspberry Pi without calling it retro.
The heart of the build is a vintage Borletti sewing machine, and if you like machinery porn, you’re going to enjoy the video after the break. The brains of the machine are an Arduino UNO filled with GRBL goodness and the Pi which is running CherryPy. For muscles, there are three Postep25 stepper drivers and corresponding NEMA 17 stepper motors.
The first two axes are for an X-Y table responsible for moving the fabric through the machine. The third axis is the flywheel. The rigidity of the fabric frame comes from its brass construction which may have been soldered at the kitchen table and supervised by a big orange cat. A rigid frame is the first ingredient in reliable results, but belt tension can’t be understated. His belt tensioning trick may not be new to you, but it was new to some of us. Italian translation may be necessary.
The skills brought together for this build were vast. There was structural soldering, part machining, a microcontroller, and motion control. The first time we heard from [juppiter] was December 2012, and it was the result of a Portable CNC Mill which likely had some influence on this creation. Between then, he also shared his quarter-gobbling arcade cabinet with us.


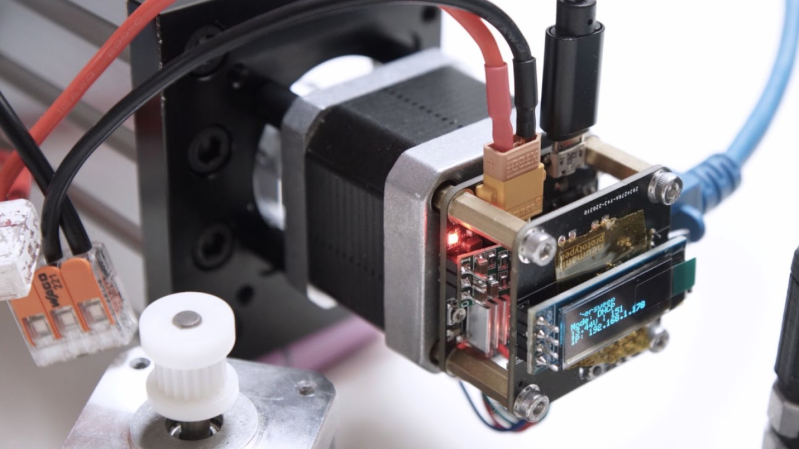
 making uploading firmware a breeze. To that end, a USB port is also provided, hooked up to the uC with the cheap CP2102 USB bridge chip as per most Arduino-like designs. The thing that makes this build a little unusual is the ethernet port. The hardware side of things is taken care of with the