Posts with «oled» label

Ergonomic Keyboard Designed from the Ground Up

In 2011, [Fabio] had been working behind a keyboard for about a decade when he started noticing wrist pain. This is a common long-term injury for people at desk jobs, but rather than buy an ergonomic keyboard he decided that none of the commercial offerings had all of the features he needed. Instead, he set out on a five-year journey to build the perfect ergonomic keyboard.

Part of the problem with other solutions was that no keyboards could be left in Dvorak (a keyboard layout [Fabio] finds improves his typing speed) after rebooting the computer, and Arduino-based solutions would not make themselves available to the computer’s BIOS. Luckily he found the LUFA keyboard library, and then was able to salvage a PCB from another keyboard. From there, he programmed everything on a Teensy microcontroller, added an OLED screen, and soldered it all together (including a set of Cherry MX switches).

Of course, the build wasn’t truly complete until recently, when a custom two-part case was 3D printed. The build quality and attention to detail in this project is impressive, and if you want to roll out your own [Fabio] has made all of the CAD files and software available. Should you wish to incorporate some of his designs into other types of specialized keyboards, there are some ideas floating around that will surely improve your typing or workflow.


Filed under: computer hacks

ATMega328 3D!

Small OLED displays are inexpensive these days–cheap enough that pairing them with an 8-bit micro is economically feasible. But what can you do with a tiny display and not-entirely-powerful processor? If you are [ttsiodras] you can do a real time 3D rendering. You can see the results in the video below. Not bad for an 8-bit, 8 MHz processor.

The code is a “points-only” renderer. The design drives the OLED over the SPI pins and also outputs frame per second information via the serial port.

As you might expect, 3D output takes a good bit of math, and the chip in question isn’t very good at handling real numbers. [Ttsiodras] handles this using an old technique: fixed point arithmetic. The idea is simple. Normally, we think of a 16-bit word as holding unsigned values of 0 – 65535. However, if you choose, you can also use it to represent numbers from 0-50.999, for example. Mentally, you scale everything by 1,000 and then reverse the operation when you want to output. Addition and subtraction are straightforward, but multiplication and division require some extra work.

If you want to read more about fixed point math, you are in the right place. We’ve also covered a great external tutorial, too. But if you think this is the first time we’ve covered a 3D graphics engine for the ATmega parts, you’re wrong.


Filed under: Arduino Hacks

Dirt Cheap Muon Detector Puts Particle Physics Within DIY Reach

Subatomic physics is pretty neat stuff, but not generally considered within the reach of the home-gamer. With cavernous labs filled with racks of expensive gears and miles-wide accelerators, playing with the subatomic menagerie has been firmly in the hands of the pros for pretty much as long as the field has been in existence. But that could change with this sub-$100 DIY muon detector.

[Spencer Axani] has been fiddling with the idea of a tiny muon detector since his undergrad days. Now as an MIT doctoral candidate, he’s making that dream a reality. Muons are particles that are similar to electrons but more massive and less likely to be affected by electromagnetic fields. Muons rain down on the Earth’s surface at the rate of 10,000 per square meter every minute after being created by cosmic rays interacting with the atmosphere and are capable of penetrating deep into the planet. [Spencer]’s detector is purposely kept as low-budget as possible, using cheap plastic scintillators and solid-state photomultipliers hooked up to an Arduino. The whole project is as much STEM outreach as it is a serious scientific effort; the online paper (PDF link) stresses the mechanical and electronics skills needed to complete the build. At the $100 price point, this build is well within the means of most high school STEM programs and allows for a large, distributed array of muon detectors that has the potential for some exciting science.

We’ve covered quite a few subatomic detection projects before, from the aforementioned large-scale builds to more modest efforts. But we like this project because it has the potential to inspire a lot of citizen scientists.

Thanks for the tip, [deralchemist]


Filed under: misc hacks

Hackaday Prize Entry: Head-up For High Voltage

[Alain Mauer] wanted to build something like a Google Glass setup using a small OLED screen. A 0.96 inch display was too large, but a 0.66 inch one worked well. Combining an Arduino, a Bluetooth module, and battery, and some optics, he built glasses that will show the readout from a multimeter.

You’d think it was simple to pull this off, but it isn’t for a few reasons as [Alain] discovered. The device cost about 70 Euro and you can see a video of the result, below.

The video shows a common problem and its solution. You are probing a mains circuit and have to look away to read the voltmeter. With the glasses, you don’t have to look away, the voltage floats in your field of vision.

These reminded us of Pedosaglass which we covered earlier. Of course, it used a different optical solution. We’ve also seen Google Glass knockoffs as part of our Hackaday prize entries.


Filed under: Arduino Hacks, The Hackaday Prize, wearable hacks

8 Crazy Keyboards That Will Trick Out Your Typing

A custom keyboard could be right at your fingertips, so why are you still using that basic keyboard that came with your computer?

Read more on MAKE

The post 8 Crazy Keyboards That Will Trick Out Your Typing appeared first on Make: DIY Projects and Ideas for Makers.

An Arduino-based Cellular Automata with OLED monitor

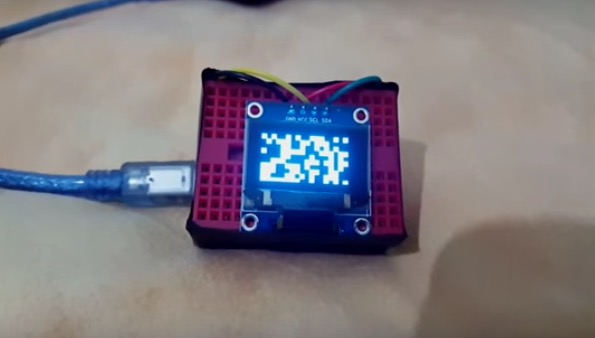
RuntimeProject made a tutorial to create a little cellular automata on a small 126×64 OLED using Arduino Nano.

He worked on one type of cellular automata, the Game of Life by John Conway, which has a grid of cells each having 2 states True or False/on or off/alive or dead. These cells are governed by 2 simple rules:

Rule 1: A cell which is dead and is surrounded by exactly 3 alive cells, will be born

Rule 2: A cell which is alive and has either 3 or 2 alive cells will remain alive, else it dies

The Arduino-based Cellular Automata works using 2 libraries the,  Adafruit GFX library  to handle all graphics and text displayed on the OLED;
Adafruit SSD1306 library which is the driver for the OLED.

You can read more info on how to make it on his blog and download the sketch on Github.

Simple USB Power Meter

The USB interface is being increasingly used as a power supply and charging port for all kinds of devices, besides data transfer. A meter to measure the electrical parameters of devices connected to a USB socket or charger would be handy on any hacker workbench. The folks at [electro-labs] designed this simple USB power meter which does just that.

The device measures voltage and current and displays them, along with the calculated power, on the small 0.5″ OLED display. The circuit is built around an ATmega328. To keep the board size small, and reduce component count, the microcontroller is run off its internal 8MHz clock. A low-resistance shunt provides current sensing which is amplified by the LT6106 a high side current sense amplifier before being fed to the 10 bit analog port of the ATmega. A MCP1525 precision voltage reference provides 2.5V to the Analog reference pin of the microcontroller, resulting in a 2.44mV resolution. Voltage measurement is via a resistive divider that has a range of up to 6V. An Arduino sketch reads voltage and current data on the analog ports and displays measurements on the display. The measured data is averaged to filter out noise.

The OLED display has a SPI interface and requires the u8glib library. The project uses all SMD parts, but is fairly easy to assemble by hand and could be a nice starter project if you want to wet your feet on surface mount assembly techniques. It’s designed using SolaPCB EDA software, and the source files for schematic and board layout are available as a ZIP archive. Download the BoM and Arduino code and you have everything needed to build this nifty device.

Thanks to [Abdulgafur] for sending in this tip. And if you are looking for a more comprehensive solution, check the awesome Friedcircuits USB Tester which we reviewed earlier and is available in the Hackaday Store.


Filed under: Arduino Hacks

High Speed SSD1306 Library

[Lewin] wrote in to tell us about a high speed library for Arduino Due that he helped develop which allows interfacing OLED displays that use the SSD1306 display controller, using DMA routines for faster display refresh time.

Typically, displays such as the Monochrome 1.3″ 128×64 OLED graphic display , are interfaced with an Arduino board via the SPI or I2C bus. The Adafruit_SSD1306 library written by [Limor Fried] makes it simple to use these displays with a variety of Arduinos, using either software or hardware SPI. With standard settings using hardware SPI, calls to display() take about 2ms on the Due.

[Lewin] wanted to make it faster, and the SAM3X8E on the Due seemed like it could deliver. He first did a search to find out if this was already done, but came up blank. He did find [Marek Buriak]’s library for ILI9341-based TFT screens. [Marek] used code from [William Greiman], who developed SD card libraries for the Arduino. [William] had taken advantage of the SAM3X8E’s DMA capabilities to enable faster SD card transfers, and [Marek] then adapted this code to allow faster writes to ILI9341-based screens. All [Lewin] had to do was to find the code that sent a buffer out over SPI using DMA in Marek’s code, and adapt that to the Adafruit library for the SSD1306.

There is a caveat though: using this library will likely cause trouble if you are also using SPI to interface to other hardware, since the regular SPI.h library will no longer work in tandem with [Lewin]’s library. He offers some tips on how to overcome these issues, and would welcome any feedback or testing to help improve the code. The speed improvement is substantial. Up to 4 times quicker using standard SPI clock, or 8 times if you increase SPI clock speed. The code is available on his Github repo.


Filed under: Arduino Hacks

Making MicroView Wordy

Despite the MicroView shipping a ton of units, we haven’t seen many projects using this tiny Arduino and OLED display in a project. Never fear, because embedded systems engineer, podcaster, and Hackaday Prize judge [Elecia White] is here with a wearable build for this very small, very cool device.

The size and shape of the MicroView just cried out to be made into a ring, and for that, [Elicia] is using air-drying bendy polymer clay. To attach the clay to the MicroView, [Elecia] put some female headers in a breadboard, and molded the clay over them into a ring shape. It works, and although [Elecia] didn’t do anything too tricky with the headers and clay, there are some interesting things you could do running wires through the clay.

What does this ring do? It’s a Magic 8 Ball, a game of Pong controlled by an accelerometer, a word-of-the-day thing (with definitions), all stuffed into a brass silicon, OLED, and clay knuckle. Video below.

If you’re wondering, Turbillion (n). A whirl; a vortex.


Filed under: wearable hacks
Hack a Day 12 Dec 12:00

Hackaday Links: BSAPEDWLOVKTUB.YBKAB

Here’s something that’s just a design study, but [Ivan]‘s Apple IIe phone is a work of art. You’re not fitting a CRT in there, but someone out there has a 3D printer, an old LCD, and a GSM module. Make it happen. See also: the Frog Design Apple phone.

A few days ago we posted something on an old ‘286 machine that was able to load up the Hackaday retro site. For a few people, this was the first they’ve heard about our CSS and Javascript-less edition designed specifically for old computers. They dragged out some hardware, and [WTH] pulled up the site on a Dell Axim.It’s actually somewhat impressive that these machines have SD cards…

[Arduino Enigma] created a touchscreen Enigma machine. Why haven’t we seen an Arduino Colossus yet?

The crew at Adafruit now have a Flying Toaster OLED, which means we now have flying toaster bitmaps for all your OLED/graphic display projects.

[Ian] had an old rackmount programmable voltage standard. This was the remote programmable voltage standard, without front panel controls. No problem, just get an Arduino, shift register, and a few buttons. Video right here.

A few months ago, [Jan] released a neat device that stuffs a modelling synth inside a MIDI plug. He’s selling them now, and we’d love to see a few videos of this.


Filed under: Hackaday links