Posts with «mouse» label

Mouse Mis-Clicking? We Got You.

A mouse with malfunctioning buttons can be a frustrating to deal with — and usually a short leap to percussive maintenance. Standard fixes may not always last due to inferior build quality of the components, or when the microswitch won’t close at all. But, for mice that double/triple-click, will release when dragging, or mis-click on release, this Arduino-based hack may be the good medicine you’re after.

Instructables user [themoreyouknow]’s method cancels click malfunctions by latching the mouse’s controller switch trace to ‘on’ when pressed, keeping it there until the button normally closed contact closes again completely. Due to the confined spaces, you’ll want to use the smallest Arduino you can find, some insulating tape to prevent any shorts, and care to prevent damaging the wires this process adds to the mouse when you cram it all back together.

Before you take [themoreyouknow]’s guide as dogma, the are a few caveats to this hack; they are quick to point out that this won’t work on mice that share two pins between three buttons — without doing it the extra hard way, and that this might be trickier on gaming or other high-end mice, so attempt at your own peril.

Speaking of gaming mice, we recently featured a way to add some extra functionality to your mouse — cheating optional — as well as how to stash a PC inside an old Logitech model.


Filed under: hardware, how-to
Hack a Day 30 Aug 09:00
arduino  click  debounce  hardware  how-to  mouse  nano  repair  

Go Big or Go Home: A Tablecloth Touchpad

Phone screens keep getting bigger. Computer screens keep getting bigger. Why not a large trackpad to use as a mouse? [MaddyMaxey] had that thought and with a few components and some sewing skills created a trackpad in a tablecloth.

The electronics in this project are right off the shelf. A Flora board for the brains and 4 capacitive touch boards. If you haven’t seen the Flora, it is a circular-shaped Arduino made for sewing into things. The real interesting part is the construction. If you haven’t worked with conductive fabric and thread, this will be a real eye-opener. [Maddy’s] blog has a lot of information about her explorations into merging fabric and electronics and also covers things like selecting conductive thread.

As an optional feature, [MaddyMaxey] added vibration motors that provide haptic feedback to her touchpad. We were hoping for a video, but there doesn’t seem to be one. The code is just the example program for the capacitive sensor boards, although you can see in a screenshot the additions for the haptic motors.

We’ve covered the Flora before, by the way. You could also make a ridiculously large touch surface using tomography, although the resolution isn’t quite good enough for mouse purposes.


Filed under: Arduino Hacks, wearable hacks

This Old Mouse Keeps Track of Filament Usage

Keeping track of your 3D-printer filament use can be both eye-opening and depressing. Knowing exactly how much material goes into a project can help you make build-versus-buy decisions, but it can also prove gut-wrenching when you see how much you just spent on that failed print. Stock filament counters aren’t always very accurate, but you can roll your own filament counter from an old mouse.

[Bin Sun]’s build is based around an old ball-type PS/2 mouse, the kind with the nice optical encoders. Mice of this vintage are getting harder to come by these days, but chances are you’ve got one lying around in a junk bin or can scrounge one up from a thrift store. Stripped down to its guts and held in place by a 3D-printed bracket, the roller that used to sense ball rotation bears on the filament on its way to the extruder. An Arduino keeps track of the pulses and totalizes the amount of filament used; the counter handily subtracts from the totals when the filament is retracted.

Simple, useful, and cheap — the very definition of a hack. And even if you don’t have a 3D-printer to keep track of, harvesting encoders from old mice is a nice trick to file away for a rainy day. Or you might prefer to just build your own encoders for your next project.


Filed under: 3d Printer hacks, Android Hacks

Disassembled Mouse Keeps Track Of Gas Meter

After building devices that can read his home’s electricity usage, [Dave] set out to build something that could measure the other energy source to his house: his gas line. Rather than tapping into the line and measuring the gas directly, his (much safer) method was to simply monitor the gas meter itself.

The major hurdle that [Dave] had to jump was dealing with an ancient meter with absolutely no modern electronics like some other meters have that make this job a little easier. The meter has “1985” stamped on it which might be the manufacturing date, but for this meter even assuming that it’s that new might be too generous. In any event, the only option was to build something that could physically watch the spinning dial. To accomplish this, [Dave] used the sensor from an optical mouse.

The sensor is surrounded by LEDs which illuminate the dial. When the dial passes a certain point, the sensor alerts an Arduino that one revolution has occurred. Once the Arduino has this information, the rest is a piece of cake. [Dave] used KiCad to design the PCB and also had access to a laser cutter for the enclosure. It’s a great piece of modern technology that helps integrate old analog technology into the modern world. This wasn’t [Dave]’s first energy monitoring system either; be sure to check out his electricity meter that we featured a few years ago.


Filed under: peripherals hacks

Send HEX values to Arduino

FIVE MINUTE TUTORIAL

Project Description: Sending Hex values to an Arduino UNO


This simple tutorial will show you how to send Hexadecimal values from a computer to an Arduino Uno. The "Processing" programming language will be used to send the HEX values from the computer when a mouse button is pressed. The Arduino will use these values to adjust the brightness of an LED.


Learning Objectives


  • To Send Hexadecimal (Hex) values from a computer to the Arduino
  • Trigger an action based on the press of a mouse button
  • Learn to create a simple Computer to Arduino interface
  • Use Arduino's PWM capabilities to adjust brightness of an LED
  • Learn to use Arduino's analogWrite() function
  • Create a simple LED circuit


Parts Required:


Fritzing Sketch


The diagram below will show you how to connect an LED to Digital Pin 10 on the Arduino.
Don't forget the 330 ohm resistor !


Arduino Sketch


The latest version of Arduino IDE can be downloaded here.
 
  1
2
3
4
5
6
7
8
9
10
11
12
13
14
15
16
17
18
19
20
21
22
23
24
25
26
27
28
29
30
31
/* ==================================================================================================================================================
         Project: 5 min tutorial: Send Hex from computer to Arduino
          Author: Scott C
         Created: 21th June 2015
     Arduino IDE: 1.6.4
         Website: http://arduinobasics.blogspot.com/p/arduino-basics-projects-page.html
     Description: Arduino Sketch used to adjust the brightness of an LED based on the values received
                  on the serial port. The LED needs to be connected to a PWM pin. In this sketch
                  Pin 10 is used, however you could use Pin 3, 5, 6, 9, or 11 - if you are using an Arduino Uno.
===================================================================================================================================================== */

byte byteRead; //Variable used to store the byte received on the Serial Port
int ledPin = 10; //LED is connected to Arduino Pin 10. This pin must be PWM capable.

void setup() {
 Serial.begin(9600); //Initialise Serial communication with the computer
 pinMode(ledPin, OUTPUT); //Set Pin 10 as an Output pin
 byteRead = 0;                   //Initialise the byteRead variable to zero.
}

void loop() {
  if(Serial.available()) {
    byteRead = Serial.read(); //Update the byteRead variable with the Hex value received on the Serial COM port.
  }
  
  analogWrite(ledPin, byteRead); //Use PWM to adjust the brightness of the LED. Brightness is determined by the "byteRead" variable.
}


Processing Sketch


The latest version of the Processing IDE can be downloaded here.
 
  1
2
3
4
5
6
7
8
9
10
11
12
13
14
15
16
17
18
19
20
21
22
23
24
25
26
27
28
29
30
31
32
33
34
35
36
37
38
39
40
41
42
43
/* ==================================================================================================================================================
         Project: 5 min tutorial: Send Hex from computer to Arduino
          Author: Scott C
         Created: 21th June 2015
  Processing IDE: 2.2.1
         Website: http://arduinobasics.blogspot.com/p/arduino-basics-projects-page.html
     Description: Processing Sketch used to send HEX values from computer to Arduino when the mouse is pressed.
                  The alternating values 0xFF and 0x00 are sent to the Arduino Uno to turn an LED on and off.
                  You can send any HEX value from 0x00 to 0xFF. This sketch also shows how to convert Hex strings
                  to Hex numbers.
===================================================================================================================================================== */

import processing.serial.*; //This import statement is required for Serial communication

Serial comPort;                       //comPort is used to write Hex values to the Arduino
boolean toggle = false; //toggle variable is used to control which hex variable to send
String zeroHex = "00"; //This "00" string will be converted to 0x00 and sent to Arduino to turn LED off.
String FFHex = "FF"; //This "FF" string will be converted to 0xFF and sent to Arduino to turn LED on.

void setup(){
    comPort = new Serial(this, Serial.list()[0], 9600); //initialise the COM port for serial communication at a baud rate of 9600.
    delay(2000);                      //this delay allows the com port to initialise properly before initiating any communication.
    background(0); //Start with a black background.
    
}


void draw(){ //the draw() function is necessary for the sketch to compile
    //do nothing here //even though it does nothing.
}


void mousePressed(){ //This function is called when the mouse is pressed within the Processing window.
  toggle = ! toggle;                   //The toggle variable will change back and forth between "true" and "false"
  if(toggle){ //If the toggle variable is TRUE, then send 0xFF to the Arduino
     comPort.write(unhex(FFHex)); //The unhex() function converts the "FF" string to 0xFF
     background(0,0,255); //Change the background colour to blue as a visual indication of a button press.
  } else {
    comPort.write(unhex(zeroHex)); //If the toggle variable is FALSE, then send 0x00 to the Arduino
    background(0); //Change the background colour to black as a visual indication of a button press.
  }
}


The Video


The tutorial above is a quick demonstration of how to convert Hex strings on your computer and send them to an Arduino. The Arduino can use the values to change the brightness of an LED as shown in this tutorial, however you could use it to modify the speed of a motor, or to pass on commands to another module. Hopefully this short tutorial will help you with your project. Please let me know how it helped you in the comments below.


If you like this page, please do me a favour and show your appreciation :

 
Visit my ArduinoBasics Google + page.
Follow me on Twitter by looking for ScottC @ArduinoBasics.
I can also be found on Pinterest and Instagram.
Have a look at my videos on my YouTube channel.


However, if you do not have a google profile...
Feel free to share this page with your friends in any way you see fit.

The Rabbit H1 is a Stationary Mouse Replacement

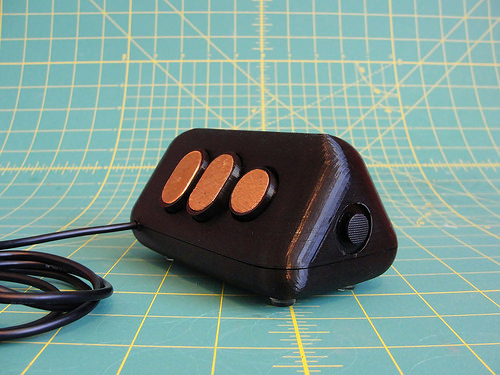
[Dave] has some big plans to build himself a 1980′s style computer. Most of the time, large-scale projects can be made easier by breaking them down into their smaller components. [Dave] decided to start his project by designing and constructing a custom controller for his future computer. He calls it the Rabbit H1.

[Dave] was inspired by the HOTAS throttle control system, which is commonly used in aviation. The basic idea behind HOTAS is that the pilot has a bunch of controls built right into the throttle stick. This way, the pilot doesn’t ever have to remove his hand from the throttle. [Dave] took this basic concept and ran with it.

He first designed a simple controller shape in OpenSCAD and printed it out on his 3D printer. He tested it out in his hand and realized that it didn’t feel quite right. The second try was more narrow at the top, resulting in a triangular shape. [Dave] then found the most comfortable position for his fingers and marked the piece with a marker. Finally, he measured out all of the markings and transferred them into OpenSCAD to perfect his design.

[Dave] had some fun with OpenSCAD, designing various hinges and plywood inlays for all of the buttons. Lucky for [Dave], both the 3D printer software as well as the CNC router software accept STL files. This meant that he was able to design both parts together in one program and use the output for both machines.

With the physical controller out of the way, it was time to work on the electronics. [Dave] bought a couple of joysticks from Adafruit, as well as a couple of push buttons. One of the joysticks controls the mouse cursor. The other joystick controls scrolling vertically and horizontally, and includes a push button for left-click. The two buttons are used for middle and right-click. All of these inputs are read by a Teensy Arduino. The Teensy is compact and easily capable of emulating a USB mouse, which makes it perfect for this job.

[Dave] has published his designs on Thingiverse if you would like to try to build one of these yourself.


Filed under: Arduino Hacks

Turning A Cheap Optical Mouse Into A Robot Odometer

John Graham-Cumming (JGC), author of The Geek Atlas, wrote in to let us know about a fun conversion he did with a cheap optical mouse:

For a small robot project I’m working on I needed a way to measure the robot’s progress across the floor. There are various possibilities, such as: use stepper motors (expensive and am recycling some old continuous run servos), add an encoder to the wheels (would need to go buy some parts for that), or use the optical sensor for a mouse.

I had a really old PS/2 optical mouse lying around which contains an MCS-12085 optical sensor that has a rather simple serial interface suitable for connection to a microcontroller. Inside there are two separate areas of components. On the right in the picture above is the PS/2 interface chips and four nice extras that I desoldered for later use (three microswitches and a quadrature encoder)…

This is a great example of repurposing something that might otherwise go to a landfill; and to top it off, JGC has posted some code you can use as an Arduino interface to the optical mouse sensor. Read all about his conversion at his blog.


The Geek Atlas
128 Places Where Science and Technology Come Alive
The history of science is all around us, if you know where to look. With this unique traveler’s guide, you’ll learn about 128 destinations around the world where discoveries in science, mathematics, or technology occurred or is happening now. Travel to Munich to see the world’s largest science museum, watch Foucault’s pendulum swinging in Paris, ponder a descendant of Newton’s apple tree at Trinity College, Cambridge, and more.
Filed under: Arduino, Mods
MAKE » Arduino 15 Sep 23:00

Personal Energy Orb Aruino project knows you haven't been exercising, cripples your computer

Spending too much time indoors? You need a Personal Energy Orb, a glowing Arduino powered ball that allows you to trade physical exertion for a tolerable mouse speed. Developed by two students at the University of Munich for a physical computing course, the PEO connects to a bike-mounted revolution counter to note how far a user rides, counting the total distance toward usable time on a computer. A fully "charged" green orb will allow a user to use their PC unhindered -- but a spent red orb will drag Windows' cursor sensitivity settings to its lowest. The idea, the project's creators say, is to annoy the user off of the computer and back on to their bike. It sure sounds aggravating to us. Check out the full homework assignment at the source link below, complete with goals, follies and Python scripts.

Filed under: Misc

Personal Energy Orb Aruino project knows you haven't been exercising, cripples your computer originally appeared on Engadget on Sun, 26 Aug 2012 02:19:00 EST. Please see our terms for use of feeds.

Permalink | Email this | Comments

Mouse Controlling Arduino LEDs


Use a mouse to control LEDs attached to an Arduino. This project uses the processing language to transmit the mouse coordinates to the Arduino, which then uses this information to turn on some LEDs. Please see the video below to see it in action.


Components Required for this project:

  • Arduino UNO
  • Breadboard
  • 9 LEDs
  • 9 x 330 ohm resistors
  • Wires to connect the circuit
  • USB connection cable: to connect the computer to the Arduino
  • A computer: to run the processing sketch, and to compile / upload the Arduino sketch
  • Processing Program installed on computer
  • Arduino Program installed on the computer

Arduino Sketch


This was made using Fritzing.

Arduino Code

You can download the Arduino IDE from this site.

 1
2
3
4
5
6
7
8
9
10
11
12
13
14
15
16
17
18
19
20
21
22
23
24
25
26
27
28
29
30
31
32
33
34
35
36
37
38
39
40
41
42
/* This program was created by ScottC on 9/5/2012 to receive serial 
signals from a computer to turn on/off 1-9 LEDs */

void setup() {
// initialize the digital pins as an output.
pinMode(2, OUTPUT);
pinMode(3, OUTPUT);
pinMode(4, OUTPUT);
pinMode(5, OUTPUT);
pinMode(6, OUTPUT);
pinMode(7, OUTPUT);
pinMode(8, OUTPUT);
pinMode(9, OUTPUT);
pinMode(10, OUTPUT);
// Turn the Serial Protocol ON
Serial.begin(9600);
}

void loop() {
byte byteRead;

/* check if data has been sent from the computer: */
if (Serial.available()) {

/* read the most recent byte */
byteRead = Serial.read();
//You have to subtract '0' from the read Byte to convert from text to a number.
byteRead=byteRead-'0';

//Turn off all LEDS
for(int i=2; i<11; i++){
digitalWrite(i, LOW);
}

if(byteRead>0){
//Turn on the relevant LEDs
for(int i=1; i<(byteRead+1); i++){
digitalWrite(i+1, HIGH);
}
}
}
}

The code above was formatted using this site.


Processing Code

You can download the Processing IDE from this site.

 1
2
3
4
5
6
7
8
9
10
11
12
13
14
15
16
17
18
19
20
21
22
23
24
25
26
27
28
29
30
31
32
33
34
35
36
37
38
39
40
41
42
43
44
45
46
47
48
49
50
51
52
53
54
//Created by ScottC on 12/05/2012 to send mouse coordinates to Arduino

import processing.serial.*;

// Global variables
int new_sX, old_sX;
int nX, nY;
Serial myPort;

// Setup the Processing Canvas
void setup(){
size( 800, 400 );
strokeWeight( 10 );

//Open the serial port for communication with the Arduino
//Make sure the COM port is correct
myPort = new Serial(this, "COM6", 9600);
myPort.bufferUntil('\n');
}

// Draw the Window on the computer screen
void draw(){

// Fill canvas grey
background( 100 );

// Set the stroke colour to white
stroke(255);

// Draw a circle at the mouse location
ellipse( nX, nY, 10, 10 );

//Draw Line from the top of the page to the bottom of the page
//in line with the mouse.
line(nX,0,nX,height);
}


// Get the new mouse location and send it to the arduino
void mouseMoved(){
nX = mouseX;
nY = mouseY;

//map the mouse x coordinates to the LEDs on the Arduino.
new_sX=(int)map(nX,0,800,0,10);

if(new_sX==old_sX){
//do nothing
} else {
//only send values to the Arduino when the new X coordinates are different.
old_sX = new_sX;
myPort.write(""+new_sX);
}
}

The code above was formatted using this site.