Posts with «misc hacks» label

Demonstrating Baudot Code

Visualizing how electronic signals work can be difficult. A physical model can be darn useful in overcoming that difficulty. At a recent workshop entitled “Unboxing Black Boxes” [Julian Hespenheide’s] group created a device to show Baudot Code in operation. This amalgam of wood and Arduino they dubbed émile in honor of Émile Baudot (1845-1903).

Baudot developed his code to transmit telegraph signals from one machine to another, in contrast to Morse code which was principally for human communication. Both codes were used throughout the 20th century. For example, those big clattering, mechanical teletype machines use a minor variation of Baudot code.

Baudot is a fixed length code of 5 bits, as opposed to Morse’s variable length code. Morse has a separate code for each characters while Baudot uses “shift’ codes to change between alphabet and figure characters. For instance, a binary 11 would represent either an ‘A’ or a ‘-‘ depending on the shift state. If the shift code was missed the receiver would get gibberish.

In émile the Baudot code is sent by marbles. That’s right, marbles. There are five marbles, one for each bit in the Baudot code. Each marble rolls in a track toward the Arduino. How does the machine know which marbles to send? “Punch cards”! These are a marvelous aspect of the design.

Each card represents a code. Each position in the card has a gap to allow a marble to pass ( a set bit), or no gap to block the marble (an unset bit). The operator loads 5 marbles and a punch card and launches the marbles via a spring mechanism.

[Julian’s] really created a great visualization of Baudot code with this project! Take a look at émile in action after the break.


Filed under: Arduino Hacks, misc hacks
Hack a Day 27 Sep 15:01

Air Rocket Launch Pad UI Entertains Eager Kids

Last spring [Mike] built a foam rocket launchpad which was a hit with the kids in his neighborhood. But the launch system was merely a couple of buttons so the early enthusiasm quickly wore off. He went back to the drawing board to make improvements and really hit the jackpot!

The original launch system had one button for building up air pressure with a second big red button of doom for launching the rocket. The problem was a complete lack of user feedback; all the kids could do is guess how long they needed to hold the button to achieve the highest launch. This revision adds flashing LEDs to hold the attention of the wee ones but to also function as a gauge for the new pressure control system. The visually fascinating control board also includes a removable key to prevent accidental launches.

The particulars of this are as you’d expect: it’s a bunch of plumbing to manage the air pressure, an Arduino to control it all, and additional electronics in between to make them work together.

We’re especially impressed by the leap in features and quality from the first version to this one. It’s a testament to the power of quick proofs-of-concept before committing to a more involved build. Great work [Mike]!

We’ve seen rocket launchers for adults and some neat mission control panels but [Mike’s] kid friendly launch controller really is out of this world (sorry, couldn’t resist). You’ll find a video demo of this launcher after the break.


Filed under: Arduino Hacks, misc hacks
Hack a Day 26 Sep 09:01

You Can Have my TIPs When You Pry them from my Cold, Dead Hands

We’ve seen a growing number of posts and recommendations around the net regarding components, specifically transistors. “Don’t use old parts” they cry,  “Go with newer components.”  You can often find these recommendations on Arduino forums. This all came to a head with a page called “Do Not TIP,” which was linked in the Arduino subreddit.  This page belongs to [Tom Jennings], creator of Fidonet, and one of the early authors of what would become Phoenix BIOS. [Tom] and a few others have been calling for everyone to send their old parts to the landfill – not use them, nor gift them to new experimenters. Get them out of the food chain. No offense to [Tom], but we have to disagree. These parts are still perfectly usable for experienced designers, and have a lot to offer new hardware hackers.

TIP is the part number prefix for a series of power transistors created by Texas Instruments.  In fact, “TIP” stands for Texas Instruments Power. The series was originally released in 1969. Yes, that’s right, 1969. Why are we still using parts designed when man first walked on the moon? The same reason people are still using the 555 timer: they’re simple, they’re easily available, they’re robust, and most of all, they get the job done. The TIP series has been used in thousands of classes, tutorials both online and off, and millions of projects over the years. Much of that documentation is already out there on the internet. The TIP series is also out in the distribution channel – they’ve been used for 40 years. Any retail shop that stocks a few electronics parts will have at least one of the TIP series.

The TIP series aren’t always the best transistors for the job. However, for most hobbyist-designed circuits, we don’t need the best performance, nor the best price – we’re going to use the parts we have on hand. There is always room to improve once you get the basic circuit working.  

In [Tom’s] specific example, he’s using a TIP120 to control a motor at 5 volts drawing 1 amp of current. [Tom’s] big problem with the TIP120 is that it’s inefficient when running the motor. That’s because the TIP120 isn’t a transistor. It’s two transistors configured as a Darlington pair. Like everything else in life, Darlington pairs have trade offs. To achieve high gain, you end up with higher voltage drop. In high current designs, that translates into heat. In this case, 2 watts of heat, which [Tom] claims will result in melted parts and fire. It turns out that the datasheet shows 2 watts is the upper limit for thermal dissipation on the TIP120’s TO-220 case. It will get very hot, but it will not catch fire. Want to be on the safe side? Add a heatsink, which is as easy as attaching a piece of metal using the convenient screw hole in the TO-220 case.

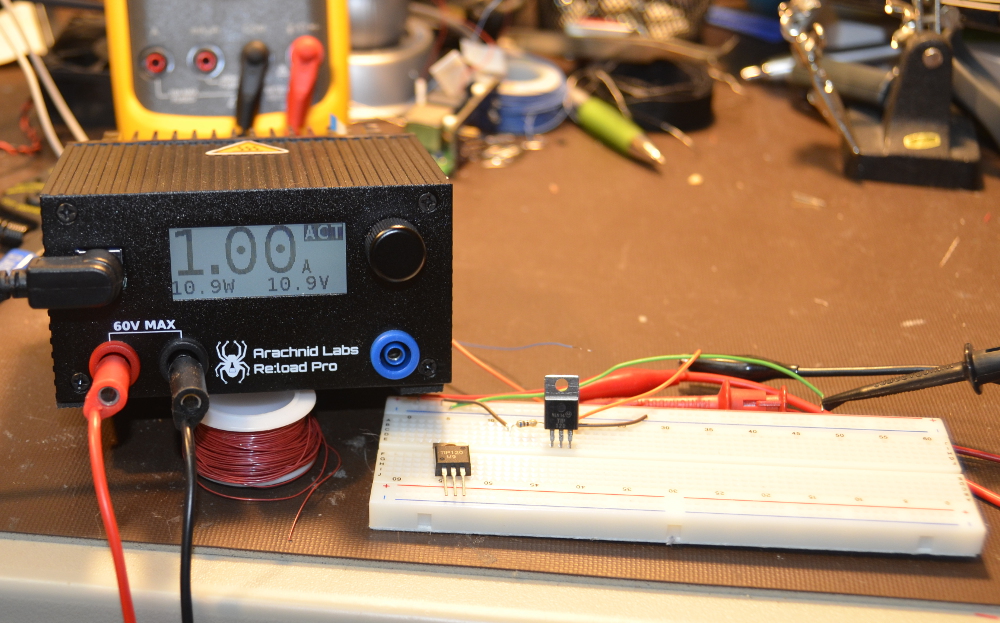
Just for fun, we created our own version of [Tom’s] example. We connected a TIP120 to a 12V lab supply. Rather than connect a motor, we grabbed our Re:Load Pro and set it for 1 amp. We use a 680 ohm base resistor to ensure the TIP120 was in saturation. The Re:Load Pro indicated that it was indeed seeing 1 amp of current flow, at 10.9 volts. This means that the TIP120 was only dropping 1.1V, rather than the 2V quoted on the datasheet. Were we just lucky? We tried a few TIP120s we had around the lab from a couple of manufacturers, and all of them were pretty close – well below the worst case 2V. Obviously you can’t design beyond the specs called on in the datasheet, but sometimes things work out in your favor. With the current set to 1 amp, the math is easy. The Re:Load Pro was converting 10.9 watts of power to heat. The TIP120 was dissipating 1.1 watts. The TIP120 did get hot – we measured up to 60°C. But it never went beyond that. A heatsink would have cooled things down, but we were shooting for worst case scenario.  We ran this setup for 2 hours and there was no smoke, fire, or failure.

Can you do better with a different part? Absolutely. [Tom] suggests a MOSFET such as the NTD4906N. FETs are great, we use them all the time. However, they come with a completely different set of rules and pitfalls compared to BJTs. Learning the rules, the design trade offs and pitfalls of both families of devices are key factors when learning electronics design. Every component a designer learns is a new color on their design palette. On the code side we worry about people becoming “cut and paste” coders. The same thing happens on the hardware side when a designer doesn’t learn how to use different types of parts.

So don’t throw away your old parts. Use them, learn from them, and become a better designer for it!


Filed under: classic hacks, misc hacks

School Kids Build Ontario Power Generation System Model

The STEAMLabs community makerspace teamed up with a grade 6 class from Vocal Music Academy, a public elementary school in downtown Toronto, to create a working model of the Ontario Power System. It pulls XML files and displays the live power generation mix from renewable and other sources on a 3D printed display on RGB LED strips. Arduino coding on a Spark Core provides the brains.

The kids learned HTML, CSS and Javascript to build a web interface to send commands to the Spark and explain how the system works. Their project was accepted as an exhibition at the TIFF DigiPlaySpace. The kids presented their project to adults and other kids at the event. STEAMLabs has also published a free, open source Internet of Things teaching kit to enable other educators to make projects with Internet brains.

STEAMLabs is currently crowd-funding a new makerspace in Toronto. They’re almost there, a few hundred dollars short of their target, with a couple of days to go. Help them help kids and adults make amazing things! When Hackaday visited Toronto recently, [Andy Brown] dropped in to show off this project. Projects like these which let kids become creators of technology, rather than mere consumers, is one of the best ways to get them hooked to hacking from an early age.


Filed under: misc hacks

Automated Pocky Dispenser

Sometimes, along comes a build project that is not so much a fail, as how not to do it. First off, some of us here had to look up what a Pocky is, never having heard, seen or tasted one – seriously. Once satisfied, we turned our attention to [Michael]’s Automated Pocky Dispenser. Took a while for us to figure out if it’s useful or not. But it’s a fun, quick project that [Michael] put together in around an hour using parts lying around in his office.

For those of you who’d like to know, a Pocky is a chocolate-coated biscuit stick, although you can also buy it in other flavors. You can grab one from a box, but maybe it tastes better when you dispense it by banging a big red button. [Michael] says he used  incredibly advanced construction techniques, but we leave it to our readers to decide on that. The key element of the build is the special “flexible coupling” that he built to transfer the rotation of the stepper motor to the dispensing mechanism. The rest of the build consists of an Arduino, stepper motor, driver, and giant red button. Special motor driving code ensures that the dispenser wiggles back and forth every time, preventing any stuck Pocky’s. And the Electronics is, well, hanging out for all to see. Happy with the success of his build, [Michael] is planning an upgraded version – to connect the Pocky Dispenser to the cloud for statistical gathering of office Pocky habits. He claims even Google does not have that data. To see the dispenser in action, check out the video below.


Filed under: misc hacks
Hack a Day 01 Mar 18:11

Digitally Controlled Circuit Bending

Circuit bending doesn’t get a lot of respect around some parts of the Internet we frequent, but there is certainly an artistry to it. Case in point is the most incredible circuit bending we’ve ever seen. Yes, it’s soldering wires to seemingly random points on a PCB, but these bend points are digitally controlled, allowing a drum machine to transform between bent crunchiness and a classic 1980s drum machine with just a few presses of a touch screen controller.

All circuit bending must begin with an interesting piece of equipment and for this project, [Charles], the creator of this masterpiece of circuit bending, is using a Roland TR-626, a slightly more modern version of the TR-606, the percussive counterpart of the infamous TB-303. The circuit is bent in the classical fashion – tying signals on the PCB to ground, VCC, or other signals on the board. [Charles] then out does everyone else by connecting these wires to 384 analog switches controlled by an Arduino Mega. Also on the Arduino is a touch screen, and with a slick UI, this old drum machine can be bent digitally, no vast array of toggle switches required.

[Charles] has put up a few videos going over the construction, capabilities, and sound of this touch screen, circuit bent drum machine. It’s an amazing piece of work, and something that raises the bar for every circuit bending mod from this point on.

Thanks [oxygen_addiction] and [Kroaton] for sending this one in.


Filed under: misc hacks, musical hacks

Solid State Tesla Coil Plays Music

If you’ve ever wanted to build a Tesla coil but found them to be prohibitively expensive and/or complicated, look no further! [Richard] has built a solid-state Tesla coil that has a minimum of parts and is relatively easy to build as well.

This Tesla coil is built around an air-core transformer that steps a low DC voltage up to a very high AC voltage. The core can be hand-wound or purchased as a unit. The drive circuit is where this Tesla coil built is set apart from the others. A Tesla coil generally makes use of a spark gap, but [Richard] is using the Power Pulse Modulator PWM-OCXi v2 which does the switching with transistors instead. The Tesla coil will function with one drive circuit but [Richard] notes that it is more stable with two.

The build doesn’t stop with the solid-state circuitry, though. [Richard] used an Arduino with software normally used to drive a speaker to get his Tesla coil to play music. Be sure to check out the video after the break. If you’re looking for a Tesla coil that is more Halloween-appropriate, you can take a look at this Tesla coil that shocks pumpkins!


Filed under: misc hacks

Open-Source Water Quality Tester

Contaminated water is a huge problem in many third-world countries. Impure water leads to many serious health problems, especially in children. Installing a water purification system seems like a simple solution to this problem, but choosing the right purification system depends on the level of contaminants in the water.

Water turbidity testers are often used to measure the severity of water contamination. Unfortunately most commercial water turbidity testers are very expensive, so [Wijnen, Anzalone, and Pearce] set out to develop a much more affordable open-source tester. Their tester performs just as well as commercial units, but costs 7-15 times less.

The open-source water tester was designed in OpenSCAD and 3d printed. It houses an Arduino with a custom shield that measures the frequency from several TSL235R light-to-frequency converters. An LED illuminates the water and the sensors measure how much light is diffused and reflected off of particles in the water. Another sensor measures the brightness of the LED as a baseline reference. The turbidity of the water is calculated from the brightness values, and is displayed on a character LCD. More details about the tester are included in a fairly extensive paper.

[Thanks Andrew]


Filed under: misc hacks

‘Duinos and VR Environments

At the Atmel booth at Maker Faire, they were showing off a few very cool bits and baubles. We’ve got a post on the WiFi shield in the works, but the most impressive person at the booth was [Quin]. He has a company, he’s already shipping products, and he has a few projects already in the works. What were you doing at 13?

[Quin]‘s Qduino Mini is your basic Arduino compatible board with a LiPo charging circuit. There’s also a ‘fuel gauge’ of sorts for the battery. The project will be hitting Kickstarter sometime next month, and we’ll probably put that up in a links post.

Oh, [Quin] was also rocking some awesome kicks at the Faire. Atmel, I’m trying to give you money for these shoes, but you’re not taking it.

[Sophie] had a really cool installation at the faire, and notably something that was first featured on hackaday.io. Basically, it’s a virtually reality Segway, built with an Oculus, Leap Motion, a Wobbleboard, an Android that allows you to cruise on everyone’s favorite barely-cool balancing scooter through a virtual landscape.

This project was a collaboration between [Sophie], [Takafumi Ide], [Adelle Lin], and [Martha Hipley]. The virtual landscape was built in Unity, displayed on the Oculus, controlled with an accelerometer on a phone, and has input with a Leap Motion. There are destructible and interactable things in the environment that can be pushed around with the Leap Motion, and with the helmet-mounted fans, you can feel the wind in your hair as you cruise over the landscape on your hovering Segway-like vehicle. This is really one of the best VR projects we’ve ever seen.


Filed under: misc hacks
Hack a Day 28 Sep 03:00

This Arduino Hookup is Perfect for Microgrowery

All it takes is one little seed. One tiny little seed, that when planted into the ground and nourished correctly, can flourish into a healthy and happy plant. But there are some challenges involved. For example, maintaining a steady temperature and keeping moisture at an optimum level can be difficult at times, especially when just starting out.

This Arduino grow-op monitoring solution helps to solve those problems. It was built by [growershower] as a fun side project to monitor the vital signs of 3 marijuana plants. The board is an Uno and has an SD card shield with a DHT22 temperature sensor plus a soil moisture sensor. A photo diode is also used to measure light.

The graph produced from the data is a weed grower’s wet dream:

Humidity, temperature, moisture, and light can all be regularly logged into the system. This empirical data gathering is key for keeping track of how the plants are doing, giving the grower the option to make educated changes.

Obviously these sensors and the attached cables are not waterproof, so they need to be removed when watering, which is very inconvenient. However, this system will be refined over time as more people contribute to the design. [growershower] plans to seal the electronics with some sort of resin for the next grow. In addition, the use of a Raspberry Pi instead of an Arduino will allow [growershower] to check the data in real time remotely through a web browser.

The next steps after all that will be to run the lights and ventilation. Watering schedules could be included as well. Just be careful when adding H2O into the equation, especially when dealing with the high voltages associated with grow lights. You don’t want to accidentally zap yourself into oblivion! Safety first. Safety first.


EDITORIAL NOTE: The editorial staff chose to publish this post after considering the following items: First, the gathering and graphing of data by this project is both interesting and useful in other applications. Second, the cultivation of marijuana is legal in some jurisdictions.


Filed under: misc hacks
Hack a Day 26 Jul 03:01