Posts with «led(s)» label

Smart motorcycle helmet lighting follows your signals

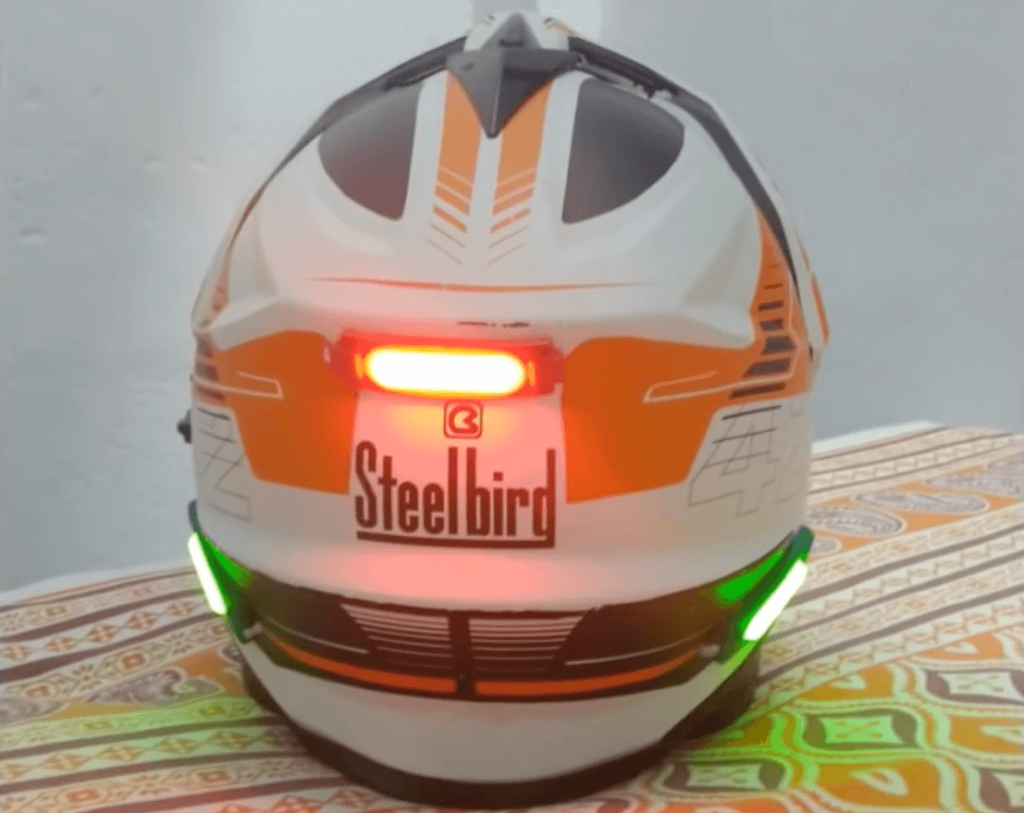
When riding a motorcycle, it’s important to be seen, and if other vehicles can see your brake lights and turn signals as well, all the better. To help with visibility, YouTuber “MechTools” outfitted his helmet with a brake light and turn indicators that activate along with the motorcycle’s built-in signals.

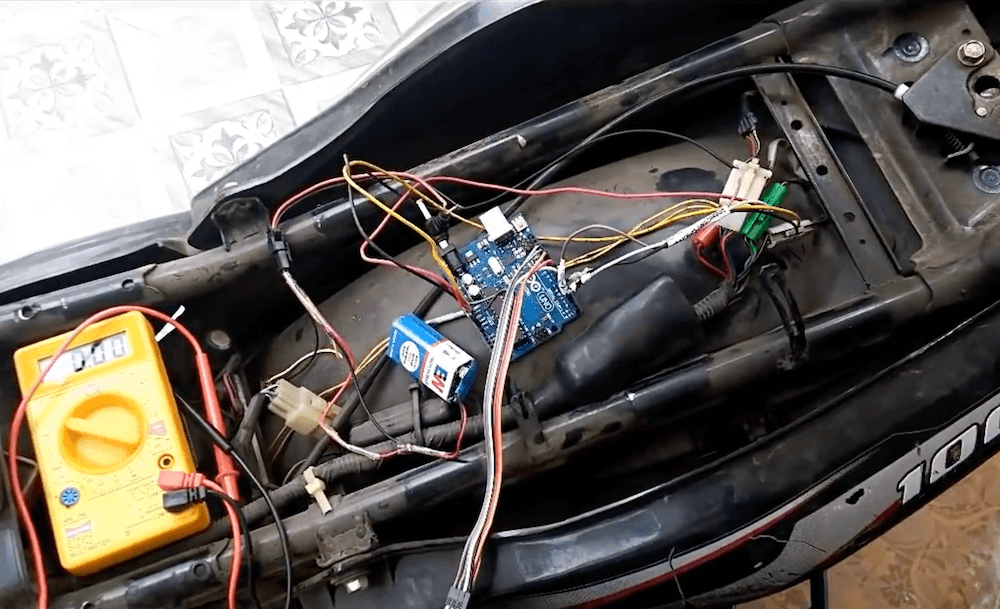
The video below shows off how it was built, using an Arduino Uno onboard the motorcycle, plus a Nano embedded in the helmet. A pair of nRF24L01 transceivers enable the two Arduinos to communicate wirelessly, and three TIP122 transistors controls the lighting directly for sufficient power output.

While a neat concept, be sure that you don’t compromise your helmet’s structural integrity or legality if you try something similar! Code is available in the video’s description.

A brilliant clock made out of 128 LED-lit ping pong balls

Ping pong balls have long been known as excellent LED diffusers, but few have taken this technique as far as Thomas Jensma. His colorful clock features 128 LEDs, arranged in an alternating pattern, and housed in a stretched-out hexagonal wood frame. 

For control, the device uses an Arduino Nano, along with a RTC module for accurate timekeeping. Demos of the clock can be seen below, cycling through numbers and testing out the FastLED library.

Code for the build is available in Jensma’s write-up. This also includes tips on using table tennis balls as diffusers, as well as how to create an orderly array out of these spheres—useful in a wide range of projects.

Massive wall-mounted skull lights up workshop under Arduino control

While you may or may not want a gigantic backlit skull cutout haunting the wall of your workshop, this was perfect for Jay and Jamie of the “Wicked Makers” YouTube channel. 

Their device is cut of two 30” squares of plywood with a CNC router. This forms a base layer that holds everything off the wall, while an outer layer provides a nice circuit/skull texture.

They affixed WS2812B LED strips to the base layer, controlled by an Arduino Micro. These strips shine off the wall for a glow through the edges, along with circuit board style cutouts inside the skull, diffused using wax paper. 

Arduino code and the circuit diagram are found in the project’s write-up if you’d like to construct your own!


Arduino Blog 08 Mar 21:12

This faux candle lights, flickers, smokes, and smells like the real thing

Keith of “Keith’s Test Garage” wanted an LED candle. While somewhat realistic flicking units are easy to find, he was in search of something much more like the actual thing, and after several years of work has come up with a rather amazing replica.

The device’s wax-embedded glass enclosure houses an Arduino, along with a series of six  RGBW LEDs inside that randomly flicker away to simulate a flame. This effect is triggered via a real match, which is sensed by an IR module. To stop the effect, one literally blows out the candle through a microphone input that picks up on this action. 

Most impressively however, upon putting out the faux flame, a length of resistive wire heats up glycerin and smelling oil on a wick, producing a puff of smoke to end the light performance.


LED strips installation beyond Xmas

The installation of Dmitry Morozov (:: vtol: :)”Wave is my nature” exhibited at the Mars center in Moscow is focused on the concept of Wave as the basis of all audiovisual art:

The project draws from the theory of Wave–particle duality which considers the light to be a particle and a wave at the same time. In this case, the notion of the “wave” is uniform for the sound wave, light wave and a “tangible” kinetic wave with wide amplitude, physically presented in the space as stretched cables moved by a system of motors. The piece also refers to the topic of physical modeling of the wave processes which take place in various media and materials: “string”, “data flow”, “visualisation of sound”, “sonification of light” etc. In general, the installation can be viewed as a kinetic spacial light installation which reacts to the presence of audience and creates an autonomous sound and light composition.

The artist used led strips, servo motors, 2-channel sound system, ir motion sensors running on Arduino Mega and Arduino Uno:

Build a Touchscreen Controlled Marionette with Intel Galileo

Making gets really interesting and fun especially when mixing laser cut shapes, servo motor, tft screen, MDF, plexiglass and Intel Galileo Gen 2. After you assemble the parts and follow the steps of this tutorial, you’ll be able to control the puppet through an interface on the screen. Enjoy the tutorial!

We are going to have a little fun with the Intel® Galileo development board. This time around, we’ll make a simple puppet control system. We’ve put together a “running robot” marionette with a simple mechanism that uses a continuous servo. We’ll be use a touchscreen interface to control various outputs using sliders and switches.

As always, you can modify the designs to suit your needs. We will teach you how to incorporate touchscreens, and make the interface necessary for controlling the Intel® Galileo Gen 2 board.

Just so you know, the instructions this time around are quite long. That’s due to the assembly of the marionette. I would review the assembly instructions fully before attempting to put it together. While it looks long and complicated, if you group the parts, it much simpler.

So, let’s start the puppet show!

Follow the link and start making!

An Arduino-controlled RGB lamp

On his blog, Miguel presents one of his latest projects:

This project shows the operation of an RGB lamp using a digital LED strip. After activating the bluetooth connection, the user can open the GUI on the PC to control the lamp. The program shows a hue palette divided into 30 rods, one for each LED of the strip.
By clicking & dragging the mouse cursor it is possible to make your own patterns,. To remove a color, the user can simply click on a rod while pressing the spacebar, which switches off the selected LED.

Part list: wooden support, RGB digitally-addressable LED strip, microcontroller (Arduino Pro Mini, for example), Bluetooth or USB wire.

More information on this project can be found on Miguel’s blog, while a brief video about its operation can be found here; the code of the project can be found on Github. The project’s page on Thingiverse can be found here.

[Via: Miguel's blog]


Arduino Blog 12 Jan 09:20

XBee-controlled 4WD wireless robot

In his blog, Michael describes a nice 4WD robot he realized by means of an arduino-compatible board, a motor shield and a couple of XBee radios, which have been used to implement a simple and effective remote control.

Actually, the remote is made up of a standard breadboard equipped with a joystick, a couple of buttons (that can turn the robot in a Kitt-like vehicle!) and the XBee radio. One interesting feature of this project is that the remote controller is fairly simple and has been designed to work with just the XBee radio board, instead of requiring an additional MCU.

More details can be found here.

[Via: Project Lab - Nootropic design]

Arduino Blog 23 Dec 18:37
4wd  controllers  led(s)  motor  projects  remote  robot  wireless  xbee  

A simple Arduino-based tachometer


Chris, from PyroElectro.com, proposes a comprehensive tutorial on how to make a simple, yet effective, Arduino-based tachometer.
The circuit is very simple: an IR led is coupled with an IR phototransistor to detect possible interruptions of the light beam, while the Arduino is responsible to calculate the time interval between two such events. Finally, a LCD is used to display the current RPM to the user.
To validate his project, a typical computer fan has been used in the set-up and the outcomes have demonstrated to be very close to the true RPM value (2600 +/- 100 RPMs).
The bill of materials, as well as the schematic, the source code and a detailed tutorial on how to build the circuit is available here.

[Via: PyroElectro.com]


Arduino Blog 06 Sep 20:10

Wearable Fabric on the Arduino Store

We are happy to announce the first wearable kit on the Arduino Store . This kit has been made by Plug’n'Wear specifically for us. All fabrics in this kit are produced in Italy, and strongly related to a textile family business. If you want to get deeper into the story of this product have a look at Riccardo Marchesi presentation (still in Italian, soon to be traslated!) at World Wide Rome 2012.

Read over for Kit’s features

This kit features:

  1. 1x Circular Stretch Sensor Designed by Hannah Perner-Wilson, this circular knit stretch sensor works perfect when you need to detect tension in many projects.
  2. 2x Textile push button to make easy digital inputs in cloth, scarfs o bags.
  3. 2x Spools of Conductive thread, ready to be hooked over a sewing machine
  4. 2x Soft potentiometer kit will let you import analog data into your wearable project: this kit includes 1 meter of knitted conductive tape and a metal ring. Watch it in action (see video)
  5. 10x 1k ohm resistor
  6. 10x 10k ohm resistor
  7. 1x Textile perfboard is going to change the way you think of wearable circuits. You can sew or even solder components (SMD & through-hole) on this . It can be easily cut or sewn with a standard sewing machine. Washable. Size: 15 cm x 15 cm (6″ x 6″) / Pitch: 2.54 mm (0.1″)
  8. 1x Knitted Coated Copper Tape. Small conductive tape made of coated copper fine wire (112 micron). Flexible, easy to cut, sewable with a standard sewing machine, It can be easily welded ( The coating will melt and tape will be soldered). The surface of this tape has a good insulation thrughout its lenght. Resistance: 107 Ohm/m. Width: 9 mm (0.35″)
  9. 1x Analog Textile Press Button, working with a resistive principle (resistance goes down when you press it). It works as a bend sensor as well. By connecting more sensors together it is possible to make a matrix analog switch. Sensitive area 40mm x 40mm (1.57″x1.57″)
  10. 2x LilyPad LED Bright White A simple, very bright, 250mcd, white LED LilyPad

source: [arduino store]