Posts with «led(s)» label

Schools projects with Arduino: Flow Meter

Loccioni Group, is an italian company that sponsors every year a project internship entitled “Classe Virtuale”, dedicated to young students coming from local technical schools.

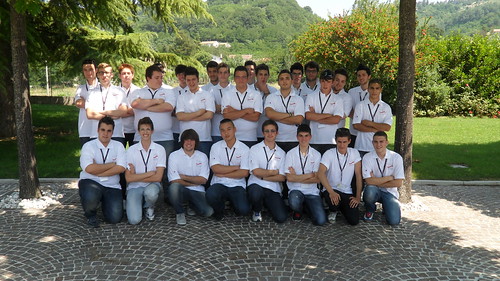
This year, “Classe Virtuale 2012″ has been composed by 27 students with different backgrounds, selected among 120 candidates. After a stating training period, during the three-weeks internship the team worked on a very nice Arduino-based project: Flow Meter.

Here you may find a brief interview we had with Daniele Caschera, one of the components of “Classe Virtuale 2012″, about Flow Meter and on how Arduino helped in its design.

Alessandro: Daniele, could you describe us what “Classe Virtuale” is, in practice?

Daniele: “Classe Virtuale”, the partnership between Loccioni Group and local technical education institutions, has began in 2001 when Mr. Loccioni decided to invest on young students, by offering training periods and stages inside his company. In 2010 the project, which occours on annual basis, expanded to three more scools and in 2012 it has reached the 12-th edition.

The goal of this collaboration is to train and educate young technicians, by serving as a bridge between school and a real employment.

A: Could you briefly describe us the “Flow Meter” project?

D: “Flow Meter” is a real flow measurer: it has been designed to measure the flow of all the students who have attended to the previous editions of “Classe Virtuale”, starting from the first edition.

First, we have designed a PHP web application usable to collect the information reagarding all the participants to the previous editions and, then, we used some Arduino boards to represent this amount of data into a visible form, by means of several LEDs.

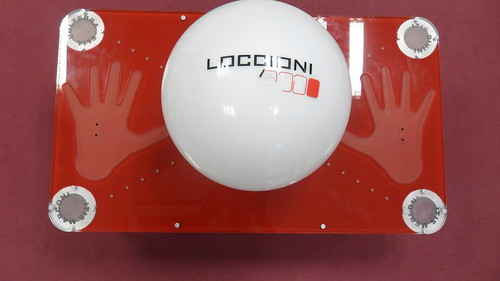
More in details, Flow Meter can be turned on by laying the hands on it, which can be detected by means of some proximity sensors located on the surface.

Then, it begins to show the collected data, starting from the first edition of “Classe Virtuale”, by turning on a set of LEDs, arranged in three rows inside a semi-transparent, white sphere. The first row, composed by red LEDs, represents how many students are currently employed at Loccioni, while the second one, composed by blue LEDs, shows how many people work or study in Italy; the last row (again composed by red LEDs) presents how many people work or study abroad.

By leaving the hands on Flow Meter, it is possible to scroll through all the editions of “Classe Virtuale”.

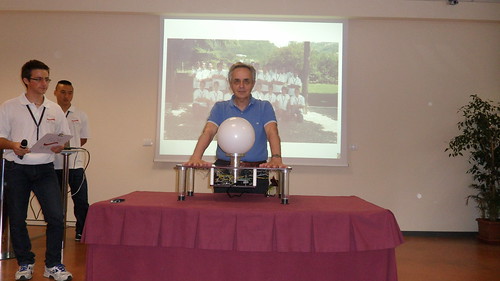
Finally, four small pillars, placed at the corners of the structure, represent the four schools involved in the 2012 edition of the project: a set of LEDs is used to show how many students come from each institution per year.

A: How Arduino contributed to this Flow Meter?

D: Many of us did not know Arduino at the beginning of “Classe Virtuale 2012″. The board has been introduced us during the initial training period by some electronic engineers at Loccioni. Then, we started to find out more information about it and how to adopt it in our project on the web, on books and so on.

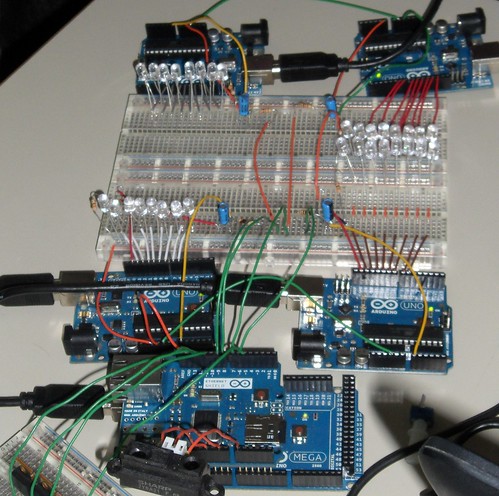
Arduino has been fundamental in our project, simply because it composes the “brain” of Flow Meter, by means of a set 4 Arduino Uno and an Arduino Mega, and because it is used to activate the LEDs composing its “visual” interface.


A: How do you evaluate this internship experience?

D: This experience has been very positive for us, mainly because it gave us the chance to work on a real project together with very skilled people and technicians. Moreover, since the team has been divided into small working groups (e.g., those working on mechanical parts and those working on electronics and programming), we have gained experience on topics that you typically won’t study at school. Everyone has learned a lot during “Classe Virtuale”!

This very nice project, which has been presented on July 19 (the streaming of the event will be available here), represents another example of how open-source solutions can be used as effective enabling technologies, even for educational purposes.

Great job “Classe Virtuale” and thanks for this interview!

Arduino Blog 10 Jul 14:54

Indoor air quality mapping

PLOTS guys propose an interesting way to measure the quality of the air for indoor environments, by hacking a second-hand Roomba robot (an autonomous vacuum cleaner).

These robots are programmed to randomly move inside rooms to clean up the floor, so by adding a simple air quality sensor on top of one of them, it is possible to easily implement a sort of “random walker” that will sense for us the presence of gases (volatile organic chemicals, VOCs), such as NH3, alcohol, CO2 and so forth.

To keep track of the air quality measurements, the authors equipped the so hacked Roomba with an RGB led, whose color can be changed according to the air sample. By taking a long exposure picture of the room where the robot was roaming in, they could determine the areas where a high concentration of VOCs was present.

The complete description of the project can be found on the PLOTS’ website, while here you may find a short video about it:

PLOTS guys are also working on a different approach to air sensing, which does not make use of a Roomba robot but uses a hamster ball, instead. Further details can be found here.

[Via: Public Laboratory for Open Technology and Science]

Alarma DIY con Módulo 3G, Cámara, Ultrasonidos, Teclado Matricial & Led RGB


Arduteka lanza su último tutorial!

En él nos descubre el nuevo módulo 3G para Arduino de Cooking Hacks con el que podremos construir una divertida alarma que nos enviará la foto de nuestro intruso directamente a nuestro correo, además de avisarnos por un mensaje sms a nuestro teléfono móvil sin necesidad de tener conectado nuestro Arduino a internet constantemente, pues lo hace todo a través de la red móvil.

Vamos a construirnos una alarma totalmente casera, a través del sensor de ultrasonidos, escanearemos continuamente el espacio situado enfrente suyo con un radio aproximado de 30º, cuando algún objeto o persona se sitúe en su campo de actuación a una distancia inferior a la que establezcamos, haremos sonar una alarma, tomaremos una fotografía, el Led RGB que antes estaba verde, pasará a color azul y daremos 10 segundos para poder desactivar la alarma a través de nuestro teclado matricial, si la desactivamos, volverá de nuevo a escanear el campo, pero si no!! Reproducirá un sonido contundente y se dispondrá a mandarnos un sms a nuestro teléfono móvil y la fotografía a nuestro correo electrónico.

Via:[Arduteka]


Arduino Blog 15 May 13:16
3g  audio  cooking hacks  education  gps  gsm  hacks  hardware  home hacks  iphone  keyboard  keypad  led(s)  mms  mp3  ping  rgb  sms  urban hacks  

TicTocTrac: track your perception of time

Brian Schiffer and Sima Mitra, from Cornell University, propose a very nice wristwatch that allows you to keep track of your time perception, using a method known as duration production: TicTocTrac.

Human perception of time is typically distorted, due to the different amount of information and experiences acquired everyday. TicTocTrac lets you to estimate your own perception, first by signaling the perceived duration of a given event and, then, by comparing it with the actual event duration. Finally, all the information can easily be saved to a micro SD card.

The hardware is based on a Atmega32u4, a DS3234S real-time clock and several leds to display time, while the software part is mostly based on Arduino’s DS3234S RTC library.

More information can be found here.

[Via: TicTocTrac]

Cheap Arduino-based Thermal Flashlight

Thermal flashlight is a widely used technique to “paint temperature with light”: by using a temperature sensor and a RGB flashlight, it is possible to illuminate a surface with a proper tonality, which, in turn, can be acquired by means of a standard camera. It’s main use is to find thermal leaks in houses and buildings.

In their article, PLOTS‘ staff propose and describe a nice and cheap way to build your own thermal flashlight with Arduino, together with a clear introduction to the subject.

Read more here.

Via: The Public Laboratory for Open Technology and Science


Arduino Blog 09 May 21:18
camera  enviroment  led  led(s)  rgb  themal  thermal  

Control your dreams using DIY goggles

Lucid dream is a state in which you can control what you dream. Be it winning a million bucks worth lottery, or dating your favorite cine star, it is possible to control your dreams using these DIY goggles!

Simple to build and a nice weekend hack for the bored, these goggles are pretty cost effective and impressive. Put together a pair of glasses, LED, Arduino, a battery and some other minor paraphernalia and you are ready to live your favorite dream in your resting time!

Via:[Hackaday, Madscientist]