Posts with «featured» label

Play like a spy with L.E.A.P. Engine


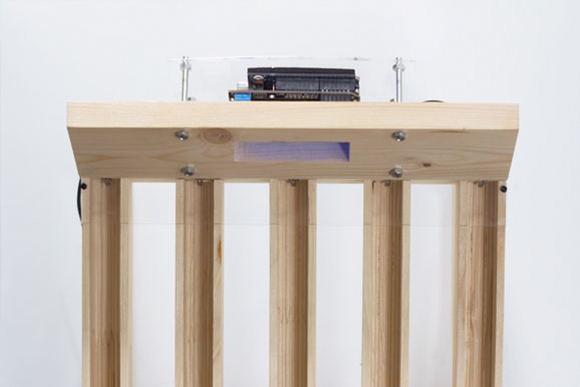
Toronto-based collaborative duo Hopkins Duffield created a gaming environment running on Arduino Mega in which the player battles a laser wielding A.I. security system gone awry. It’s like being in an action movie, walking in a pitch black room filled with the hollow sound of a machine breathing and a series of red laser fences slicing through the fog-filled air!

Laser Equipped Annihilation Protocol (The L.E.A.P. Engine) is a an installation that :

explores the personality of a snarky and mysterious game sentience who has infected a room with technological systems that challenge players and collect data. With a limited amount of time, the player must pass through a complicated series of changing and alternating laser patterns without tripping any of the lasers in order to deactivate the system and win the game. If the player trips a laser or if the timer runs out, it’s game over.

The gaming installation uses Max 6, Max For Live, an Arduino Mega 2560 R3 and custom electronic circuits. They also used a special modification of Lasse Vestergaard’s and Rasmus Lunding’s ArduinoInOutForDummies designed to allow communication between Arduino 2560 and Max 7. In Max, laser patterns are written using MIDI.

Take a look at the video to discover how they made it:

Arduino Blog 26 Aug 11:17

Exploring tangible user interfaces and soundscapes

Originally from Guatemala, Balam Soto is an artist and maker of software and hardware creating interactive art installations and public artworks that fuse low tech with high tech. He recently shared with us a project called Exp.Inst.Rain and running on Arduino Uno:

” Exp.Inst.Rain” is an interactive installation and experimental instrument that incorporates projection and sound generated by a wireless box made of wood, plexiglas, Arduino, electronic components and custom touch sensors. By touching the box at various points, participants create different sounds; these sounds then generate changes in the projection.

It is an analysis of the social and cultural adoption of tangible user interface. Globally, touch devices are increasingly common; people understand how to use them. “Exp.Inst.Rain” analyses this new technology and makes use of this new common understanding to fuse sound and visuals into realtime interactivity.

This artworks it’s power by Arduino and wireless vibes , using Capacitive Touch Sensor and home made aluminum electrode to pick up touch. Custom software acts as a Bridge between the Exp.inst.X and Midi software.


A tribute to 5-bit Baudot code

Julian Hespenheide is an interaction designer based in Germany who submitted to Arduino blogpost a writing machine called émile. It’s an interactive installation created in collaboration with Irena Kukric, David Beermann, Jasna Dimitrovskais and using Baudot code - a binary 5-bit code, predecessor of ASCII and EBCDID – intended for telecommunication and electronic devices, representing the entire alphabet.

It runs on Arduino Uno and  translates the bauds (/?b??d/, unit symbol Bd) into moving objects that are being sent over physical tracks in order to illustrate  a simple computational process of 5-bit binary information transmission:

The machine was built in six days with four people. In our group we came to the conclusion, that not every process in a computer is really transparent and it already starts when you type a simple letter on a keyboard. To unwrap this “black box” of data transmission, we set our goal to build a small writing machine where you can literally see bits rolling around. After some research we got back to the beginnings of Telefax machines and data transmission using Baudot-code. We then quickly designed punchcards and mapped them to a slightly altered baudot code table and cut them with a laser cutter from 5mm plywood.
Whenever a marble hits a switch, a short timer goes off and waits for input on the other switches. If no other marbles are hitting those switches, we finally translate the switches that have been hit into the corresponding letter.

Take a look at the machine in action:


Preparing 200 teachers to inspire students with electronics

Arduino Verkstad has just started CTC* Catalunya 2015 in Barcelona with David Cuartielles preparing a group of 200 teachers that will be teaching CTC to students in Cataluña next September. A technology fair will be hosted at the end of the program and we are expecting more than 2500 people to attend.

Creative Technologies in the Classroom (CTC) is a collaborative learning curriculum designed for schools that wish to incorporate emerging technologies into their existing technology classes. It’s also a collection of experiments aimed at transforming the way technology is taught in schools around the world. These experiments introduce basic concepts in programming, electronics, and mechanics.These experiments introduce basic concepts in programming, electronics, and mechanics.

Thanks to the Departament d’Ensenyament of the Generalitat de Catalunya and our partner eduCaixa Obra Social “La Caixa” who is also involved with launching CTC for 75 schools in Andalusia in the fall. Stay tuned with Arduino Verkstad blog for news on CTC Andalucía.

Last year’s show included over 240 projects, which means we’ll probably have twice as many for this year’s show. This is the second edition of the program and it will reach 103 schools; we expect about 2.500 students to be involved in the project and the final fair will be at CosmoCaixa Museum in Barcelona on February 6th, 2016. Since the numbers promise a lot and the amount of people participating might be big, we will need the whole temporary exhibition space at the museum to be booked for the fair!

Click here for a press article on the teachers’ training in Barcelona. (in Catalan).

The news was originally posted on the Arduino Verkstad Blog.

A DIY Seizure Alarm based on Arduino Micro

Chad Herbert’s son Daniel was diagnosed with Benign Rolandic Epilepsy in 2014. It’s a type of epilepsy the Epilepsy Foundation says accounts for about 15 percent of all Epilepsies in children and the good news is that most children grow out of it.

The bad news is that Daniel’s most affected by his condition at night or early morning while he sleeps. That’s why Chad invested in a sleep monitor/alarm for his bed that detects when he’s having a full tonic-clonic seizure.

At the same time though, he decided to work on a DIY version of a seizure alarm  running on Arduino Micro. The starting point was Arduino’s “Knock” example project with the sketch code originally created in 2007 by David Cuartielles and modified by Tom Igoe in 2011:

While shopping around for the exact type of monitor/alarm my wife and I wanted, I found out a few things:

  • They are hard to find. I believe the one we ended up with was manufactured by a company in Great Britain.
  • They are expensive. The one we ended up getting cost in the $400-$500 range.
  • The one we have isn’t totally cumbersome, but it’s not easy to pack up and take with you somewhere.

Figuring these things out, I decided to search for a way to build a simple seizure alam that’s both relatively inexpensive and easy to transport. I’m sure there are people out there who have children that suffer from seizures that simply cannot afford equipment such as this even though they truly need it. Thanks to the folks in the Arduino community, I was able to accomplish both things I was setting out to do.

Discover how it was made on his blog.


A traditional weather house gets a smart upgrade

The “Enchanted Cottage” is a project by Andy Clark with the aim of upgrading a traditional  german “wetter haus”  with a new mechanism and electronics running on Arduino Yún:

The mechanics were replaced with a servo and 3D printed parts designed to make the movement linear rather than arcing as in the traditional approach. The figures were fitted with magnets so that they could move without any obvious form of propulsion.
The electronics were based on an Arduino Yún, custom prototyping shield and an Infineon RGB LED driver shield. The whole thing is powered by a rechargable LiPo battery and a module from AdaFruit. Because the Arduino was deep in the middle of the house, I used fibre optics to bring the light to the top panel. A sensor was added into the roof so you could simply tap it to get it to update the forecast for you.

The project was build over a period of 16 weeks, the mechanical aspects were completed first and the 3D printing took several goes to get it right. The electronics build was fairly straightforward but fitting everything onto the proto shield was challenging and the high clearance for the Yún was also a challenge. The software was written as I went along with demo programs created to test each part. Getting the Yún to work on low power was fairly straightforward but getting a secure and validated HTTPS connection took a few attempts. tried to put as much of the processing into the Python script so that the C++ code was just handling the control. All in all a challenging project that pushed the Yún to it’s limits.

Learn more about the project on Andy’s blog.

Arduino Blog 07 Aug 18:06

Build an IoT Gauge with Arduino Yún and IFTTT

Tomas Amberg shared with us the link to an Instructable he published on how to build a Web-enabled, Arduino-based IoT Gauge with a REST API, and connect it to the IFTTT mash-up platform, via the Yaler.net relay service he founded.

The cool thing about this project is the connection with the Maker Channel  of IFTTT which supports custom Webhooks, to integrate DIY IoT projects: 

Inspired by WhereDial, a DIY Internet of Things classic, the IoT Gauge shows the current location of its owner. A bit like the Weasley Clock in Harry Potter. The design and code of the IoT Gauge is generic and could be used as well to display e.g. weather conditions. The logic resides in the Cloud, the gauge is just a servo with an API.

Check out the five-step tutorial and the ingredients you need at this link.

Arduino Blog 05 Aug 18:00
arduino  featured  fritzing  gauge  ifttt  iot  lasercut  tutorial  uno  yún  

David Cuartielles and Bruce Sterling at Sonar

Sónar+D is the international conference that brings together a combination of activities with a common theme: the relationship between creativity and technology and the digital transformation of the cultural industries involved.

During latest edition David Cuartielles gave a talk about the value of Open Source and a workshop with Alessandro Contini titled Making Noise with Arduino

David presented some examples like:

  • The Alcontrol Device (a breath analyser that detects high alcohol levels and limits mobile usage of a user depending on how drunk he/she is)
  • The involuntary dance machine that uses electrical stimulus to different muscles
  • A 5-day hack to a car that needed be driven remotely by musicians playing live
  • A large scale light installation for the Jakarta Marathon

He also got the opportunity to talk about robotics, kids learning code and electronics, and the future of Arduino. Later on Bruce Sterling, curator of Casa Jasmina,  was the protagonist of the festival’s closing keynote and talked about technology, music and the past/current state of the industry.


News originally posted on Arduino Verkstad blog

Xbee and Arduino sent to space by NASA

Last July 7 at Wallops Flight Facility, NASA launched Black Brant IX , a suborbital sounding rocket to test “wireless-in-space” with XBee and Arduino :

Onboard the rocket was an experiment testing Exo-Brake technology. XBee was used to collect sensor data including temperature, air pressure, and 3-axis acceleration parameters. NASA is considering Exo-brakes as a possible solution for returning cargo from the International Space Station (ISS), orbiting platforms or as possible landing mechanisms in low-density atmospheres. This was one of many tests used to analyze its effectiveness, but the first to incorporate an XBee connected sensor network. If you would like to read more about the Exo-brake, check out this article.

As part of a program to determine potential applications of wireless technologies in space, NASA chose XBee® ZigBee modules and Arduino Mega  explaining that:

Wireless sensor technology allows measuring important parameters such as aerodynamic pressure and temperature at the apex of the Exo-Brake during re-entry. It is very difficult to instrument a deployable parachute like the Exo-Brake, and wireless sensor modules provide the means for this type of measurement where it is difficult to run wires,” said Rick Alena, computer engineer at NASA Ames.

The NASA team constructed a gateway using an Arduino Mega, XBee, and Iridium module. The Arduino Mega was used to manage communications between the local XBee wireless network and the long-range Iridium satellite uplink. It was chosen as part of a NASA initiative to use commercial off-the-shelf components where possible, and to employ rapid prototyping tools to efficiently explore new ideas.

See the diagram below to get a detailed view into how the network was configured.


Arduino Blog 31 Jul 17:20
arduino mega  featured  mega  space  xbee  

Autodesk teams up with Arduino to electrify creativity and coding

We are excited to introduce our new collaboration with Autodesk, launching with us the Arduino Basic Kit in the US! Starting today we are bringing creativity and electronics to everyone wanting to get started with more than 30 components added into the 123D Circuits simulator and 15 step-by-step tutorials available through the Project Ignite learning platform.

With the Arduino Basic Kit you’ll be able to access digital simulations for a unique experience of engagement with the kit, understanding and tapping right away into the power of smart objects.

“Arduino is creating new opportunities for makers and educators to get hands on with coding and electronics,” said Samir Hanna, vice president and general manager, Consumer and 3D Printing, Autodesk. “Our collaboration with Arduino will enable our passionate community of users to unlock their creativity while building the skills to succeed in a technologically-focused world.”

“By collaborating with Autodesk on the Arduino Basic Kit we are showing that designing electronics is a great educational area for teachers,” said Massimo Banzi, co-founder of Arduino. “By offering our tutorials in digital format instructors can involve students of all ages on interactive projects within Project Ignite platform.”

Autodesk recently launched Project Ignite during the White House National Week of Making to provide a free and open learning platform that builds the skills of young learners through creative, hands-on design experiences focused on the latest technology trends like 3D printing and electronics. Through these efforts, Autodesk aims to empower the next generation of innovators with the tools and confidently enter this new future of making things.


What’s in the Arduino Basic Kit:

  • All the physical and digital components you need to build simple projects and learn how to turn an idea into reality using Arduino and Autodesk 123D Circuits.
  • The digital simulations in 123D Circuits provide a unique experience to engage and learn about the power of smart objects .
  • Exclusive online access to 15 step-by-step tutorials, through the Project Ignite learning platform, to make simple projects using components that let you control the physical world.

Projects include:

  • Get to know your tools: An introduction to the concepts you need to know to advance
  • Love-O-Meter to measure how hot-blooded you are
  • Zoetrope to create a mechanical animation you can play forward or reverse
  • Knock Lock to tap a secret code and open the door

Get your kit today, exclusively at www.autodesk.com/arduino for $84.00.

Join the conversation on the Arduino Forum.