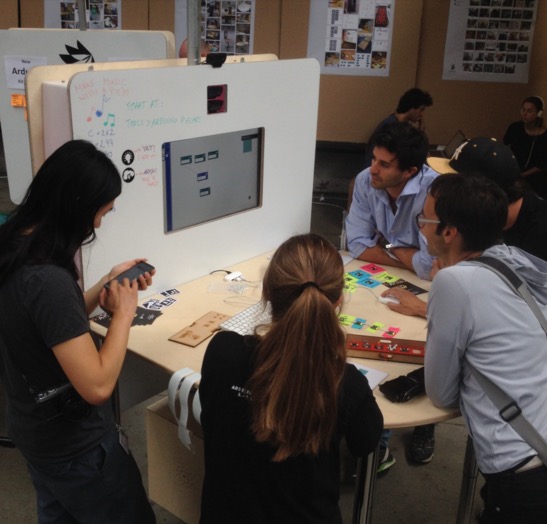
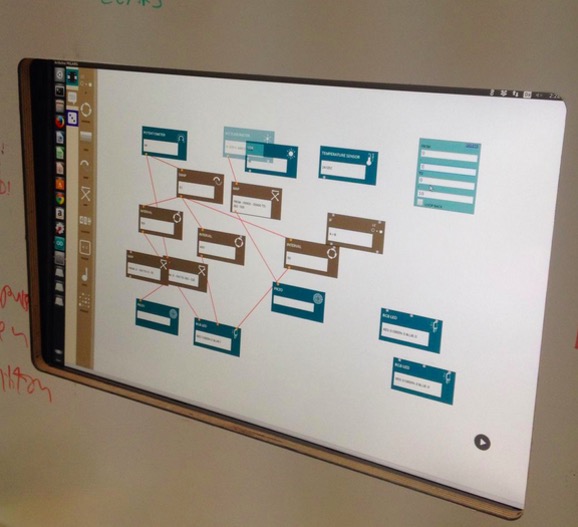
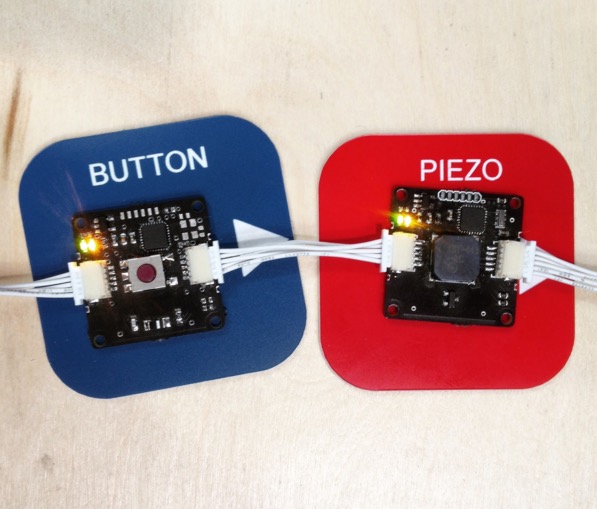
After nine years, Arduino participated to Ars Electronica 2015 to present an intelligent module system developed at the Malmö office: the system is called Eslov and is meant to make creation and coding very easy. This system allows you to explore the concepts of physical computing by plugging modules that can be programmed using a visual interface.
Our partners at the PELARS* project and some of our team members went to Linz to build the PELARS “Learning + Making” Zone for the U19 / Create Your World area, a part of the festival dedicated to teenagers. A pop-up experimental learning environment was built and it aimed to support learners understand what’s going on when they do hands-on science, technology & math in the classroom. Students and visitors tried Eslov and made some game dynamics to experience how the modules work. The feedback from the participants was encouraging with many students staying for a couple of hours and even returning back for multiple sessions.
Eslov will be also presented on our booth at World Maker Faire New York on September 26th to 27th, and Maker Faire Rome on October 16th to 18th.
*Pelars stands for Practice-based Experiential Learning Analytics Research And Support. Pelars is a project meant for improving how teachers, learners and technologies can support one another in hands-on learning of science, technology and math (STEM). Pelars will develop technologies (kits, sensing and electronic systems for classrooms) that will help teachers and learners understand what happens when people do science and math in the classroom.
PELARS project has received funding from the European’s Seventh Framework Programme for research technological development and demonstrations under grant agreement 619738.
If you want to follow up the development of the project in depth, visit the PELARS main page at: http://learningmaking.eu
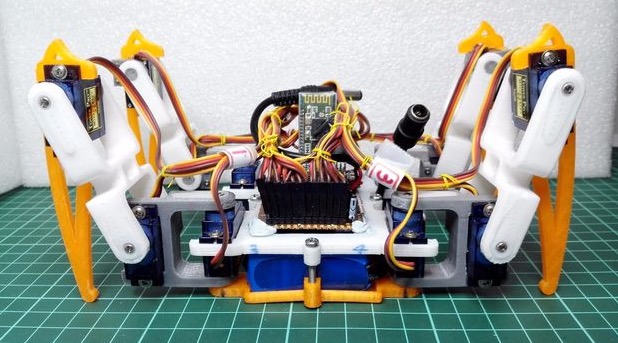
It takes 14 steps, a Prusa i3 3D printer and a lot of soldering to build Spider Robot v3.0, a quad robot running on Arduino Pro Mini. That’s what told us RegisHsu, a maker who shared his project’s tutorial on Instructables and the 3d printable files on Thingiverse.
It took 12 months of work to build the robot and it reached the fourth generation of design, that you can explore on his blog if you are interested in its history:
This is my first project for the 4 legs robot and it took me about 1 year development.
It is a robot that relies on calculations to position servos and pre-programmed sequences of legs. I’m doing this is because of it could be fun and educational for 3D design/printing and robot control.
The robot allows cool customizations like adding IR detection:
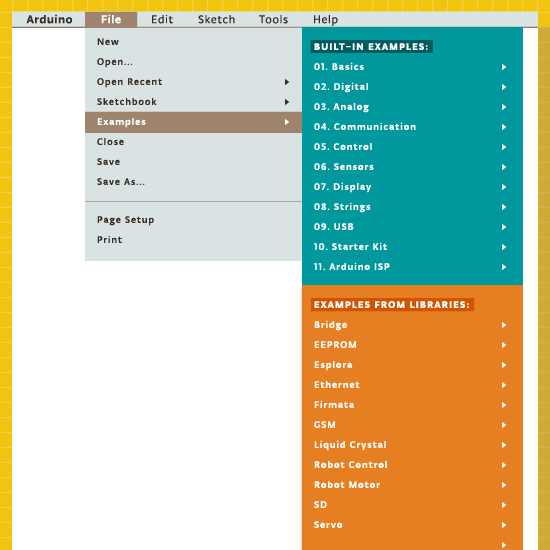
We never rest, even during summer, to serve our community and we announce today that we’ve refreshed over 150 example pages and redesigned the Examples area, offering an updated support to the current Arduino Software (IDE) Built-in and Libraries examples
Our website is a living entity that everyday hosts a huge number of visitors. They are looking for software, information, guidelines, ideas and also the right tutorial to start tinkering with their new board on a specific issue or project.
The Reference is the place where everything is documented and explained, with dry and essential information that is also included locally with every Arduino Software (IDE) installation.
Our software also includes a number of built-in sketches that help our users to quickly understand how the various functions and libraries may be used and applied to specific projects and tasks. We all started with the famous Blink and at the end of this tutorial we all felt the power and the excitement of having tamed our board with the upload of our first sketch. Keeping all these examples in good shape and updated is essential to keep you users safe from troubles or difficulties.
These examples evolve, as the libraries also evolve, therefore the sketches may be updated, amended or added. Each of these examples is commented and has an introductory part that gives a description of the purpose of the sketch and – if necessary – the instructions to put together the circuit. We know that the information provided inside the IDE and the sketches is not enough and therefore we made an area of our website where each sketch is explained and documented.
Year after year, board after board and library after library, many “hands” contributed to this area, filling gaps and amending things to reflect the Arduino Software (IDE) status. It has been an ongoing process that inevitably brought the Tutorials area in a state where many styles and ways of explaining things merged. We have big plans for our www.arduino.cc website and it is important to clean and fix the existing areas before we add new contents. This is why my first task – as editorial manager – has been the refresh and overall alignment of our Examples and Examples from Libraries pages.
We have roughly 150 pages documenting our Examples for the current products and libraries and going through them all wasn’t exactly a piece of cake: many things were checked for each example and sometimes things were outdated or missing. We also have our sister brand Genuino that got its space in all the relevant example pages. Now contents, style, look and feel and links in this area are ready for new and fresh developments.
I would like to end this post adding that this task was also a very good opportunity to refresh my knowledge about the powerful capabilities of Arduino programming language and its libraries. I had a few doubts on how to do a few things in my own sketches and going through all the examples gave me the hints I was missing.
The plain list of examples available in the Arduino Software (IDE) is just made of the sketch names, conversely in our pages you find a brief description of each of them. I suggest that you wander through these descriptions: let them excite your curiosity and inspire you!
What would you pay for a 1.2Ghz dual-core ARM computer with 1GB RAM, 4GB onboard flash, 800×600 display, and 5 megapixel camera? Did we mention it also has WiFi, Bluetooth, and is a low power design, including a lithium battery which will run it for hours? Does $15 sound low enough? That’s what you can pay these days for an Android cell phone. The relentless march of economies of scale has finally given us cheap phones with great specs. These are prepaid “burner” phones, sold by carriers as a loss leader. Costs are recouped in the cellular plan, but that only happens if the buyer activates said plan. Unlike regular cell phones, you aren’t bound by a contract to activate the phone. That means you get all those features for $15-$20, depending on where you buy it.
The specs I’m quoting come from the LG Optimus Exceed 2, which is currently available from Amazon in the USA for $20. The same package has been available for as little as $10 from retail stores in recent weeks. The Exceed 2 is just one of several low-cost Android prepaid phones on the market now, and undoubtedly the list will change. How to keep up with the current deals? We found an unlikely place. Perk farmers. Perk is one of those “We pay you to watch advertisements” companies. We’re sure some people actually watch the ads, but most set up “farms” of drone phones which churn through the videos. The drones earn the farmer points which can be converted to cash. How does this all help us? In order to handle streaming video, Perk farmers want the most powerful phones they can get for the lowest investment. Subreddits like /r/perktv have weekly “best deals” posts covering prepaid phones. There are also tutorials on rooting and debloating current popular phones like the Whirl 2 and the Exceed 2.
Once you have your phone, the first order of business is to boot it up. Many prepaid phones try to force the user to go through an activation process. There is always a back door for installers to exit the process though. In the case of the Exceed 2, simply pressing volume up, volume down, back, and home quits out of the activation process.
Got root?
Some applications require root permissions. To achieve this, your best bet is to do a bit of Googling for your particular phone model. The XDA developers forums are a great resource for this. While prepaid phones don’t usually have communities behind them like flagship phones, you can often find at least some information on what it takes to root your particular device. The most well-known “root every device” application to date is towelroot, created by GeoHot. You might remember [George Hotz] aka GeoHot as the first person to jailbreak an iPhone. He also made the news by getting into a bit of hot water with Sony over some PlayStation 3 security holes. Towelroot uses a Linux kernel exploit (futex) to gain root permissions. Released in June of 2014, the futex exploit has been patched on most new phones. However, it hasn’t been patched on phones that receive relatively few updates – like prepaid phones. On the Exceed 2, Towelroot works perfectly, giving the user root without even requiring a reboot. Once the phone is rooted, a root privilege manager like SuperSU is needed to keep track of which applications should have root permissions. Once that is done, anything goes! We’ve found packages like BusyBox to be huge helps – especially when working at the console through Android Debug Bridge (ADB).
What do you want to hack today?
Between these low-cost phones and the used phones every family seems to have floating around now, there are a heck of a lot of devices out there waiting to be used. What can you do with a spare Android phone? Quite a lot. There has never been a better time to learn to code for the Android Platform. Android Studio is the current official development environment. If you know a bit of Java, it’s easy to jump in and start making apps. If you’re not a Java head but want to learn, there are tutorials all over the web to help get into the swing of things.
Not a coder? The swiss army knife of automating android devices has long been Tasker. Tasker allows you to set off simple scripts (called tasks) with triggers which can be anything from plugging in headphones to connecting to a particular WiFi access point, to pressing a button on the screen. Want your smart phone to announce your arrival home with your own theme music? Just set up a Tasker profile to play a song when it connects to your home WiFi router. Tasker supports plenty of actions natively, and can be extended with plugins. Scripting Layer For Android SL4A) even allows it to extended with Python scripts.
Moving into the hardware world, there are plenty of ways to get GPIOs from an Android phone. The Android Accessory Development Kit (ADK) is getting a bit long in the tooth, but it’s still a great way to interface an Arduino board like the Arduino Mega ADK with your device. Another option for getting into the hardware realm is the IOIO OTG board. As the name implies, this new version of the IOIO board supports the USB OTG standard. This allows it to connect a phone either as a host or as an accessory. Need a simple wireless terminal for your project? Grab a terminal app and a Serial Port Profile (SPP) compatible Bluetooth module, and Bob’s your uncle. Interested in hacking with the ESP8266? There is an entire page of apps on the Google Play store dedicated to interfacing with everyone’s favorite low-cost WiFi module.
We’ve just covered the tip of the iceberg here. What kind of hacking would you do with a spare Android phone, or one of these low-cost prepaid devices. Let us know in the comments!
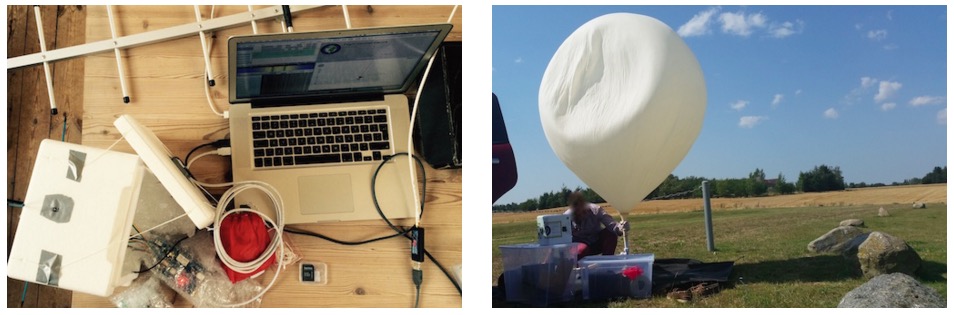
The project Emanuel Bombasaro submitted to the Arduino blog is about a high altitude balloon he launched on August 21st over Denmark. The balloon, called Titan 1, is made of a helium-filled latex balloon, a payload box holding the flight computer, sensors and a parachute (36” diameter). A GoPRO camcorder mounted inside the payload box and capturing an image every second.
The flight computer is an Arduino Mega which logs position (GPS), pressure, temperature, humidity, luminosity, earth magnetic field, acceleration and spin, measured by a variety of sensors:
At 1:10 we jump from cloud level (~3200m) towards reaching the peak altitude of 35393m. Immediately the moon appears on the right and is visibile again and again. 2:05 the fragments of the bursted balloon can be seen and up it goes back to earth. 3:00 we drop down to cloud level (~3200m) and soon after hit the ground.
This is the list of modules and sensors connected to the Arduino Mega:
MTX2 Radiometrix
MTX2 434 MHz Radio Module.
HX1 VHF Narrow Band FM 300 mW Transmitter, 144.800 MHz, used for APRS.
MAX-M8 GPS module used for position (longitude, latitude and altitude) and time acquisition.
DS18B20 Temperature sensor on HABuino showing the temperature of the flight computer compartment. This temperature should remain most near to 20 ” C. Any temperature variation will e?ect the transmission frequency of the radio module.
MCP9808 Maximum accuracy digital temperature sensor measuring air temperature.
HTU21DF Temperature and humidity sensor measuring air temperature and relative humidity of the air.
MPL3115A2 Precision altimeter mainly used for measuring atmospheric pressure, but also temperature and altitude is detected.
TSL2561 Light to digital converter BST-BMP180 Pressure sensor mainly used for measuring atmospheric pressure, but also temperature and altitude is detected.
L3GD20 3D gyroscope
LSM303DLHC 3D accelerometer and 3D magnetometer module
LSH20 Saft LSH 20 battery used as power supply with 3.6 V and 13.0 A h. The power feeds into the low input voltage synchronous boost converter TPS61201 on the HABuino shield.
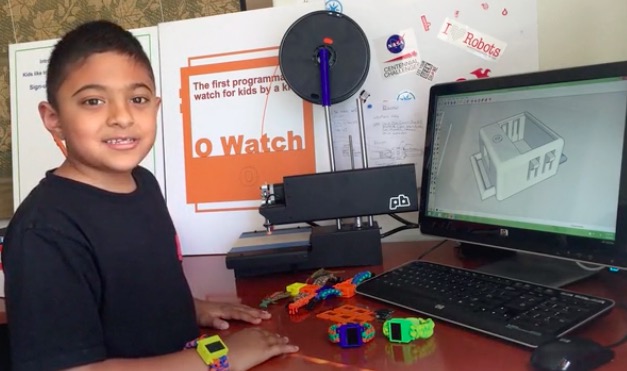
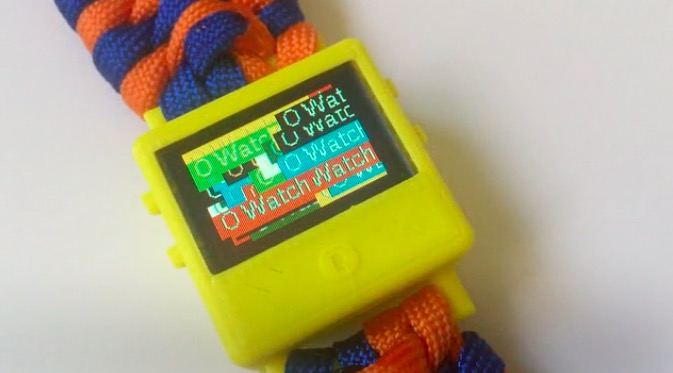
Omkar is a special 8 years old who created a wearable device called O Watch: an Arduino Zero-based smartwatch kit for kids. The project, recently kickstarted, allows young people to learn programming, 3D printing and a bit of craft while making their own smartwatch and customizing it. The kit will be released with a series learning tools including a kid-friendly website with easy tutorials, examples and a community to share creations.
He’s not new to DIY tech and learning as he’s been doing a few workshops to teach Arduino to other kids and likes it when they get excited about making Arduino projects. Omkar told us:
I was first interested in robots. But my dad got me started with projects that light up LEDs that were easier to learn and code myself. (ps: my dad did not let me get a robot kit at first :).
I decided to do a wearable project because there were many of them I saw in the news and I thought they were cool. I wanted to make a smartwatch so that I could wear it myself and share my project with my friends in school.
If you are a kid and are new to making, O Watch could be a great starting point as you’ll learn about coding, 3d printing, craft and also sharing. The Arduino IDE will be your primary programming tool for the watch, the case can be 3D printed in a color of your choice and you’ll experiment on how to knot yourself a cool band to wear it.
What are you waiting for? You have just a few days to back the project on Kickstarter and have an O Watch delivered to your home!
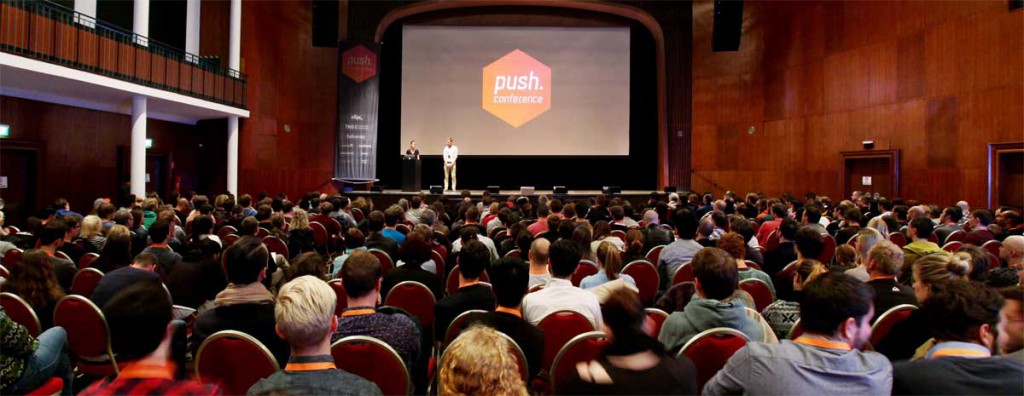
Next October 23rd and 24th in Munich (Germany) push.conference will bring together digital professionals merging the established UX/ UI scene with the potential and skill-set of a new generation of creative coders and technologists.
Organised by a group of designers, the conference is run driven by a passion for having an active role in the creative community. Since four years they’ve been carefully curating the most relevant topics and speakers to share practical experiences and inspire with visions and examples of what’s next in the interactive field.
The conference is limited to 450 guests, and tickets sell fast. Our readers can have a 15% discount on the regular ticket using the following code: PushArduino15 (it lasts till 21st of September).
Confirmed Speakers for 2015 are:
Josh Clark / UX Strategy Designer and author @ Big Medium
Simone Rebaudengo / Speculative Interaction Designer @ Frog
Dustin Senos / former Head of Design @ Medium
Pamela Pavliscak / UX Researcher @ Change Sciences
Anders Toxboe / Founder @ UI-Patterns.com
Benjamin Wiederkehr / Director @ Interactive Things
Heather Daggett / Senior Experience Design Prototyper @ Intuit
Pasquale d’Silva / Founder, Creative Director @ Keezy
Paul Skinner / Creative Director @ Tellart
Audree Lapierre / Information Visualisation Expert @ FFunction
Felix van de Sand / Director Design Strategy @ COBE
Sandra Heinzen / Art Director Online @ Plan.net
Nicole Weber / UX-Designer @ Ableton
Caroline Goulard / Generative Designer @ Dataveyes
Get inspired by a sneak peek of the topics:
Truly multi-platform
Great user experiences don’t only happen on the web or in apps. Users live in a world that gets richer day by day where they face different devices, operating systems, wearables, online services, interactive terminals and media installations. They don’t look at your product in an isolated way—and you shouldn’t either when designing it. At push.conference you will meet designers and developers of outstanding digital products on all platforms.
The Internet of Things is finally happening
While we amuse ourselves laughing about the connected fridge, IoT has arrived everywhere around us. The idea of omnipresent connected devices is stronger than ever before and hitting the product lines of startups like Nest as well as those of established players like Apple, Bosch and Siemens. Simone Rebaudengo, speculative interaction designer at frog, and mobile platform expert and author Josh Clark, share with you where this is heading and how we must prepare our products to be ready to succeed in the global networked ecosystem of tomorrow.
Psychology enables even more personal interactions
User research is a great basis to define requirements and directions for services and interfaces. Turning insights into the actual features in an interface is however not always so simple. That’s when understanding how emotions and psychology influence our users comes into play. Experience researcher Pamela Pavliscak and founder of UI-patterns.com Anders Toxboe will share their strategies when it comes to harnessing the power of happiness and persuasive UI patterns to create emotional reponses, help make decisions and guide our users.
Process shapes product
With iterative design and lean mindsets, prototyping has become an essential skill in our design process. Heather Daggett, Sr. experience design prototyper at Intuit, will cover when and with which fidelity prototypes inspire or help make decisions, and give advice to designers that face the decision how much of their energy to invest into technology skills.
Rich experiences
As important as a good concept is, it is the actual pixels on a screen that users will see and interact with. Making complex information accessible with interactive visualisations is the expertise of Audrée Lapierre of Montreal based studio FFunction. Dustin Senos, former Head of Design at Medium.com will explain how delightful details and a contextual interface make for a great experience beyond reading content on the web. Finally, we live and design in an age where dynamic use of space inspires interaction design from Google’s Material Design to the first ripples of virtual reality. Preparing for this, motion designer Pasquale d’Silva will propose to us a new approach for structuring multidimensional interfaces.
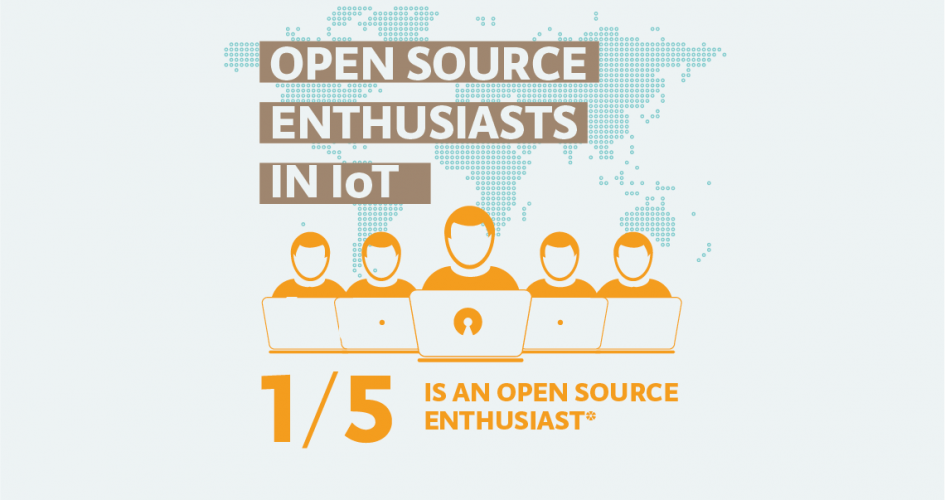
We discovered that Between IoT developers there is a big chunk of open source enthusiast. 1/5 value the importance of using open source tools and platforms.
Developer that define themselves explorers cover a crucial role in the field. It is from them that all the truly new, out-of-the-box ideas come from.
Only by exploring seemingly crazy ideas can the Internet of Things reach its full potential. The open source ecosystem is often the area where these ideas bloom.
While open source is so valued between developers, there is still a lot of work to be done. 60% of the opensource enthusiast in fact, think that open standards are missing in IoT.
We are really happy that the connected Home is the most interesting vertical market for developers, and we can’t wait to see what this big group of explorers will develop in the next future. Hopefully the next big invention will be open source.
The most important role of Internet of Things developers is to explore new possibilities. The technology is widely available; in no small part because of open source software and hardware projects. Now we need to learn where we can take it. We can build it, but should we?
Marcelo Jimenez developed a library to use an Arduino as a JTAG programmer. Basically a Python script uploads a XSVF file to an Arduino which interprets it and performs the necessary JTAG manipulation in order to do the programming.
The project is pretty simple because it just uses a few resistors and some wires and the library is included in the Arduino library manager or you can check it on Github.
He also wrote an article to explain some JTAG, SVF and XSVF basics:
I have recently felt the need to incorporate a JTAG port in a project to program a hardware that contained a CPLD. The idea was to both program it and perform some integrity tests on the board. I imagined something using pogo pins, to make it easier and quicker to test everything. I would also write the necessary test routines and generate some kind of report.
With this objective in mind, I have decided to design an Arduino shield to do the job. The testing routines were not really a big deal. And I was sure I would find some JTAG library for Arduino ready to be used. That was not the case.
There were some projects using Arduino to control a JTAG TAP (Test Access Port), but they were all incomplete. And I had no idea what was really JTAG. So I had to study a little bit to make things work for me.
In the end, the challenge proved enlightening. There were some caveats, both from hardware and from software. I’ll try to address them in this article.
Microcontrollers existed before the Arduino, and a device that anyone could program and blink an LED existed before the first Maker Faire. This might come as a surprise to some, but for others PICs and 68HC11s will remain as the first popular microcontrollers, found in everything from toys to microwave ovens.
Arduino can’t even claim its prominence as the first user-friendly microcontroller development board. This title goes to the humble Basic Stamp, a four-component board that was introduced in the early 1990s. I recently managed to get my hands on an original Basic Stamp kit. This is the teardown and introduction to the first user friendly microcontroller development boards. Consider it a walk down memory lane, showing us how far the hobbyist electronics market has come in the past twenty year, and also an insight in how far we have left to go.
The Basic Stamp 1. A Simple circuit with just a microcontroller, an EEPROM, crystal, and brownout circuit.
Teardown
The Basic Stamp kit on my workbench was made in 1993, and sold for a suggested retail price of $139 USD. Adjusted for inflation, this is nearly $230 in 2015 dollars. What do you get in the Basic Stamp starter kit? A single stamp, a programmer cable, and a surprising amount of documentation.
The Basic Stamp is an extremely minimalist board that does just enough to blink an LED, read a button, or drive an LCD. In the official documentation, there are only a handful of parts: a microcontroller, an EEPROM with a few bytes of memory, a crystal, and a voltage regulator.
The PIC16C56XL is the brains of the outfit, featuring 1.5kilobits of Flash memory and 25 bytes of RAM. By modern standards, it’s tiny; the closest modern analog would be the ATtiny10, itself not a very recent chip. Microchip’s smallest and newest chip is the PIC12LF1522, featuring twice as much Flash and ten times the amount of RAM. We’re dealing with an old microcontroller when using the Basic Stamp
Like the Arduino, it was encouraged to use the Basic Stamp in product design.
Other components include a 93LC56 serial EEPROM. beside that is a 4MHz regulator, a 5V linear regulator, and a transistor and a few resistors for the ‘brown out’ circuit. Power is provided by a 9V battery connector soldered onto the board.
The electronic design of the Basic Stamp is simple, yes, but there’s a method to the madness. The code you write for the Basic Stamp is stored in 256 bytes of the EEPROM. This code is read by a PBASIC interpreter on the PIC, dutifully following commands to blink a LED or display a character on an LCD. No user code is actually stored on the microcontroller.
Programming
How about the programming environment? That’s a single executable running in a DOS shell. The system requirements are only, an IBM PC or compatible, DOS 2.0+, 128k of RAM, and a disk drive. Meager requirements, but this is not something that will run on your modern Windows workstation; it requires a proper parallel port.
For an IDE, the Basic Stamp editor is comparable to earlier Arduino IDEs; Alt+R runs the program on the Stamp connected to the computer, Alt+L loads a program, Alt+S saves a program, and Alt+Q quits the editor.
The BASIC language implemented on the PIC is minimal, but it does everything you would expect; individual pins can be set as input and output, buttons are debounced, and PWM functions are baked into the language.
An ad for the Basic Stamp. From High Tech Entrepreneur, October/November 1993. Ads had text in the past.
Context
The Basic Stamp is now regarded as a slow, inconvenient artifact from the past. No one uses it, and the only place you’ll find one is in the back cabinet in a physics or EE classroom. This is an incredible disservice to a still-impressive piece of technology, and looking back at the Basic Stamp with our modern expectations is an incredible bias.
There were microcontroller development platforms before the Basic Stamp, but these were engineering tools, and expensive compared to the Stamp. Development platforms for the electrical hobbyist were around after the stamp, too: the Micromint Domino packed an entire development platform into a rectangular brick of plastic. None of these designs could match the popularity of the Basic Stamp despite the platform’s shortcomings.
The Arduino receives a lot of hate. Detractors say it’s too high-level for proper embedded programming, not high-level enough for a modern workflow, is based on old, obsolete chips, doesn’t have the features of modern ARM microcontrollers, and the IDE is a mess. Despite an even less capable IDE, meager memory, and a slow processor, the Basic Stamp proved incredibly popular. The fact that you could pick up a Basic Stamp development kit at any Radio Shack probably didn’t hurt it’s popularity, either.
Now, with our fancy IDEs, mbed microcontrollers, powerful ARMs, and huge libraries, the ease of use of the Basic Stamp has still not been equaled. It may be slow, outdated, but all of us owe a great debt to the Basic Stamp for introducing an entire generation to the world of embedded programming, microcontrollers, and electronics tinkering.


 Not a coder? The swiss army knife of automating android devices has long been
  Moving into the hardware world, there are plenty of ways to get GPIOs from an Android phone. The Android