Posts with «diy» label

RVR is a Sphero robot for budding tinkerers

Sphero's been amusing us with its collection of robotic balls, like its adorable BB-8, for eight years. But lately the company has been getting away from the toy aspect of its products and embracing its educational potential. It's had an app that can be used to program many of its current bots for a while now, but that's only for budding coders — what do kids interested in hardware have to tinker with? Indeed, Sphero is about to release its first robot specifically made to be physically modded, called the RVR.

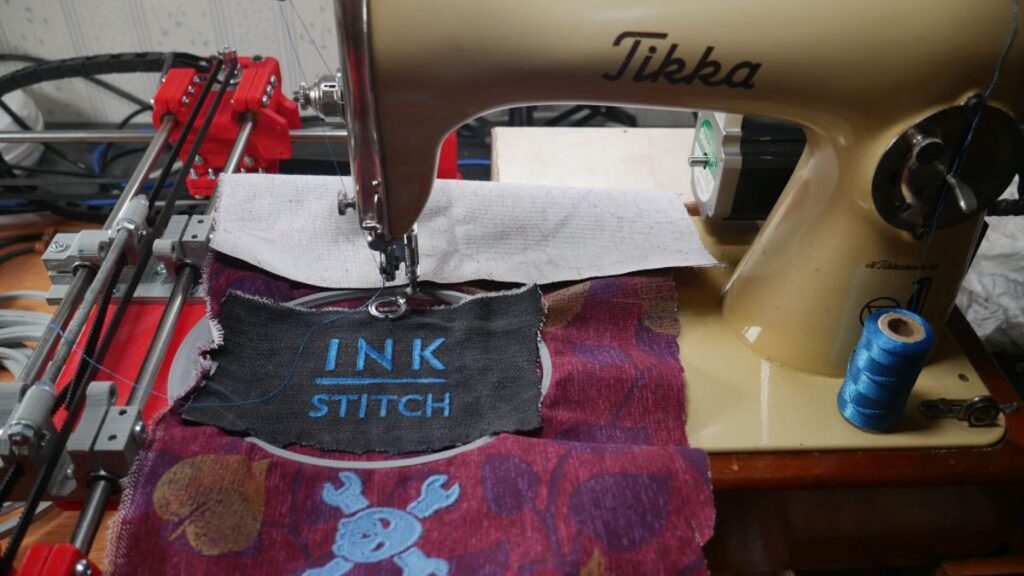
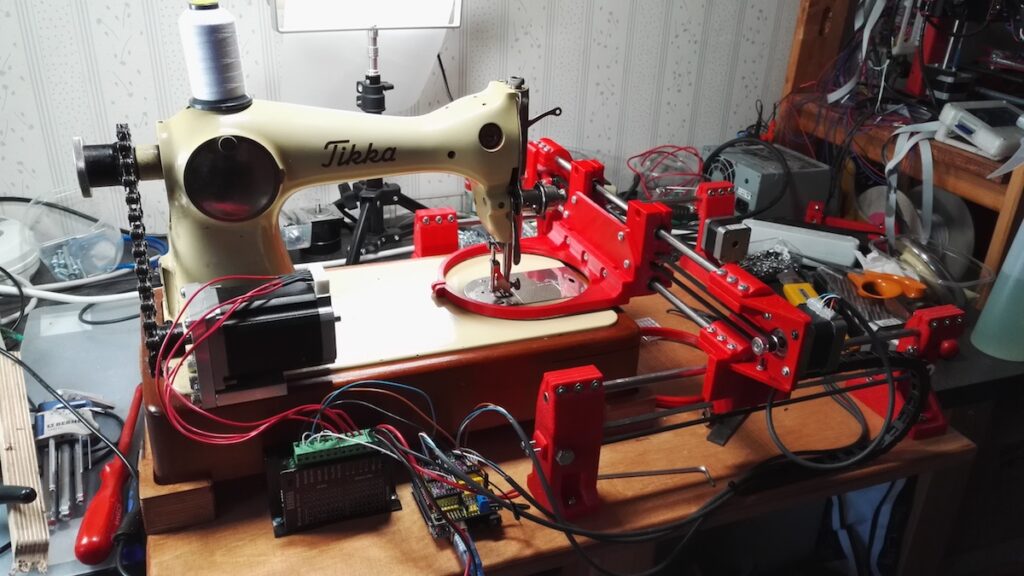
Upgrade a sewing machine into an automatic embroidery rig

A needle and thread is extremely useful if you need to fasten a few pieces of fabric or sew on a button, and a sewing machine takes things up several notches in speed an accuracy. This venerable machine, however, can now be enhanced with a trio of stepper motors under Arduino Uno GRBL control to take things to an entirely new level.

The “Self-Made Embroidery Machine” employs a setup very similar to a 3D printer or CNC router. Two steppers move the fabric around, while a third actuates the needle. This allows the user to program in decorative shapes and patterns as shown in the video below, and the build process is well documented if you’d like to build your own!

Sewing machine part is any old or new sewing machine. Only change for original is stepper motor with synchronised pulley system (chain/belt drive) and more embroidery friendly presser foot. It is recommended to use older sewing machine, way more convenient to mount stepper motor to cast iron and prices are relatively cheap.

XY movement consists mainly 3D printed parts, 12 pcs and similar parts known from self build 3D printers. Both axes use GT2 belts, NEMA 17 steppers and both directions are fully scalable.

Synchronous movement comes from Arduino powered GRBL G-code interpreter, it is mouthful, but basically machine moves using G-code send to Arduino. It is not that complicated and it is only carrier like any other one when going from system to another one.

Now we have movement and code, but how to make nice shapes and export to G-code. It is nothing to do with medieval sorcery, it is a matter of downloading Inkscape and extension called Inkstitch.

Help and examples how to use Inkstitch extension can be found address above. End result should be really close to hobby level embroidery machines, just slower speed. After all, embroidery machine is nothing more than overgrown sewing machine.

Watch the Snappy, Insect-like Moves of this DIY Quadruped Robot

Some legged robots end up moving with ponderous deliberation, or wavering in unstable-looking jerks. A few unfortunates manage to do both at once. [MusaW]’s 3D Printed Quadruped Robot, on the other hand, moves in rapid motions that manage to look sharp and insect-like instead of unstable. Based on an earlier design he made for a 3D printable quadruped frame, [MusaW] has now released this step-by-step guide for building your own version. All that’s needed is the STL files and roughly $50 in parts from the usual Chinese resellers to have the makings of a great weekend project.

The robot uses twelve SG90 servos and an Arduino nano with a servo driver board to control them all, but there’s one additional feature: Wi-Fi control is provided thanks to a Wemos D1 Mini (which uses an ESP-8266EX) acting as a wireless access point to serve up a simple web interface through which the robot can be controlled with any web browser.

Embedded below is a brief video. The first half is assembly, and the second half demonstrates the robot’s fast, sharp movements.

We love it when robots show some personality, like this adorable little quadruped robot that can make small jumps.

Thanks to [Baldpower] for the tip!

DIY Puff-Suck Interface Aims for Faster Text Input

Puff and Suck (or Sip and Puff) systems allow people with little to no arm mobility to more easily interact with computers by using a straw-like unit as an input device. [Ana] tells us that the usual way these devices are used to input text involves a screen-based keyboard; a cursor is moved to a letter using some method (joystick, mouse emulator, buttons, or eye tracking) and that letter is selected with a sip or puff into a tube.

[Ana] saw such systems as effective and intuitive to use, but also limited in speed because there’s only so fast that one can select letters one at a time. That led to trying a new method; one that requires a bit more work on the user’s part, but the reward is faster text entry. The Puff-Suck Interface for Fast Text Input turns a hollow plastic disk and a rubber diaphragm into bipolar pressure switch, able to detect three states: suck, puff, and idle. The unit works by having an IR emitter and receiver pair on each side of a diaphragm (one half of which is shown in the image above). When air is blown into or sucked out of the unit, the diaphragm moves and physically blocks one or the other emitter-receiver pair. The resulting signals are interpreted by an attached Arduino.

How does this enable faster text input? By throwing out the usual “screen keyboard” interface and using Morse code, with puffs as dots and sucks as dashes. The project then acts as a kind of Morse code keyboard. It does require skill on the user’s part, but the reward is much faster text entry. The idea got selected as a finalist in the Human-Computer Interface Challenge portion of the 2018 Hackaday Prize!

Morse code may seem like a strange throwback to some, but not only does the bipolar nature of [Ana]’s puff-suck switch closely resemble that of Morse code input paddles, it’s also easy to learn. Morse code is far from dead; we have pages of projects and news showing its involvement in everything from whimsical projects to solving serious communication needs.

A HID For Robots

Whether with projects featured here or out in the real world, we have a tendency to focus most upon the end product. The car, solar panel, or even robot. But there’s a lot more going on behind the scenes that needs to be taken care of as well, whether it’s fuel infrastructure to keep the car running, a semiconductor manufacturer to create silicon wafers, or a control system for the robot. This project is one of the latter: a human interface device for a robot arm that is completely DIY.

While robots are often automated, some still need human input. The human input can be required all the time, or can be used to teach the robot initially how to perform a task which will then be automated. This “keyboard” of sorts built by [Ahmed] comes with a joystick, potentiometer, and four switch inputs that are all fully programmable via an Arduino Due. With that, you can perform virtually any action with whatever type of robot you need, and since it’s based on an Arduino it would also be easy to expand.

The video below and project page have all the instructions and bill of materials if you want to roll out your own. It’s a pretty straightforward project but one that might be worth checking out since we don’t often feature controllers for other things, although we do see them sometimes for controlling telescopes rather than robots.


Hack a Day 02 Jun 06:00

Laser projector ditches galvanometer for spinning drum

Laser projectors like those popular in clubs or laser shows often use mirror galvanometers to reflect the laser and draw in 2D. Without galvos, and on a tight budget, [Vitaliy Mosesov] decided that instead of downgrading the quality, he would seek an entirely different solution: a spinning mirror drum.

He fires a laser at a rotating drum with twelve mirror faces, each at a different adjustable vertical angle. The laser will hit a higher or lower point on the projection surface depending on which mirror it’s reflecting off – this creates resolution in the Y direction.

Timing the pulsing of the laser so that it reflects off the mirror at a certain horizontal angle provides the X resolution.

As you can already tell, speed and timing is critical for this to work. So much so that [Vitaliy] decided he wanted to overclock his Arduino – from 16 MHz to 24.576 MHz. Since this changes the baud rate, an AVR ISP II was used for programming after the modification, and the ‘duino’s hardware serial initialization had to be hacked too.

For the laser itself, [Vitaliy] designed some nifty driver circuitry, which can respond quickly to the required >50 kHz modulation, supply high current, and filter out voltage transients on the power supply (semiconductor lasers have no protection from current spikes).

On the motor side of things, closed loop control is essential. A photo-interrupter was added to the drum for exact speed detection, as well as a differentiator to clean up the signal. Oh, and did we mention the motor is from a floppy disk drive?

We’ve actually seen builds like this before, including a dot-matrix version with multiple lasers and one made apparently out of Meccano and hot-glue that can project a Jolly Wrencher. But this build, with its multiple, adjustable mirrors, is a beauty.  Check it out in action below.

Hack a Day 20 Apr 16:30

Arduino and processing based GUI person counter

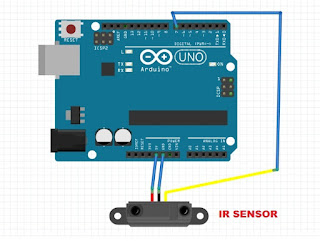
In this post, we will make arduino and processing based GUI person counter. For person counter, we are using infrared sensor (IR). It's output is digital and is fed to pin number 7 of arduino.

The connections are as follows:


Arduino Code:

int switchPin=7;
int ledPin=13;

void setup() {
pinMode(switchPin,INPUT);
digitalWrite(switchPin,HIGH);
pinMode(ledPin,OUTPUT);
Serial.begin(9600);
}

void loop() {
  if(digitalRead(switchPin))
    {
    while(digitalRead(switchPin));        
    Serial.print(1,DEC);
    }
  else
    {
    Serial.print(0,DEC);
    }
    delay(100);
} 

Processing Code:

import processing.serial.*;

Serial port;
int val;
int count=0;
PFont f;                           // STEP 1 Declare PFont variable

void setup()  {
    size(400,400);
    noStroke();
    println(Serial.list());  // print list of available serial port 
    port=new Serial(this,Serial.list()[0],9600);        
    f = createFont("Arial",16,true); // STEP 2 Create Font
 }
  
void draw()  {
  if(0<port.available())
  {
    val=port.read();
  } 
    background(204);
    println(val);

  if(val==48)
{     fill(255,0,0);   // red
  rect(50,50,300,300);  // green
}
  else if(val==49)
{     fill(0,255,0);   // green
  rect(50,50,300,300);  // green
  count++;
}

  textFont(f,30);               
  fill(0);                         
  text("Number of Person is: " + count , 30, 30);
//text(count, 100, 100);
delay(100);

 }

/* END OF CODE */

Man-in-the-Middle Jog Pendant: Two Parts Make Easier Dev Work

In a project, repetitive tasks that break the flow of development work are incredibly tiresome and even simple automation can make a world of difference. [Simon Merrett] ran into exactly this while testing different stepper motors in a strain-wave gear project. The system that drives the motor accepts G-Code, but he got fed up with the overhead needed just to make a stepper rotate for a bit on demand. His solution? A grbl man-in-the-middle jog pendant that consists of not much more than a rotary encoder and an Arduino Nano. The unit dutifully passes through any commands received from a host controller, but if the encoder knob is turned it sends custom G-Code allowing [Simon] to dial in a bit acceleration-controlled motor rotation on demand. A brief demo video is below, which gives an idea of how much easier it is to focus on the nuts-and-bolts end of hardware when some simple motor movement is just a knob twist away.

[Simon]’s jog pendant moves a single motor which is exactly what he needs to ease development of his 3D printed strain-wave gear using a timing belt, but it could be programmed with any G-Code at all. Speaking of DIY jog pendants for CNC machines, don’t forget this wireless one made from an Atari 2600 joystick that jogs a plasma cutter in X and Y, and zeroes it with a push of the button.


Filed under: Arduino Hacks, cnc hacks

Step by step guide installation guide for ch340 USB-UART converter

Hello Friends,

In this tutorial, we will cover how to install ch340 driver for different versions of windows.
CH340 is USB-UART converter and is used for serial communication with PC/ laptop with external device e.g. GSM module, GPS module, arduino pro, etc.

Things required:

CH340 USB-UART

First of all, download the driver from link below:

Download

After downloading, extract the file and follow the steps as follows:

Step 1: Open Device Manager, go to other devices. Right click on the USB2.0-Serial

Device Manager


Step 2: Browse the directory, where you had extracted the downloaded file

Browse the directory

Step 3: Select the parent directory


Choosing directory

Step 4: Viola! your driver has been installed

Driver installed
Now, check with any terminal software. I am using Bray's Terminal.


FunWithElectronics 01 Aug 06:11
diy  tutorial  usb-uart