Posts with «display» label

How Much Is That Plotter in the Window?

We live in a strange time indeed. People who once eschewed direct interactions with fellow humans now crave it, but to limited avail. Almost every cashier at the few stores deigned essential enough to maintain operations are sealed away behind plastic shields, with the implication that the less time one spends lingering, the better. It’s enough to turn an introvert into an extrovert, at least until the barriers are gone.

We get the idea that the need to reach out and touch someone is behind [Niklas Roy]’s “Please Leave a Message”, an interactive art installation he set up in the front window of his Berlin shop. Conveniently located on a downtown street, his shop is perfectly positioned to attract foot traffic, and his display is designed to catch the eye and perhaps crack a smile. The device consists of a large wooden easel holding the guts from an old X-Y pen plotter, an Arduino and an ESP-8266, and a couple of drivers for the plotter’s steppers. Passers-by are encouraged to scan a QR code that accesses a web page served up by the ESP-8266, where they can type in a brief message. The plotter dutifully spells it out on a scroll of paper for all to see, using a very nice font that [Niklas] designed to be both readable and easily plotted. The video below shows it in action with real people; it seems to be a crowd-pleaser.

[Niklas] has been incredibly prolific, and we’ve covered many of his interactive art installations. Just search for his name and you’ll find everything from a pressure-washer dancing waters display to a plus-sized pinball machine.

Hack a Day 14 May 16:30

Tutorial – Arduino and Four Digit Seven Segment Display Module

This is a quick start guide for the Four Digit Seven Segment Display Module and Enclosure from PMD Way. This module offers a neat and bright display which is ideal for numeric or hexadecimal data. It can display the digits 0 to 9 including the decimal point, and the letters A to F. You can also control each segment individually if desired. 

Each module contains four 74HC595 shift registers – once of each controls a digit. If you carefully remove the back panel from the enclosure, you can see the pin connections:

If you’re only using one display, use the group of pins at the centre-bottom of the board. From left to right the connections are:

  1. Data out (ignore for single display use)
  2. VCC – connect to a 3.3V or 5V supply
  3. GND – connect to your GND line
  4. SDI – data in – connect to the data out pin on your Arduino/other board
  5. LCK – latch – connect to the output pin on your Arduino or other board that will control the latch
  6. CLK – clock – connect to the output pin on your Arduino or other board that will control the clock signal

For the purposes of our Arduino tutorial, connect VCC to the 5V pin, GND to GND, SDI to D11, LCK to D13 and CLK to D12. 

If you are connecting more than one module, use the pins on the left- and right-hand side of the module. Start with the connections from your Arduino (etc) to the right-hand side, as this is where the DIN (data in) pin is located.

Then connect the pins on the left-hand side of the module to the right-hand side of the new module – and so forth. SDO (data out) will connect to the SDI (data in) – with the other pins being identical for connection. 

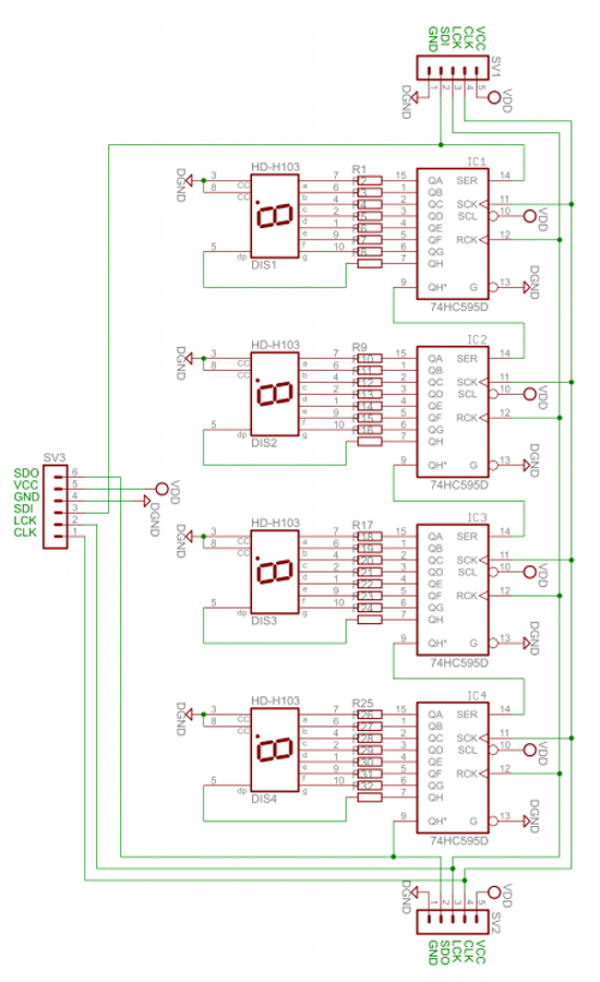
The module schematic is shown below:

Arduino Example Sketch

Once you have made the connections to your Arduino as outlined above, upload the following sketch:

// Demonstration Arduino sketch for four digit, seven segment display with enclosure
// https://pmdway.com/collections/7-segment-numeric-leds/products/four-digit-seven-segment-display-module-and-enclosure
int latchPin = 13; // connect to LCK pin intclockPin = 12; // connect to CLK pin intdataPin = 11; // connect to SDI pin int LED_SEG_TAB[]={ 0xfc,0x60,0xda,0xf2,0x66,0xb6,0xbe,0xe0,0xfe,0xf6,0x01,0xee,0x3e,0x1a,0x7a,0x9e,0x8e,0x01,0x00}; //0 1 2 3 4 5 6 7 8 9 dp . a b c d e f off void setup() { //set pins to output so you can control the shift register pinMode(latchPin, OUTPUT); pinMode(clockPin, OUTPUT); pinMode(dataPin, OUTPUT); } void displayNumber(int value, boolean leadingZero) // break down "value" into digits and store in a,b,c,d { int a,b,c,d; a = value / 1000; value = value % 1000; b = value / 100; value = value % 100; c = value / 10; value = value % 10; d = value; if (leadingZero==false) // removing leading zeros { if (a==0 && b>0) { a = 18; } if (a==0 && b==0 && c>0) { a = 18; b = 18; } if (a==0 && b==0 && c==0) { a = 18; b = 18; c = 18; } if (a==0 && b==0 && c==0 && d==0) { a = 18; b = 18; c = 18; d = 18; } } digitalWrite(latchPin, LOW); shiftOut(dataPin, clockPin, LSBFIRST, LED_SEG_TAB[d]); shiftOut(dataPin, clockPin, LSBFIRST, LED_SEG_TAB[c]); shiftOut(dataPin, clockPin, LSBFIRST, LED_SEG_TAB[b]); shiftOut(dataPin, clockPin, LSBFIRST, LED_SEG_TAB[a]); digitalWrite(latchPin, HIGH); } void allOff() // turns off all segments { digitalWrite(latchPin, LOW); shiftOut(dataPin, clockPin, LSBFIRST, 0); shiftOut(dataPin, clockPin, LSBFIRST, 0); shiftOut(dataPin, clockPin, LSBFIRST, 0); shiftOut(dataPin, clockPin, LSBFIRST, 0); digitalWrite(latchPin, HIGH); } void loop() { for (int z=900; z<=1100; z++) { displayNumber(z, false); delay(10); } delay(1000); for (int z=120; z>=0; --z) { displayNumber(z, true); delay(10); } delay(1000); digitalWrite(latchPin, LOW); shiftOut(dataPin, clockPin, LSBFIRST, LED_SEG_TAB[14]); shiftOut(dataPin, clockPin, LSBFIRST, LED_SEG_TAB[13]); shiftOut(dataPin, clockPin, LSBFIRST, LED_SEG_TAB[12]); shiftOut(dataPin, clockPin, LSBFIRST, LED_SEG_TAB[11]); digitalWrite(latchPin, HIGH); delay(1000); digitalWrite(latchPin, LOW); shiftOut(dataPin, clockPin, LSBFIRST, LED_SEG_TAB[16]); shiftOut(dataPin, clockPin, LSBFIRST, LED_SEG_TAB[15]); shiftOut(dataPin, clockPin, LSBFIRST, LED_SEG_TAB[14]); shiftOut(dataPin, clockPin, LSBFIRST, LED_SEG_TAB[13]); digitalWrite(latchPin, HIGH); delay(1000); digitalWrite(latchPin, LOW); shiftOut(dataPin, clockPin, LSBFIRST, LED_SEG_TAB[0]); shiftOut(dataPin, clockPin, LSBFIRST, LED_SEG_TAB[1]); shiftOut(dataPin, clockPin, LSBFIRST, LED_SEG_TAB[2]); shiftOut(dataPin, clockPin, LSBFIRST, LED_SEG_TAB[3]+1); digitalWrite(latchPin, HIGH); delay(1000); digitalWrite(latchPin, LOW); shiftOut(dataPin, clockPin, LSBFIRST, LED_SEG_TAB[7]); shiftOut(dataPin, clockPin, LSBFIRST, LED_SEG_TAB[6]+1); shiftOut(dataPin, clockPin, LSBFIRST, LED_SEG_TAB[5]); shiftOut(dataPin, clockPin, LSBFIRST, LED_SEG_TAB[4]); digitalWrite(latchPin, HIGH); delay(1000); }

After a moment you should see the display spring into action in the same way as in the demonstration video:

How does it work? 

First we define which digital output pins are used for latch, clock and data on lines four to six. On line eight we have created an array which contains values that are sent to the shift registers in the module to display the possible digits and letters. For example, the first – 0xfc – will activate the segments to display a zero, 0x7a for the letter C, and so on. 

From line 20 we’ve created a custom function that is used to send a whole number between zero and 9999 to the display. To do so, simply use:

void displayNumber(value, true/false);

where value is the number to display (or variable containing the number) – and the second parameter of true or false. This controls whether you have a leading zero displayed – true for yes, false for no. 

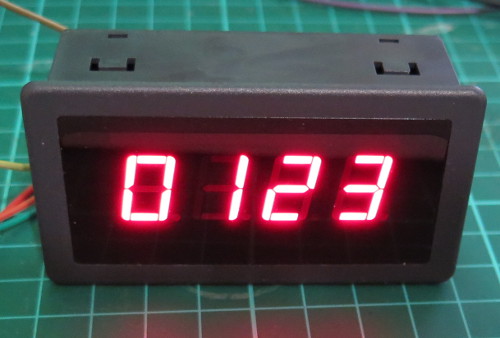
For example, to display “0123” you would use:

displayNumber(123, true);

… which results with:

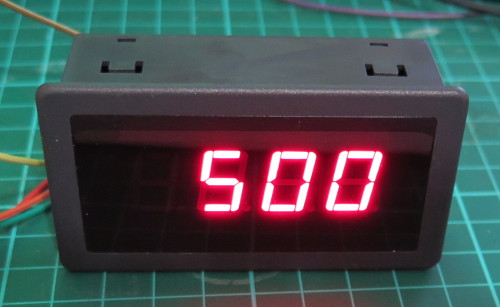
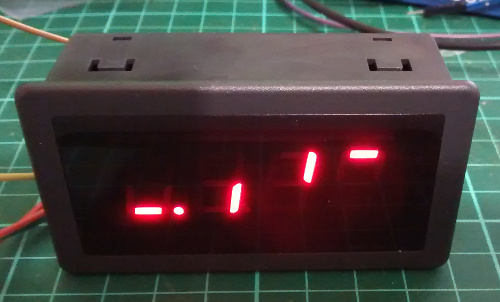
or to display “500” you would use:

displayNumber(500, false);

… which results with:

To turn off all the digits, you need to send zeros to every bit in the shift register, and this is accomplished with the function in the sketch called 

allOff();

What about the decimal point? 

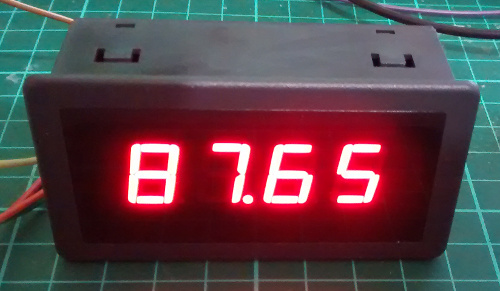
To turn on the decimal point for a particular digit, add 1 to the value being sent to a particular digit. Using the code from the demonstration sketch to display 87.65 you would use:

 digitalWrite(latchPin, LOW);

 shiftOut(dataPin, clockPin, LSBFIRST, LED_SEG_TAB[5]);

 shiftOut(dataPin, clockPin, LSBFIRST, LED_SEG_TAB[6]);

 shiftOut(dataPin, clockPin, LSBFIRST, LED_SEG_TAB[7]+1); // added one for decimal point

 shiftOut(dataPin, clockPin, LSBFIRST, LED_SEG_TAB[8]);

 digitalWrite(latchPin, HIGH);

… which results with:

In-depth explanation of how the module is controlled

As shown in the schematic above, each digit is controlled by a 74HC595 shift register. Each shift register has eight digital outputs, each of which control an individual segment of each digit. So by sending four bytes of data (one byte = eight bits) you can control each segment of the display. 

Each digit’s segments are mapped as follows:

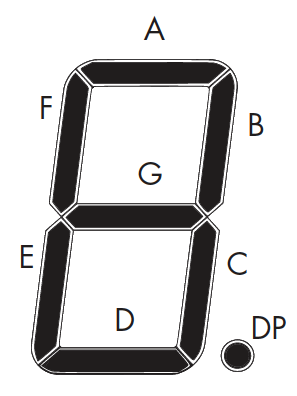
And the outputs from each shift register match the order of segments from left to right. So outputs 0~7 match A~G then decimal point. 

For example, to create the number seven with a decimal point, you need to turn on segments A, B, C and DP – which match to the shift register’s outputs 0,1,2,8. 

Thus the byte to send to the shift register would be 0b11100001 (or 225 in decimal or 0xE1 in hexadecimal). 

Every time you want to change the display you need to re-draw all four (or more if more than one module is connected) digits – so four bytes of data are sent for each display change. The digits are addressed from right to left, so the first byte send is for the last digit – and the last byte is for the first digit. 

There are three stages of updating the display. 

  1. Set the LCK (latch) line low
  2. Shift out four bytes of data from your microcontroller
  3. Set the LCK (latch) line high

For example, using Arduino code we use:

  digitalWrite(latchPin, LOW);

  shiftOut(dataPin, clockPin, LSBFIRST, 0b10000000); // digit 4

  shiftOut(dataPin, clockPin, LSBFIRST, 0b01000000); // digit 3

  shiftOut(dataPin, clockPin, LSBFIRST, 0b00100000); // digit 2

  shiftOut(dataPin, clockPin, LSBFIRST, 0b00010001); // digit 1

  digitalWrite(latchPin, HIGH);

This would result with the following:

Note how the bytes in binary match the map of the digits and their position. For example, the first byte sent was for the fourth digit, and the segment A was turned on. And that’s all there is to it – a neat and simple display. 

This post brought to you by pmdway.com – everything for makers and electronics enthusiasts, with free delivery worldwide.

To keep up to date with new posts at tronixstuff.com, please subscribe to the mailing list in the box on the right, or follow us on twitter @tronixstuff.


Tronixstuff 13 Jul 08:48
arduino  display  led  numeric  pmdway  

A Ping Pong Ball LED Video Wall

Constrained builds are often the most fun. Throw an artificial limit into the mix, like time limiting your effort or restricting yourself to what’s on hand, and there’s no telling what will happen.

[bitluni] actually chose both of those constraints for this ping pong ball LED video display, and the results are pretty cool, even if the journey was a little rough. It seems like using sheet steel for the support of his 15 x 20 Neopixel display was a mistake, at least in hindsight. A CNC router would probably have made the job of drilling 300 holes quite a bit easier, but when all you have is a hand drill and a time limit, you soldier on. Six strings of Neopixels fill the holes, a largish power supply provides the 18 or so amps needed, and an Arduino knock-off controls the display. The ping pong ball diffusers are a nice touch, even if punching holes in them cost [bitluni] a soldering iron tip or two. The display is shown in action in the video below, mostly with scrolling text. If we may make a modest suggestion, a game of Pong on a ping pong ball display might be fun.

[bitluni] says that the display is on its way to Maker Faire Berlin this weekend, so stop by and say hi. Maybe he’ll have some of his other cool builds too, like his Sony Watchman Game Boy mashup, or the electric scooter of questionable legality.

Hack a Day 17 May 16:30

Hackaday Prize Entry: Safety Glasses Are Also Hands-Free Multimeter

It seems like the multimeter is never easy to see during a project. Whether it’s troubleshooting a vehicle’s electrical system and awkwardly balancing the meter on some vacuum lines and the intake manifold, or installing a new solar panel and hoping the meter doesn’t fall on the ground while the leads are in both hands, it seems like there’s never a good way to see the meter while actually using it. Some meters have a small magnet and strap that can be used to hang them temporarily, but this will only get you so far.

[Alain Mauer]’s entry into the Hackaday Prize looks to solve this glaring problem. Using a heads-up Bluetooth display mounted to a pair of safety glasses, a multimeter can be connected to the device in order to display its information directly to its user. Based on his original idea which used a normal pair of prescription glasses as its foundation, [Alain]’s goal is to reduce safety hazards that might arise when using a multimeter in an awkward or dangerous manner that might not otherwise be possible.

The device uses an Arduino Pro Micro to connect to the multimeter and drive the display. [Alain] notes that the real challenge is with the optical system, however. Either way though, this would be a welcome addition to any lab, workspace, or electrician’s toolbox. Be sure to check out the video of it in action after the break.


Filed under: The Hackaday Prize, tool hacks

Arduino Lighting Controller With Remote Twist

The time for putting up festive lights all around your house is nigh, and this is a very popular time for those of us who use the holiday season as an excuse to buy a few WiFi chips and Arduinos to automate all of our decorations. The latest in this great tradition is [Real Time Logic]’s cloud-based Christmas light setup.

In order to give public access to the Christmas light setup, a ESP8266 WiFi Four Relay board was configured with NodeMCU. This allows for four channels for lights, which are controlled through the Light Controller Server software. Once this is setup through a domain, all anyone has to do to change the lighting display is open up a web browser and head to the website. The creators had homeowners, restaurants, and church displays in mind, but it’s not too big of a leap to see how this could get some non-holiday use as well.

The holidays are a great time to get into the hacking spirit. From laser-projected lighting displays to drunk, animatronic Santas, there’s almost no end to the holiday fun, and you’ve still got a week! (Or 53!)


Filed under: Holiday Hacks
Hack a Day 16 Dec 03:00

Animated Progress Bar Shows LCD New Tricks

A small LCD screen can be extremely helpful with small microcontroller projects. Not everything needs to communicate to a fancy server using an ESP8266. However, if the simplicity of the character displays irks you, it’s possible to spice them up a little bit with custom characters and create animations, like [Fabien] did with his animated Arduino progress bar. (Google Translate from French)
The project started out simply enough: all [Fabien] needed was a progress bar. It’s easy enough to fill in the “characters” on the 2×16 character LCD screen one-by-one to indicate progress, and the first version of this did exactly that. The second version got a little bit fancier by adding a border around the progress bar and doubling its resolution, but the third version is where knowing the inner machinations of the microcontroller really paid off. Using a custom charset reuse optimization, [Fabien] was able to use 19 custom characters at a time when the display will normally only allow for eight. This was accomplished by placing the custom characters in memory in the correct order, to essentially trick the microcontroller into displaying them.
These types of microcontroller hacks get deep into the inner workings of the microcontroller and help expose some tricks that we can all use to understand their operation on a deeper level. Whether you’re using PWM to get a microcontroller to operate a TV, or creating the ATtiny-est MIDI synth, these tricks are crucial to getting exactly what you want out of a small, inexpensive microcontroller.

Filed under: Microcontrollers

Paraffin Oil and Water Dot Matrix Display

In preparation for Makerfaire, [hwhardsoft] needed to throw together some demos. So they dug deep and produced this unique display.

The display uses two synchronized peristaltic pumps to push water and red paraffin through a tube that switches back over itself in a predictable fashion. As visible in the video after the break, the pumps go at it for a few minutes producing a seemingly random pattern. The pattern coalesces at the end into a short string of text. The text is unfortunately fairly hard to read, even on a contrasting background. Perhaps an application of UV dye could help?

Once the message has been displayed, the water and paraffin drop back into the holding tank as the next message is queued up. The oil and water separate just like expected and a pump at the level of each fluid feeds it back into the system.

We were deeply puzzled at what appeared to be an Arduino mounted on a DIN rail for use in industrial settings, but then discovered that this product is what [hwhardsoft] built the demo to sell. We can see some pretty cool variations on this technique for art displays.


Filed under: Arduino Hacks
Hack a Day 03 Jun 03:00

Hackaday Prize Entry: ForEx Display is A Well Executed Hack

[Stefan] works in a place where knowing the exact state of the foreign-exchange market is important to the money making schemes of the operation. Checking an app or a website was too slow and broke him out of his workflow. OS desktop widgets have more or less departed this earth for the moment. The only solution then, was to build a widget for his actual desk.

The brains of the device is a ESP8266 board, some peripherals and a small backlit TFT display. The device can run off battery or from a wall wart. [Stefan] even added some nice features not typically found in hacks like this, such as a photocell that detects the light level and dims the screen accordingly.

The software uses an interesting approach to get the latest times and timezones. Rather than use a chart or service made for the task, he uses an open weather API to do the task. Pretty clever.

The case is 3D printed and sanded. To get the nice finish shown in the picture [Stefan] spray-painted the case afterwards. All put together the device looks great and gives him the desktop widget he desired.

The HackadayPrize2016 is Sponsored by:

Filed under: clock hacks
Hack a Day 13 May 06:01

NeoPixel Heart Beat Display


Project Description


In this project, your heart will control a mesmerising LED sequence on a 5 metre Neopixel LED strip with a ws2812B chipset. Every heart beat will trigger a LED animation that will keep you captivated and attached to your Arduino for ages. The good thing about this project is that it is relatively easy to set up, and requires no soldering. The hardest part is downloading and installing the FastLED library into the Arduino IDE, but that in itself is not too difficult. The inspiration and idea behind this project came from Ali Murtaza, who wanted to know how to get an LED strip to pulse to his heart beat.
 
Have a look at the video below to see this project in action.


The Video


Parts Required:


Power Requirements

Before you start any LED strip project, the first thing you will need to think about is POWER. According to the Adafruit website, each individual NeoPixel LED can draw up to 60 milliamps at maximum brightness - white. Therefore the amount of current required for the entire strip will be way more than your Arduino can handle. If you try to power this LED strip directly from your Arduino, you run the risk of damaging not only your Arduino, but your USB port as well. The Arduino will be used to control the LED strip, but the LED strip will need to be powered by a separate power supply. The power supply you choose to use is important. It must provide the correct voltage, and must able to supply sufficient current.
 

Operating Voltage (5V)

The operating voltage of the NeoPixel strip is 5 volts DC. Excessive voltage will damage/destroy your NeoPixels.

Current requirements (9.0 Amps)

OpenLab recommend the use of a 5V 10A power supply. Having more Amps is OK, providing the output voltage is 5V DC. The LEDs will only draw as much current as they need. To calculate the amount of current this 5m strip can draw with all LEDs turned on at full brightness - white:

30 NeoPixel LEDs x 60mA x 5m = 9000mA = 9.0 Amps for a 5 metre strip.

Therefore a 5V 10A power supply would be able to handle the maximum current (9.0 Amps) demanded by a 5m NeoPixel strip containing a total of 150 LEDs.


Arduino Libraries and IDE


Before you start to hook up any components, upload the following sketch to the Arduino microcontroller. I am assuming that you already have the Arduino IDE installed on your computer. If not, the IDE can be downloaded from here.
 
The FastLED library is useful for simplifying the code for programming the NeoPixels. The latest "FastLED library" can be downloaded from here. I used FastLED library version 3.0.3 in this project.
 
If you have a different LED strip or your NeoPixels have a different chipset, make sure to change the relevant lines of code to accomodate your hardware. I would suggest you try out a few of the FastLED library examples before using the code below, so that you become more familiar with the library, and will be better equipped to make the necessary changes. If you have a 5 metre length of the NeoPixel 30 LED/m strip with the ws2812B chipset, then you will not have to make any modification below.
 

ARDUINO CODE:


1
2
3
4
5
6
7
8
9
10
11
12
13
14
15
16
17
18
19
20
21
22
23
24
25
26
27
28
29
30
31
32
33
34
35
36
37
38
39
40
41
42
43
44
45
46
47
48
49
50
51
52
53
54
55
56
57
58
59
60
61
62
63
64
65
66
67
68
69
70
71
72
73
74
75
76
77
78
79
80
81
82
83
84
85
86
87
88
89
90
91
92
93
94
95
96
97
98
99
100
101
102
103
104
105
106
107
108
109
110
111
112
113
114
115
116
117
118
119
120
121
122
123
124
125
126
127
128
129
130
131
132
133
134
135
136
137
138
139
140
/* ================================================================================================ Project: NeoPixel Heart Beat Display Neopixel chipset: ws2812B (30 LED/m strip) Author: Scott C Created: 8th July 2015 Arduino IDE: 1.6.4 Website: http://arduinobasics.blogspot.com/p/arduino-basics-projects-page.html Description: This sketch will display a heart beat on a 5m Neopixel LED strip. Requires a Grove Ear-clip heart rate sensor and a Neopixel strip. This project makes use of the FastLED library: http://fastled.io/ You may need to modify the code below to accomodate your specific LED strip. See the FastLED library site for more details. ================================================================================================== */ //This project needs the FastLED library - link in the description. #include "FastLED.h" //The total number of LEDs being used is 150 #define NUM_LEDS 150 // The data pin for the NeoPixel strip is connected to digital Pin 6 on the Arduino #define DATA_PIN 6 //Attach the Grove Ear-clip heart rate sensor to digital pin 2 on the Arduino. #define EAR_CLIP 2 //Initialise the LED array CRGB leds[NUM_LEDS]; //Initialise the global variables used to control the LED animation int ledNum = 0; //Keep track of the LEDs boolean beated = false; //Used to identify when the heart has beated int randomR = 0; //randomR used to randomise the fade-out of the LEDs //================================================================================================ // setup() : Is used to initialise the LED strip //================================================================================================ void setup() { FastLED.addLeds<NEOPIXEL,DATA_PIN>(leds, NUM_LEDS); //Set digital pin 2 (Ear-clip heart rate sensor) as an INPUT pinMode(EAR_CLIP, INPUT);} //================================================================================================ // loop() : Take readings from the Ear-clip sensor, and display the animation on the LED strip //================================================================================================ void loop() { //If the Ear-clip sensor moves from LOW to HIGH, call the beatTriggered method if(digitalRead(EAR_CLIP)>0){ //beatTriggered() is only called if the 'beated' variable is false. //This prevents multiple triggers from the same beat. ifbeated){ beatTriggered(); } } else { beated = false; //Change the 'beated' variable to false when the Ear-clip heart rate sensor is reading LOW. } //Fade the LEDs by 1 unit/cycle, when the heart is at 'rest' (i.e. between beats) fadeLEDs(5);} //================================================================================================ // beatTriggered() : This is the LED animation sequence when the heart beats //================================================================================================ void beatTriggered(){ //Ignite 30 LEDs with a red value between 0 to 255 for(int i = 0; i<30; i++){ //The red channel is randomised to a value between 0 to 255 leds[ledNum].r=random8(); FastLED.show(); //Call the fadeLEDs method after every 3rd LED is lit. if(ledNum%3==0){ fadeLEDs(5); } //Move to the next LED ledNum++; //Make sure to move back to the beginning if the animation falls off the end of the strip if(ledNum>(NUM_LEDS-1)){ ledNum=0; } } //Ignite 20 LEDS with a blue value between 0 to 120 for(int i = 0; i<20; i++){ //The blue channel is randomised to a value between 0 to 120 leds[ledNum].b=random8(120); FastLED.show(); //Call the fadeLEDs method after every 3rd LED is lit. if(ledNum%3==0){ fadeLEDs(5); } //Move to the next LED ledNum++; //Make sure to move back to the beginning if the animation falls off the end of the strip if(ledNum>(NUM_LEDS-1)){ ledNum=0; } } //Change the 'beated' variable to true, until the Ear-Clip sensor reads LOW. beated=true;} //================================================================================================ // fadeLEDs() : The fading effect of the LEDs when the Heart is resting (Ear-clip reads LOW) //================================================================================================ void fadeLEDs(int fadeVal){ for (int i = 0; i<NUM_LEDS; i++){ //Fade every LED by the fadeVal amount leds[i].fadeToBlackBy( fadeVal ); //Randomly re-fuel some of the LEDs that are currently lit (1% chance per cycle) //This enhances the twinkling effect. if(leds[i].r>10){ randomR = random8(100); if(randomR<1){ //Set the red channel to a value of 80 leds[i].r=80; //Increase the green channel to 20 - to add to the effect leds[i].g=20; } } } FastLED.show();}


NeoPixel Strip connection

The NeoPixel strip is rolled up when you first get it. You will notice that there are wires on both sides of the strip. This allows you to chain LED strips together to make longer strips. The more LEDs you have, the more current you will need. Connect your Arduino and power supply to the left side of the strip, with the arrows pointing to the right. (i.e. the side with the "female" jst connector).


NeoPixel Strip Wires

There are 5 wires that come pre-attached to either side of the LED strip.


You don't have to use ALL FIVE wires, however you will need at least one of each colour: red, white & green.


Fritzing sketch

The following diagram will show you how to wire everything together
 
(click to enlarge)

Arduino Power considerations

Please note that the Arduino is powered by a USB cable.
If you plan to power the Arduino from your power supply, you will need to disconnect the USB cable from the Arduino FIRST, then connect a wire from the 5V line on the Power supply to the VIN pin on the Arduino. Do NOT connect the USB cable to the Arduino while the VIN wire is connected.


Large Capacitor

Adafruit also recommend the use of a large capacitor across the + and - terminals of the LED strip to "prevent the initial onrush of current from damaging the pixels". Adafruit recommends a capacitor that is 1000uF, 6.3V or higher. I used a 4700uF 16V Electrolytic Capacitor.


Resistor on Data Pin

Another recommendation from Adafruit is to place a "300 to 500 Ohm resistor" between the Arduino's data pin and the data input on the first NeoPixel to prevent voltage spikes that can damage the first pixel. I used a 330 Ohm resistor.


Grove Ear-clip heart rate sensor connection

The Grove Base shield makes it easy to connect Grove modules to the Arduino. If you have a Grove Base shield, you will need to connect the Ear-clip heart rate sensor to Digital pin 2 as per the diagram below.


Completed construction

Once you have everything connected, you can plug the USB cable into the Arduino, and turn on the LED power supply. Attach the ear-clip to your ear (or to your finger) and allow a few seconds to allow the sensor to register your pulse. The LED strip will light up with every heart beat with an animation that moves from one end of the strip to the other in just three heart beats. When the ear-clip is not connected to your ear or finger, the LEDs should remain off. However, the ear clip may "trigger" a heart beat when opening or closing the clip.
 
Here is a picture of all the components (fully assembled).


Concluding comments


This very affordable LED strip allows you to create amazing animations over a greater distance. I thought that having less LEDs per metre would make the animations look "jittery", but I was wrong, they look amazing. One of the good things about this strip is the amount of space between each Neopixel, allowing you to easily cut and join the strip to the size and shape you need.
 
This LED strip is compatible with the FastLED library, which makes for easy LED animation programming. While I used this LED strip to display my heart beat, you could just as easily use it to display the output of any other sensor attached to the Arduino.


If you like this page, please do me a favour and show your appreciation :

 
Visit my ArduinoBasics Google + page.
Follow me on Twitter by looking for ScottC @ArduinoBasics.
I can also be found on Pinterest and Instagram.
Have a look at my videos on my YouTube channel.


This project would not have been possible without OpenLab's collaborative effort.
Please visit their site for more cool projects.


However, if you do not have a google profile...
Feel free to share this page with your friends in any way you see fit.

NeoPixel Heart Beat Display


Project Description


In this project, your heart will control a mesmerising LED sequence on a 5 metre Neopixel LED strip with a ws2812B chipset. Every heart beat will trigger a LED animation that will keep you captivated and attached to your Arduino for ages. The good thing about this project is that it is relatively easy to set up, and requires no soldering. The hardest part is downloading and installing the FastLED library into the Arduino IDE, but that in itself is not too difficult. The inspiration and idea behind this project came from Ali Murtaza, who wanted to know how to get an LED strip to pulse to his heart beat.
 
Have a look at the video below to see this project in action.


The Video


Parts Required:


Power Requirements

Before you start any LED strip project, the first thing you will need to think about is POWER. According to the Adafruit website, each individual NeoPixel LED can draw up to 60 milliamps at maximum brightness - white. Therefore the amount of current required for the entire strip will be way more than your Arduino can handle. If you try to power this LED strip directly from your Arduino, you run the risk of damaging not only your Arduino, but your USB port as well. The Arduino will be used to control the LED strip, but the LED strip will need to be powered by a separate power supply. The power supply you choose to use is important. It must provide the correct voltage, and must able to supply sufficient current.
 

Operating Voltage (5V)

The operating voltage of the NeoPixel strip is 5 volts DC. Excessive voltage will damage/destroy your NeoPixels.

Current requirements (9.0 Amps)

OpenLab recommend the use of a 5V 10A power supply. Having more Amps is OK, providing the output voltage is 5V DC. The LEDs will only draw as much current as they need. To calculate the amount of current this 5m strip can draw with all LEDs turned on at full brightness - white:

30 NeoPixel LEDs x 60mA x 5m = 9000mA = 9.0 Amps for a 5 metre strip.

Therefore a 5V 10A power supply would be able to handle the maximum current (9.0 Amps) demanded by a 5m NeoPixel strip containing a total of 150 LEDs.


Arduino Libraries and IDE


Before you start to hook up any components, upload the following sketch to the Arduino microcontroller. I am assuming that you already have the Arduino IDE installed on your computer. If not, the IDE can be downloaded from here.
 
The FastLED library is useful for simplifying the code for programming the NeoPixels. The latest "FastLED library" can be downloaded from here. I used FastLED library version 3.0.3 in this project.
 
If you have a different LED strip or your NeoPixels have a different chipset, make sure to change the relevant lines of code to accomodate your hardware. I would suggest you try out a few of the FastLED library examples before using the code below, so that you become more familiar with the library, and will be better equipped to make the necessary changes. If you have a 5 metre length of the NeoPixel 30 LED/m strip with the ws2812B chipset, then you will not have to make any modification below.
 

ARDUINO CODE:


1
2
3
4
5
6
7
8
9
10
11
12
13
14
15
16
17
18
19
20
21
22
23
24
25
26
27
28
29
30
31
32
33
34
35
36
37
38
39
40
41
42
43
44
45
46
47
48
49
50
51
52
53
54
55
56
57
58
59
60
61
62
63
64
65
66
67
68
69
70
71
72
73
74
75
76
77
78
79
80
81
82
83
84
85
86
87
88
89
90
91
92
93
94
95
96
97
98
99
100
101
102
103
104
105
106
107
108
109
110
111
112
113
114
115
116
117
118
119
120
121
122
123
124
125
126
127
128
129
130
131
132
133
134
135
136
137
138
139
140
/* ================================================================================================ Project: NeoPixel Heart Beat Display Neopixel chipset: ws2812B (30 LED/m strip) Author: Scott C Created: 8th July 2015 Arduino IDE: 1.6.4 Website: http://arduinobasics.blogspot.com/p/arduino-basics-projects-page.html Description: This sketch will display a heart beat on a 5m Neopixel LED strip. Requires a Grove Ear-clip heart rate sensor and a Neopixel strip. This project makes use of the FastLED library: http://fastled.io/ You may need to modify the code below to accomodate your specific LED strip. See the FastLED library site for more details. ================================================================================================== */ //This project needs the FastLED library - link in the description. #include "FastLED.h" //The total number of LEDs being used is 150 #define NUM_LEDS 150 // The data pin for the NeoPixel strip is connected to digital Pin 6 on the Arduino #define DATA_PIN 6 //Attach the Grove Ear-clip heart rate sensor to digital pin 2 on the Arduino. #define EAR_CLIP 2 //Initialise the LED array CRGB leds[NUM_LEDS]; //Initialise the global variables used to control the LED animation int ledNum = 0; //Keep track of the LEDs boolean beated = false; //Used to identify when the heart has beated int randomR = 0; //randomR used to randomise the fade-out of the LEDs //================================================================================================ // setup() : Is used to initialise the LED strip //================================================================================================ void setup() { FastLED.addLeds<NEOPIXEL,DATA_PIN>(leds, NUM_LEDS); //Set digital pin 2 (Ear-clip heart rate sensor) as an INPUT pinMode(EAR_CLIP, INPUT);} //================================================================================================ // loop() : Take readings from the Ear-clip sensor, and display the animation on the LED strip //================================================================================================ void loop() { //If the Ear-clip sensor moves from LOW to HIGH, call the beatTriggered method if(digitalRead(EAR_CLIP)>0){ //beatTriggered() is only called if the 'beated' variable is false. //This prevents multiple triggers from the same beat. ifbeated){ beatTriggered(); } } else { beated = false; //Change the 'beated' variable to false when the Ear-clip heart rate sensor is reading LOW. } //Fade the LEDs by 1 unit/cycle, when the heart is at 'rest' (i.e. between beats) fadeLEDs(5);} //================================================================================================ // beatTriggered() : This is the LED animation sequence when the heart beats //================================================================================================ void beatTriggered(){ //Ignite 30 LEDs with a red value between 0 to 255 for(int i = 0; i<30; i++){ //The red channel is randomised to a value between 0 to 255 leds[ledNum].r=random8(); FastLED.show(); //Call the fadeLEDs method after every 3rd LED is lit. if(ledNum%3==0){ fadeLEDs(5); } //Move to the next LED ledNum++; //Make sure to move back to the beginning if the animation falls off the end of the strip if(ledNum>(NUM_LEDS-1)){ ledNum=0; } } //Ignite 20 LEDS with a blue value between 0 to 120 for(int i = 0; i<20; i++){ //The blue channel is randomised to a value between 0 to 120 leds[ledNum].b=random8(120); FastLED.show(); //Call the fadeLEDs method after every 3rd LED is lit. if(ledNum%3==0){ fadeLEDs(5); } //Move to the next LED ledNum++; //Make sure to move back to the beginning if the animation falls off the end of the strip if(ledNum>(NUM_LEDS-1)){ ledNum=0; } } //Change the 'beated' variable to true, until the Ear-Clip sensor reads LOW. beated=true;} //================================================================================================ // fadeLEDs() : The fading effect of the LEDs when the Heart is resting (Ear-clip reads LOW) //================================================================================================ void fadeLEDs(int fadeVal){ for (int i = 0; i<NUM_LEDS; i++){ //Fade every LED by the fadeVal amount leds[i].fadeToBlackBy( fadeVal ); //Randomly re-fuel some of the LEDs that are currently lit (1% chance per cycle) //This enhances the twinkling effect. if(leds[i].r>10){ randomR = random8(100); if(randomR<1){ //Set the red channel to a value of 80 leds[i].r=80; //Increase the green channel to 20 - to add to the effect leds[i].g=20; } } } FastLED.show();}


NeoPixel Strip connection

The NeoPixel strip is rolled up when you first get it. You will notice that there are wires on both sides of the strip. This allows you to chain LED strips together to make longer strips. The more LEDs you have, the more current you will need. Connect your Arduino and power supply to the left side of the strip, with the arrows pointing to the right. (i.e. the side with the "female" jst connector).


NeoPixel Strip Wires

There are 5 wires that come pre-attached to either side of the LED strip.


You don't have to use ALL FIVE wires, however you will need at least one of each colour: red, white & green.


Fritzing sketch

The following diagram will show you how to wire everything together
 
(click to enlarge)

Arduino Power considerations

Please note that the Arduino is powered by a USB cable.
If you plan to power the Arduino from your power supply, you will need to disconnect the USB cable from the Arduino FIRST, then connect a wire from the 5V line on the Power supply to the 5V pin on the Arduino. Do NOT connect the USB cable to the Arduino while the 5V wire is connected to the Arduino.


Large Capacitor

Adafruit also recommend the use of a large capacitor across the + and - terminals of the LED strip to "prevent the initial onrush of current from damaging the pixels". Adafruit recommends a capacitor that is 1000uF, 6.3V or higher. I used a 4700uF 16V Electrolytic Capacitor.


Resistor on Data Pin

Another recommendation from Adafruit is to place a "300 to 500 Ohm resistor" between the Arduino's data pin and the data input on the first NeoPixel to prevent voltage spikes that can damage the first pixel. I used a 330 Ohm resistor.


Grove Ear-clip heart rate sensor connection

The Grove Base shield makes it easy to connect Grove modules to the Arduino. If you have a Grove Base shield, you will need to connect the Ear-clip heart rate sensor to Digital pin 2 as per the diagram below.


Completed construction

Once you have everything connected, you can plug the USB cable into the Arduino, and turn on the LED power supply. Attach the ear-clip to your ear (or to your finger) and allow a few seconds to allow the sensor to register your pulse. The LED strip will light up with every heart beat with an animation that moves from one end of the strip to the other in just three heart beats. When the ear-clip is not connected to your ear or finger, the LEDs should remain off. However, the ear clip may "trigger" a heart beat when opening or closing the clip.
 
Here is a picture of all the components (fully assembled).


Concluding comments


This very affordable LED strip allows you to create amazing animations over a greater distance. I thought that having less LEDs per metre would make the animations look "jittery", but I was wrong, they look amazing. One of the good things about this strip is the amount of space between each Neopixel, allowing you to easily cut and join the strip to the size and shape you need.
 
This LED strip is compatible with the FastLED library, which makes for easy LED animation programming. While I used this LED strip to display my heart beat, you could just as easily use it to display the output of any other sensor attached to the Arduino.


If you like this page, please do me a favour and show your appreciation :

 
Visit my ArduinoBasics Google + page.
Follow me on Twitter by looking for ScottC @ArduinoBasics.
I can also be found on Pinterest and Instagram.
Have a look at my videos on my YouTube channel.


This project would not have been possible without OpenLab's collaborative effort.
Please visit their site for more cool projects.


However, if you do not have a google profile...
Feel free to share this page with your friends in any way you see fit.