Posts with «numeric» label

Tutorial – Arduino and Four Digit Seven Segment Display Module

This is a quick start guide for the Four Digit Seven Segment Display Module and Enclosure from PMD Way. This module offers a neat and bright display which is ideal for numeric or hexadecimal data. It can display the digits 0 to 9 including the decimal point, and the letters A to F. You can also control each segment individually if desired. 

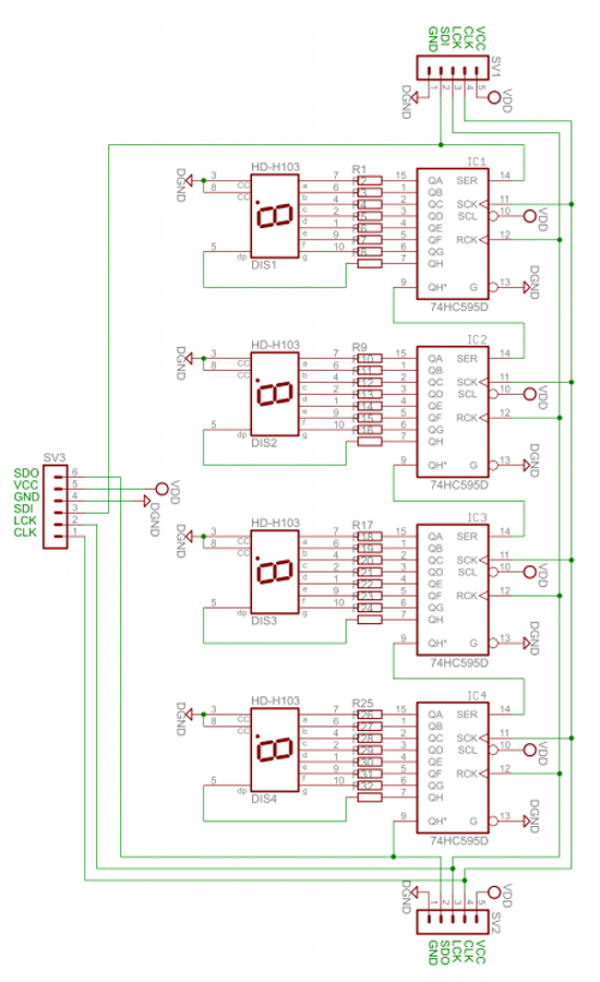
Each module contains four 74HC595 shift registers – once of each controls a digit. If you carefully remove the back panel from the enclosure, you can see the pin connections:

If you’re only using one display, use the group of pins at the centre-bottom of the board. From left to right the connections are:

  1. Data out (ignore for single display use)
  2. VCC – connect to a 3.3V or 5V supply
  3. GND – connect to your GND line
  4. SDI – data in – connect to the data out pin on your Arduino/other board
  5. LCK – latch – connect to the output pin on your Arduino or other board that will control the latch
  6. CLK – clock – connect to the output pin on your Arduino or other board that will control the clock signal

For the purposes of our Arduino tutorial, connect VCC to the 5V pin, GND to GND, SDI to D11, LCK to D13 and CLK to D12. 

If you are connecting more than one module, use the pins on the left- and right-hand side of the module. Start with the connections from your Arduino (etc) to the right-hand side, as this is where the DIN (data in) pin is located.

Then connect the pins on the left-hand side of the module to the right-hand side of the new module – and so forth. SDO (data out) will connect to the SDI (data in) – with the other pins being identical for connection. 

The module schematic is shown below:

Arduino Example Sketch

Once you have made the connections to your Arduino as outlined above, upload the following sketch:

// Demonstration Arduino sketch for four digit, seven segment display with enclosure
// https://pmdway.com/collections/7-segment-numeric-leds/products/four-digit-seven-segment-display-module-and-enclosure
int latchPin = 13; // connect to LCK pin intclockPin = 12; // connect to CLK pin intdataPin = 11; // connect to SDI pin int LED_SEG_TAB[]={ 0xfc,0x60,0xda,0xf2,0x66,0xb6,0xbe,0xe0,0xfe,0xf6,0x01,0xee,0x3e,0x1a,0x7a,0x9e,0x8e,0x01,0x00}; //0 1 2 3 4 5 6 7 8 9 dp . a b c d e f off void setup() { //set pins to output so you can control the shift register pinMode(latchPin, OUTPUT); pinMode(clockPin, OUTPUT); pinMode(dataPin, OUTPUT); } void displayNumber(int value, boolean leadingZero) // break down "value" into digits and store in a,b,c,d { int a,b,c,d; a = value / 1000; value = value % 1000; b = value / 100; value = value % 100; c = value / 10; value = value % 10; d = value; if (leadingZero==false) // removing leading zeros { if (a==0 && b>0) { a = 18; } if (a==0 && b==0 && c>0) { a = 18; b = 18; } if (a==0 && b==0 && c==0) { a = 18; b = 18; c = 18; } if (a==0 && b==0 && c==0 && d==0) { a = 18; b = 18; c = 18; d = 18; } } digitalWrite(latchPin, LOW); shiftOut(dataPin, clockPin, LSBFIRST, LED_SEG_TAB[d]); shiftOut(dataPin, clockPin, LSBFIRST, LED_SEG_TAB[c]); shiftOut(dataPin, clockPin, LSBFIRST, LED_SEG_TAB[b]); shiftOut(dataPin, clockPin, LSBFIRST, LED_SEG_TAB[a]); digitalWrite(latchPin, HIGH); } void allOff() // turns off all segments { digitalWrite(latchPin, LOW); shiftOut(dataPin, clockPin, LSBFIRST, 0); shiftOut(dataPin, clockPin, LSBFIRST, 0); shiftOut(dataPin, clockPin, LSBFIRST, 0); shiftOut(dataPin, clockPin, LSBFIRST, 0); digitalWrite(latchPin, HIGH); } void loop() { for (int z=900; z<=1100; z++) { displayNumber(z, false); delay(10); } delay(1000); for (int z=120; z>=0; --z) { displayNumber(z, true); delay(10); } delay(1000); digitalWrite(latchPin, LOW); shiftOut(dataPin, clockPin, LSBFIRST, LED_SEG_TAB[14]); shiftOut(dataPin, clockPin, LSBFIRST, LED_SEG_TAB[13]); shiftOut(dataPin, clockPin, LSBFIRST, LED_SEG_TAB[12]); shiftOut(dataPin, clockPin, LSBFIRST, LED_SEG_TAB[11]); digitalWrite(latchPin, HIGH); delay(1000); digitalWrite(latchPin, LOW); shiftOut(dataPin, clockPin, LSBFIRST, LED_SEG_TAB[16]); shiftOut(dataPin, clockPin, LSBFIRST, LED_SEG_TAB[15]); shiftOut(dataPin, clockPin, LSBFIRST, LED_SEG_TAB[14]); shiftOut(dataPin, clockPin, LSBFIRST, LED_SEG_TAB[13]); digitalWrite(latchPin, HIGH); delay(1000); digitalWrite(latchPin, LOW); shiftOut(dataPin, clockPin, LSBFIRST, LED_SEG_TAB[0]); shiftOut(dataPin, clockPin, LSBFIRST, LED_SEG_TAB[1]); shiftOut(dataPin, clockPin, LSBFIRST, LED_SEG_TAB[2]); shiftOut(dataPin, clockPin, LSBFIRST, LED_SEG_TAB[3]+1); digitalWrite(latchPin, HIGH); delay(1000); digitalWrite(latchPin, LOW); shiftOut(dataPin, clockPin, LSBFIRST, LED_SEG_TAB[7]); shiftOut(dataPin, clockPin, LSBFIRST, LED_SEG_TAB[6]+1); shiftOut(dataPin, clockPin, LSBFIRST, LED_SEG_TAB[5]); shiftOut(dataPin, clockPin, LSBFIRST, LED_SEG_TAB[4]); digitalWrite(latchPin, HIGH); delay(1000); }

After a moment you should see the display spring into action in the same way as in the demonstration video:

How does it work? 

First we define which digital output pins are used for latch, clock and data on lines four to six. On line eight we have created an array which contains values that are sent to the shift registers in the module to display the possible digits and letters. For example, the first – 0xfc – will activate the segments to display a zero, 0x7a for the letter C, and so on. 

From line 20 we’ve created a custom function that is used to send a whole number between zero and 9999 to the display. To do so, simply use:

void displayNumber(value, true/false);

where value is the number to display (or variable containing the number) – and the second parameter of true or false. This controls whether you have a leading zero displayed – true for yes, false for no. 

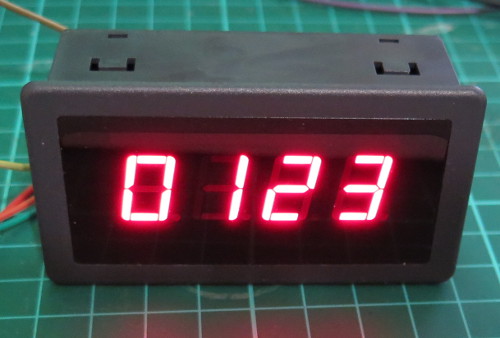
For example, to display “0123” you would use:

displayNumber(123, true);

… which results with:

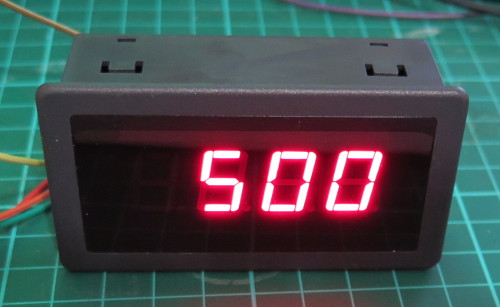
or to display “500” you would use:

displayNumber(500, false);

… which results with:

To turn off all the digits, you need to send zeros to every bit in the shift register, and this is accomplished with the function in the sketch called 

allOff();

What about the decimal point? 

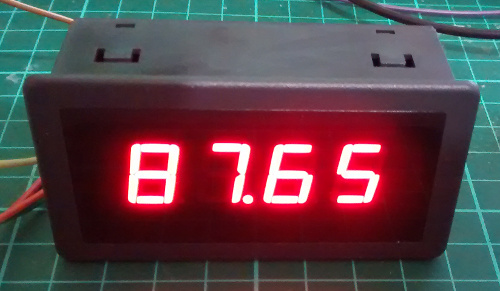
To turn on the decimal point for a particular digit, add 1 to the value being sent to a particular digit. Using the code from the demonstration sketch to display 87.65 you would use:

 digitalWrite(latchPin, LOW);

 shiftOut(dataPin, clockPin, LSBFIRST, LED_SEG_TAB[5]);

 shiftOut(dataPin, clockPin, LSBFIRST, LED_SEG_TAB[6]);

 shiftOut(dataPin, clockPin, LSBFIRST, LED_SEG_TAB[7]+1); // added one for decimal point

 shiftOut(dataPin, clockPin, LSBFIRST, LED_SEG_TAB[8]);

 digitalWrite(latchPin, HIGH);

… which results with:

In-depth explanation of how the module is controlled

As shown in the schematic above, each digit is controlled by a 74HC595 shift register. Each shift register has eight digital outputs, each of which control an individual segment of each digit. So by sending four bytes of data (one byte = eight bits) you can control each segment of the display. 

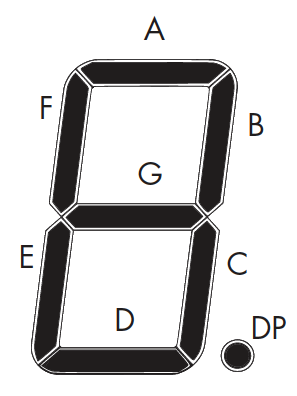
Each digit’s segments are mapped as follows:

And the outputs from each shift register match the order of segments from left to right. So outputs 0~7 match A~G then decimal point. 

For example, to create the number seven with a decimal point, you need to turn on segments A, B, C and DP – which match to the shift register’s outputs 0,1,2,8. 

Thus the byte to send to the shift register would be 0b11100001 (or 225 in decimal or 0xE1 in hexadecimal). 

Every time you want to change the display you need to re-draw all four (or more if more than one module is connected) digits – so four bytes of data are sent for each display change. The digits are addressed from right to left, so the first byte send is for the last digit – and the last byte is for the first digit. 

There are three stages of updating the display. 

  1. Set the LCK (latch) line low
  2. Shift out four bytes of data from your microcontroller
  3. Set the LCK (latch) line high

For example, using Arduino code we use:

  digitalWrite(latchPin, LOW);

  shiftOut(dataPin, clockPin, LSBFIRST, 0b10000000); // digit 4

  shiftOut(dataPin, clockPin, LSBFIRST, 0b01000000); // digit 3

  shiftOut(dataPin, clockPin, LSBFIRST, 0b00100000); // digit 2

  shiftOut(dataPin, clockPin, LSBFIRST, 0b00010001); // digit 1

  digitalWrite(latchPin, HIGH);

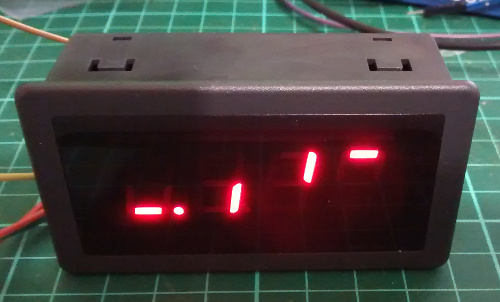
This would result with the following:

Note how the bytes in binary match the map of the digits and their position. For example, the first byte sent was for the fourth digit, and the segment A was turned on. And that’s all there is to it – a neat and simple display. 

This post brought to you by pmdway.com – everything for makers and electronics enthusiasts, with free delivery worldwide.

To keep up to date with new posts at tronixstuff.com, please subscribe to the mailing list in the box on the right, or follow us on twitter @tronixstuff.


Tronixstuff 13 Jul 08:48
arduino  display  led  numeric  pmdway  

Arduino Tutorials – Chapter 42 – Numeric Keypads

Learn how to use various numeric keypads with your Arduino.

This is chapter forty-two of our huge Arduino tutorial seriesUpdated 16/12/2013

Numeric keypads can provide a simple end-user alternative for various interfaces for your projects. Or if you need a lot of buttons, they can save you a lot of time with regards to construction. We’ll run through connecting them, using the Arduino library and then finish with a useful example sketch.

Getting Started

Numeric keypads are available from many retailers, and no matter where you get them from, make sure you can get the data sheet, as this will make life easier when wiring them up. Here are the two examples for our tutorial, from Futurlec (slow and cheap):

 Again, the data sheet is important as it will tell you which pins or connectors on the keypad are for the rows and columns, for example the black keypad shown above. If you don’t have the data sheet – you will need to manually determine which contacts are for the rows and columns.

This can be done using the continuity function of a multimeter (the buzzer). Start by placing one probe on pin 1, the other probe on pin 2, and press the keys one by one. Make a note of when a button completes the circuit, then move onto the next pin. Soon you will know which is which. For example, on the example keypad pins 1 and 5 are for button “1″, 2 and 5 for “4″, etc…

Furthermore some keypads will have the pins soldered to the end, some will not. With our two example keypads, the smaller unit had the pins – and we soldered pins to the large white unit:

At this point please download and install the keypad Arduino library. Now we’ll demonstrate how to use both keypads in simple examples. 

Using a 12 digit keypad

We’ll use the small black keypad from Futurlec, an Arduino Uno-compatible and an LCD with an I2C interface for display purposes. If you don’t have an LCD you could always send the text to the serial monitor instead.

Wire up your LCD then connect the keypad to the Arduino in the following manner:
  • Keypad row 1 to Arduino digital 5
  • Keypad row 2 to Arduino digital 4
  • Keypad row 3 to Arduino digital 3
  • Keypad row 4 to Arduino digital 2
  • Keypad column 1 to Arduino digital 8
  • Keypad column 2 to Arduino digital 7
  • Keypad column 3 to Arduino digital 6

If your keypad is different to ours, take note of the lines in the sketch from:

// keypad type definition

As you need to change the numbers in the arrays rowPins[ROWS] and colPins[COLS]. You enter the digital pin numbers connected to the rows and columns of the keypad respectively.

Furthermore, the array keys stores the values displayed in the LCD when a particular button is pressed. You can see we’ve matched it with the physical keypad used, however you can change it to whatever you need. But for now, enter and upload the following sketch once you’re satisfied with the row/pin number allocations:

/* Numeric keypad and I2C LCD
   https://tronixstuff.com/tutorials > chapter 42
   Uses Keypad library for Arduino
   http://www.arduino.cc/playground/Code/Keypad
   by Mark Stanley, Alexander Brevig */

#include "Keypad.h"
#include "Wire.h" // for I2C LCD
#include "LiquidCrystal_I2C.h" // for I2C bus LCD module 
// http://www.dfrobot.com/wiki/index.php/I2C/TWI_LCD1602_Module_(SKU:_DFR0063)
LiquidCrystal_I2C lcd(0x27,16,2);  // set the LCD address to 0x27 for a 16 chars and 2 line display

// keypad type definition
const byte ROWS = 4; //four rows
const byte COLS = 3; //three columns
char keys[ROWS][COLS] =
 {{'1','2','3'},
  {'4','5','6'},
  {'7','8','9'},
  {'*','0','#'}};

byte rowPins[ROWS] = {
  5, 4, 3, 2}; //connect to the row pinouts of the keypad
byte colPins[COLS] = {
  8, 7, 6}; // connect to the column pinouts of the keypad

int count=0;

Keypad keypad = Keypad( makeKeymap(keys), rowPins, colPins, ROWS, COLS );

void setup()
{
  lcd.init();          // initialize the lcd
  lcd.backlight(); // turn on LCD backlight
}

void loop()
{
  char key = keypad.getKey();
  if (key != NO_KEY)
  {
    lcd.print(key);
    count++;
    if (count==17)
    {
      lcd.clear();
      count=0;
    }
  }
}

And the results of the sketch are shown in this video.

So now you can see how the button presses can be translated into data for use in a sketch. We’ll now repeat this demonstration with the larger keypad.

Using a 16 digit keypad

We’ll use the larger white 4×4 keypad from Futurlec, an Arduino Uno-compatible and for a change the I2C LCD from Akafugu for display purposes. (We reviewed these previously). Again, if you don’t have an LCD you could always send the text to the serial monitor instead. Wire up the LCD and then connect the keypad to the Arduino in the following manner:

  • Keypad row 1 (pin eight) to Arduino digital 5
  • Keypad row 2 (pin 1) to Arduino digital 4
  • Keypad row 3 (pin 2) to Arduino digital 3
  • Keypad row 4 (pin 4) to Arduino digital 2
  • Keypad column 1 (pin 3) to Arduino digital 9
  • Keypad column 2 (pin 5) to Arduino digital 8
  • Keypad column 3 (pin 6) to Arduino digital 7
  • Keypad column 4 (pin 7) to Arduino digital 6
Now for the sketch – take note how we have accommodated for the larger numeric keypad:
  • the extra column in the array char keys[]
  • the extra pin in the array colPins[]
  • and the byte COLS = 4.
/* Numeric keypad and I2C LCD
   https://tronixstuff.com/tutorials > chapter 42
   Uses Keypad library for Arduino
   http://www.arduino.cc/playground/Code/Keypad
   by Mark Stanley, Alexander Brevig */

#include "Keypad.h"
#include "Wire.h" // for I2C LCD
#include "TWILiquidCrystal.h"
// http://store.akafugu.jp/products/26
LiquidCrystal lcd(12, 11, 5, 4, 3, 2);

const byte ROWS = 4; //four rows
const byte COLS = 4; //four columns
char keys[ROWS][COLS] =
 {{'1','2','3','A'},
  {'4','5','6','B'},
  {'7','8','9','C'},
  {'*','0','#','D'}};
byte rowPins[ROWS] = {
  5, 4, 3, 2}; //connect to the row pinouts of the keypad
byte colPins[COLS] = {
  9, 8, 7, 6}; //connect to the column pinouts of the keypad
int count=0;

Keypad keypad = Keypad( makeKeymap(keys), rowPins, colPins, ROWS, COLS );

void setup()
{
  Serial.begin(9600);
  lcd.begin(16, 2);
  lcd.print("Keypad test!");  
  delay(1000);
  lcd.clear();
}

void loop()
{
  char key = keypad.getKey();
  if (key != NO_KEY)
  {
    lcd.print(key);
    Serial.print(key);
    count++;
    if (count==17)
    {
      lcd.clear();
      count=0;
    }
  }
}

And again you can see the results of the sketch above in this video.

And now for an example project, one which is probably the most requested use of the numeric keypad…

Example Project – PIN access system

The most-requested use for a numeric keypad seems to be a “PIN” style application, where the Arduino is instructed to do something based on a correct number being entered into the keypad. The following sketch uses the hardware described for the previous sketch and implements a six-digit PIN entry system. The actions to take place can be inserted in the functions correctPIN() and incorrectPIN(). And the PIN is set in the array char PIN[6]. With a little extra work you could create your own PIN-change function as well. 

// PIN switch with 16-digit numeric keypad
// https://tronixstuff.com/tutorials > chapter 42

#include "Keypad.h"
#include <Wire.h>
#include <TWILiquidCrystal.h>
LiquidCrystal lcd(12, 11, 5, 4, 3, 2);

const byte ROWS = 4; //four rows
const byte COLS = 4; //four columns
char keys[ROWS][COLS] =
{
  {
    '1','2','3','A'  }
  ,
  {
    '4','5','6','B'  }
  ,
  {
    '7','8','9','C'  }
  ,
  {
    '*','0','#','D'  }
};
byte rowPins[ROWS] = {
  5, 4, 3, 2}; //connect to the row pinouts of the keypad
byte colPins[COLS] = {
  9, 8, 7, 6}; //connect to the column pinouts of the keypad

Keypad keypad = Keypad( makeKeymap(keys), rowPins, colPins, ROWS, COLS );

char PIN[6]={
  '1','2','A','D','5','6'}; // our secret (!) number
char attempt[6]={ 
  '0','0','0','0','0','0'}; // used for comparison
int z=0;

void setup()
{
  Serial.begin(9600);
  lcd.begin(16, 2);
  lcd.print("PIN Lock ");
  delay(1000);
  lcd.clear();
  lcd.print("  Enter PIN...");
}

void correctPIN() // do this if correct PIN entered
{
  lcd.print("* Correct PIN *");
  delay(1000);
  lcd.clear();
  lcd.print("  Enter PIN...");
}

void incorrectPIN() // do this if incorrect PIN entered
{
  lcd.print(" * Try again *");
  delay(1000);
  lcd.clear();
  lcd.print("  Enter PIN...");
}

void checkPIN()
{
  int correct=0;
  int i;
  for ( i = 0;   i < 6 ;  i++ )
  {

    if (attempt[i]==PIN[i])
    {
      correct++;
    }
  }
  if (correct==6)
  {
    correctPIN();
  } 
  else
  {
    incorrectPIN();
  }

  for (int zz=0; zz<6; zz++) 
  {
    attempt[zz]='0';
  }
}

void readKeypad()
{
  char key = keypad.getKey();
  if (key != NO_KEY)
  {
    attempt[z]=key;
    z++;
    switch(key)
    {
    case '*':
      z=0;
      break;
    case '#':
      z=0;
      delay(100); // for extra debounce
      lcd.clear();
      checkPIN();
      break;
    }
  }
}

void loop()
{
  readKeypad();
}

The project is demonstrated in this video.

Conclusion

So now you have the ability to use twelve and sixteen-button keypads with your Arduino systems. I’m sure you will come up with something useful and interesting using the keypads in the near future.

Stay tuned for upcoming Arduino tutorials by subscribing to the blog, RSS feed (top-right), twitter or joining our Google Group. And if you enjoyed the tutorial, or want to introduce someone else to the interesting world of Arduino – check out my book (now in a third printing!) “Arduino Workshop” from No Starch Press.

Arduino Tutorials – Chapter 42 – Numeric Keypads

Learn how to use various numeric keypads with your Arduino.

This is chapter forty-two of our huge Arduino tutorial seriesUpdated 16/12/2013

Numeric keypads can provide a simple end-user alternative for various interfaces for your projects. Or if you need a lot of buttons, they can save you a lot of time with regards to construction. We’ll run through connecting them, using the Arduino library and then finish with a useful example sketch.

Getting Started

Numeric keypads are available from many retailers, and no matter where you get them from, make sure you can get the data sheet, as this will make life easier when wiring them up. Here are the two examples for our tutorial, from Futurlec (slow and cheap):

 Again, the data sheet is important as it will tell you which pins or connectors on the keypad are for the rows and columns, for example the black keypad shown above. If you don’t have the data sheet – you will need to manually determine which contacts are for the rows and columns.

This can be done using the continuity function of a multimeter (the buzzer). Start by placing one probe on pin 1, the other probe on pin 2, and press the keys one by one. Make a note of when a button completes the circuit, then move onto the next pin. Soon you will know which is which. For example, on the example keypad pins 1 and 5 are for button “1″, 2 and 5 for “4″, etc…

Furthermore some keypads will have the pins soldered to the end, some will not. With our two example keypads, the smaller unit had the pins – and we soldered pins to the large white unit:

At this point please download and install the keypad Arduino library. Now we’ll demonstrate how to use both keypads in simple examples. 

Using a 12 digit keypad

We’ll use the small black keypad from Futurlec, an Arduino Uno-compatible and an LCD with an I2C interface for display purposes. If you don’t have an LCD you could always send the text to the serial monitor instead.

Wire up your LCD then connect the keypad to the Arduino in the following manner:
  • Keypad row 1 to Arduino digital 5
  • Keypad row 2 to Arduino digital 4
  • Keypad row 3 to Arduino digital 3
  • Keypad row 4 to Arduino digital 2
  • Keypad column 1 to Arduino digital 8
  • Keypad column 2 to Arduino digital 7
  • Keypad column 3 to Arduino digital 6

If your keypad is different to ours, take note of the lines in the sketch from:

// keypad type definition

As you need to change the numbers in the arrays rowPins[ROWS] and colPins[COLS]. You enter the digital pin numbers connected to the rows and columns of the keypad respectively.

Furthermore, the array keys stores the values displayed in the LCD when a particular button is pressed. You can see we’ve matched it with the physical keypad used, however you can change it to whatever you need. But for now, enter and upload the following sketch once you’re satisfied with the row/pin number allocations:

/* Numeric keypad and I2C LCD
   http://tronixstuff.com/tutorials > chapter 42
   Uses Keypad library for Arduino
   http://www.arduino.cc/playground/Code/Keypad
   by Mark Stanley, Alexander Brevig */

#include "Keypad.h"
#include "Wire.h" // for I2C LCD
#include "LiquidCrystal_I2C.h" // for I2C bus LCD module 
// http://www.dfrobot.com/wiki/index.php/I2C/TWI_LCD1602_Module_(SKU:_DFR0063)
LiquidCrystal_I2C lcd(0x27,16,2);  // set the LCD address to 0x27 for a 16 chars and 2 line display

// keypad type definition
const byte ROWS = 4; //four rows
const byte COLS = 3; //three columns
char keys[ROWS][COLS] =
 {{'1','2','3'},
  {'4','5','6'},
  {'7','8','9'},
  {'*','0','#'}};

byte rowPins[ROWS] = {
  5, 4, 3, 2}; //connect to the row pinouts of the keypad
byte colPins[COLS] = {
  8, 7, 6}; // connect to the column pinouts of the keypad

int count=0;

Keypad keypad = Keypad( makeKeymap(keys), rowPins, colPins, ROWS, COLS );

void setup()
{
  lcd.init();          // initialize the lcd
  lcd.backlight(); // turn on LCD backlight
}

void loop()
{
  char key = keypad.getKey();
  if (key != NO_KEY)
  {
    lcd.print(key);
    count++;
    if (count==17)
    {
      lcd.clear();
      count=0;
    }
  }
}

And the results of the sketch are shown in this video.

So now you can see how the button presses can be translated into data for use in a sketch. We’ll now repeat this demonstration with the larger keypad.

Using a 16 digit keypad

We’ll use the larger white 4×4 keypad from Futurlec, an Arduino Uno-compatible and for a change the I2C LCD from Akafugu for display purposes. (We reviewed these previously). Again, if you don’t have an LCD you could always send the text to the serial monitor instead. Wire up the LCD and then connect the keypad to the Arduino in the following manner:

  • Keypad row 1 (pin eight) to Arduino digital 5
  • Keypad row 2 (pin 1) to Arduino digital 4
  • Keypad row 3 (pin 2) to Arduino digital 3
  • Keypad row 4 (pin 4) to Arduino digital 2
  • Keypad column 1 (pin 3) to Arduino digital 9
  • Keypad column 2 (pin 5) to Arduino digital 8
  • Keypad column 3 (pin 6) to Arduino digital 7
  • Keypad column 4 (pin 7) to Arduino digital 6
Now for the sketch – take note how we have accommodated for the larger numeric keypad:
  • the extra column in the array char keys[]
  • the extra pin in the array colPins[]
  • and the byte COLS = 4.

/* Numeric keypad and I2C LCD
   http://tronixstuff.com/tutorials > chapter 42
   Uses Keypad library for Arduino
   http://www.arduino.cc/playground/Code/Keypad
   by Mark Stanley, Alexander Brevig */

#include "Keypad.h"
#include "Wire.h" // for I2C LCD
#include "TWILiquidCrystal.h"
// http://store.akafugu.jp/products/26
LiquidCrystal lcd(12, 11, 5, 4, 3, 2);

const byte ROWS = 4; //four rows
const byte COLS = 4; //four columns
char keys[ROWS][COLS] =
 {{'1','2','3','A'},
  {'4','5','6','B'},
  {'7','8','9','C'},
  {'*','0','#','D'}};
byte rowPins[ROWS] = {
  5, 4, 3, 2}; //connect to the row pinouts of the keypad
byte colPins[COLS] = {
  9, 8, 7, 6}; //connect to the column pinouts of the keypad
int count=0;

Keypad keypad = Keypad( makeKeymap(keys), rowPins, colPins, ROWS, COLS );

void setup()
{
  Serial.begin(9600);
  lcd.begin(16, 2);
  lcd.print("Keypad test!");  
  delay(1000);
  lcd.clear();
}

void loop()
{
  char key = keypad.getKey();
  if (key != NO_KEY)
  {
    lcd.print(key);
    Serial.print(key);
    count++;
    if (count==17)
    {
      lcd.clear();
      count=0;
    }
  }
}

And again you can see the results of the sketch above in this video.

And now for an example project, one which is probably the most requested use of the numeric keypad…

Example Project – PIN access system

The most-requested use for a numeric keypad seems to be a “PIN” style application, where the Arduino is instructed to do something based on a correct number being entered into the keypad. The following sketch uses the hardware described for the previous sketch and implements a six-digit PIN entry system. The actions to take place can be inserted in the functions correctPIN() and incorrectPIN(). And the PIN is set in the array char PIN[6]. With a little extra work you could create your own PIN-change function as well. 

// PIN switch with 16-digit numeric keypad
// http://tronixstuff.com/tutorials > chapter 42

#include "Keypad.h"
#include <Wire.h>
#include <TWILiquidCrystal.h>
LiquidCrystal lcd(12, 11, 5, 4, 3, 2);

const byte ROWS = 4; //four rows
const byte COLS = 4; //four columns
char keys[ROWS][COLS] =
{
  {
    '1','2','3','A'  }
  ,
  {
    '4','5','6','B'  }
  ,
  {
    '7','8','9','C'  }
  ,
  {
    '*','0','#','D'  }
};
byte rowPins[ROWS] = {
  5, 4, 3, 2}; //connect to the row pinouts of the keypad
byte colPins[COLS] = {
  9, 8, 7, 6}; //connect to the column pinouts of the keypad

Keypad keypad = Keypad( makeKeymap(keys), rowPins, colPins, ROWS, COLS );

char PIN[6]={
  '1','2','A','D','5','6'}; // our secret (!) number
char attempt[6]={ 
  '0','0','0','0','0','0'}; // used for comparison
int z=0;

void setup()
{
  Serial.begin(9600);
  lcd.begin(16, 2);
  lcd.print("PIN Lock ");
  delay(1000);
  lcd.clear();
  lcd.print("  Enter PIN...");
}

void correctPIN() // do this if correct PIN entered
{
  lcd.print("* Correct PIN *");
  delay(1000);
  lcd.clear();
  lcd.print("  Enter PIN...");
}

void incorrectPIN() // do this if incorrect PIN entered
{
  lcd.print(" * Try again *");
  delay(1000);
  lcd.clear();
  lcd.print("  Enter PIN...");
}

void checkPIN()
{
  int correct=0;
  int i;
  for ( i = 0;   i < 6 ;  i++ )
  {

    if (attempt[i]==PIN[i])
    {
      correct++;
    }
  }
  if (correct==6)
  {
    correctPIN();
  } 
  else
  {
    incorrectPIN();
  }

  for (int zz=0; zz<6; zz++) 
  {
    attempt[zz]='0';
  }
}

void readKeypad()
{
  char key = keypad.getKey();
  if (key != NO_KEY)
  {
    attempt[z]=key;
    z++;
    switch(key)
    {
    case '*':
      z=0;
      break;
    case '#':
      z=0;
      delay(100); // for extra debounce
      lcd.clear();
      checkPIN();
      break;
    }
  }
}

void loop()
{
  readKeypad();
}

The project is demonstrated in this video.

Conclusion

So now you have the ability to use twelve and sixteen-button keypads with your Arduino systems. I’m sure you will come up with something useful and interesting using the keypads in the near future.

Stay tuned for upcoming Arduino tutorials by subscribing to the blog, RSS feed (top-right), twitter or joining our Google Group. And if you enjoyed the tutorial, or want to introduce someone else to the interesting world of Arduino – check out my book (now in a third printing!) “Arduino Workshop” from No Starch Press.

The post Arduino Tutorials – Chapter 42 – Numeric Keypads appeared first on tronixstuff.