Posts with «atmega328» label

Ebay-bot (my version of the start here robot)

Primary image

What does it do?

Avoid obstacles

This is my version of the "start here" robot. For me this was a programming exercise. I had written an obstacle avoiding sketch for my Rover 5. It worked but I was never really happy with it. Most code that I've seen online uses lots of delays in the code. Some time ago I swore to myself to never use the delay function in void loop ever again. There are various reasons for it, once you start writing more advanced code the delay function can cause lots of trouble. I also use a library (RF24network) in another project where I can not use the delay function.

Cost to build

$50,00

Embedded video

Finished project

Number

Time to build

Type

URL to more information

Weight

read more

MechBass robot nails bass guitar sounds with Arduino and a stone cold groove (video)

End-of-year engineering school projects often pique our interest for their creativity. It's not every day that they can carry a bassline, however. James McVay's robot project for his honors year at the Victoria University of Wellington, the supremely well-named MechBass, wouldn't have much trouble keeping up with a favorite band. It centers on a custom, Arduino-compatible board that controls the plucking, fretting and damping of four strings to faithfully recreate bass guitar sounds from MIDI input. The design even accounts for the unwanted noises of actuators and motors, while virtually everything was either 3D-printed or laser-cut just for the task at hand. Sounds good? There's more in the pipeline: an upcoming Swivel robot will experiment with different playing techniques, and McVay ultimately sees his work teaching us about robotic music's interaction with human performers. For now, we'll be happy with the video after the break and hope that MechBass takes requests.

Continue reading MechBass robot nails bass guitar sounds with Arduino and a stone cold groove (video)

Filed under: Robots, Alt

Comments

Source: Hack A Day

Light Seeking Car (Moth Car)

Primary image

What does it do?

Navigate around according to ambient light

Let me introduce you to my Moth Car! The Moth Car is made from the chassis of an old RC car I found out in the shed. Forgotten and deteriorating away I decided to give it a new life.

I carefully de-soldered the wires from the battery pack and DC motors and kept the receiver for another day. Using the Adafruit motor shield for the Arduino Uno I connected the cables. Making sure that everything was connected properly and operational I uploaded some test code and thankfully it all worked.

Cost to build

Embedded video

Finished project

Complete

Number

Time to build

Type

URL to more information

Weight

read more

Nebulophone microcontroller synthesizer project sounds great

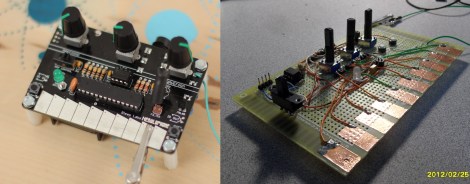
Judging from the video (found after the break) the Nebulophone is one of the best sounding DIY synthesizers we’ve seen. Especially when you consider the simplicity of the hardware design. It uses an AVR chip and an OpAmp. The rest of the parts are just a few handfuls of inexpensive components.

The device was developed by Bleep Labs, and they sell the synthesizer kit seen on the left. But since it’s an open source project you can follow their design to fabricate your own, which is what [BlinkyBlinky] did with his offering seen to the right.

An ATmega328 drives the device, which is the chip often used in the Arduino Duemilanove. The keyboard is a set of traces hooked to the microcontroller. These are tinned pads on the kit PCB, but the DIY version simply uses some adhesive copper foil with a jumper wire soldered to it. The keys are played with a probe that makes the electrical connection, a common practice on these stylophone type designs. Chances are you have everything on hand to make this happen so keep it in mind for that next cold winter weekend that’s making everyone a bit stir crazy.

[Thanks Wybren]


Filed under: arduino hacks, musical hacks

Bajdupod 9G

Primary image

What does it do?

I hope it will be able to walk around.

This my version of a small hexapod with micro 9G servos. I'm using 2 DOF legs, that way I' need to control 12 servos. They are all controlled by an ATmega328. The board I'm using is my own design. I've named it the Bajduino 3A, it has an ATmega328P-PU and a LM2576 switch mode voltage regulator. The regulator should be good for 3A. Power comes from a 2S Lipo battery. I drew up some pieces in Autocad and had them laser cut by a local company. Not cheap but I prefer it this way, I'm not a mechanical man. I prefer to design things on a pc and let others make it.

Cost to build

Embedded video

Finished project

Number

Time to build

Type

URL to more information

Weight

read more

Build a POV Death Star, you will

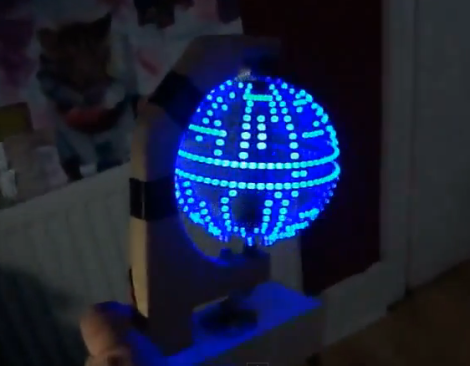
Building a Persistence of Vision globe is pretty awesome, but overlaying a Death Star pattern on the display takes it to the next level of geekery. Like us, [Jason] has wanted to build one of these for a long time. His success pushes us one step closer to taking the plunge and we hope it will inspire you to give it a shot too.

As he mentions in the beginning of his write up, the mechanical bits of these displays are really where the problems lie. Specifically, you need to find a way to transfer power to the spinning display. In this case use went with some DC motor brushes. These are replacement parts through which he drilled a hole to accept the metal axles on top and bottom. We hadn’t seen this technique before, but since motor brush replacements are easy to find and only cost a few bucks we’d say it’s a great idea.

The 24 blue LEDs that make up the display are all on one side of the PCB. They’re driven by an ATmega328 running the Arduino bootloader. [Jason] uses an FTDI adapter to program the chip. Don’t miss the video embedded after the break.


Filed under: led hacks
Hack a Day 01 Oct 17:17

What is an ATMEGA328P

I'm about to start my first robot using Arduino, and I wonder what that long rectangular chip is. I later find out it is called the ATMEGA328P. What is it? Is it like a data storage for the code? If not, what does it do?

'Antrobot' Ver 1.0.0- Based on arduino clone

Primary image

What does it do?

Walks,scampers,scitters

Alright ! After a haitus and some odd but trivial glitches I am finally happy to declare the birth of ANTROBOT Ver 1.0.0. Its a 2 legged creature with a single purpose - to explore and traverse its surroundings. Powered by a Lithium-Ion Rechargeable Battery it is a joy to see it scamper through the room. The way it frolics is delightful and reminds me of a swaying pendulum. It is by no stretch of imagination complete.

Cost to build

$30,00

Embedded video

Finished project

Number

Time to build

5 hours

Type

legs

URL to more information

Weight

read more

Red Bull Creation hardware (Bullduino) arrives

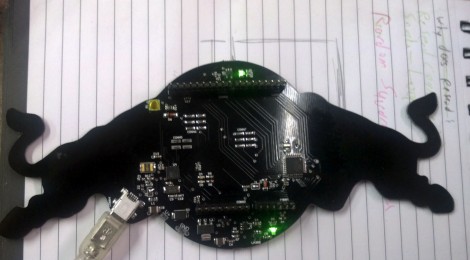
The Bullduino’s are starting to arrive. When [Arclight] received his in the mail the first thing he did was to share the hardware details. Of course this is the hardware that participants in the Red Bull Creation contest will be receiving ahead of this year’s contest.

The board is an ATmega328 Arduino clone. Instead of an FTDI chip for USB this one is sporting an ATmega8u2. That’s not too much of a surprise as it should translate to a cost savings. [Arclight] reports that the stock firmware flashes a message in Morse code. It seems the Hartford HackerSpace got their Bullduino several days ago and already decoded the message. It reads:

“Wouldn’t lou prefer a good game of chess?”

The guys that did the decoding speculate that this could be a type as ‘l’ and ‘y’ are inversions of each other in Morse code; or it could be some kind of clue. At any rate, if you want to do some disassembly and see if there’s anything lurking in the firmware, [Arclight] posted FLASH and EEPROM dumps from both ATmega chips along with his article.


Filed under: arduino hacks

Starbot

Primary image

What does it do?

Shines toward Spectator

The Starbot is a custom robot made for one of my sons. It is a star that shines and rotates to where the spectator is.

My son found this wooden star-on-a-stick somewhere and played around with it. After a while he came to me and said it would be cool if this star would shine whenever somebody comes close to it.

Bam! Here we go. This is a perfect question for a geek dad. Of course we can! So this little kid and I elaborated a bit more and out came this robot named Starbot.

Cost to build

$40,00

Embedded video

Finished project

Number

Time to build

8 hours

Type

URL to more information

Weight

200 grams

read more