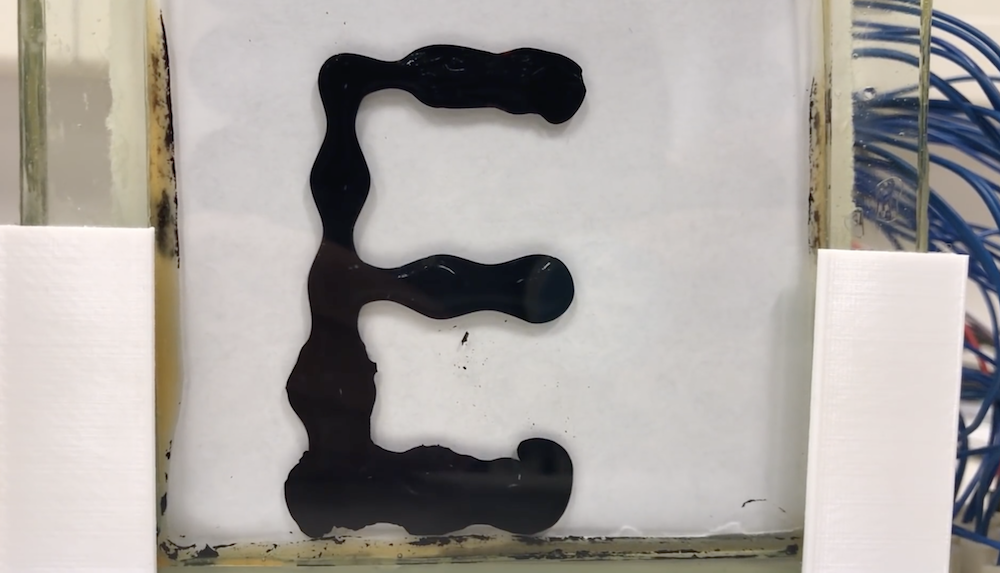
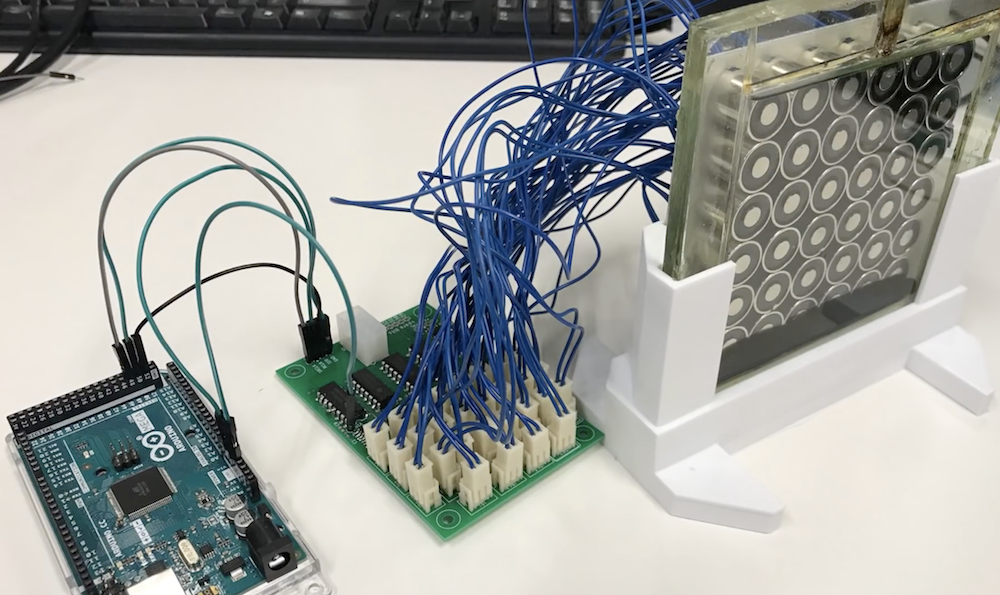
You’ve seen LED matrices, E Ink, CRTs, and likely a variety of other display methods, but chances are you’ve never seen anything like the ferrofluid matrix display by ‘Applied Procrastination.’
This student team from the University of Oslo has created a 252-pixel ferrofluid panel, dubbed “Fetch,” manipulating the inky black substance suspended in a saltwater brine with an array of electromagnets.
The video below, however, shows only an early 6×6 prototype powered by an Arduino and motor driver. While certainly not as impressive as the yet-to-be-revealed final result, watching the fluid move via this small matrix and even under ‘manual’ magnet control is still incredible.
More details on the build—and of course, the large display—is forthcoming, so you may want to subscribe to or bookmark their channel to see what comes next!
CDs were a great advancement in audio quality when they were first put on the market. There’s no vinyl-style degradation of the medium if it’s played over and over, and there’s no risk of turning them into a giant pile of ribbon while rewinding like a cassette tape. The one downside was that if you were to take them on the move you needed special hardware and software to prevent the inevitable skipping. If you look at the skipping not as a downside, though, but as a way to produce interesting music, you might end up with a pretty unique piece of hardware.
[Dmitry] is known for his interesting art installations, and the latest one uses parts from three 1988 Sony D2 CD players that have been reassembled in order to take advantage of a skipping and glitching CD. The modified equipment is able to play during pause or rewind thanks to a processor modification, and can also change the rotational speed of the disc. There are other pieces of hardware included for more fine control of glitching and skipping of the audio being read off of the CD.
The new device functions as a working musical instrument, although [Dmitry] says that it is more useful for deconstructing the information stored on the disc, and exploring the medium itself. Of course if you have enough motivation, you can find sounds from almost anywhere on (or in) the planet too.
There are plenty of techniques and components that we use in our everyday hardware work, for which their connection and coding is almost a done deal. We are familiar with them and have used them before, so we drop them in without a second thought. But what about the first time we used them, we had to learn somewhere, right? [TheMagicSmoke] has produced just what we’d have needed then for one component that’s ubiquitous, the I2C EEPROM.
These chips provide relatively small quantities of non-volatile memory storage, and though they are not the fastest of memory technologies they have a ready application in holding configuration or other often-read and rarely written data.
Since the ST24C04 512-byte device in question has an I2C bus it’s a straightforward add-on for an Arduino Mega, so we’re shown the wiring for which only a couple of pull-down resistors are required, and some sample code. It’s not the most complex of projects, but it succinctly shows what you need to do so that you too can incorporate an EEPROM in your work.
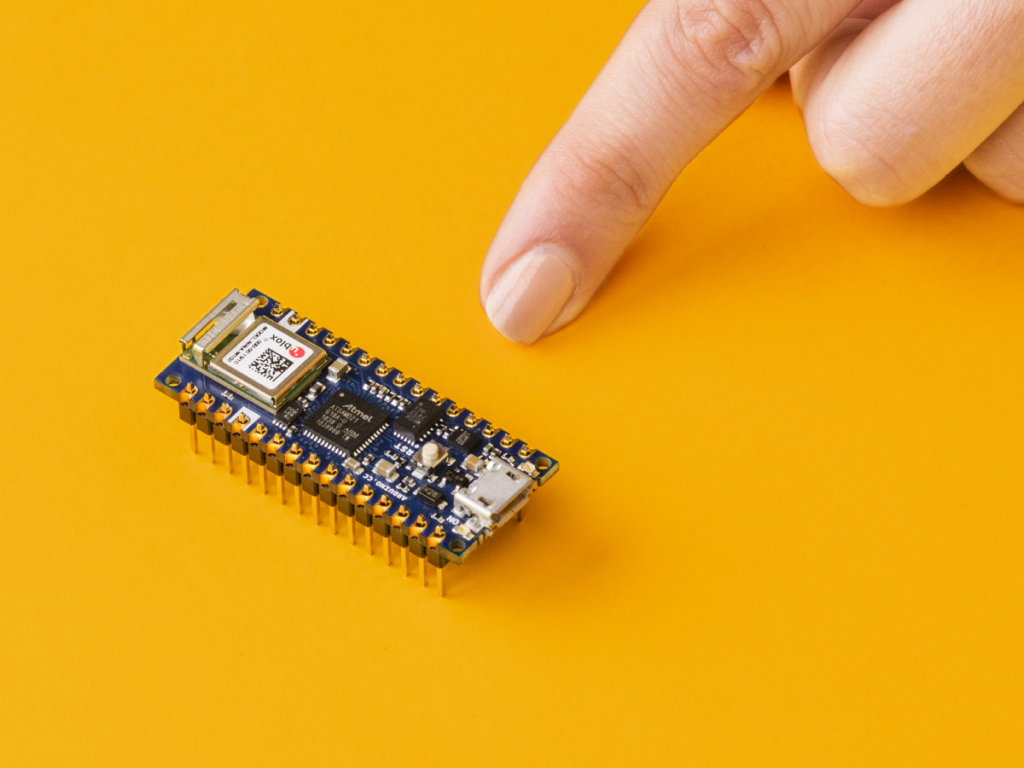
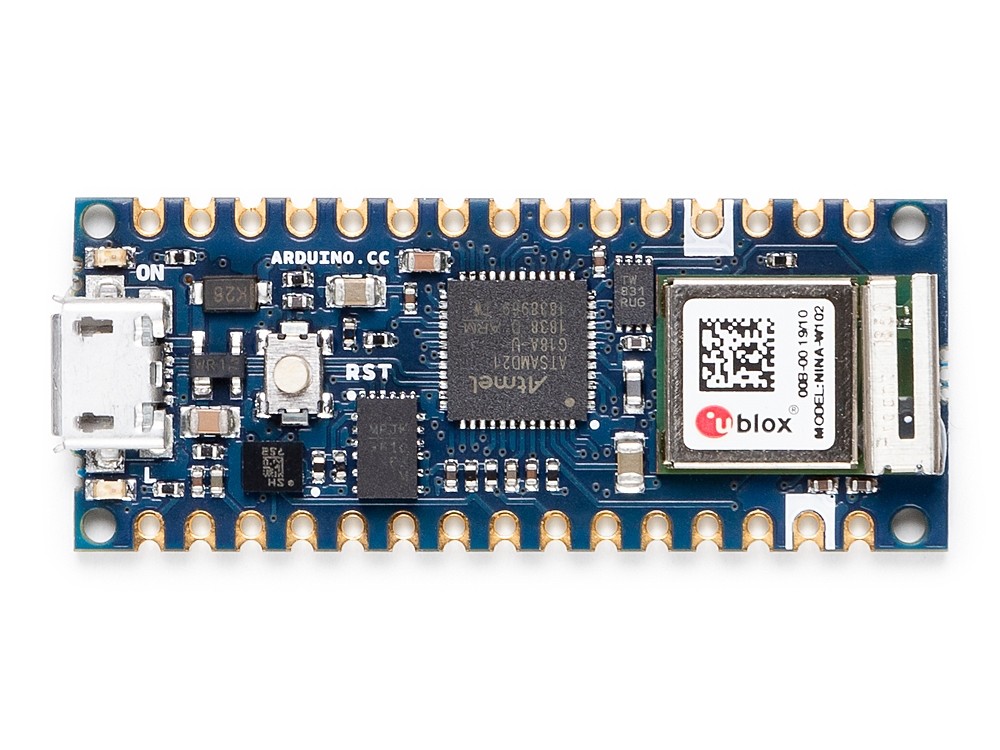
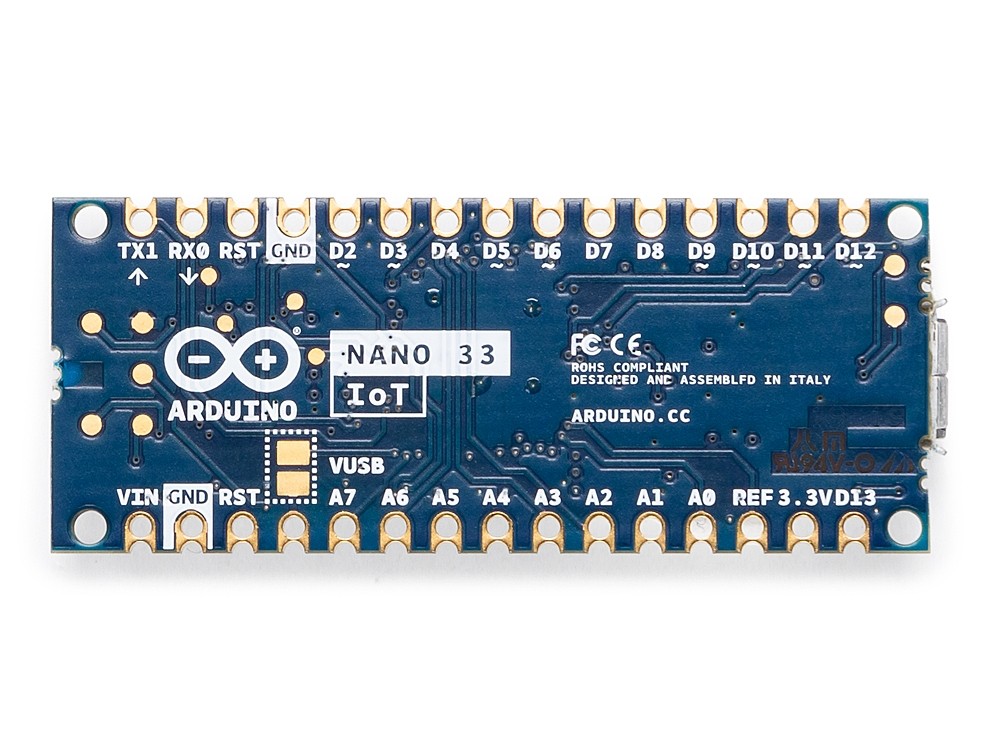
The Nano form factor has been a crowd-pleaser amongst makers for years due to its small footprint and ease of integration into any project. As announced at Maker Faire Bay Area, the Nano 33 IoT is part of the new 3.3V variant of the family, adding a pre-certified ESP32-based WiFi and Bluetooth module that brings sophisticated connectivity to its tiny package. The inclusion of an ECC608A crypto chip provides the security that Arduino users are now used to as opposed to other competing solutions that lack a secure key storage.
Today, we sat down with Dario Pennisi, Arduino hardware and firmware development manager, to learn more about the Nano IoT 33.
What are three key features of this board? How will they impact the experience of our users?
1. Secure WiFi and Bluetooth connectivity with a 6-axis IMU.
2. Pre-certified module with external processor ensures maintaining RF compliance when writing application code versus ESP32 modules where modifying code impacts certification.
3. On-board DC-DC power supply enables the board to be powered up to 21V maintaining high efficiency and offering a lot of current to external devices without overheating. This is a big improvement over other products on the market that have LDO and heat up quite a bit when powered at high voltages.
What are a few applications and why is this board a great option for them?
1. Add WiFi and Bluetooth connectivity with strong security to all the existing Arduino Nano applications.
2. On-board IMU can be used to wirelessly monitor vibration, orientation, and rotational speed of small objects thanks to its lightweight and compact form factor.
3. Run directly from high voltages from lead or multi-cell Lithium-ion batteries providing 3.3V power supply to peripherals at significant output current.
Which Arduino board is the most similar to the Nano 33?
The Nano 33 IoT is essentially a MKR WiFi 1010, but sacrifices a battery charger and shield compatibility in favor of a miniaturized footprint and lower cost. The Nano 33 IoT is built around the ESP32, which is primarily aimed at WiFi but supports Bluetooth as well, although with higher power consumption than the Nano 33 BLE.
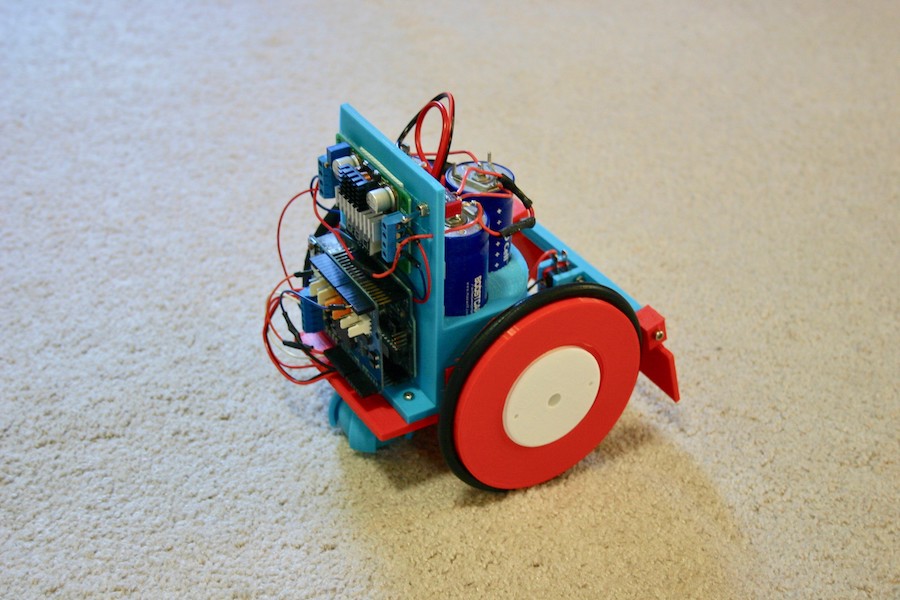
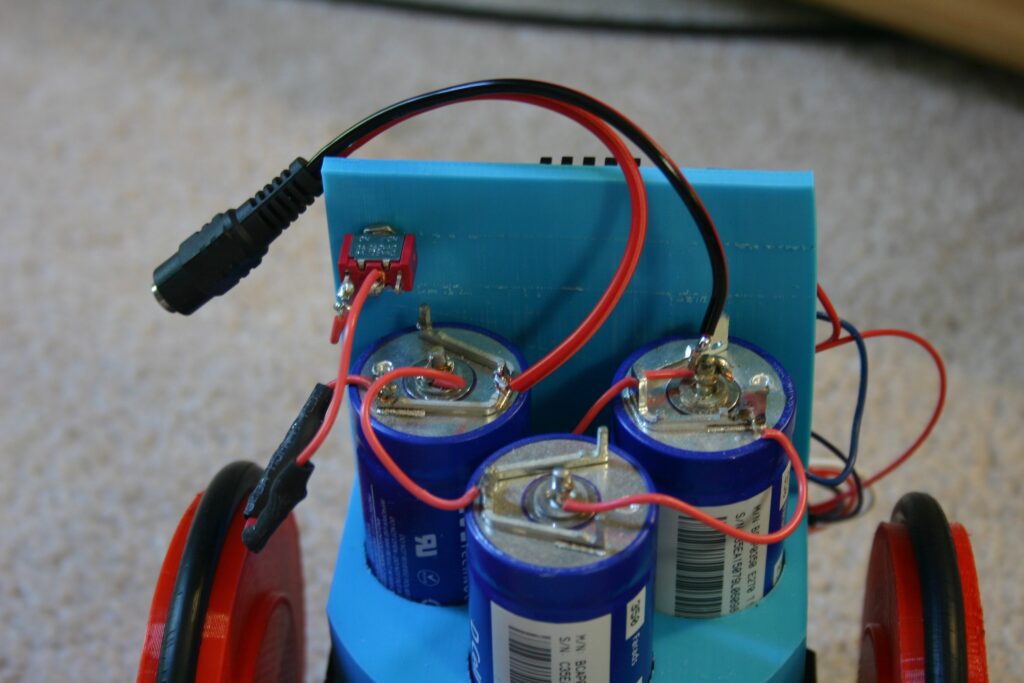
Supercapacitors are intriguing power sources, and while they don’t hold as much total energy as a battery, they can store and release charges in an instant. To take advantage of this interesting properly, Mike Rigsby created the ‘Little Flash‘ rover.
This device uses a pair of continuous rotation-modded servos to move about for roughly 20 minutes. It’s controlled by an Arduino Uno, and employs over-current detection as well as a bump switch to keep it from getting stuck.
The coolest feature, however, is that it’s powered by a bank of three 350 farad supercaps in series. The capacitor setup allows it to charge in seconds, though with a current flow of nearly 50 amps, charging experimentation wisely took place with Rigsby some distance away!
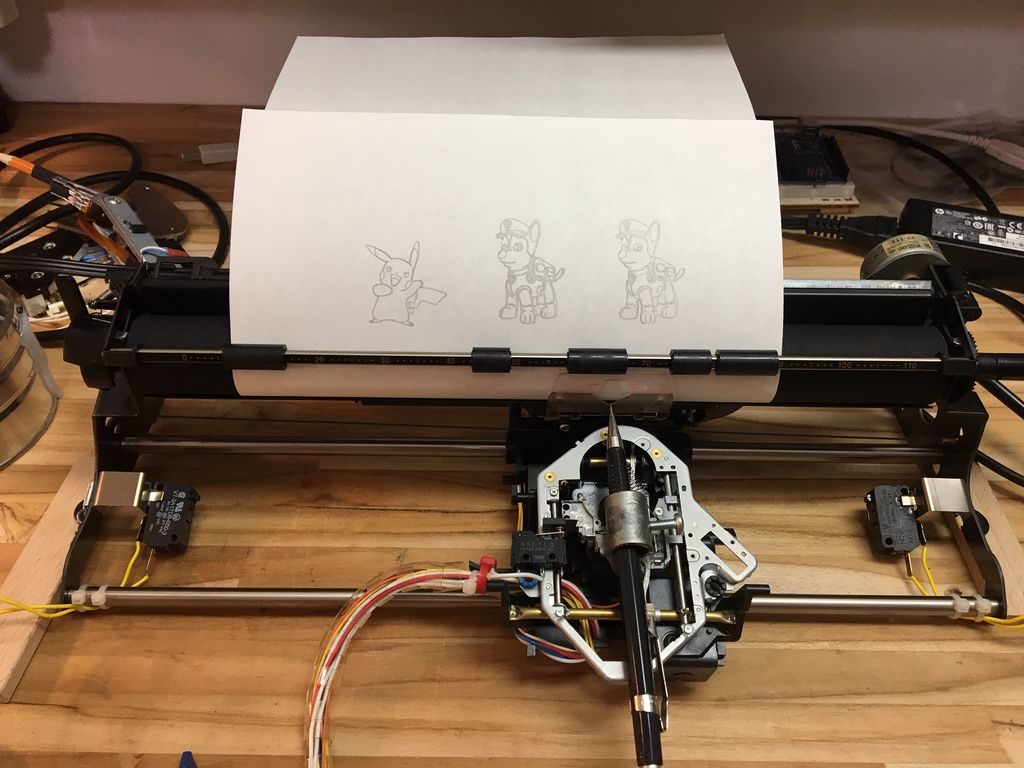
A few months ago, maker Fabian Mazza created a CD ROM plotter for his daughters. While the three-year-old loves it, the eight-year-old thought it was too small. Rather than giving up—or building a CNC machine from scratch—he cleverly constructed a new plotter out of a Smith Corona electric typewriter.
Since this device is designed to control the X and Y positions of a writing implement using steppers, it gave him everything he needed for CNC use via an Arduino Uno and GRBL shield.
For better resolution, he added gear reduction to the carriage stepper salvaged from an old scanner. Z-axis movement is done using parts from a DVD-ROM to control whether the pen lowered onto the paper or retracted.
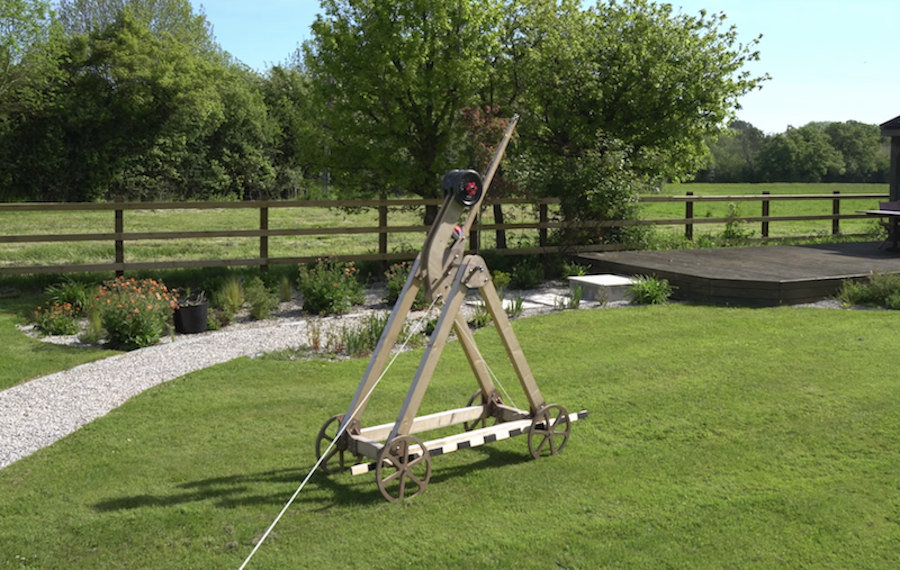
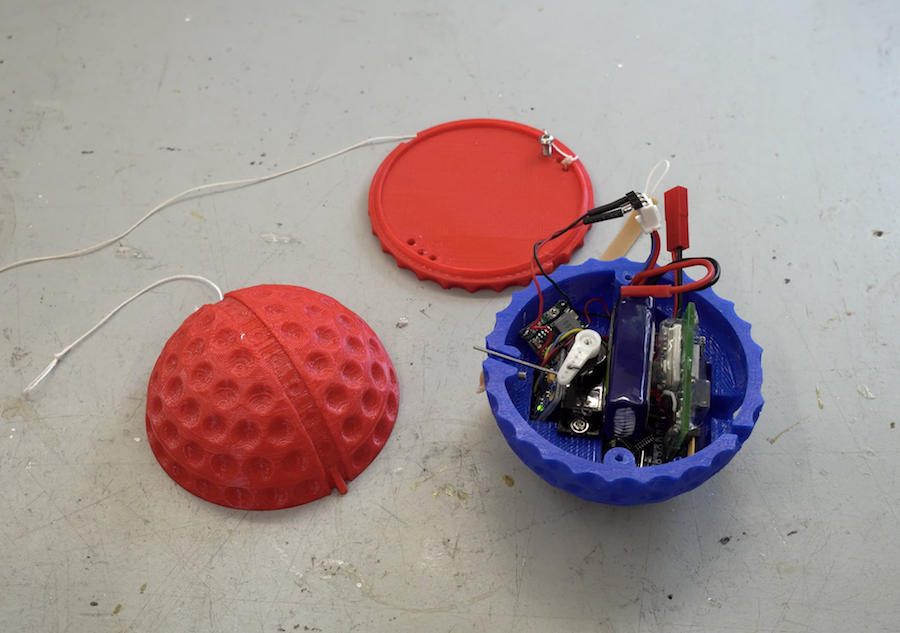
YouTuber Tom Stanton built a trebuchet about a year ago. Now, in order to figure out just how high it can toss something, he designed a custom altitude tracking device in the form of an oversize golf ball.
An Arduino Nano is squeezed inside this sphere, along with a battery, an altimeter, an accelerometer, and even a small servo. The altimeter is used for primary height measurement, while the accelerometer detects launches. A servo then deploys a parachute four seconds later to keep the electronics safe.
As it turns out, the trebuchet is able to fling the ball in the air 60 meters. While impressive, per Stanton’s discussion, it may not be as efficient as you might suspect! Be sure to check out the project in the video below!
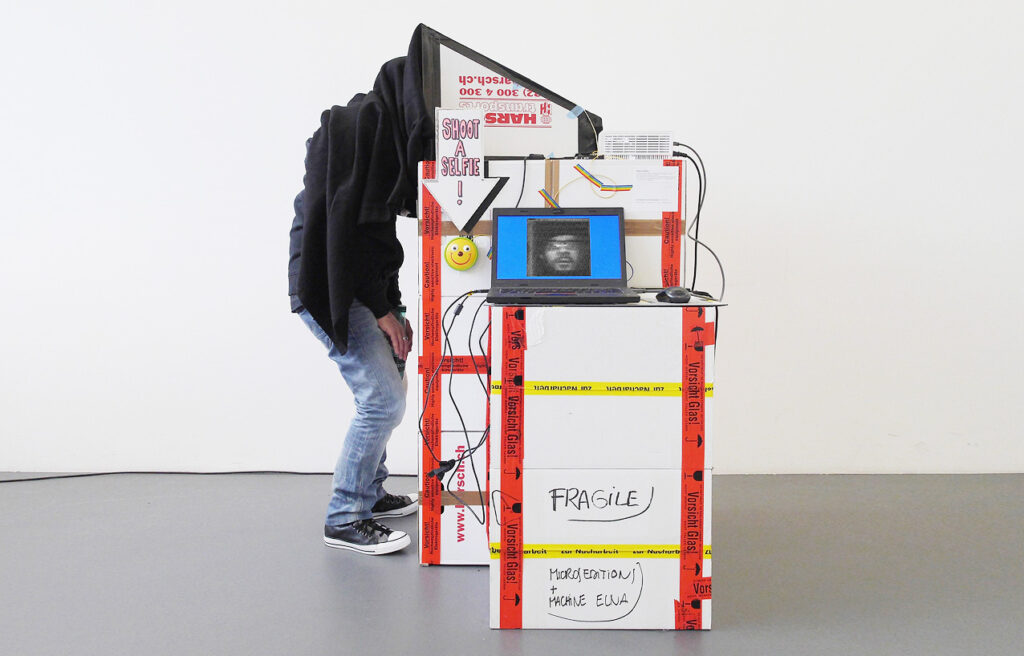
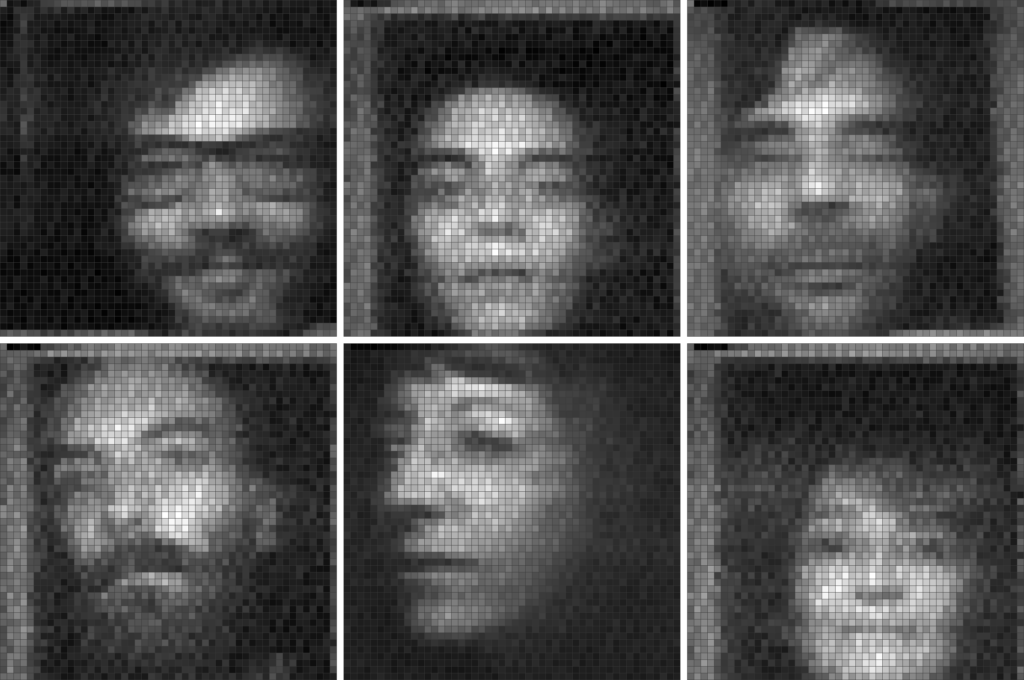
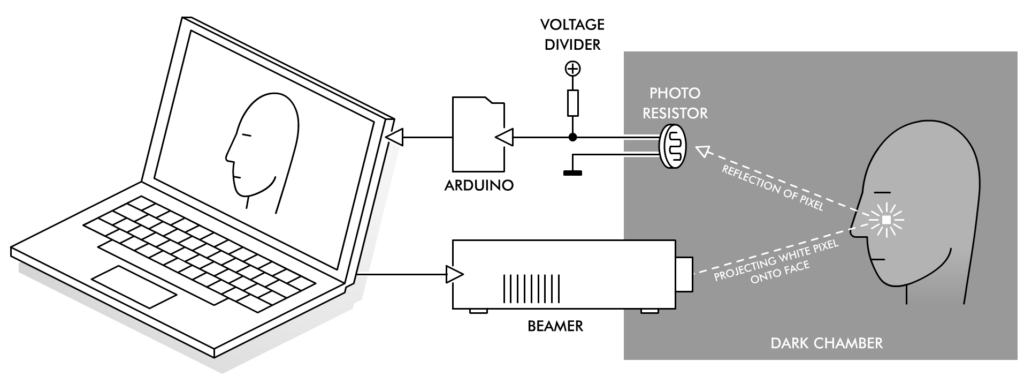
While most cameras use an array of sensors to quickly capture an image, Niklas Roy presents a different take on things with his Flying Pixel Portrait Camera.
This installation invites participants to place their head under a shroud for nearly a minute and a half, while a computer-controlled projector scans one’s face pixel by pixel. Reflected light levels are recorded with a single light-dependent resistor (LDR) via an Arduino flashed with Firmata, allowing it to interface with the Processing sketch that runs the device without any extra software.
The results are 50×50 black and white photos. It’s also possible to produce color images, which means triple the wait time—and a bit more noise.
The Flying Pixel Portrait Camera uses a video beamer, a single photo resistor, an Arduino and a PC for taking photos of people’s faces. The beamer ‘scans’ the image by projecting a small white square onto a person’s face inside an otherwise completely dark chamber. While the projected square slowly moves over the entire face, the photo resistor captures the reflected luminosities. This generates a proportional analog electric signal which is digitized by an Arduino and transmitted to the PC. As the PC also controls the position of the projected square, it can now construct an image based on the different brightness values that it receives, one pixel at a time.
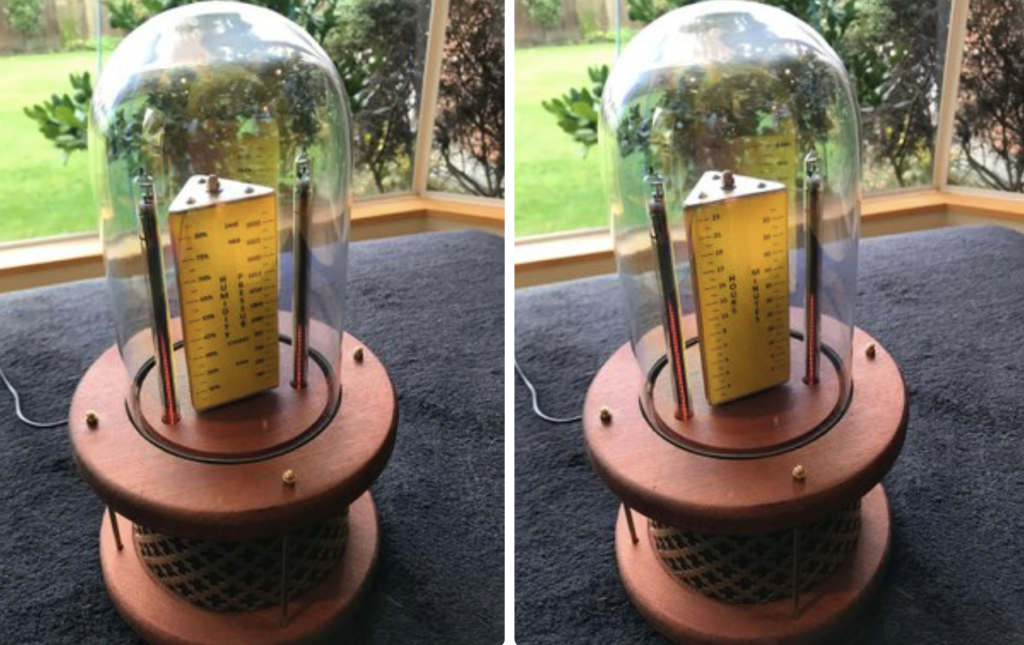
Creators keep coming up with new clock designs, and while you might think that every new possibility has been exhausted, Christine Thompson has proved this assumption wrong once again with her “VFD Trilateral Clock.“
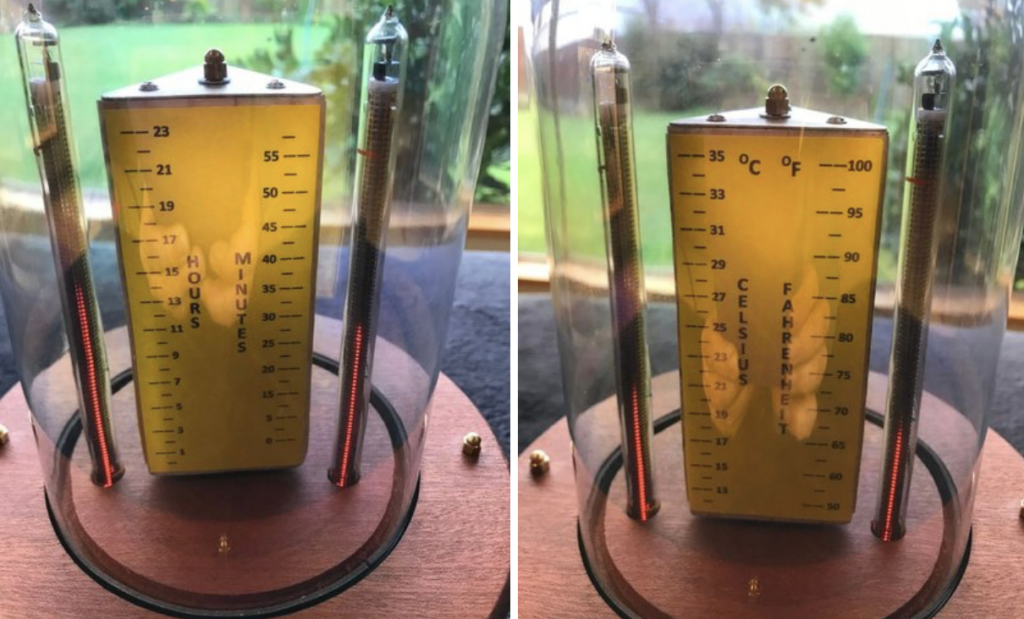
This Arduino Uno-powered device employs a stepper motor to rotate a triangular prism shape with scales for hours and minutes on one side, temperature in Celsius and Fahrenheit on the other, and humidity and pressure on the third surface.
The geometric scale travels in 120-degree steps, causing each face to line up with a pair of IN-13 Nixie tubes on either side. These linear tubes are then used to indicate time and environmental conditions in a beautiful bell jar display, as seen at around 3:30 in the video below.
While waiting for the delivery of parts for another project I decided to push ahead with this project. At its heart is two IN-13M Nixie tubes. These tubes are designed to provide a linear scale between maximum and minimum points using an illuminated column. The project uses two of these IN-13M, three wire Nixie tubes to show, time (Hours and Minutes), temperature (Celsius and Fahrenheit), Humidity (percentage), and Pressure (millibars).
At this point I would like to thank Dr. Scott M. Baker for his great web site, which provided me with all the information I needed to get these Nixie tubes to work. In particular the Current Regulator as displayed and detailed on his web site.
The project uses a BME280 sensor to determine the temperature, pressure and humidity and RTC clock to monitor time. As the system needs to display six different values it was necessary to construct a rotating central display which showed these values against six scales. In order to achieve this an equilateral triangle of wood was fashioned, each side showing two sets of values. A stepper motor was mounted under the top platform and this motor rotates through 120 degrees in time for the next set of values to be displayed on the two Nixie tubes.
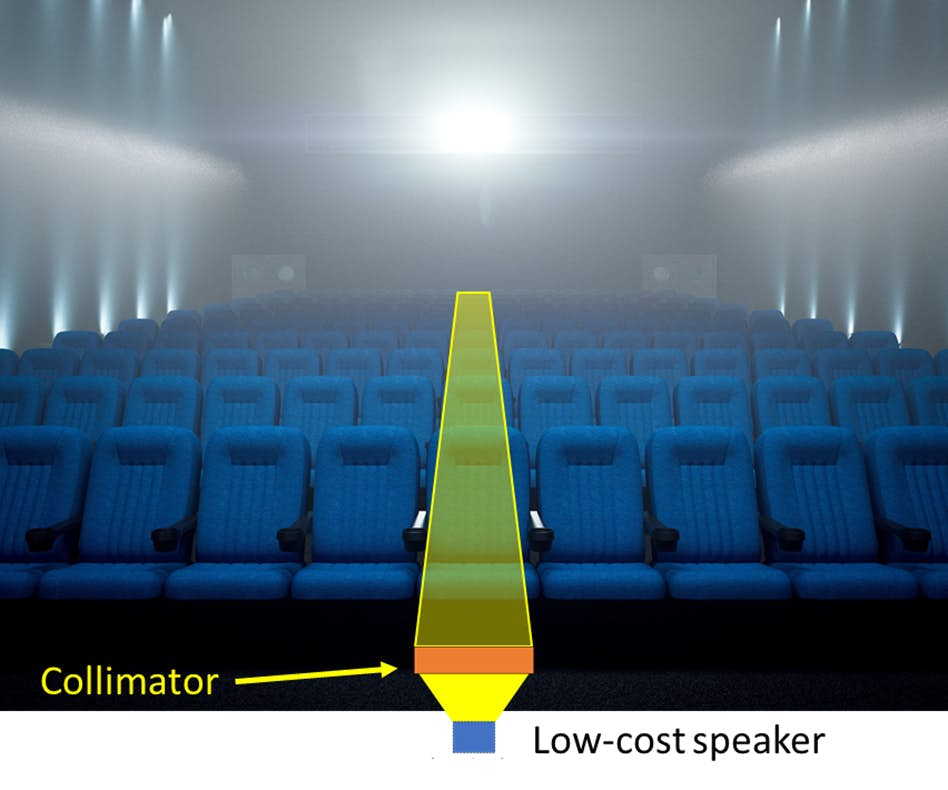
Consider all the tools that modify how light is transmitted and received: lasers direct light in a tightly focused beam and telescopes let us focus on an area far away. While there are certainly ways to modify sound, these techniques are not nearly as developed as their light counterparts.
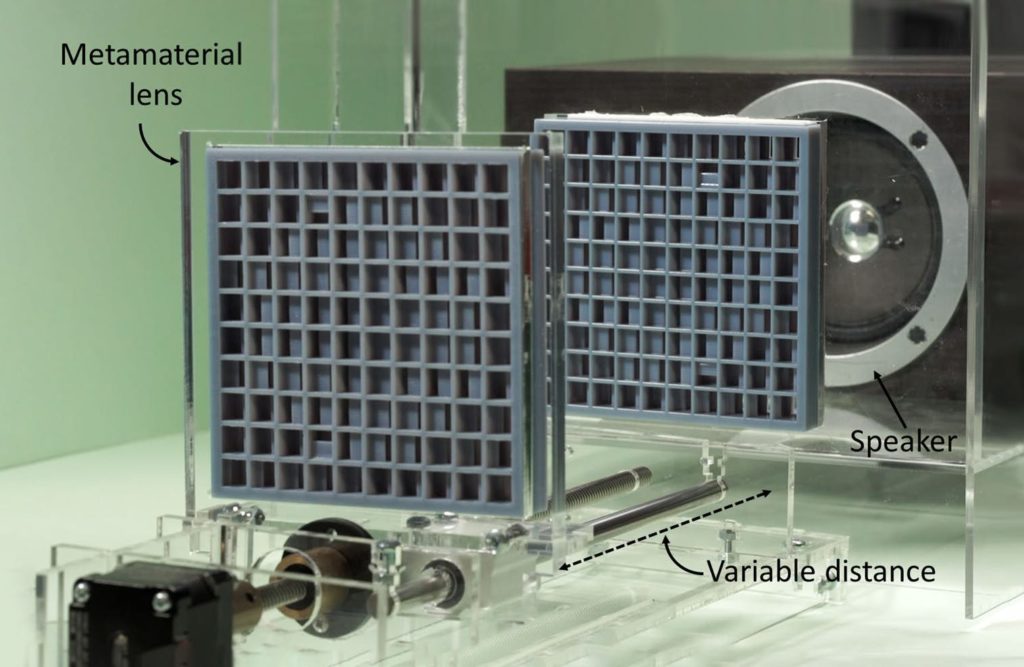
With hopes of changing that, researchers from the University of Sussex and the University of Bristol have been working with metamaterials—normal materials like plastic, paper, wood or rubber with an internal structure designed to manipulate sound waves—to build acoustic lenses.
The team demonstrated the first dynamic metamaterial device with the zoom objective of a varifocal for sound, as well as create a collimator capable of transmitting sound as a directional beam from a standard speaker.
The lenses are attached to the collimator, and can be used to direct sound from a speaker or two can be employed together to construct an adjustable focus system. Focal length is regulated by the distance between the two lenses, which is controlled by an Arduino Nano and a single stepper motor mounted to an adjustable rail.