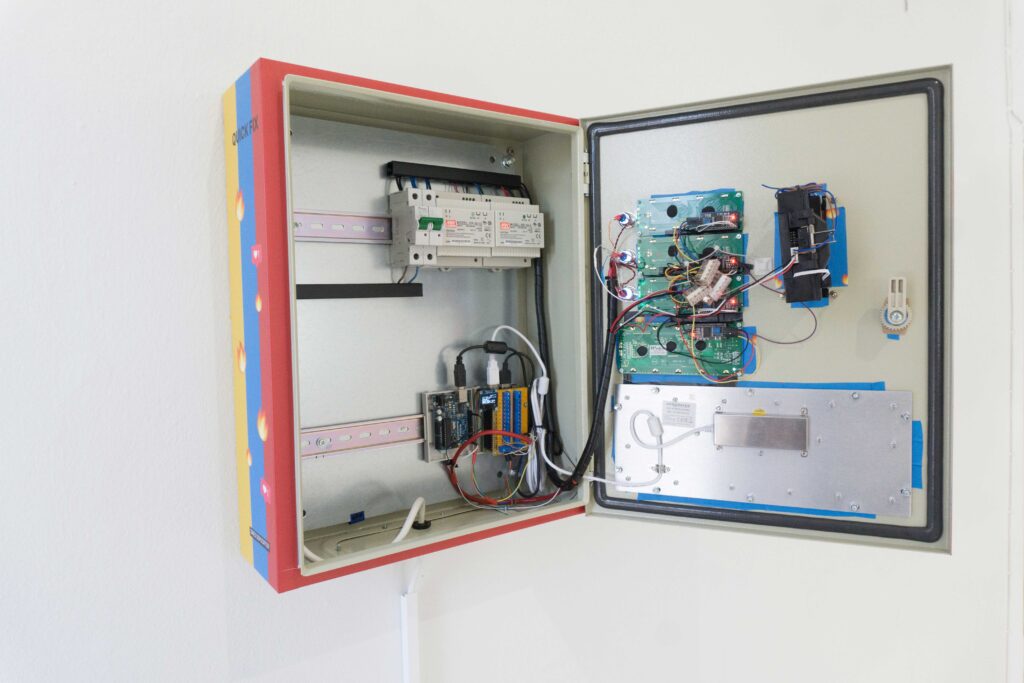
Do you want to grow your popularity on social media? Sure, there are those online services that could give your audience a boost, but if you’d prefer something a bit more tangible, then the “Quick Fix” vending machine is just the thing for you—and it even accepts actual currency.
After you deposit the appropriate amount of coins and enter your social media account name, you’re then bombarded with an army of new followers or likes. As you might suspect, these interactions are via faux accounts.
Fake or not, it’s a brilliant art installation constructed by Dries Depoorter as a commission for the 2019 Pixelache Festival. The build features an industrial-style enclosure and hardened keyboard, along with an Arduino, a Raspberry Pi 3B+, and a few I2C LCD screens.
As the video below puts it, “Influencers will love it.”
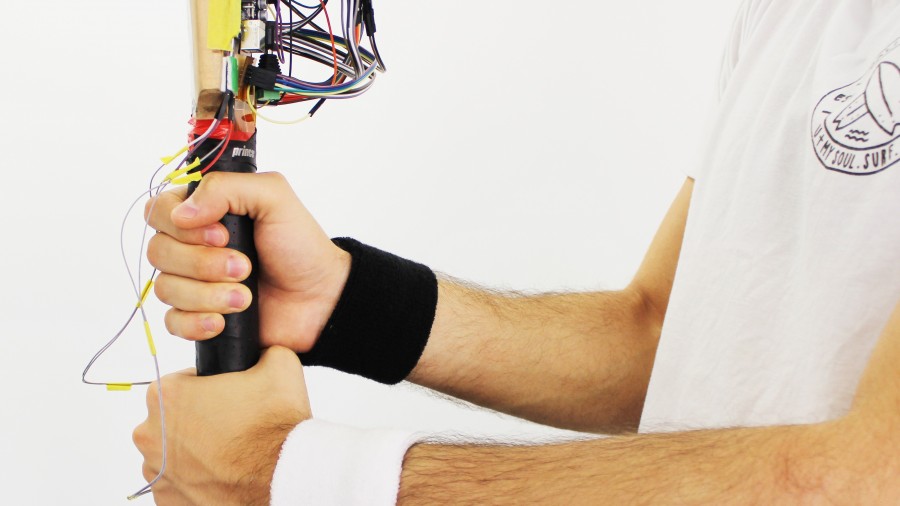
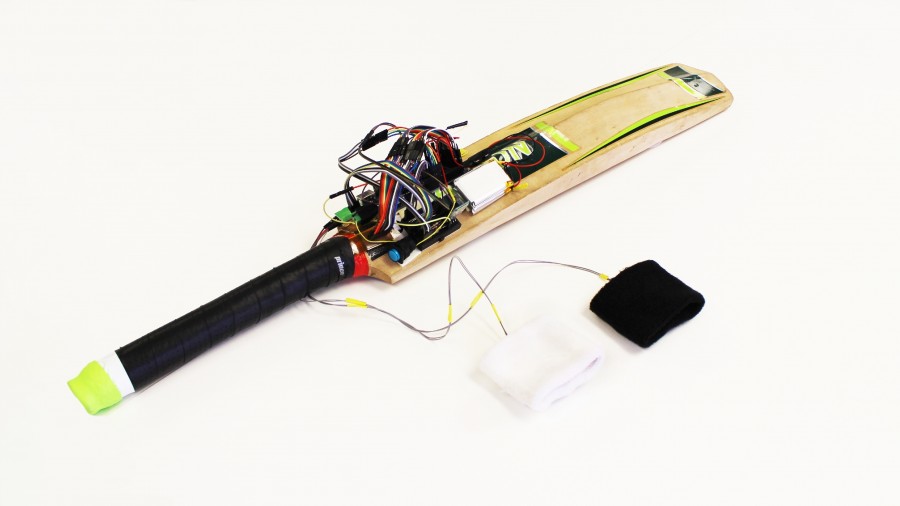
When batting in cricket, applying the proper amount of force with both hands is critical; however, as a coach, it’s difficult to judge just how much is actually used. To assist with player improvement, researchers at the University of Auckland’s Augmented Human Lab have come up with a bat that senses the force exerted by each hand gripping the handle.
The augmented handle is covered with an array of force sensitive resistors, which push data to an Arduino Mega and then to a PC over Bluetooth. Direct vibrotactile feedback is implemented in a pair of smart wristbands, leading to better accuracy and confidence in swing technique.
CricketCoach is a smart system that creates awareness of the hand-grip force for cricket players. A custom Force-Sensitive Resistor (FSR) matrix was developed and attached to the bat’s handle to sense the gripping. Two wristbands, incorporating vibration motors, provide feedback that helps non-expert users to understand the relative forces exerted by each hand while performing a stroke. A preliminary user study was conducted to collect first insights. The results show that both, binary vibration, as well as vibration patterns, improved the execution of batting strikes significantly.
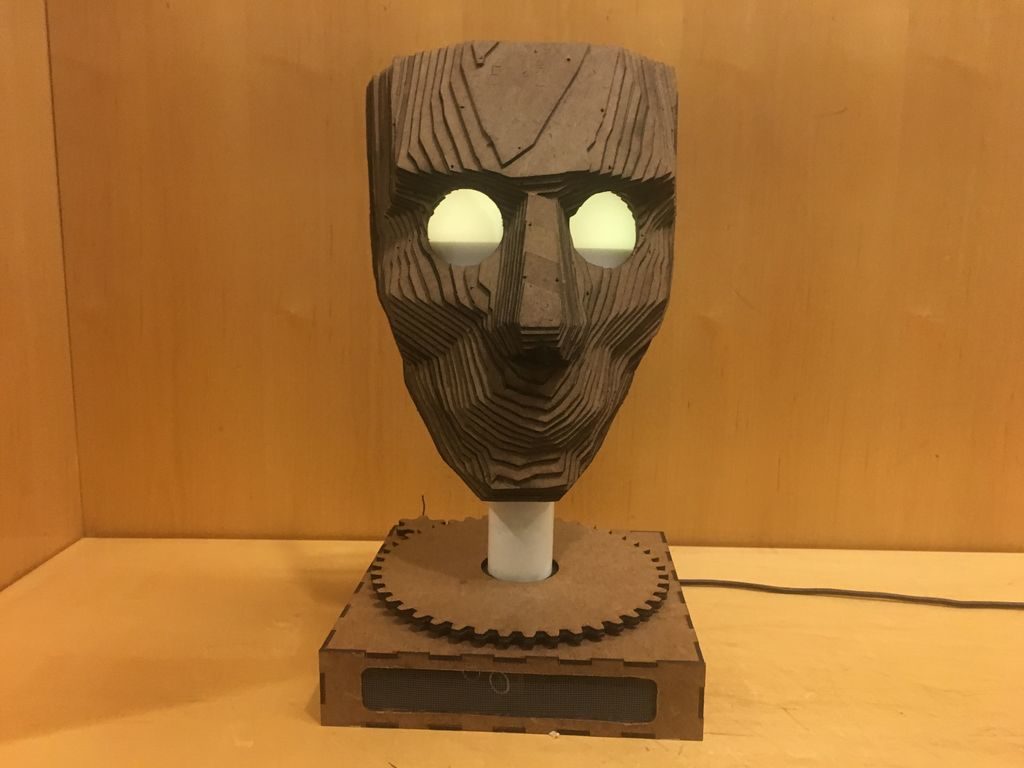
Plenty of people and organizations have busts of famous figures, but how many of them can follow you around the room with a moving head? If you would like to be one of those lucky few, check out this Chartreuse model by Anna Lynton.
The face itself was laser cut in layers, stuck together to form its 3D figure, and a diffused LED eye assembly is also implemented to give it a more lifelike feel. Whenever someone approaches Chartreuse, the person or thing is tracked via an ultrasonic sensor mounted to a servo, while a separate stepper is used to actuate the head.
This Arduino Uno-controlled statue not only rotates, but conveys emotion through the color of its eyes, as well as an internal eyebrow assembly that changes the light’s shape.
Meet Chartreuse! Chartreuse’s face follows you when you walk by. When she sees you, her eyes turn yellow and she gets a happy expression in her eyes. As you walk away, her eyes change to blue and she sadly turns away.
Chartreuse is powered by an Arduino Uno, two servos, and a stepper motor and a couple of addressable LEDs and constructed from a few pieces of 1/8″ hardboard.
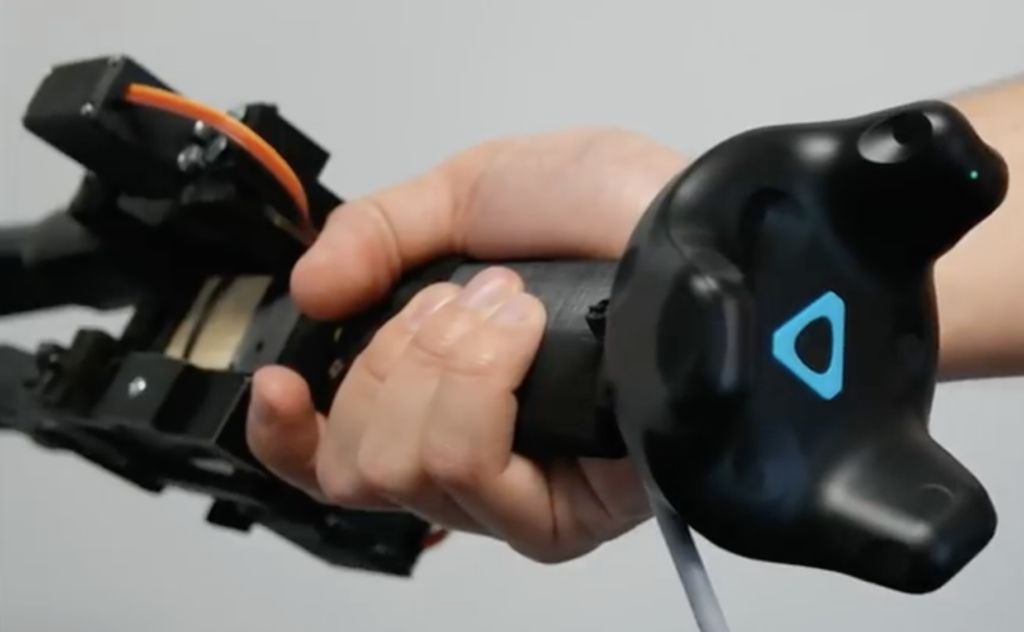
As seen here, “Standard controllers for virtual reality (VR) lack sophisticated means to convey realistic, kinesthetic impression on size, resistance or inertia.” To overcome these limitations, André Zenner and Antonio Krüger at the German Research Center for Artificial Intelligence (DFKI) have come up with Drag:on—a haptic feedback device that changes air resistance and weight distribution using a commercially-available hand fan.
Drag:on uses a pair of MG996R servos to actuate the fan, shifting its weight and air resistance as needed to simulate a virtual environment. The assembly is attached to an HTC Vive tracker, and an Arduino Nano provides control and computer interface via a USB serial link.
Drag:on leverages the airflow occurring at the controller during interaction. By dynamically adjusting its surface area, the controller changes the drag and rotational inertia felt by the user. In a user study, we found that Drag:on can provide distinguishable levels of haptic feedback. Our prototype increases the haptic realism in VR compared to standard controllers and when rotated or swung improves the perception of virtual resistance. By this, Drag:on provides haptic feedback suitable for rendering different virtual mechanical resistances, virtual gas streams, and virtual objects differing in scale, material and fill state
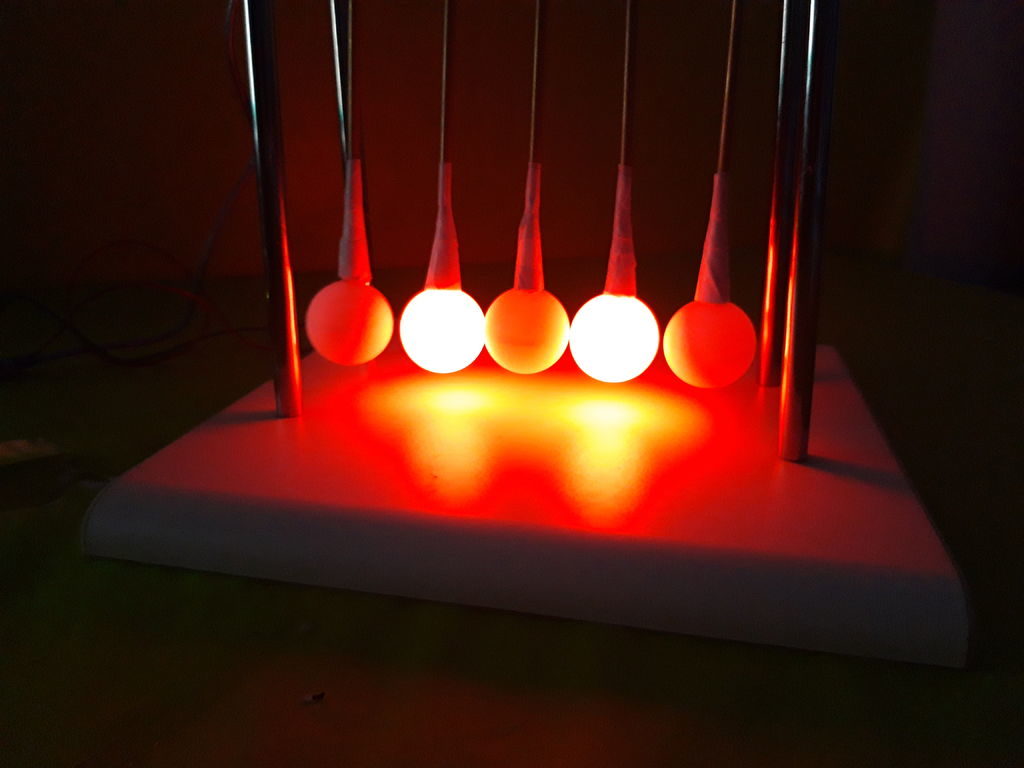
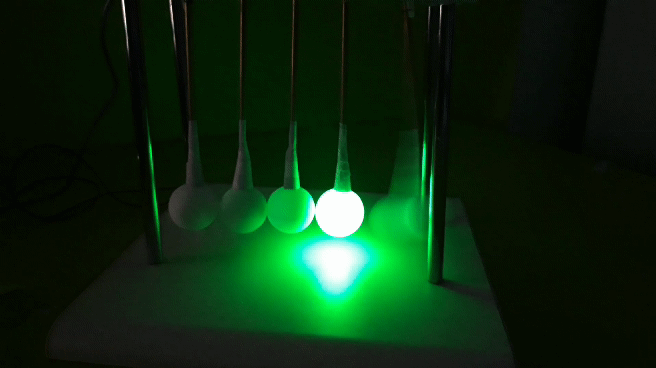
Newton’s cradles consist of a series of suspended spherical masses, and are normally started by pulling one ball back. The outer balls then click back and forth for an interesting distraction.
To make things even more interesting, “TecnoProfesor” made his own version using ping pong balls and RGB LEDs. As the outer balls sway, they light up in sequence, along with the inner three balls that stay largely in one place.
Power here isn’t provided by kinetic energy, but everything moves via a pair of servo motors. An Arduino Mega is used to control the light/motion simulator, while a button and potentiometer allow the user to change between two modes and variable swing frequency.
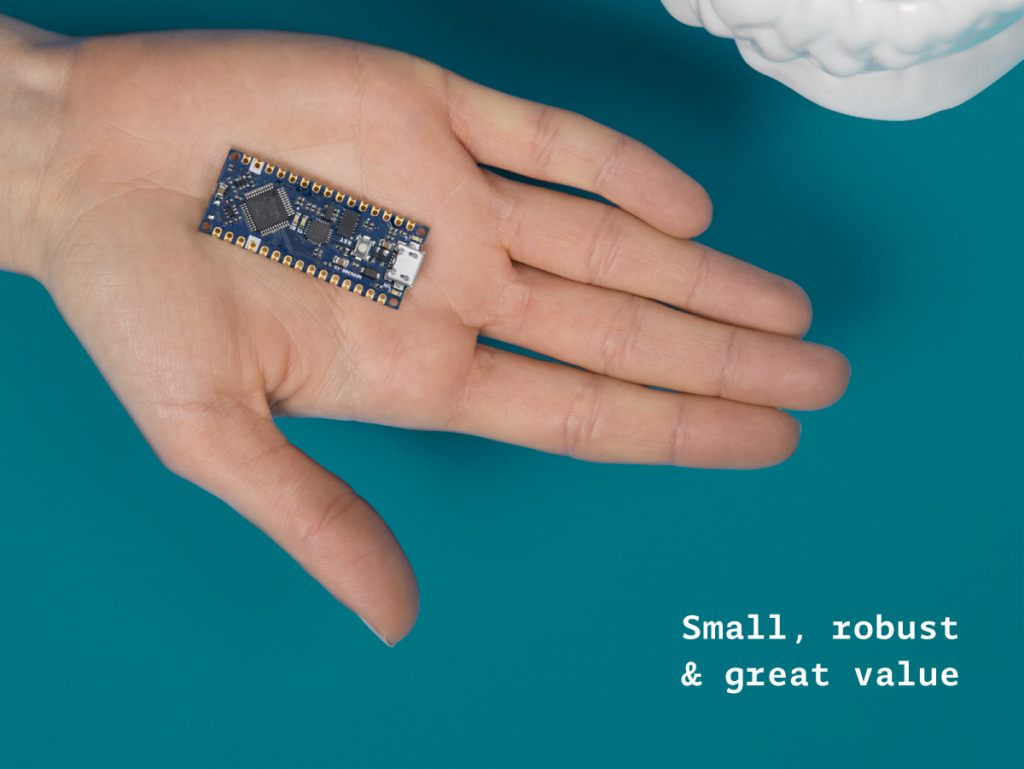
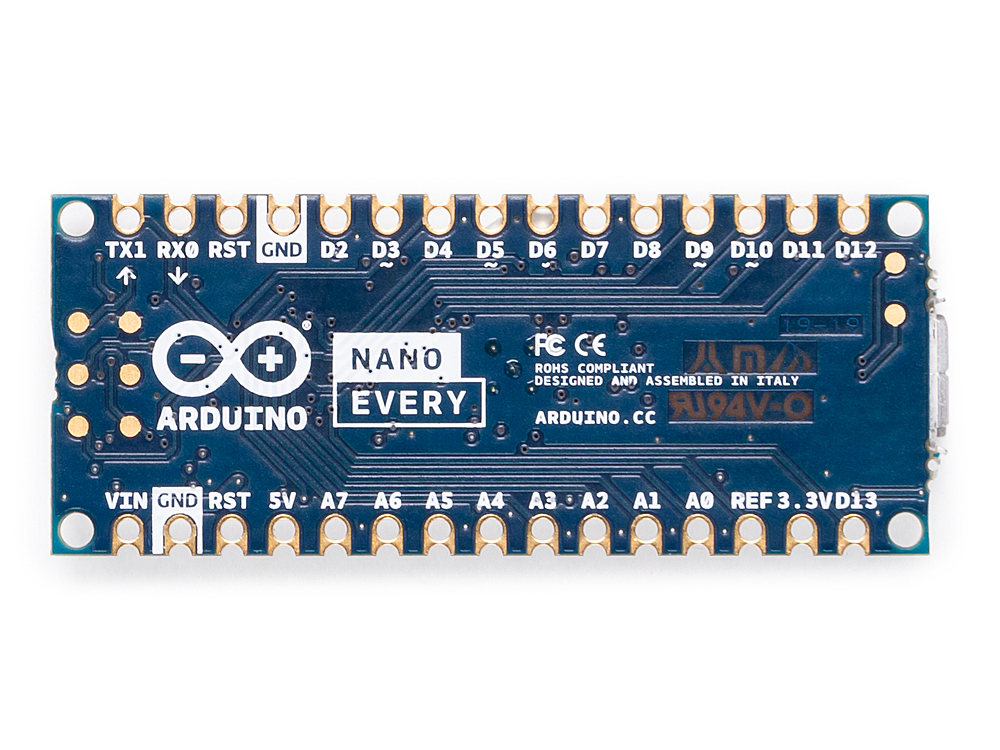
The original Arduino Nano occupies a special place in many makers’ hearts. The tiny footprint (48*18 mm), reliability and tons of examples makes the Nano perfect for wearables, drones — in fact any project made to last.
The Nano is back! The new entry-level Arduino Nano Every manages to pack in even more features at an even lower price – just $9.90 / €8.00 without headers — and is backwards compatible with the original. Dario Pennisi led the development of the Arduino Nano Every. We sat down with him to learn more.
Why did you decide to create the Arduino Nano Every?
Searching for “Arduino Nano project” yields millions of results. But you also find people complaining about boards not working. Of course these boards are usually clones (not genuine Arduino boards)! Clones can be cheaper but reliability issues can mean you need to pay for more, or are frustrated trying to get them to work.
This is why we made the Arduino Nano Every. It’s reliable, affordable and more powerful. We’ve used a quality USB chip so people won’t have connection or driver issues. The newer ATmega4809 microcontroller fixes limitations of older ATmega328p based boards – you can add a second hardware serial port! As well as more peripherals and memory, the Configurable Custom Logic (CCL) is a great way to get beginners more interested in hardware. Finally, the separate processor handling the USB interface makes it possible to implement USB classes such as Human Interface Device (HID) instead of just the classic CDC/UART.
We see the Arduino Nano Every at the heart of wearable projects; in experiments, in prototypes or in a full cosplay setup! Sensors and motors can be connected without too much fuss which means it’s great for robotics, drones and 3D printing too. Not only is it a great choice for makers – in buying a genuine Arduino they will be supporting us in continuing to contribute to open source for the whole community to benefit from.
Can you tell us the three key features of Nano Every?
New processor with more memory and new peripherals, still 5V capable. The added memory will unleash creativity and open to more complex applications and the new peripheral set, which includes a second serial port, will finally allow communicating at the same time with a PC and with peripherals such as a wireless interface or a GPS.
The new power supply architecture based on a high efficiency DC-DC converter allows powering the board at up to 21V and to drive output peripherals with up to 950mA without overheating
Castellated contacts and flush bottom side allow soldering the Nano Every directly on a board as a traditional SMT component, opening the possibility to reduce final product size and helping the use in volume applications
So the processor is the same as the Uno WiFi R2 and it has more Flash and more RAM. The sketches made for the Nano are going to run on the Every as they are? Is it truly a replacement with zero modification in any Nano based project? Please elaborate.
Actually the ATmega4809 we use on Uno WiFi R2 and Nano Every is not directly compatible with ATmega328p, however we’ve implemented a compatibility layer which translates low level register writes without any overhead so the result is that most libraries and sketches, even those accessing directly GPIO registers, will work out of the box
Why you decided to offer the board with no headers supplied or soldered in the basic package?
Not only are new Nano boards are offered without headers, they all are totally flat on the bottom side and offer castellated pads on the sides, so you can actually solder them on your PCB as a standard SMT component using a normal pick & place machine.
The price is really aggressive, did you compromise on Arduino quality standards to achieve this?
We’ll never give up on Arduino quality standards and we’re still manufacturing in Italy making sure that our ethical values are strictly followed. The lower price point on these products has been achieved thanks to a careful optimization on purchasing prices and by trimming our margins as we believe that it’s important to give makers the quality they deserve at competitive prices.
The Arduino Nano Every is now available for pre-order on the Arduino online store with headers or without headers mounted (estimated shipping date: mid-June 2019).
Historically, getting files on to a microcontroller device was a fraught process. You might have found yourself placing image data manually into arrays in code, or perhaps repeatedly swapping SD cards in and out. For select Arduino boards, that’s no longer a problem – thanks to the new TinyUSB library from Adafruit (Youtube link, embedded below).
The library is available on Github, and is compatible with SAMD21 and SAMD51 boards, as well as Nordic’s NRF52840. It allows the Arduino board to appear as a USB drive, and files can simply be dragged and dropped into place. The library can set up to use SPI flash, SD cards, or even internal chip memory as the storage medium.
Potential applications include images, audio files, fonts, or even configuration files. Future plans include porting the TinyUSB library to the ESP32-S2 as well. Being able to drag a settings file straight on to a board could make getting WiFi boards online much less of a hassle.
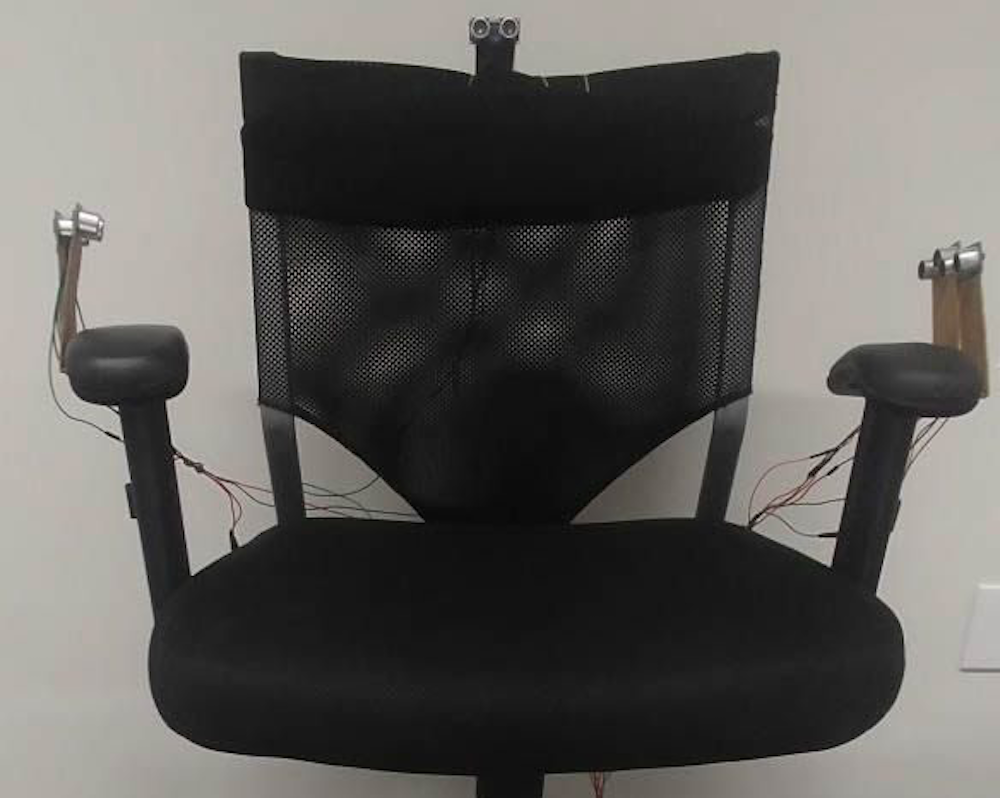
Multi-rotor drones are normally controlled using handheld devices, but what if you wanted to instead operate them with your whole body? Flight Chair, developed by researchers at Simon Fraser University in Canada, allows you to do just that, and is envisioned for use with emergency personnel observing a scene.
The chair is augmented with ultrasonic sensors to detect when a user leans forward, backward, left, and right, commanding the drone to do the same, while a gyroscopic sensor detects when the chair is swiveled to adjust its heading.
Altitude adjustment is handled by a T-shaped foot panel, leaving one’s hands free to do other tasks. Sensor values are collected by an Arduino Mega, which passes this to a drone server over a USB connection.
In future, emergency services will increasingly use technology to assist emergency service dispatchers and call taker with information during an emergency situation. One example could be the use of drones for surveying an emergency situation and providing contextual knowledge to emergency service call takers and first responders. The challenge is that drones can be difficult for users to maneuver in order to see specific items. In this paper, we explore the idea of a drone being controlled by an emergency call taker using embodied interaction on a tangible chair. The interactive chair, called Flight Chair, allows call takers to perform hands-free control of a drone through body movements on the chair. These include tilting and turning of one’s body.
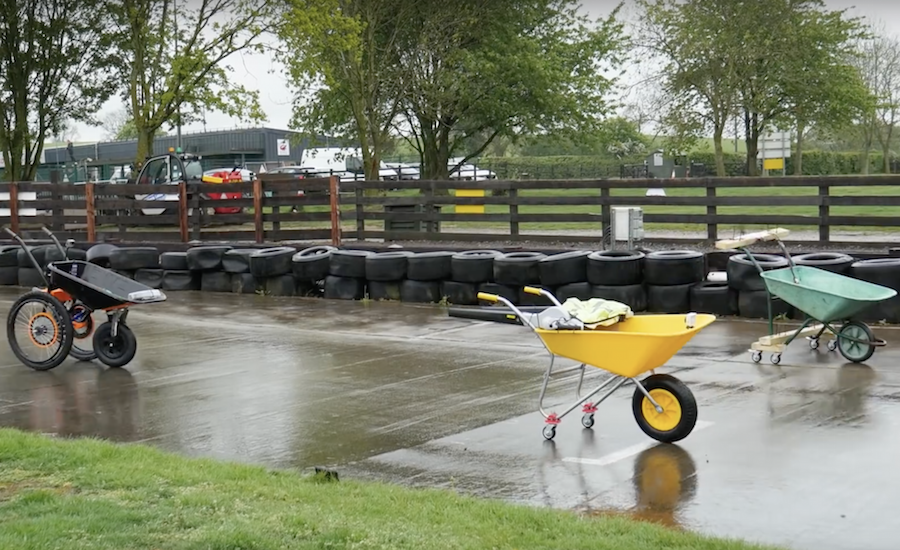
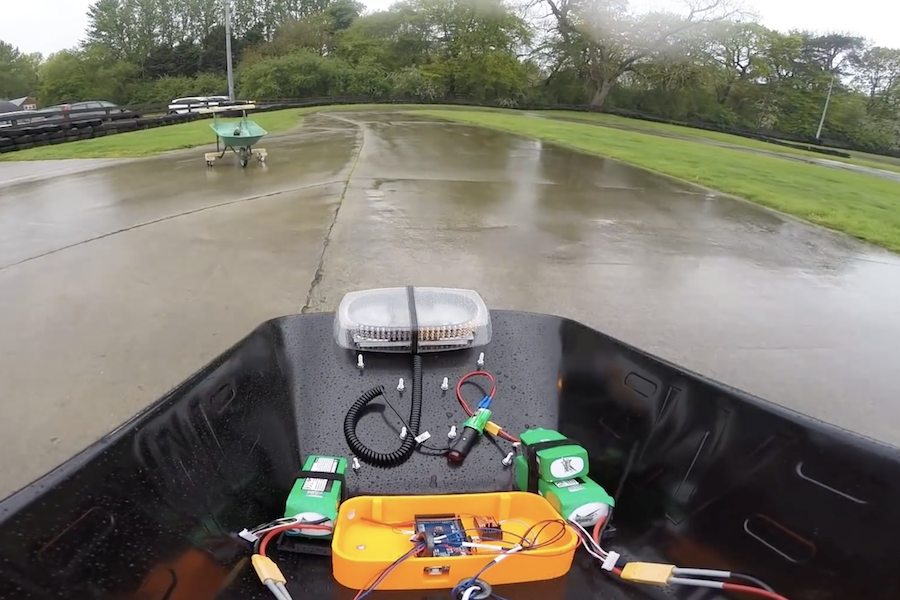
We’ve seen Arduino boards used in a wide variety of situations, but this may be the first time one has been implemented to control an RC wheelbarrow.
In the video below, YouTubers James Bruton, Tom Stanton, and Ivan Miranda have taken on a ‘barrow racing challenge,’ where each competitor must modify a wheelbarrow for remote racing purposes.
Miranda and Stanton went with air-powered designs, while Bruton instead chose differential steering, adding a pair of wheelchair wheels to the main wheel that he modified to swivel on a caster. Bruton’s user interface is provided by a generic RC transmitter, and an Arduino Mega translates these signals into the proper left/right wheel speeds.
‘Race’ results are quite entertaining, and include a variety of wheelies, crashes, and even some improvisation to deal with the day’s rainy conditions!
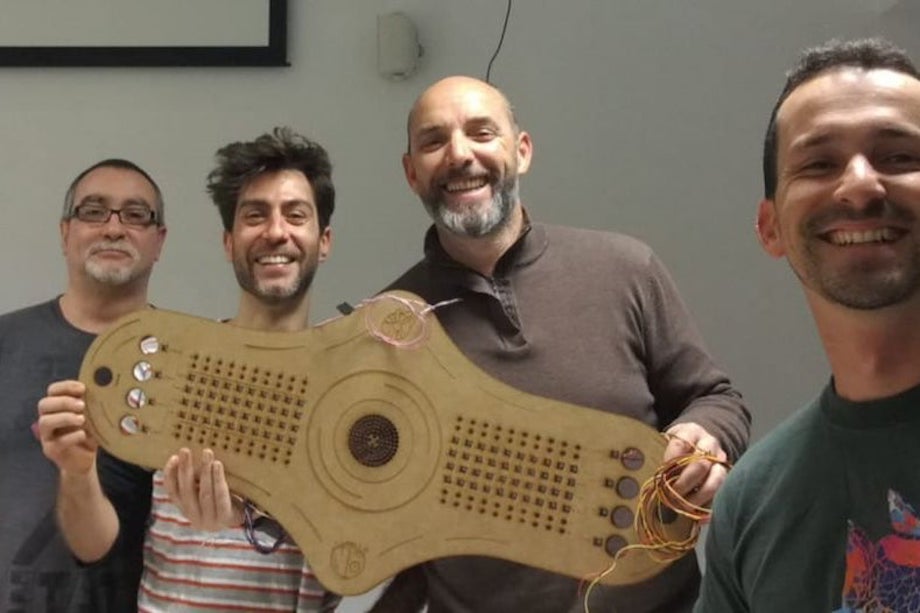
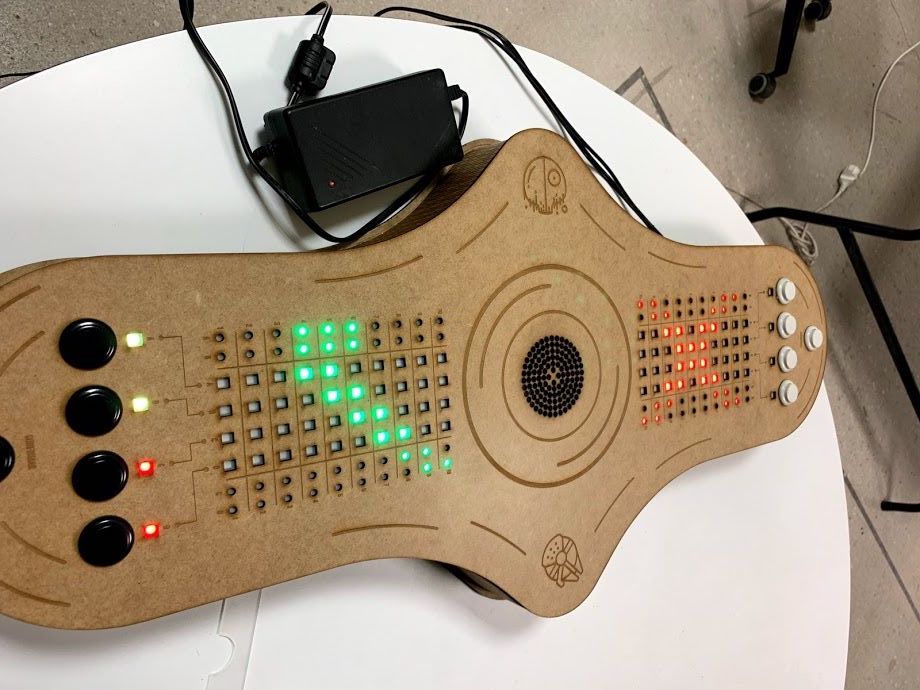
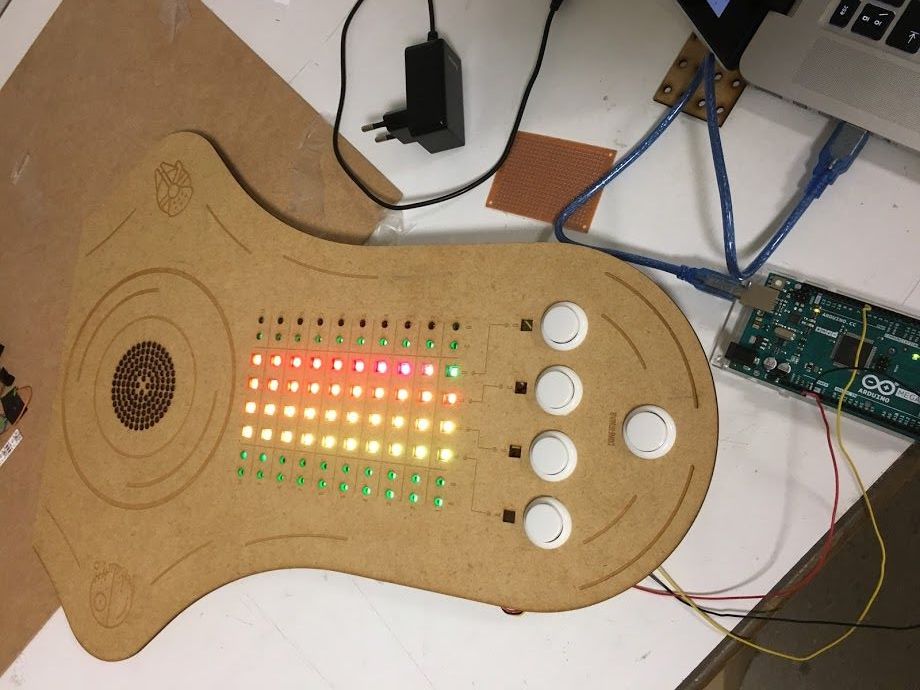
Mastermind is a game where one player attempts to guess a secret combination of colored pegs. It normally requires a second player to act as the judge, giving hints in the form of secondary pegs as to whether the other participant is on the right track. Maker “luisdel” decided to put a new spin on things using an Arduino Mega to display RGB LEDs on a Star Wars-themed play field. This automation allows players to directly compete, rather than taking turns.
In action, each player uses a series of buttons to enter light codes, with 10 tries at guessing the correct combination. No human judge is needed, so it’s a race to see who can unlock this critical sequence first and save—or further subjugate—the galaxy!
These are adverse times for rebellion. Although the Death Star has been destroyed, the Imperial troops are using free hardware and Arduino as a secret weapon.
That is the advantage of free technologies, any person (either good or bad) can use them.
In a hidden base located on the planet Anoat, they are building a 3D printer capable of replicating Imperial Destroyer.
The only solution to defeat the Empire is that a group of rebels commanded by Luke Skycuartielles and Obi-Wan Banzi, defeat the imperial troops and get the key that will give access to the plans to destroy the secret weapon.
This key consists of 4 colors and you have 10 attempts to get it deciphered. There are only four rules:
1. The colors can be repeated
2. A white light indicates that you have hit the right color and position
3. A violet light indicates that you have hit the color but not the position
4. If there is no light you have not guessed the color or the position.
You must hurry since at the other extreme, the evil Darth Ballmer will try to get the key before you. In that case, you will not be able to find out what it is and you will not have access to the plans of the secret weapon. Your mission will have failed.
Little Padawan, may the force accompany you to decipher the key and thus be able to save the galaxy.