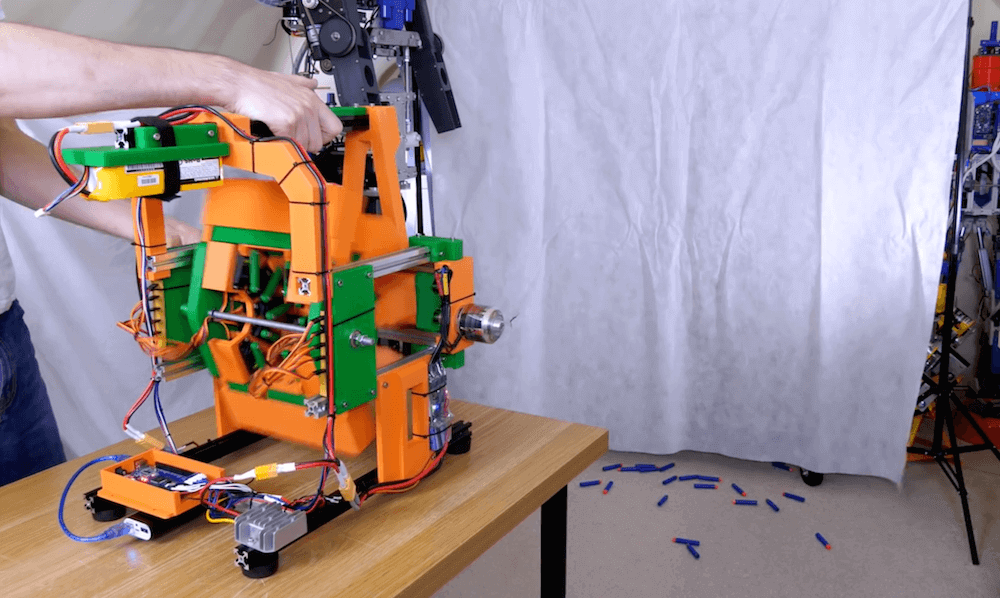
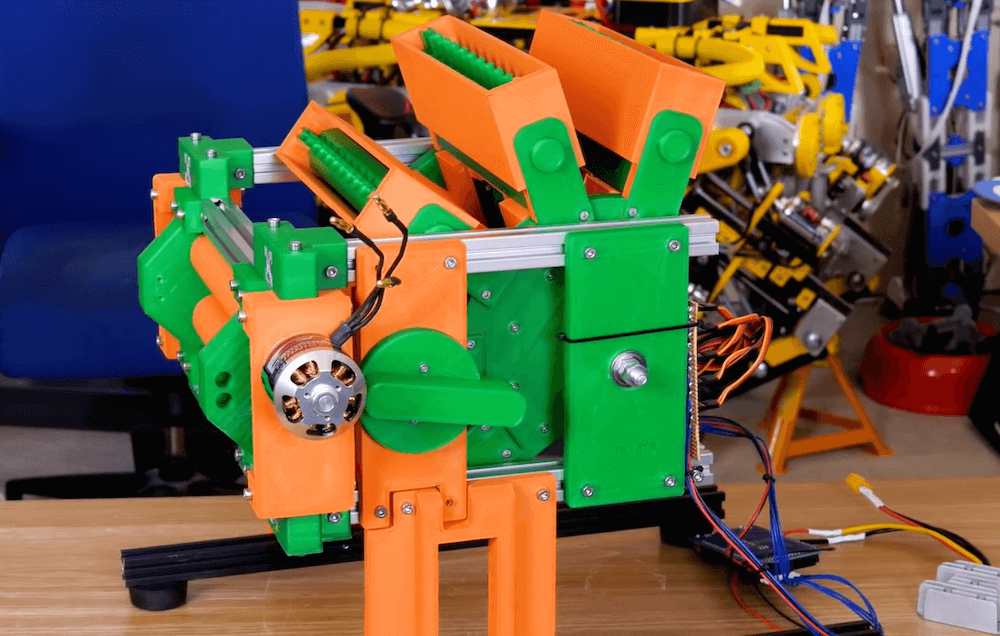
Nerf guns can be a lot of fun, but what if you want your launcher to shoot 10 projectiles simultaneously? Is so, then look no further than James Bruton’s custom blaster.
His 3D-printed project employs two BLDC-powered rollers to accelerate cartridges of 10 darts each, and allows for quick reloading via a clever manual locking mechanism. The device holds five magazines, for total of 50 darts.
When loaded, an arcade-style button fires the darts, pushing them into the rollers at the same time using a couple of servo motors. Everything is powered by a six-cell 24V LiPo battery, while an Arduino Mega is used for control, and to track which cartridge is in place, enabling the operator to concentrate on getting shots downrange!
The device consists of an Arduino, a Bluetooth module, and an SD card. When it’s plugged into the target computer the device loads the selected payload from the SD card, compromising the system. Then it does its unique trick which is to switch the injector over to Bluetooth mode. Now the attacker has much more control, albeit local, over the system.
While we would never even be tempted to plug this device into a real computer, we like some of the additional features, like how an added dip switch can be used to select from up to eight different payloads depending on the required attack. The addition of a photo diode is also interesting, and makes us dream of all sorts of impractical movie hacker scenarios. [Amirreza] says it’s to trigger when the person leaves the room and turns the lights off.
[Amirreza] has all the code and design files on the GitHub. There are also a few payload examples, which should be fun to hack on. After all, one of life’s pleasures is to find new ways to mess with your friends.
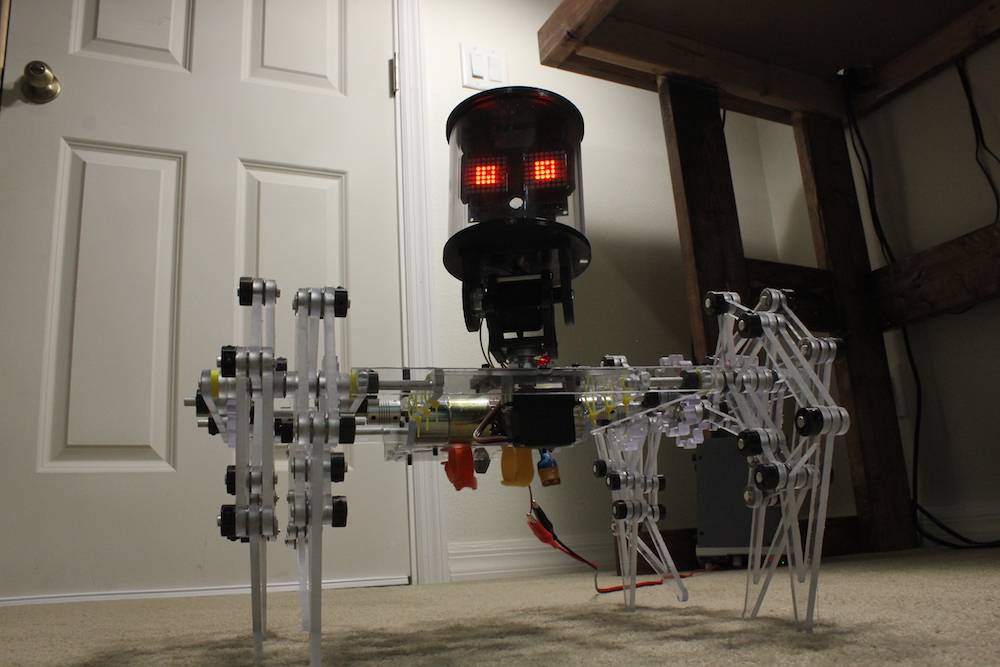
Maker Jeremy S. Cook has been building Theo Jansen-style walkers for literally years, and after several iterations has come up with what he calls the “ClearCrawler.”
This little guy stands at just over 15 inches tall — including its comparatively large clear cylindrical head — and travels around via a pair of motors that move four legs on either side like tank treads.
For control, Cook is using an Arduino Nano onboard, along with a motor driver, plus an Uno and joystick shield as the remote unit. Communication between the two is accomplished by a pair of nRF24L01+ radio modules.
Code for the project is available on GitHub, and the build is split up into an electronics and mechanical section in the videos below.
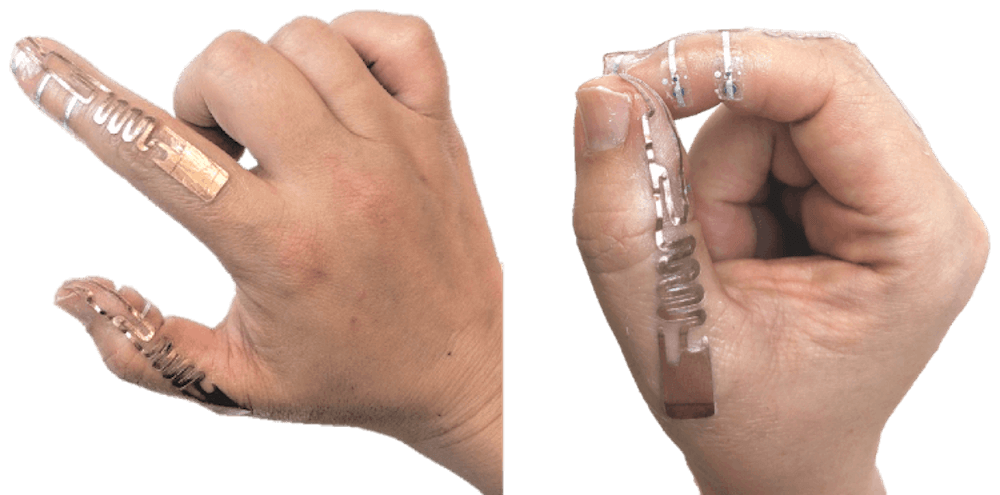
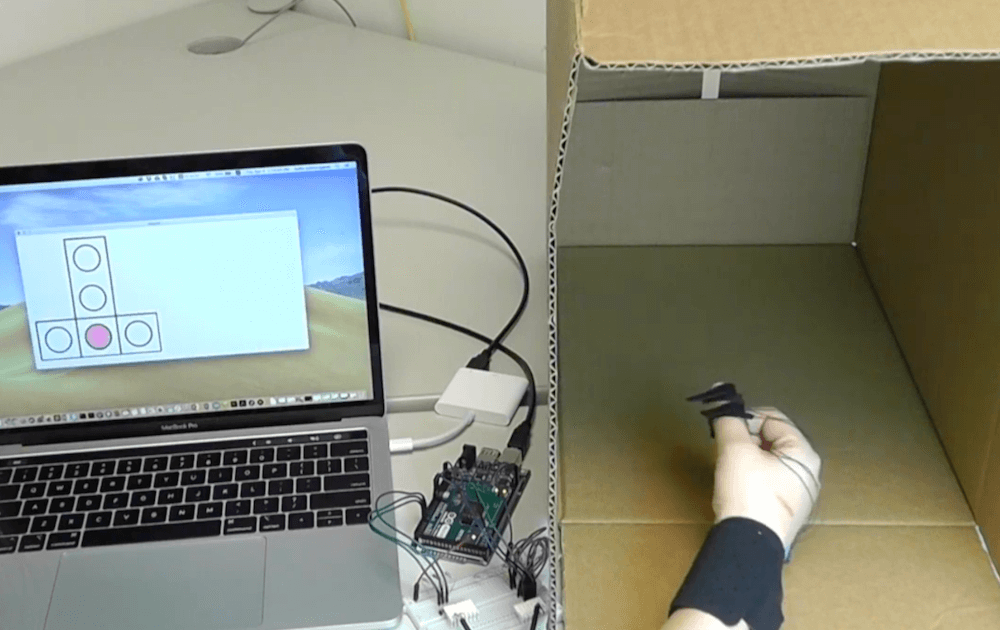
Researchers at the University of Waterloo in Canada have developed a novel hand-based input technique called Tip-Tap that amazingly requires no batteries.
The wearable device uses a series of three custom RFID tags on both the thumb and index finger with half an antenna on each digit. When the fingertips are touched together, a signal is sent to the computer indicating where the thumb and index finger intersect, which is mapped as a position on a 2D grid.
Usability experiments were carried out using an Arduino Mega, with both on-screen visual feedback and without. Possible applications could include the medical field, where Tip-Tap can be added to disposable gloves enabling surgeons to access a laptop without dictating inputs to an assistant or sterilization issues.
We describe Tip-Tap, a wearable input technique that can be implemented without batteries using a custom RFID tag. It recognizes 2-dimensional discrete touch events by sensing the intersection between two arrays of contact points: one array along the index fingertip and the other along the thumb tip. A formative study identifies locations on the index finger that are reachable by different parts of the thumb tip, and the results determine the pattern of contacts points used for the technique. Using a reconfigurable 3×3 evaluation device, a second study shows eyes-free accuracy is 86% after a very short period, and adding bumpy or magnetic passive haptic feedback to contacts is not necessary. Finally, two battery-free prototypes using a new RFID tag design demonstrates how Tip-Tap can be implemented in a glove or tattoo form factor.
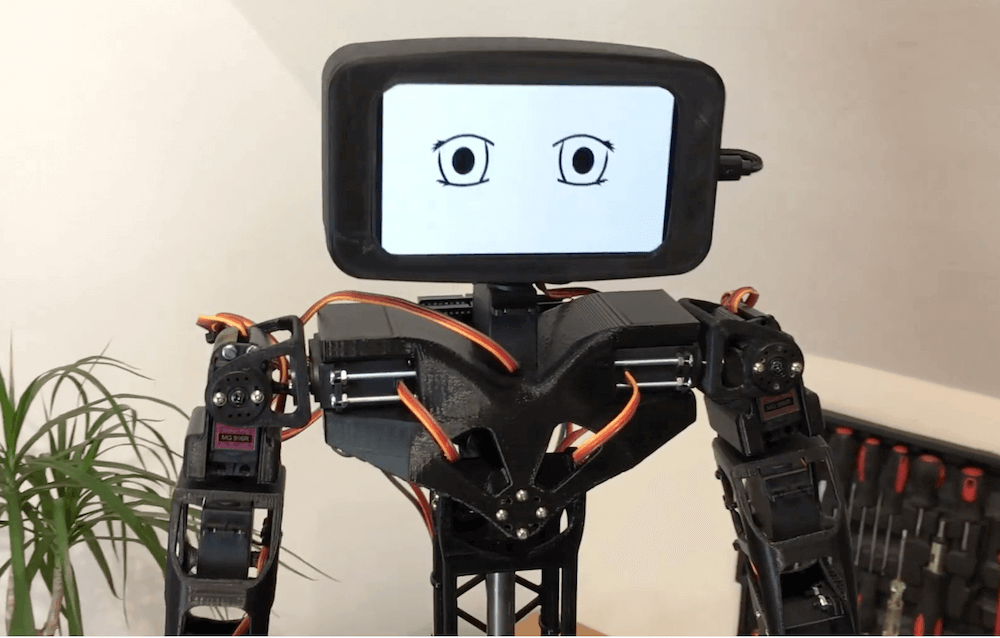
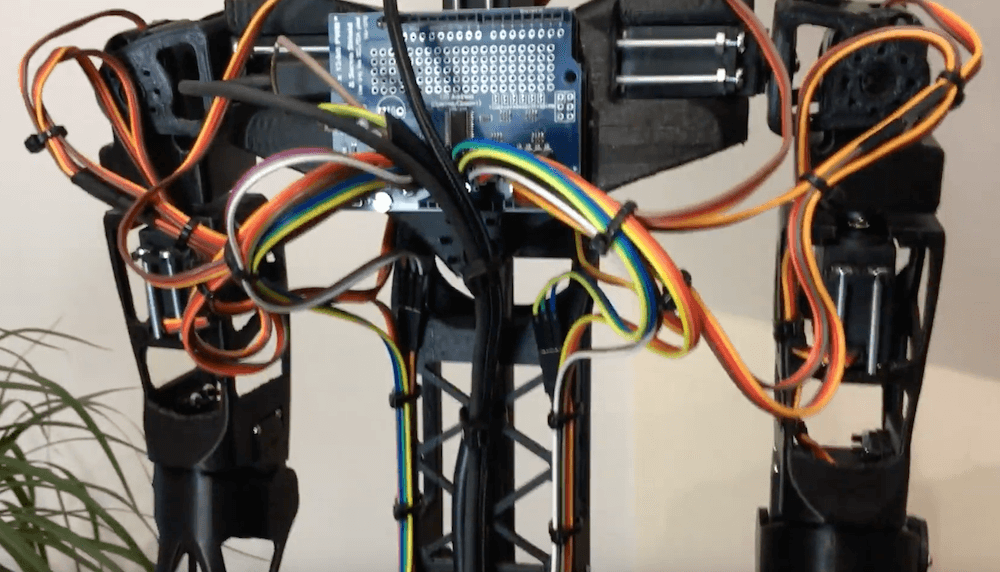
If you’d like to build your own vaguely humanoid robot, but don’t care about it getting around, then look no farther than Aster.
The 3D-printed bot is controlled by an Arduino Uno, with a servo shield to actuate its 16 servo motors. This enables it to move its arms quite dramatically as seen in the video below, along with its head. The legs also appear to be capable of movement, though not meant to walk, and is supported with a column in the middle of its structure.
Aster’s head display is made out of an old smartphone, and in the demo it shows its eyes as green geometric objects, an animated sketch, and then, somewhat shockingly, as different humans. Print files for the project are available here and the design is actually based on the more expensive Poppy Humanoid.
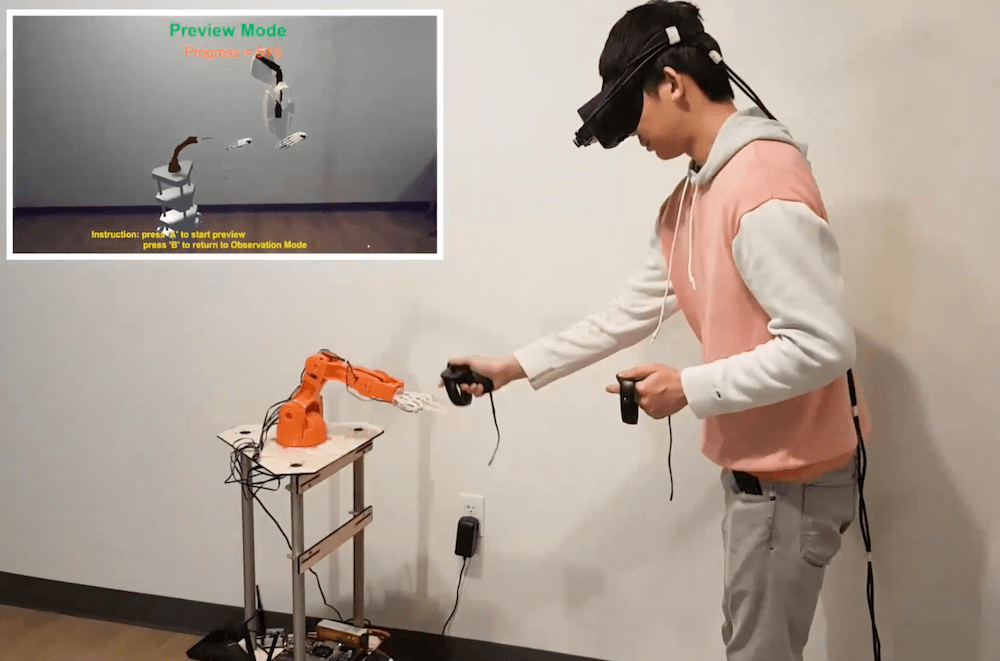
As robotics advance, the future could certainly involve humans and automated elements working together as a team. The question then becomes, how do you design such an interaction? A team of researchers from Purdue University attempt to provide a solution with their GhostAR system.
The setup records human movements for playback later in augmented reality, while a robotic partner is programmed to work around a “ghost” avatar. This enables a user to plan out how to collaborate with the robot and work out kinks before actually performing a task.
GhostAR’s hardware includes an Oculus Rift headset and IR LED tracking, along with actual robots used in development. Simulation hardware consists of a six-axis Tinkerkit Braccio robot, as well as an Arduino-controlled omni-wheel base that can mount either a robot an arm or a camera as needed.
With GhostX, whatever plan a user makes with the ghost form of the robot while wearing an augmented reality head mount is communicated to the real robot through a cloud connection – allowing both the user and robot to know what the other is doing as they perform a task. The system also allows the user plan a task directly in time and space and without any programming knowledge.
First, the user acts out the human part of the task to be completed with a robot. The system then captures the human’s behavior and displays it to the user as an avatar ghost, representing the user’s presence in time and space.
Using the human ghost as a time-space reference, the user programs the robot via its own ghost to match up with the human’s role. The user and robot then perform the task as their ghosts did.
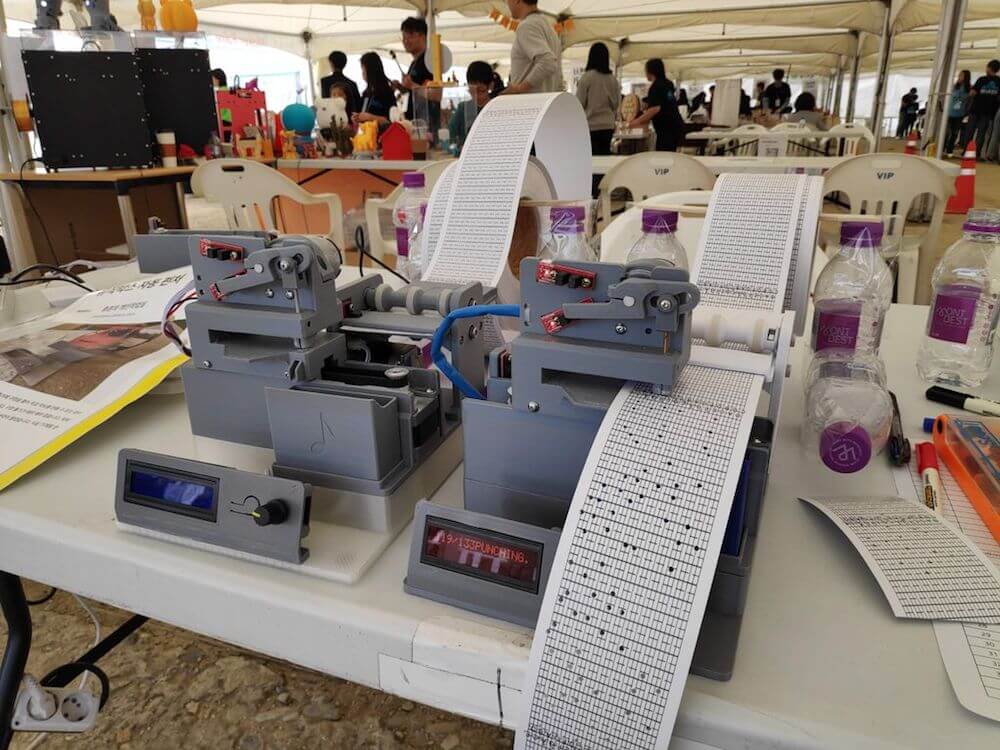
Maker ‘pashiran’ purchased a music box which could be programmed with punch cards, but soon found that actually creating tunes this way by hand was exhausting. His solution was to automate the process, designing a fixture to punch the cards for him!
His new auto-programmer acts as a simple CNC machine, using stepper motors to roll cards into place and then move the punch head perpendicular to this motion to produce the correct note. The holes are punched out over and over with a DC motor, before being removed to play a beautiful tune on the mechanical music box. Computing power is provided by an Arduino Mega, while the user interface consists of an LCD display and an encoder.
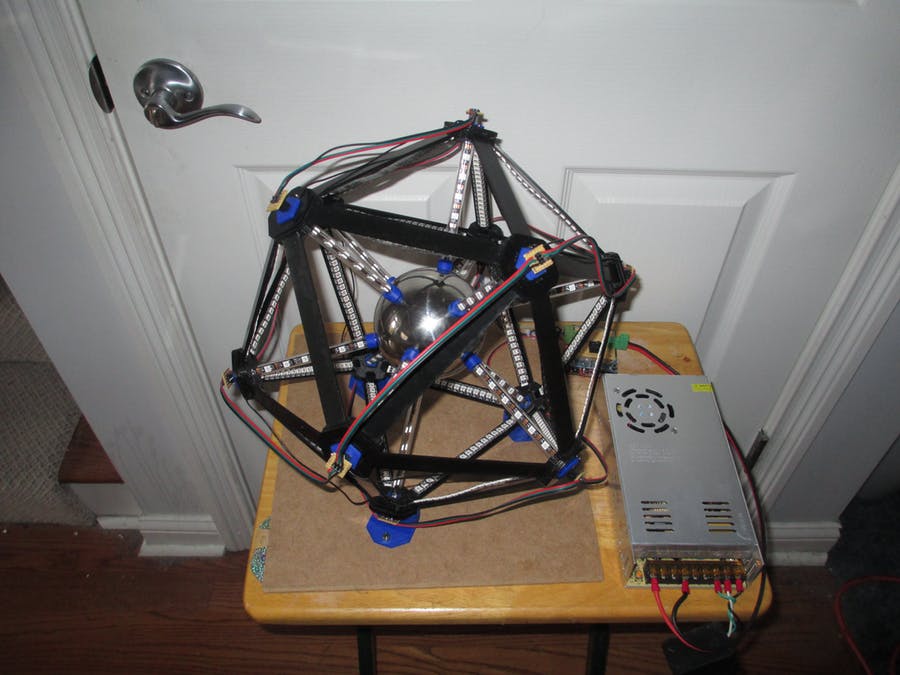
Convex regular icosahedrons contain 30 edges and 12 vertices. This makes for an interesting math problem, but as demonstrated by this project out of the LVL1 hackerspace in Louisville, Kentucky, its geometry also presents an excellent target for a massive number of LEDs.
Their build, in fact, consists of 708 programmable LEDs arranged facing inward on the edges and doubled over on each vertex support. These supports lead to a central stainless steel ball, reflecting a massive amount of light to the surrounding area.
Everything is controlled by an Arduino Mega, along with an Uno-style prototyping shield, and power is provided by a massive 5V 60A supply unit.
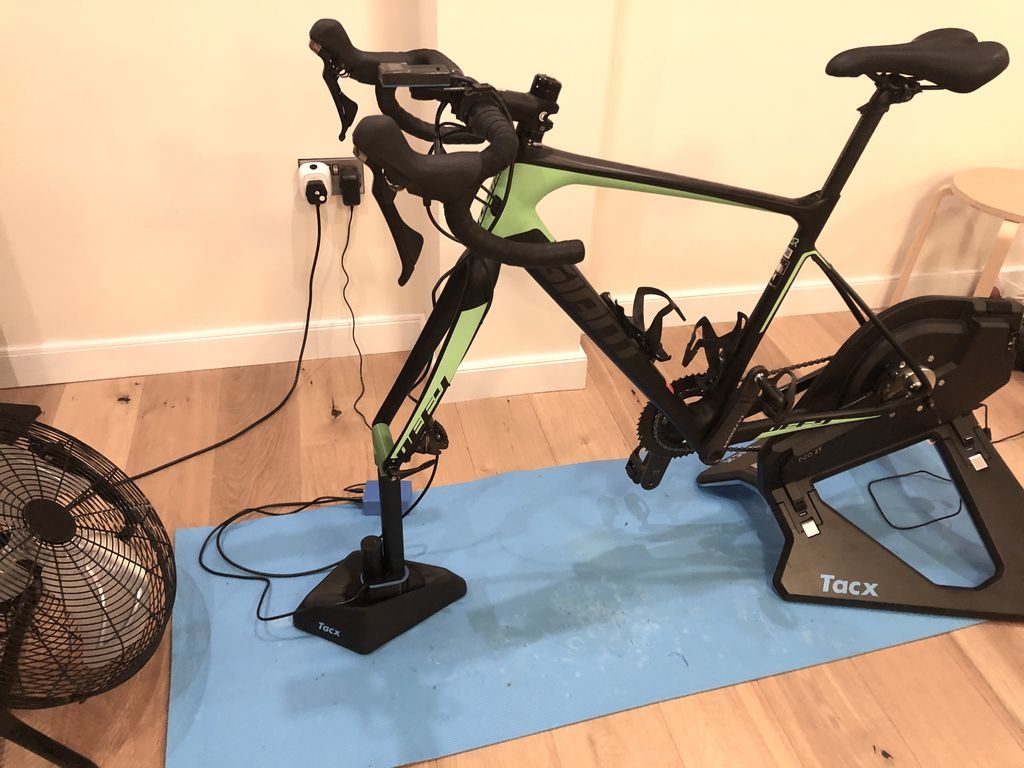
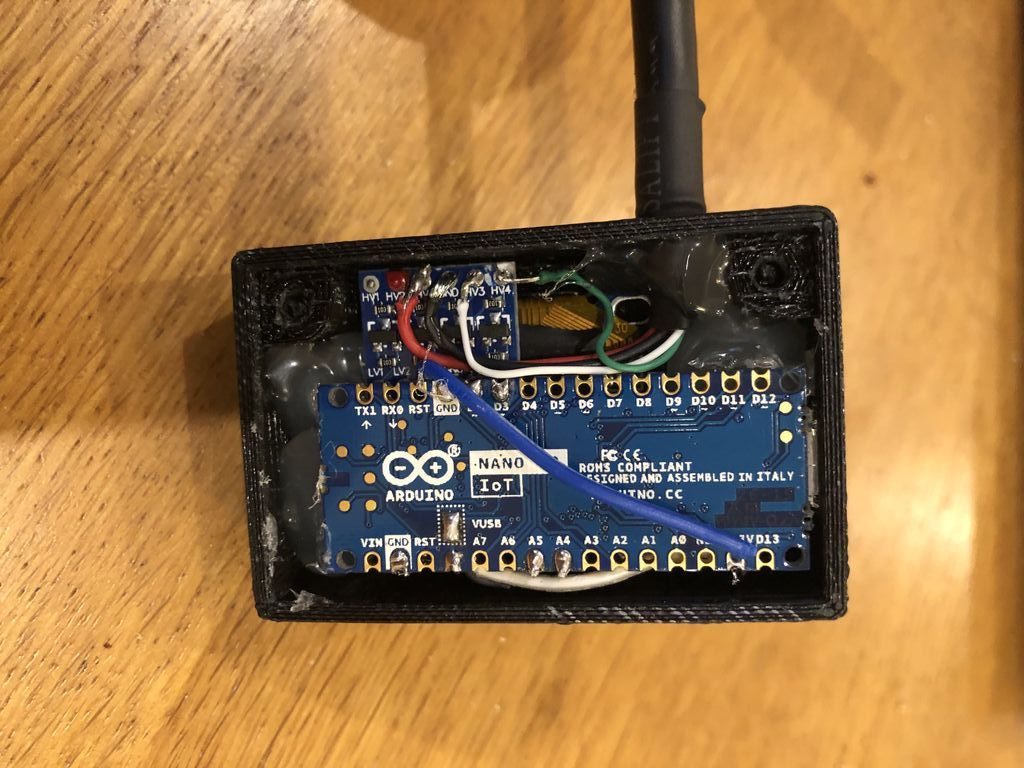
Although he would probably rather be outdoors, after an injury Matt Ockendon had a lot more time to ride his Tacx Neo indoor trainer and tinker. He decided he wanted his rig to be able to simulate the grade of hills, but as commercially available units with this capability are quite expensive, he instead devised his own solution dubbed “OpenGradeSIM.”
Ockendon’s OpenGradeSIM utilizes a Nano 33 IoT to gather power and speed data from his trainer over BLE, then calculates the grade that would be needed to produce such results.
With this data in hand, the Nano controls a linear actuator using an L298N-based driver board to raise or lower the bike’s front end. The derived bike angle is sensed via the Nano’s built-in IMU, providing an elegant closed-loop system. Additionally, the incline is shown on a 1.3″ I2C OLED display that serves as a mini dashboard while Ockendon cycles.
Anyone who has ever gone to a bowling alley will know the preferred (but ineffective) technique to telepathically control a bowling ball. [Mark Rober] and [James Bruton] decided to change that and hacked a bowling ball that can be steered remotely (and discreetly), simply by leaning your body.
They started with a standard bowling ball, that was cut in half and hollowed out on a lathe. A beam sits on the centre line of the ball, mounted on a bearing in each half to allow the ball to spin around it. Steering done by shifting the centre of mass, by moving a steel pendulum that hangs below the beam side to side with heavy-duty servo. The servo is controlled with an Arduino, and an IMU to detects the balls orientation. Power is provided by and RC Lipo battery. The wireless controller is a sneaky little device that is taped to [Mark]’s back and covered with clothing, and steers the ball by detecting how far he leans with an IMU module. The brain is an Arduino Mini and an NRF24L01 provides the RF link.
While it’s not an easy build, it’s a fairly simple system electronically, with off the shelf electronics modules and perfboard. The genius is in the implementation and its entertainment value. The look on the kids faces when [Mark] “telepathically” controls the ball, after showing off the fact that he has zero natural ability, is absolutely priceless. [Mark Rober], a former NASA engineer, has made a name for himself with viral Youtube videos on cool projects like a glitter booby trap for package thieves and a liquid sand hot tub. [James Bruton], a former toy designer is known for his robotics prowess that he has put on display with OpenDog and functional Star Wars robots.
For us this hack is a perfect example of one that entertains and inspires, a powerful combination for young and old alike. Check out the awesome video after the break.


 cut in half and hollowed out on a lathe. A beam sits on the centre line of the ball, mounted on a bearing in each half to allow the ball to spin around it. Steering done by shifting the centre of mass, by moving a steel pendulum that hangs below the beam side to side with heavy-duty servo. The servo is controlled with an Arduino, and an IMU to detects the balls orientation. Power is provided by and RC Lipo battery. The wireless controller is a sneaky little device that is taped to [Mark]’s back and covered with clothing, and steers the ball by detecting how far he leans with an IMU module. The brain is an Arduino Mini and an NRF24L01 provides the RF link.