Posts with «arduino» label

Control Large DC Motors with Arduino

Arduino boards are able to control small motors very easily and it’s just as easy when you have to deal with controlling large motors. In the following video tutorial by NYC CNC you’ll see two examples. In the first you’ll learn how to get up and running, to start, stop, control direction and speed of a large motor with Arduino Uno. In the second example, how to use two proximity sensors as limit switches and two potentiometers to allow on-the-fly speed adjustment.

Arduino Blog 31 Oct 16:44

Bluetooth-Enabled Danger Sign for Lab

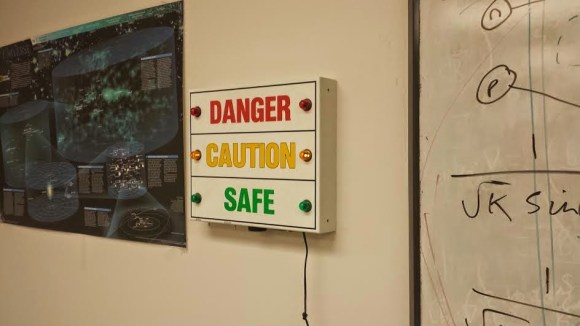
[A Raymond] had some free time at work, and decided to spend it on creating a wireless warning sign. According to his blog profile, he is a PhD student in Applied Physics. His lab utilizes a high-powered laser system. His job is to use said system, but only after it’s brought online by faculty scientists. The status of the laser system is changed by a manual switchbox that controls the warning signs wired around the lab entrances. Unfortunately, if you were in the upstairs office, you only knew this after running downstairs to check. [A Raymond's] admitted laziness finally got the better of him – he wanted a sign that displayed the laser’s status from the comfort of the office. He had an old sign he could use, but he wanted a way for it to communicate with the switchbox downstairs. After some thought, he decided Bluetooth was the way to go, using a pair of BlueSMiRF Bluetooth modules from Sparkfun and Arduino Uno R3’s.

He constructed a metal box that intercepted the cable from the main switchbox, mounting one BlueSMiRF and Uno into it. Upon learning that the switchbox sends 12V AC signals over three individual status wires, he half-wave rectified the wires and divided their voltages so that the Uno wouldn’t fry. Instead, it determined which status wire that had active voltage. and sent a “g(reen)”, “y(ellow)”, or “r(ed)” signal continuously via Bluetooth. On the receiving end, [A Raymond] gutted the sign and mounted the other BlueSMiRF and Uno into it along with some green, yellow, and red LEDs. The LEDs light up in response to the corresponding Bluetooth signal.

The result is a warning sign that is always up-to-date with the switchbox’s status. We’ve covered projects using Bluetooth before, from plush birds to cameras- [A Raymond's] wireless sign is in good company. He notes that it’s “missing” a high pitched whining noise when the “Danger” lights are on. If he decides to add an accompanying (annoying) sound, he couldn’t go wrong with something like this. Regardless, we’re sure [A Raymond] is happy that he no longer has to go back and forth between floors before he can use the laser.


Filed under: Arduino Hacks, wireless hacks

The making-of an animatronic baby alien

Eva Taylor works at EKT Workshop and built an animatronic rod puppet Alien as a masterwork research project for the National Institute of Dramatic Art (NIDA) in Sydney Australia. It was inspired by the “bambi burster” built for the film Alien 3, although her creature is somewhat different.

The animatronics are controlled via a Playstation 3 controller, using a servoshock module between the controller and an Arduino Uno board:

It contains and 8 way 2 stage tail mechanism and animatronic lips, jaw and tongue. The remaining parts are rod controlled. A myriad of techniques were deployed in its construction – the torso and limbs were hand-carved from Queensland Maple while the joints were custom made from recycled parts of RC cars and planes. The skeleton of the tail was custom made from acrylic and cut on a laser cutter. The head contains an underskull of fibreglass, dental acrylic teeth and silicone skin. The muscle groups are also made of deadened, encapsulated silicone.

She shared with us the video above showing the main phases of the making-of process, while the one below gives you an idea of how  the puppet looks like in a more dramatic piece:

Arduino Blog 29 Oct 23:47

Nikes With Power Laces, Just in Time for Next Year

With the world’s first hoverboard being shown a few days ago, we’re on the verge of the fabulous world of tomorrow from Back to the Future. Hoverboards are cool, but there’s a wealth of other cool technology from the far-off year of 2015: Mr. Fusions, inflatable pizza, Dustbusters, and of course, Nikes with power laces. [Hunter] just built them, and with the right shoes, to boot.

[Hunter] is using the BttF-inspired Nike Air Mag shoes for this build, along with a few bits of electronics – an Arduino pro mini, a force sensing resistor, and a motor. The build began by carving out a notch in the back of the shoe for the electronics. A small bit of fishing line goes around the shoe, providing the power behind the power laces.

A force sensitive resistor under the heel of the insole tells the microcontroller when a foot is inside the shoe, and a rotary encoder on the motor shaft makes sure all the power lace cycles are the same. It’s not quite the same as the shoe seen on screen – the lower laces can’t be replicated and it’s certainly not as fast as the BttF shoes, but it does work, and as far as shoelaces are concerned, they work well.

Videos below.


Filed under: wearable hacks

Follow your cat with FPV camera and Arduino Leonardo

After the Bike Tachometer we posted back in September, Nikus  shared with us a new Instructable to show you how to build remote-controlled tank using a first person view (FPV) camera and Arduino Leonardo:

At the beginning I build only RC tank without FPV camera but when I was driving it in the house I have not seen where it is. So I came up with that I will add to it the camera mounted on a 2 servos. The range is about 100m, you can also ride with it at home. With this tank you can see what your cat is doing when you’re not looking. You can see it on a video

Watch it in action and follow the tutorial:


Arduino Blog 28 Oct 23:07
arduino  camera  featured  fpv  leonardo  robot  

Hackaday Links: BSAPEDWLOVKTUB.YBKAB

Here’s something that’s just a design study, but [Ivan]‘s Apple IIe phone is a work of art. You’re not fitting a CRT in there, but someone out there has a 3D printer, an old LCD, and a GSM module. Make it happen. See also: the Frog Design Apple phone.

A few days ago we posted something on an old ‘286 machine that was able to load up the Hackaday retro site. For a few people, this was the first they’ve heard about our CSS and Javascript-less edition designed specifically for old computers. They dragged out some hardware, and [WTH] pulled up the site on a Dell Axim.It’s actually somewhat impressive that these machines have SD cards…

[Arduino Enigma] created a touchscreen Enigma machine. Why haven’t we seen an Arduino Colossus yet?

The crew at Adafruit now have a Flying Toaster OLED, which means we now have flying toaster bitmaps for all your OLED/graphic display projects.

[Ian] had an old rackmount programmable voltage standard. This was the remote programmable voltage standard, without front panel controls. No problem, just get an Arduino, shift register, and a few buttons. Video right here.

A few months ago, [Jan] released a neat device that stuffs a modelling synth inside a MIDI plug. He’s selling them now, and we’d love to see a few videos of this.


Filed under: Hackaday links

Walkman-esque Human Interface Device

Cheap keyboards never come with extra buttons, and for [Pengu MC] this was simply unacceptable. Rather than go out and buy a nice keyboard, a microcontroller was found in the parts drawer and put to work building this USB multimedia button human interface device that has the added bonus of looking like an old-school Walkman.

The functions that [Pengu MC] wants don’t require their own drivers. All of the buttons on this device are part of the USB standard for keyboards: reverse, forward, play/pause, and volume. This simplifies the software side quite a bit, but [Pengu MC] still wrote his own HID descriptors, tied all of the buttons to the microcontroller, and put it in a custom-printed enclosure.

If you’re looking to build your own similar device, the Arduino Leonardo, Micro, or Due have this functionality built in, since the USB controller is integrated on the chip with everything else. Some of the older Arduinos can be programmed to do the same thing as well! And, with any of these projects, you can emulate any keypress that is available, not just the multimedia buttons.


Filed under: Arduino Hacks

Control your Halloween Props with Arduino

Jason from Make Magazine published a video tutorial on how to create an amazing choreography hacking your Halloween props using Arduino Uno:


Arduino Blog 23 Oct 14:07

Now Let’s See The World’s Largest Arduino

A few days ago we saw what would have been a killer Kickstarter a few years ago. It was the smallest conceivable ATtiny85 microcontroller board, with resistors, diodes, a USB connector, and eight pins for plugging into a breadboard. It’s a shame this design wasn’t around for the great Arduino Minification of Kickstarter in late 2011; it would have easily netted a few hundred thousand dollars, a TED talk, and a TechCrunch biopic.

[AtomSoftTech] has thrown his gauntlet down and created an even smaller ‘tiny85 board. it measures 0.4in by 0.3in, including the passives, reset switch, and USB connector. To put that in perspective, the PDIP package of the ‘tiny85 measures 0.4 x 0.4. How is [Atom] getting away with this? Cheating, splitting the circuit onto two stacked boards, or knowing the right components, depending on how you look at it.

[Atom] is using a few interesting components in this build. The USB connector is a surface mount vertical part, making the USB cord stick out the top of this uC board. The reset button is extremely small as well, sticking out of the interior layer of the PCB sandwich.

[AtomSoft] has the project up on OSH Park ($1.55 for three. How cool is that?), and we assume he’ll be selling the official World’s Smallest Arduino-compatible board at Tindie in time.


Filed under: Arduino Hacks, ATtiny Hacks

DIY Automatic Fish Feeder Using Arduino Nano

The all in one automatic aquarium feeder uses an Arduino Nano and drill bit feed fish at certain time intervals. It doesn’t clean the tank or trim the plants but is immensely effective for feeding fish.

Read more on MAKE