Posts with «arduino» label

Hack to the future: Win $1000 Prize and Arduino Zeros in NYC
Hackster is a hardware creation community and since last february has been organizing Hardware Weekends with hackathons all over US. On Saturday and Sunday June 26th and 27th  it’s  coming back to New York City for the last time in 2015.  This hackathon is focused on open source hardware and the maker communities across America: all ages and skill levels are welcome (Children under 16 should be accompanied by an adult.)

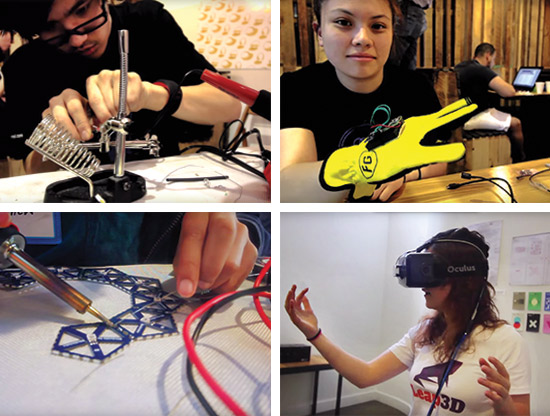
Here’s a short video from their event taking place at Kickstarter offices last month and some pictures past events.

Hackster is providing all the food, tools, soldering stations, 3D printers, workshops and gear (Arduinos, Particle, LinkItOne, Intel Edison, Pebble, Smart Things, and software from Autodesk, Azure and more!)

$1000 Grand Prize from Microsoft and Arduino Zeros from Hackster!

Register your participation here.  It’s going to be a lot of fun!



Tracking Bitcoin With The ESP8266

[Kendrick] was looking for something to do with an ESP8266 WiFi module, and since he loves Bitcoin and Arduino, the obvious solution was to make a Bitcoin price tracker.

The ESP8266 is a complete microcontroller with a WiFi chip and a few pins for a serial connection. It’s certainly possible to write some firmware for the ESP to get the current conversion rate of Bitcoin, but for simplicity’s sake, [Kendrick] chose to use an Arduino for this project. He’s using a 5V Arduino, and the ESP operates on 3.3V logic, but a few Zeners take care of the logic level conversion.

The code running on the Arduino checks the CoinDesk API minute, parses the JSON coming from the API, and prints the current Bitcoin price to the serial port. For tracking the current conversion rate of Bitcoin, it’s vastly overkill. This project could have a few interesting applications, from hooking up a few seven-segment displays, to an RGB LED mood lamp that keeps track of this magic Internet money.


Filed under: Microcontrollers, wireless hacks

Make your first wearable with Arduino Gemma

Like the LilyPad Arduino boards, the Arduino Gemma is designed to create interactive projects you can wear. It can be sewn into clothing and other fabric with conductive thread and be connected to sensors and actuators.

After you explored the Getting Started page and learn how to move the first steps with it, it’s time to explore its features with a real project.

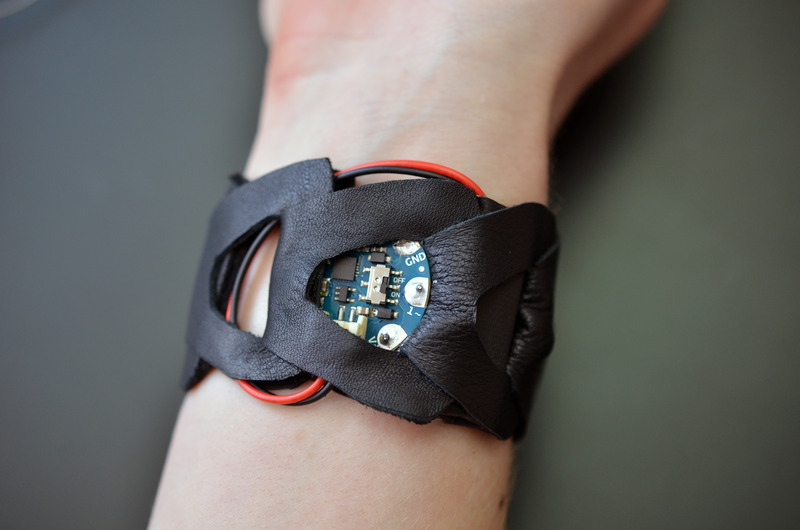
Becky Stern from Adafruit recently created a tutorial for making a vibrating mindfulness bracelet and learn the basics of wearables with Gemma! It’s like that “stand up every hour” feature you find on smart watches, but DIY.

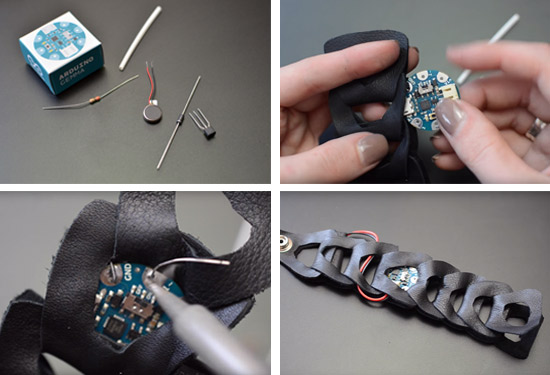
The guide shows you how to solder up the circuit using an Arduino Gemma microcontroller, small pager motor, as well as how to whip up a cute linked leather bracelet to hold everything.

Build yourself a buzzing bracelet for subtle haptic feedback as time passes! It’s great for reminding yourself to get up and walk away from your desk for a few minutes each hour, or just as a way to have a new awareness of how the perception of passing time varies based on what you’re doing.

You’ll whip up a vibrating motor circuit using a transistor, resistor, and diode, and use GEMMA to control the frequency of vibration in between low-power microcontroller naps. The circuit lives inside a linked leather/rubber bracelet, but you could build it into whatever you please. This project involves some precision soldering, but is otherwise quite easy!

Read the bill of materials, follow the steps and create your Buzzing Mindfulness Bracelet on Adafruit.

Make your first wearable with Arduino Gemma

Like the LilyPad Arduino boards, the Arduino Gemma is designed to create interactive projects you can wear. It can be sewn into clothing and other fabric with conductive thread and be connected to sensors and actuators.

After you explored the Getting Started page and learn how to move the first steps with it, it’s time to explore its features with a real project.

Becky Stern from Adafruit recently created a tutorial for making a vibrating mindfulness bracelet and learn the basics of wearables with Gemma! It’s like that “stand up every hour” feature you find on smart watches, but DIY.

The guide shows you how to solder up the circuit using an Arduino Gemma microcontroller, small pager motor, as well as how to whip up a cute linked leather bracelet to hold everything.

Build yourself a buzzing bracelet for subtle haptic feedback as time passes! It’s great for reminding yourself to get up and walk away from your desk for a few minutes each hour, or just as a way to have a new awareness of how the perception of passing time varies based on what you’re doing.

You’ll whip up a vibrating motor circuit using a transistor, resistor, and diode, and use GEMMA to control the frequency of vibration in between low-power microcontroller naps. The circuit lives inside a linked leather/rubber bracelet, but you could build it into whatever you please. This project involves some precision soldering, but is otherwise quite easy!

Read the bill of materials, follow the steps and create your Buzzing Mindfulness Bracelet on Adafruit.

Watch Massimo Banzi’s presentation at Computer History Museum

Last month Massimo Banzi gave a lecture at the Computer History Museum in Mountain View (California, US). It was titled The Arduino Experience and covered the historical origins of Arduino, including a explanation of the process of designing tools which make digital technology accessible to people who are not experts, and the essential role of the larger Arduino ecosystem that supports it. After the keynote Len Shustek, chairman of the board of the Museum, curated a session of Q&A. If you didn’t have the chance to be there, the recorded video is online and you can watch it now:


Watch Massimo Banzi’s talk at the Computer History Museum

Last month Massimo Banzi gave a lecture at the Computer History Museum in Mountain View (California, US). It was titled The Arduino Experience and covered the historical origins of Arduino, including a explanation of the process of designing tools which make digital technology accessible to people who are not experts, and the essential role of the larger Arduino ecosystem that supports it. After the keynote Len Shustek, chairman of the board of the Museum, curated a session of Q&A. If you didn’t have the chance to be there, the recorded video is online and you can watch it now:


Open Source Prosthetic Hands Focus on Function and Personality

A reddit user asked for workouts for his brother, who lost his hands. Another user responded with a 3D printed prosthetic.

Read more on MAKE

The post Open Source Prosthetic Hands Focus on Function and Personality appeared first on Make: DIY Projects, How-Tos, Electronics, Crafts and Ideas for Makers.

MAKE » Arduino 16 Jun 16:00

Open Source Prosthetic Hands Focus on Function and Personality

A reddit user asked for workouts for his brother, who lost his hands. Another user responded with a 3D printed prosthetic.

Read more on MAKE

The post Open Source Prosthetic Hands Focus on Function and Personality appeared first on Make: DIY Projects, How-Tos, Electronics, Crafts and Ideas for Makers.

MAKE » Arduino 16 Jun 16:00

Explore This Elegant Wooden Arduino Puzzle Box

If you’re like me, you find yourself fighting the urge to push every button, flip every switch, and turn every knob you see. This arcade-style puzzle box was designed to satiate those deep-seated desires. Powered by an Arduino, with completely custom wooden enclosure and components, this is a wood shop geek’s first […]

Read more on MAKE

The post Explore This Elegant Wooden Arduino Puzzle Box appeared first on Make: DIY Projects, How-Tos, Electronics, Crafts and Ideas for Makers.

Explore This Elegant Wooden Arduino Puzzle Box

If you’re like me, you find yourself fighting the urge to push every button, flip every switch, and turn every knob you see. This arcade-style puzzle box was designed to satiate those deep-seated desires. Powered by an Arduino, with completely custom wooden enclosure and components, this is a wood shop geek’s first […]

Read more on MAKE

The post Explore This Elegant Wooden Arduino Puzzle Box appeared first on Make: DIY Projects, How-Tos, Electronics, Crafts and Ideas for Makers.