Posts with «arduino» label

Want a low-cost ARM platform? Grab a Prepaid Android Phone!

What would you pay for a 1.2Ghz dual-core ARM computer with 1GB RAM, 4GB onboard flash, 800×600 display, and 5 megapixel camera? Did we mention it also has WiFi, Bluetooth, and is a low power design, including a lithium battery which will run it for hours? Does $15 sound low enough? That’s what you can pay these days for an Android cell phone. The relentless march of economies of scale has finally given us cheap phones with great specs. These are prepaid “burner” phones, sold by carriers as a loss leader. Costs are recouped in the cellular plan, but that only happens if the buyer activates said plan. Unlike regular cell phones, you aren’t bound by a contract to activate the phone. That means you get all those features for $15-$20, depending on where you buy it.

The specs I’m quoting come from the LG Optimus Exceed 2, which is currently available from Amazon in the USA for $20. The same package has been available for as little as $10 from retail stores in recent weeks. The Exceed 2 is just one of several low-cost Android prepaid phones on the market now, and undoubtedly the list will change. How to keep up with the current deals? We found an unlikely place. Perk farmers. Perk is one of those “We pay you to watch advertisements” companies. We’re sure some people actually watch the ads, but most set up “farms” of drone phones which churn through the videos. The drones earn the farmer points which can be converted to cash. How does this all help us? In order to handle streaming video, Perk farmers want the most powerful phones they can get for the lowest investment. Subreddits like /r/perktv have weekly “best deals” posts covering prepaid phones. There are also tutorials on rooting and debloating current popular phones like the Whirl 2 and the Exceed 2.

Once you have your phone, the first order of business is to boot it up. Many prepaid phones try to force the user to go through an activation process. There is always a back door for installers to exit the process though. In the case of the Exceed 2, simply pressing volume up, volume down, back, and home quits out of the activation process.

Got root?

Some applications require root permissions. To achieve this, your best bet is to do a bit of Googling for your particular phone model. The XDA developers forums are a great resource for this. While prepaid phones don’t usually have communities behind them like flagship phones, you can often find at least some information on what it takes to root your particular device. The most well-known “root every device” application to date is towelroot, created by GeoHot. You might remember [George Hotz] aka GeoHot as the first person to jailbreak an iPhone. He also made the news by getting into a bit of hot water with Sony over some PlayStation 3 security holes. Towelroot uses a Linux kernel exploit (futex) to gain root permissions. Released in June of 2014, the futex exploit has been patched on most new phones. However, it hasn’t been patched on phones that receive relatively few updates – like prepaid phones. On the Exceed 2, Towelroot works perfectly, giving the user root without even requiring a reboot. Once the phone is rooted, a root privilege manager like SuperSU is needed to keep track of which applications should have root permissions. Once that is done, anything goes! We’ve found packages like BusyBox to be huge helps – especially when working at the console through Android Debug Bridge (ADB).

What do you want to hack today?

Between these low-cost phones and the used phones every family seems to have floating around now, there are a heck of a lot of devices out there waiting to be used. What can you do with a spare Android phone? Quite a lot. There has never been a better time to learn to code for the Android Platform. Android Studio is the current official development environment. If you know a bit of Java, it’s easy to jump in and start making apps. If you’re not a Java head but want to learn, there are tutorials all over the web to help get into the swing of things.

Not a coder? The swiss army knife of automating android devices has long been Tasker. Tasker allows you to set off simple scripts (called tasks) with triggers which can be anything from plugging in headphones to connecting to a particular WiFi access point, to pressing a button on the screen. Want your smart phone to announce your arrival home with your own theme music? Just set up a Tasker profile to play a song when it connects to your home WiFi router. Tasker supports plenty of actions natively, and can be extended with plugins. Scripting Layer For Android SL4A) even allows it to extended with Python scripts.

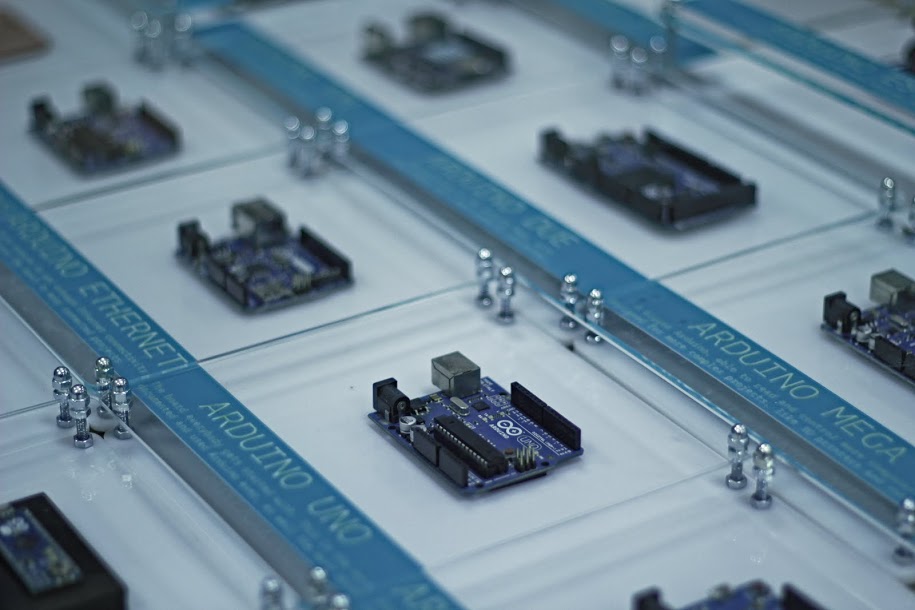
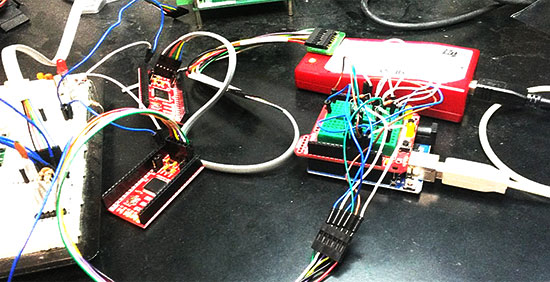
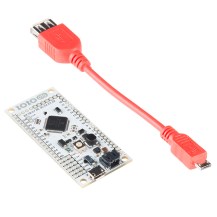
Moving into the hardware world, there are plenty of ways to get GPIOs from an Android phone. The Android Accessory Development Kit (ADK) is getting a bit long in the tooth, but it’s still a great way to interface an Arduino board like the Arduino Mega ADK with your device. Another option for getting into the hardware realm is the IOIO OTG board. As the name implies, this new version of the IOIO board supports the USB OTG standard. This allows it to connect a phone either as a host or as an accessory.  Need a simple wireless terminal for your project? Grab a terminal app and a Serial Port Profile (SPP) compatible Bluetooth module, and Bob’s your uncle. Interested in hacking with the ESP8266? There is an entire page of apps on the Google Play store dedicated to interfacing with everyone’s favorite low-cost WiFi module.

We’ve just covered the tip of the iceberg here. What kind of hacking would you do with a spare Android phone, or one of these low-cost prepaid devices. Let us know in the comments!


Filed under: Android Hacks, Featured
Hack a Day 10 Sep 18:01

New Project: Use an Arduino and Relays to Control AC Lights and Appliances

This plug-and-play rig will make it easy to control high-voltage outputs from a low-voltage Arduino.

Read more on MAKE

The post Use an Arduino and Relays to Control AC Lights and Appliances appeared first on Make: DIY Projects, How-Tos, Electronics, Crafts and Ideas for Makers.

A High altitude balloon sensing the earth’s atmosphere

The project Emanuel Bombasaro submitted to the Arduino blog is about a high altitude balloon he launched on August 21st over Denmark. The balloon, called Titan 1, is made of a helium-filled latex balloon,  a payload box holding the flight computer, sensors and a parachute (36” diameter). A GoPRO camcorder mounted inside the payload box and capturing an image every second.

The flight computer is an Arduino Mega which logs position (GPS), pressure, temperature, humidity, luminosity, earth magnetic field, acceleration and spin, measured by a variety of sensors:

At 1:10 we jump from cloud level (~3200m) towards reaching the peak altitude of 35393m. Immediately the moon appears on the right and is visibile again and again. 2:05 the fragments of the bursted balloon can be seen and up it goes back to earth. 3:00 we drop down to cloud level (~3200m) and soon after hit the ground.

This is the list of modules and sensors connected to the Arduino Mega:

  • MTX2 Radiometrix
  • MTX2 434 MHz Radio Module.
  • HX1 VHF Narrow Band FM 300 mW Transmitter, 144.800 MHz, used for APRS.
  • MAX-M8 GPS module used for position (longitude, latitude and altitude) and time acquisition.
  • DS18B20 Temperature sensor on HABuino showing the temperature of the flight computer compartment. This temperature should remain most near to 20 ” C. Any temperature variation will e?ect the transmission frequency of the radio module.
  • MCP9808 Maximum accuracy digital temperature sensor measuring air temperature.
  • HTU21DF Temperature and humidity sensor measuring air temperature and relative humidity of the air.
  • MPL3115A2 Precision altimeter mainly used for measuring atmospheric pressure, but also temperature and altitude is detected.
  • TSL2561 Light to digital converter BST-BMP180 Pressure sensor mainly used for measuring atmospheric pressure, but also temperature and altitude is detected.
  • L3GD20 3D gyroscope
  • LSM303DLHC 3D accelerometer and 3D magnetometer module
  • LSH20 Saft LSH 20 battery used as power supply with 3.6 V and 13.0 A h. The power feeds into the low input voltage synchronous boost converter TPS61201 on the HABuino shield.

Check the detailed documentation with Flight Computer Software sketch on this Design Mission PDF document.

You can also explore the Flight Data Report showing the collected mission data graphically on this PDF.

Arduino Blog 09 Sep 21:58

A DIY smartwatch designed by a kid for kids

Omkar is a special 8 years old who created a wearable device called O Watch: an Arduino Zero-based smartwatch kit for kids. The project, recently kickstarted, allows young people to learn programming, 3D printing and a bit of craft while making their own smartwatch and customizing it. The kit will be released with a series learning tools including a kid-friendly website with easy tutorials, examples and a community to share creations.

He’s not new to DIY tech and learning as he’s been doing a few workshops to teach Arduino to other kids and likes it when they get excited about making Arduino projects. Omkar told us:

I was first interested in robots. But my dad got me started with projects that light up LEDs that were easier to learn and code myself. (ps: my dad did not let me get a robot kit at first :).

I decided to do a wearable project because there were many of them I saw in the news and I thought they were cool. I wanted to make a smartwatch so that I could wear it myself and share my project with my friends in school.

If you are a kid and are new to making, O Watch could be a great starting point as you’ll learn about coding, 3d printing, craft and also sharing. The Arduino IDE will be your  primary programming tool for the watch, the case can be 3D printed in a color of your choice and you’ll experiment on how to knot yourself a cool band to wear it.

What are you waiting for? You have just a few days to back the project on Kickstarter and have an O Watch delivered to your home!

Arduino Blog 08 Sep 23:03

Simple USB Power Meter

The USB interface is being increasingly used as a power supply and charging port for all kinds of devices, besides data transfer. A meter to measure the electrical parameters of devices connected to a USB socket or charger would be handy on any hacker workbench. The folks at [electro-labs] designed this simple USB power meter which does just that.

The device measures voltage and current and displays them, along with the calculated power, on the small 0.5″ OLED display. The circuit is built around an ATmega328. To keep the board size small, and reduce component count, the microcontroller is run off its internal 8MHz clock. A low-resistance shunt provides current sensing which is amplified by the LT6106 a high side current sense amplifier before being fed to the 10 bit analog port of the ATmega. A MCP1525 precision voltage reference provides 2.5V to the Analog reference pin of the microcontroller, resulting in a 2.44mV resolution. Voltage measurement is via a resistive divider that has a range of up to 6V. An Arduino sketch reads voltage and current data on the analog ports and displays measurements on the display. The measured data is averaged to filter out noise.

The OLED display has a SPI interface and requires the u8glib library. The project uses all SMD parts, but is fairly easy to assemble by hand and could be a nice starter project if you want to wet your feet on surface mount assembly techniques. It’s designed using SolaPCB EDA software, and the source files for schematic and board layout are available as a ZIP archive. Download the BoM and Arduino code and you have everything needed to build this nifty device.

Thanks to [Abdulgafur] for sending in this tip. And if you are looking for a more comprehensive solution, check the awesome Friedcircuits USB Tester which we reviewed earlier and is available in the Hackaday Store.


Filed under: Arduino Hacks

A JTAG/XSVF Library for Arduino

Marcelo Jimenez developed a library to use an Arduino as a JTAG programmer. Basically a Python script uploads a XSVF file to an Arduino which interprets it and performs the necessary JTAG manipulation in order to do the programming.

The project is pretty simple because it just uses  a few resistors and some wires and the library is included in the Arduino library manager or you can check it  on Github.

He also wrote an article to explain some JTAG, SVF and XSVF basics:

 I have recently felt the need to incorporate a JTAG port in a project to program a hardware that contained a CPLD. The idea was to both program it and perform some integrity tests on the board. I imagined something using pogo pins, to make it easier and quicker to test everything. I would also write the necessary test routines and generate some kind of report.

With this objective in mind, I have decided to design an Arduino shield to do the job. The testing routines were not really a big deal. And I was sure I would find some JTAG library for Arduino ready to be used. That was not the case.

There were some projects using Arduino to control a JTAG TAP (Test Access Port), but they were all incomplete. And I had no idea what was really JTAG. So I had to study a little bit to make things work for me.

In the end, the challenge proved enlightening. There were some caveats, both from hardware and from software. I’ll try to address them in this article.

Continue reading on his blog.

Arduino Blog 02 Sep 18:12
arduino  arduino uno  featured  jtag  library  uno  xsvf  

Transformers, Birthday Cakes in Disguise

[Russel Munro] decided to go all-out for his son’s birthday cake: he made a Transformers robot cake that, well, transforms from a truck into a robot, Optimus Prime style. His impressive build has the actions of the original: first, the front rears up to lift the head, then the back lifts to form the body and the head and arms pop out of the top. Underneath the thin fondant exterior is a 3D printed body, driven by a mechanism in the base. He used fishing line to lift the parts, which is pulled by a motor salvaged from a CD player, being driven by an EasyDriver board from Sparkfun.

The main issue he had to overcome was weight: apparently he underestimated the weight of the fondant that covers the cake, and had to do some last-minute work to strengthen the drive mechanism, and skip plans for the more ornately decorated version that his wife had planned. But the look of glee on his son’s face when he operates it at the party is the best bit. In these days of CGI and computer games, it is good to remind the kids that there is still a lot of fun to be found in ingenuity and liberal quantities of hot glue.


Filed under: Arduino Hacks, robots hacks

Arduino Video Over 2 Wires for Under $50: Mesa-Video

If you want video support on your project, you might start from a device like a Raspberry Pi that comes with it built in. [Kevinhub88] doesn’t accept such compromises, so he and his Black Mesa Labs have come up with a whole new way to add video support to devices like the Arduino and other cheap controllers. This project is called Mesa-Video, and it can add digital video at a resolution of up to 800 by 600 pixels to any device that has a single serial output.

The video is created by an FT813, a low cost GPU from FTDI that offers a surprising amount of video oomph from a cheap, low power chip (he has demoed it running from a lemon battery), meaning that he is hoping to be able to sell the Mesa-Video for under $50.

However, Mesa-Video is just the beginning. [Kevinhub88] wanted to get around the problem of stacking shields on Arduinos: add more  than one and you get problems. He wanted to create an interface that would be simpler, faster and more open, so he created the Mesa-Bus. This effectively wraps SPI and I2C traffic together over a simple, fast serial connection that doesn’t require much decoding. This means that you can send power and bi-directional data over a handful of wires, and still connect multiple devices at once, swapping them out as required. You could, for instance, do your development work on a PC talking to the prototype devices over Mesa-Bus, them swap the PC out for an Arduino when you have got the first version working in your dev environment. Is the Arduino not cutting it? Because Mesa-Bus is cross-platform and open source, it is easy to swap the Arduino for a Raspberry Pi without having to change your other devices. And, because all the data is going over a simple serial connection in plain text, it is easy to debug.

It’s an ambitious project, and [Kevinhub88] has a way to go: he is currently working on getting his first prototype Mesa-Bus devices up and running, and finalizing the design of the Mesa-Video. But it is an impressive start and we’ll be keeping a close eye on this work. Hopefully he can avoid that head crab problem as well because those things are as itchy as hell.


Filed under: Arduino Hacks, video hacks
Hack a Day 01 Sep 09:00

Get Media Alerts from Your Lamp with This Ikea Hack

Mate Marschalko, who gave us the recent RC car over wireless and a racing wheel project now has a cool Ikea hack to share. He took an Ikea lamp and used a WiFi-enabled Arduino compatible microcontroller to create an alert notification light for his desk. He writes: This IKEA lamp […]

Read more on MAKE

The post Get Media Alerts from Your Lamp with This Ikea Hack appeared first on Make: DIY Projects, How-Tos, Electronics, Crafts and Ideas for Makers.

New Project: Ye Olde Brushless Motor

3D-print this 1872 replica Electro-Magnetic Engine that works like your drone's modern motors.

Read more on MAKE

The post Ye Olde Brushless Motor appeared first on Make: DIY Projects, How-Tos, Electronics, Crafts and Ideas for Makers.