Since most kids have already mastered the art of iPad password cracking and in-app purchasing, we should probably give them something productive to do. The arduino-based Vortex from DFRobot is a STEM-reinforcing plaything that can help kids learn to code. It comes with preinstalled programs, so you can have fun racing, bumping and spinning right out of the box, but the variations are endless. Open-source hardware and the WhenDo app's graphical programming interface mean the sky's the limit with Vortex. These little bots are laden with proximity and ground sensors, LEDs and speakers — not to mention all the optional add-ons — to help bring them to life. DFRobot has given us a pair of two-robot packs for a couple lucky Engadget readers this week. All you need to do is head to the Rafflecopter widget below for up to three chances at winning this hackable robot duo.
Since most kids have already mastered the art of iPad password cracking and in-app purchasing, we should probably give them something productive to do. The arduino-based Vortex from DFRobot is a STEM-reinforcing plaything that can help kids learn to code. It comes with preinstalled programs, so you can have fun racing, bumping and spinning right out of the box, but the variations are endless. Open-source hardware and the WhenDo app's graphical programming interface mean the sky's the limit with Vortex. These little bots are laden with proximity and ground sensors, LEDs and speakers — not to mention all the add-ons — to help bring them to life. DFRobot has given us a pair of two-robot packs for a couple lucky Engadget readers this week. All you need to do is head to the Rafflecopter widget below for up to three chances at winning this hackable robot duo.
Since most kids have already mastered the art of iPad password cracking and in-app purchasing, we should probably give them something productive to do. The arduino-based Vortex from DFRobot is a STEM-reinforcing plaything that can help kids learn to code. It comes with preinstalled programs, so you can have fun racing, bumping and spinning right out of the box, but the variations are endless. Open-source hardware and the WhenDo app's graphical programming interface mean the sky's the limit with Vortex. These little bots are laden with proximity and ground sensors, LEDs and speakers — not to mention all the optional add-ons — to help bring them to life. DFRobot has given us a pair of two-robot packs for a couple lucky Engadget readers this week. All you need to do is head to the Rafflecopter widget below for up to three chances at winning this hackable robot duo.
I'm making an arduino robot with 2 identical lipo batteries. The robot runs off one battery, and when that battery gets too low it will switch to the 2nd (fully charged) battery. It will then make it's way to base and swap the flat battery with a fully charged one, so it can switch back when the 2nd battery is low.
Can you guys give me some guidance on the best way to go about building something like this. I'm thinking of use a latching relay to switch between battery 1 and 2, and a voltage level detector to know when to switch.
Bespoke Electromechanical Instrument was built by Jay Harrison as part of a dissertation undertaken on the Creative Music Technology degree course at Staffordshire University. The instrument, running on Arduino Mega 2560 is designed to allow each note to be independently placed in a space:
The project involved the creation of an electromechanical system capable of autonomously playing a bespoke Lithophone musical instrument. The underlying idea was to create a Lithophone that allowed the audience to literally step inside it, giving a unique spatial and acoustic surround experience. Designing an autonomous electromechanical was the thought to be the most effective and reliable solution to achieving this.
The Arduino Mega 2560 was used to interface Max/MSP with the physical circuitry. Control messages/signals would be sent out of a Max/MSP patch using Maxuino, these signals would then be interpreted by the standard firmata sketch loaded onto the board and would go on to trigger and control the 24 rotary solenoids and 24 servo motors that work to produce the notes.
In the video below the instrument is arranged in a 24-foot surround configuration and the audience is invited to experience the instrument from within offering a unique spatial dimension to the Lithophone intended to completely envelop the listener:
It was Stardate 2267. A mysterious life form known as Redjac possessed the computer system of the USS Enterprise. Being well versed in both computer operations and mathematics, [Spock] instructed the computer to compute pi to the last digit. “…the value of pi is a transcendental figure without resolution” he would say. The task of computing pi presents to the computer an infinite process. The computer would have to work on the task forever, eventually forcing the Redjac out.
Calculus relies on infinite processes. And the Arduino is a (single thread) computer. So the idea of running a calculus function on an Arduino presents a seemingly impossible scenario. In this article, we’re going to explore the idea of using derivative like techniques with a microcontroller. Let us be reminded that the derivative provides an instantaneous rate of change. Getting an instantaneous rate of change when the function is known is easy. However, when you’re working with a microcontroller and varying analog data without a known function, it’s not so easy. Our goal will be to get an average rate of change of the data. And since a microcontroller is many orders of magnitude faster than the rate of change of the incoming data, we can calculate the average rate of change over very small time intervals. Our work will be based on the fact that the average rate of change and instantaneous rate of change are the same over short time intervals.
Houston, We Have a Problem
In the second article of this series, there was a section at the end called “Extra Credit” that presented a problem and challenged the reader to solve it. Today, we are going to solve that problem. It goes something like this:
We have a machine that adds a liquid into a closed container. The machine calculates the amount of liquid being added by measuring the pressure change inside the container. Boyle’s Law, a very old basic gas law, says that the pressure in a closed container is inversely proportional to the container’s volume. If we make the container smaller, the pressure inside it will go up. Because liquid cannot be compressed, introducing liquid into the container effectively makes the container smaller, resulting in an increase in pressure. We then correlate the increase in pressure to the volume of liquid added to get a calibration curve.
The problem is sometimes the liquid runs out, and gas gets injected into the container instead. When this happens, the machine becomes non-functional. We need a way to tell when gas gets into the container so we can stop the machine and alert the user that there is no more liquid.
One way of doing this is to use the fact that the pressure in the container will increase at a much greater rate when gas is being added as opposed to liquid. If we can measure the rate of change of the pressure in the container during an add, we can differentiate between a gas and a liquid.
Quick Review of the Derivative
Before we get started, let’s do a quick review on how the derivative works. We go into great detail about the derivative here, but we’ll summarize the idea in the following paragraphs.
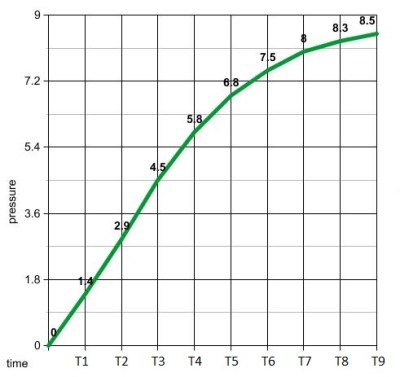
Full liquid add
An average rate of change is a change in position over a change in time. Speed is an example of a rate of change. For example, a car traveling at 50 miles per hour is changing its position at 50 mile intervals every hour. The derivative gives us an instantaneous rate of change. It does this by getting the average rate of change while making the time intervals between measurements increasingly smaller.
Let us imagine a car is at mile marker one at time zero. An hour later, it is at mile marker 50. We deduce that the average speed of the car was 50 miles per hour. What is the speed at mile marker one? How do we calculate that? [Issac Newton] would advise us to start getting the average speeds in smaller time intervals. We just calculated the average speed between mile marker 1 and 50. Let’s calculate the average speed between mile marker’s 1 and 2. And then mile marker’s 1 and 1.1. And then 1 and 1.01, then, 1.001…etc. As we make the interval between measurements smaller and smaller, we begin to converge on the instantaneous speed at mile marker one. This is the basic principle behind the derivative.
Average Rate of Change
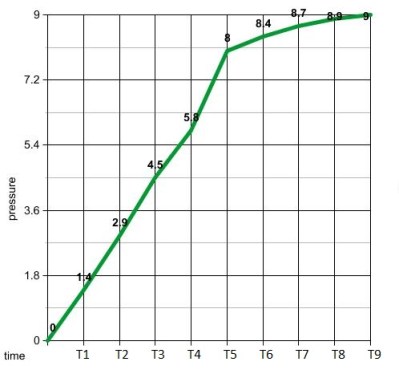
Gas enters between time T4 and T5
We can use a similar process with our pressure measurements to distinguish between a gas and a liquid. The rate of change units for this process is PSI per second. We need to calculate this rate as the liquid is being added. If it gets too high, we know gas has entered the container. First, we need some data to work with. Let us make two controls. One will give us the pressure data for a normal liquid add, as seen in the graph above and to the left. The other is the pressure data when the liquid runs out, shown in the graph on the right. Visually, it’s easy to see when gas gets in the system. We see a surge between time’s T4 and T5. If we calculate the average rate of change between 1 second time intervals, we see that all but one of them are less that 2 psi/sec. Between time’s 4 and 5 on the gas graph, the average rate of change is 2.2 psi/sec. The next highest change is 1.6 psi/sec between times T2 and T3.
So now we know what we need to do. Monitor the rates of change and error out when it gets above 2 psi/sec.
Our psuedo code would look something like:
pressure = x;
delay(1000);
pressure = y
rateOfChange = (y - x);
if (rateOfChange > 2)
digitalWrite(13, HIGH);  //stop machine and sound alarm
Instantaneous Rate of Change
It appears that looking at the average rate of change over a 1 second time interval is all we need to solve our problem. If we wanted to get an instantaneous rate of change at a specific time, we need to make that 1 second time interval smaller. Let us remember that our microcontroller is much faster than the changing pressure data. This gives us the ability to calculate an average rate of change over very small time intervals. If we make them small enough, the average rate of change and instantaneous rate of change are essentially the same.
Therefore, all we need to do to get our derivative is make the delay smaller, say 50ms. You can’t make it too small, or your rate of change will be zero. The delay value would need to be tailored to the specific machine by some old fashioned trial and error.
Taking the Limit in a Microcontroller?
One thing we have not touched on is the idea of the limit within a microcontroller. Mainly, because we don’t need it. Going back to our car example, if we can calculate the average speed of the car between mile marker one and mile marker 0.0001, why do we need to go though a limiting process? We already have our instantaneous rate of change with the single calculation.
One can argue that the idea behind the derivative is to converge on a single number while going though a limiting process. Is it possible to do this with incoming data of no known function? Let’s try, shall we? We can take advantage of the large gap between the incoming data’s rate of change and the processor’s speed to formulate a plan.
Let’s revisit our original problem and set up an array. We’ll fill the array with pressure data every 10ms. We wait 2 seconds and obtain 200 data points. Our goal is to get the instantaneous rate of change of the middle data point by taking a limit and converging on a single number.
We start by calculating the average rate of change between data points 200 and 150. We save the value to a variable. We then get the rate of change between points 150 and 125. We then compare our result to our previous rate by taking the difference. We continue this process of getting the rate of change between increasingly smaller amounts of time and comparing them by taking the difference. When the difference is a very small number, we know we have converged on a single value.
We then repeat the process in the opposite direction. We calculate the average rate of change between data points 0 and 50. Then 50 and 75. We continue the process just as before until we converge on a single number.
If our idea works, we’ll come up with two values that would look something like 1.3999 and 1.4001 We say our instantaneous rate of change at T1 is 1.4 psi per second. Then we just keep repeating this process.
Now it’s your turn. Think you have the chops to code this limiting process?
Turning the classic toy Etch-A-Sketch into a CNC drawing tablet intrigues a large number of hackers. This version by [GeekMom] certainly takes the award for precision and utility. Once you build something like this, you can hardly stop writing firmware for it; [GeekMom] produced an entire Arduino library of code to allow joystick doodling, drawing web images, and a self-erasing spirograph mode. The topper is the version that runs as a clock!
The major hassle with making a CNC version of this toy is the slop in the drawing mechanism. There is a large amount of backlash when you reverse the drawing direction. If that isn’t bad enough, the backlash is different in the vertical or horizontal directions. Part of [GeekMom’s] presentation is on how to measure and correct for this backlash.
The EtchABot uses three small stepper motors. Two drive the drawing controls and the third flips the device forward to erase the previous drawing. The motors are each controlled by a ULN2003 stepper motor drivers. An Arduino Uno provides the intelligence. Optional components are a DS3231 Real Time Clock and a dual axis X-Y joystick for the clock and doodling capability. Laser cut wood creates a base for holding the Etch-A-Sketch and the electronics.
The write up and details for this project are impressive. Be sure to check out the other entries in [GeekMom’s] blog. Watch the complete spirograph video after the break.
I was wondering what the best method to control DYNAMIXEL AX-18A motors from an Intel Edison with arduino expansion board would be, I have teh Arbotix-M, the UartSBee, the Edison with Arduino Expansion Board, and the Arduino Uno. I really want to make it so that I can use the Intel Edison w/ expansion board, and send that to the Arbotix-M. Can you help me?
My name is Gregory, but you can call me Greg. I am a 17 year-old high school student who is building a very interesting robot(I am also doing all of the designing and prototyping. I am building a six-legged robot, called a "hexapod", that is able to teach itself to walk.


 running a calculus function on an Arduino presents a seemingly impossible scenario. In this article, we’re going to explore the idea of using derivative like techniques with a microcontroller. Let us be reminded that the derivative provides an instantaneous rate of change. Getting an instantaneous rate of change when the function is known is easy. However, when you’re working with a microcontroller and varying analog data without a known function, it’s not so easy. Our goal will be to get an average rate of change of the data. And since a microcontroller is many orders of magnitude faster than the rate of change of the incoming data, we can calculate the average rate of change over very small time intervals. Our work will be based on the fact that the average rate of change and instantaneous rate of change are the same over short time intervals.