Posts with «arduino» label

Atomic Arduino (and Other) Development

Even the most die-hard Arduino fan boys have to admit that the Arduino development environment isn’t the world’s greatest text editor (they’d probably argue that its simplicity is its strength, but let’s ignore that for now). If you are used to using a real code editor, you’ll probably switch to doing your Arduino coding in that and then use the external editor integration in the IDE.

That works pretty well, but there are other options. One we noticed, PlatformIO, extends GitHub’s Atom editor. That makes it cross-platform, powerful, and with plenty of custom plug ins. It also supports a range of platforms including Arduino, many ARM platforms, MSP430, and even desktop computers running Linux or Windows.

The author claims the plug in will generate code for over 200 embedded boards. It handles all the common development tasks and even includes a terminal window. There are command line tools if you want to build scripts or make files and bypass the GUI.

You can install Platform.io on Windows, Linux, or Mac. It uses Python, so porting it elsewhere might be easy, too. The feature list is broad: code completion, linting, multiple projects, and library management. It can even import projects from the Arduino IDE. There are plenty of plug ins to add features (like Emacs keybindings, although that took a little troubleshooting).

There is also something attractive about having a single IDE that targets different platforms if you switch back and forth a lot. In all fairness, the Arduino IDE isn’t as bad as it used to be, and they both have significantly improved versions in the works (Arduino Create and Arduino Studio). We’ve seen plenty of other IDE hacks for Arudino in the past.

Thanks for the tip [Martin]


Filed under: Arduino Hacks
Hack a Day 23 Apr 18:00

IntelliServo

Servos are extremely versatile actuators used in a large number of applications which need controlled mechanical movement. The usual way of driving them is by using a PWM output from a micro-controller. But if you’re building a robot or a drone which requires a large number of servos, then it makes sense to add smarts directly to the servo.

[Alvaro Ferrán Cifuentes] did just that by building IntelliServo – an add on board which makes regular servos smart by giving them enhanced capabilities as found in high-end versions. His approach is different compared to other takes on this theme. The IntelliServo is designed to replace the electronics in any regular servo and is not limited to any particular make or type. Once upgraded, it’s possible to read the servos position, temperature and current consumption. This allows interesting uses, such as controlling one servo by moving another one, or detecting collision or stalling by monitoring the servo current. Multiple servos can be daisy-chained and controlled over I²C from a micro-controller, or over USB directly from a computer. Each board features an LPC11U24 32-bit Cortex-M0 micro-controller, a DRV8837 motor driver, a TMP36 temperature sensor and a PCA9508 I²C repeater.

The project is open source and the Github repository contains the board design, Arduino library and examples, servo firmware and mechanical parts as well as use instructions. It’s a modular design which allows using either an external controller or running it directly via the on-board micro-USB socket. Check out the videos after the break to see the IntelliServo in action.


Filed under: hardware
Hack a Day 22 Apr 09:01

Automated Blinds Open the Window to our Heart

[Brian Harms] made his living room window blinds open and close automatically using servos, an Arduino, and a SmartThings Arduino shield. Best of all, it’s connected to his Amazon Echo so that merely saying “Alexa, turn on/off the blinds” will open and close them.

To accomplish the feat [Brian] used two laser cut acrylic gears; one of which was attached to the servo horn, and the other to the long square rod running the length of the blinds. Despite using the bulky Arduino and shield, the finished product is inconspicuous and streamlined, and the single Arduino controls all three of the blinds in the living room. [Brian] answered a bunch of questions on a Reddit thread.

Blinds are a common connected home hack, and while none of the hacks we’ve covered in the past were voice activated, we have seen temp-sensitive blinds and a Raspberry Pi-based solution.


Filed under: home hacks

DIY Arduino Watch

We first thought [Alexis Ospitia]’s watch was a sports watch made with an Arduino, but it’s actually a sporty watch made with an Arduino. This explains the watch’s strange ability to tell you the current temperature and humidity.

The core of the watch is an Arduino Mini. To make it good for time telling, a real-time clock module was added. A DHT11 monitors the temperature and humidity. A charge circuit and lithium battery provide power. Finally, the watch displays the date, time, and other data with an LCD from a Nokia 5110. We can tell you the last part that’s going to break on this.

Even if you think the watch is a bit chunky, the tutorial is very slick. [Alexis] has taken the trouble to individually draw and describe each portion of the watch’s construction. He explains each pin, what they do, and provides a Fritzing drawing of the wires to the Arduino. The code is provided; to program the watch a USB-to-serial module must be used.

For the housing he made a box from a thin gauge aluminum sheet and attached leather straps to the assembly. The final construction is cool looking in a techno-punk way, and is fairly compact. One might even say sporty.


Filed under: Arduino Hacks
Hack a Day 22 Apr 00:00

Today’s Giveaway winner on Instagram is from Manila!

Here we are today announcing the winner of this week for our Instagram giveaway!

Congratulations to Thinklab.ph from Manila (Philippines) for the following picture taken at Genuino Day with Rizal High School showcasing an Arduino based battle robot: Tagisang Robotics, Salamander.  They win a Genuino MKR1000 and a Genuino Mug!

Yes, you can win it too! Here’s how:

– Follow our official Arduino.cc account on Instagram

– Share your pics on your account on Instagram using hashtag #ArduinoD16 and #GenuinoD16 and mention us with the tag @Arduino.cc

– Every thursday, from April 7th to May 26th we are going to choose one of your pics (posted starting April 2nd) and announce on this blog a winner of an Arduino or a Genuino MKR1000 and one of our t-shirt or mug for a total of of 8 lucky people. Easy enough, right?
Remember to share cool pictures regarding Arduino and Genuino moments in your community also beyond Arduino and Genuino Day.
Show us your talent!

Intel releases the Arduino 101 firmware source code

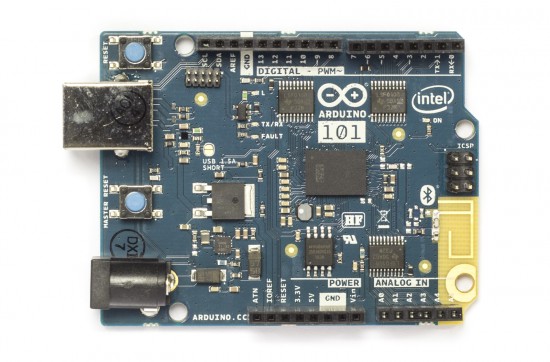
We’re very happy to announce that the source code of the real-time operating system (RTOS) powering the Arduino 101 and Genuino 101 is now available for hacking and study purposes.

The package  contains the complete BSP (Board Support Package) for the Curie processor on the 101. It allows you to compile and modify the core OS and the firmware to manage updates and the bootloader. (Be careful with this one since flashing the wrong bootloader could brick your board and require a JTAG programmer to unbrick it).

The firmware runs on the x86 chip inside the Curie module and communicates with the ARC core (which runs your Arduino sketches) using the callbacks.
Right now, the x86 core takes care of handling Bluetooth Low Energy (BLE) and USB communication, offloading the ARC core.
You can use the code which implements these functionalities as a starting point for your custom extra features.

Ever wondered about adding Mouse and Keyboard functionalities to your Arduino 101 and Genuino 101? Or uploading your sketches via BLE? Or add deep sleep functionalities when your application is battery powered? Now you can! (Some effort may be required )

We hope that this step will bring even more interesting features to your Arduino 101 and Genuino 101, so even if you are not into low-level C programming, keep an eye on the dedicated forum section and Arduino 101 core github repo to follow the news and be the first to try new features.

If you want to know more about projects made with Arduino 101, check our Project Hub section in Arduino Create, don’t forget to share with the community your experiments creating a new project and take look to this obstacle avoidance tutorial  on America’s Greatest Maker website  !

Antbo is a robot insect companion anyone can build

Interested in building and programming your own robot? You might want to give Antbo a try. Billed as the "insect robot designed for anyone with an inquisitive mind," it's a programmable entry-level kit for beginners or anyone with a casual interest in robotics.

Engadget 21 Apr 01:16

Antbo is a robot insect companion anyone can build

Interested in building and programming your own robot? You might want to give Antbo a try. Billed as the "insect robot designed for anyone with an inquisitive mind," it's a programmable entry-level kit for beginners or anyone with a casual interest in robotics.

Engadget 21 Apr 01:16

Antbo is a robot insect companion anyone can build

Interested in building and programming your own robot? You might want to give Antbo a try. Billed as the "insect robot designed for anyone with an inquisitive mind," it's a programmable entry-level kit for beginners or anyone with a casual interest in robotics.

Engadget 21 Apr 01:16

Arduino clone is as small as an AA battery

What do you do if even the smallest Arduino boards (or their clones) are too big for your homebrew project? If you're Johan Kanflo, you find a way to make them even smaller. His AAduino project turns the already miniscule Tiny328 Arduino clone into an even smaller computing device that's about as big as an AA battery. Through creative wiring, it even fits inside a typical battery holder and draws power from the batteries in the remaining slots. He had to underclock the processor to extend to the battery life, but it's otherwise as capable as its normal counterparts.