Posts with «arduino» label

An engineering student’s awesome graduation cap

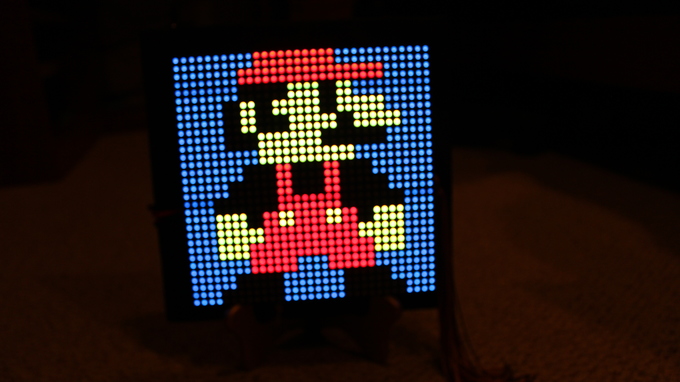
Graduation season is now underway across America, and Western Carolina University student Michael King wanted to be sure he’d stand out from the crowd during his commencement ceremony. So being a computer science and electrical engineering major and all, naturally he decided to do some tinkering. He equipped his mortarboard with a 32×32 LED array, an Arduino Mega, three SPDT switches, a 2000mAh li-ion battery, and lots of wire, along with plenty of code. This enabled him to display a running Super Mario, Pac-Man, his school’s logo, a “Hire Me Google” message, and several other animated images on top of his cap.

I used three SPDT switches — one for LED grid power, one for Arduino power, and another to break out of the loop and display a static “WCU” logo. LED grid is powered via a 3.7V li-ion battery. 9V battery to power the Arduino Mega.

Lots and lots of Arduino code. I could convert bitmaps to arrays to use in the code. For those that would understand, I had a script written in Processing that could read a 32×32 pixel image, parse and convert it into an array of hex values, and literally format/write it out to a header file that I could just copy and paste into Arduino IDE… And yes, I am working on programming pong. Yes the actual, playable game.

Read the Room with This Social Media Skimming Robotic Arm

Thumbs up or thumbs down? This robotic arm skims social media to let you know if you're viewed positively or negatively.

Read more on MAKE

The post Read the Room with This Social Media Skimming Robotic Arm appeared first on Make: DIY Projects and Ideas for Makers.

Add biometric security to your next Arduino project

If you’ve ever wanted to add biometric security features to your Arduino project, you’re in luck. That’s because Nick Koumaris of educ8s.tv has put together a quick tutorial on how to integrate a fingerprint sensor module with an Arduino Nano and a 1.44” color TFT display.

The fingerprint sensor module is small, nicely built, and it uses some advanced DSP (Digital Signal Processing) chips inside. The sensor works like this. It is an optical sensor, which means it analyzes the photo of a finger. It then renders the image, makes some calculations, finds the features of that finger and then searches in its memory for a fingerprint with the same characteristics. It can achieve all that in less than a second! This module can store up to 1,000 fingerprints in its memory and its false acceptance rate is less than 0.001% which makes it pretty secure!

As you can see in the video below, the project requires a valid fingerprint in order to unlock. If it recognizes the user, which in this case is Koumaris or his girlfriend, the fingerprint icon on the display turns green along with a kind greeting, e.g. “Welcome, Nick!”

Mechaduino- Closed Loop Stepper Servos For Everyone

Is it something in the water, or have there been a lot of really cool servo projects lately? Mechaduino is a board that sits on a regular stepper motor and turns it into a servo with a closed loop control of 0.1degree.

Whenever we post something about using cheap brushless motors for precision control, someone comments that a stepper is just a brushless motor with a lot of poles, why not just control it like one. That’s exactly what the Mechaduino does. They also hint at doing something very clever with a magnetic encoder on the board which allows them, after a calibration routine, to get the accuracy they’ve promised.

T
he Arduino-sounding bit of the name comes from their full compatibility with the Arduino development environment. The brains of the board is the compatible,  SAMD21 ARM M0+  chip. They wanted the board to be as accessible as possible. On top of this, it also allows the user to use any control algorithm they want for the board. Most industrial controllers are limited to PID control, for returning to the last sent position. Opening up the control allows for interesting applications, such as motors that behave like mass spring damper systems, or electronically gearing the input of one stepper to the output of another.

The board supports lots of standard communication protocols, but the acceptance of regular stepper inputs make it extra interesting. It can become a drop-in replacement for the motors on a normal CNC or 3D printer, which have full closed loop control as shown in the video after the break.

They intend to keep working on the project until it gets to a level where they could kickstart it. However, rather than vaguely promise an open source release sometime after the launch like some have done, interested readers can skim all the design files off their GitHub and get to playing with it today. Firmware and Hardware.


Filed under: cnc hacks

Togglit is a DIY automation kit for your home

A few years ago, Integreight set out to turn your smartphone into more than 40 different Arduino shields. Now, the creators of the 1Sheeld have launched an open-source, fully-customizable home automation kit that will enable you to control your door locks, light switches and power strips using that very same mobile device.

Togglit” can be assembled without any programming, wires, or hassle — only a screwdriver. For its debut at Maker Faire Bay Area, the connected interface was based on an Arduino Uno and 1Sheeld; however, the startup’s founder Amr Saleh notes that it can run on virtually any hardware platform, ranging from Raspberry Pi to other Wi-Fi products.

At the moment, Togglit is compatible with typical toggle light switches, standard deadbolts, as well as American and European power outlets. Ready to make your house smarter? The DIY kit is currently available for pre-order.

Get the party started with these coke bottle lights

With school just about out for the summer, Brian Fitzgerald’s son was throwing a party to celebrate the end of exam week. Like any cool Maker dad would, he decided to build awesome lights made out of a few old soda bottles, the “gooey innards” of glow sticks, and some other supplies he had lying around the basement.

Fitzgerald used a wooden plate for the base and a playground post bracket for the mount, along with an Arduino Leonardo (though any Arduino would do) and three NeoPixel rings for the colorful effects.

Fill the Coke bottles with water. Alternatively, you can add a drop of milk to get a cloudy effect — it makes the liquid translucent and gives the impression of solid light, but you loose the little bubble and scratch effects that clear water highlights, which we thought was cooler. We put a black Sugru cap on the bottles to avoid a drunken accident involving water and electronics. And filled the countersunk bolt holes with Sugru to hide the bolt heads as well.

I attached the plastic Arduino casing with double-sided velcro to the base unit for easy removal. It’d look nicer if I’d put the whole unit inside the base, but as we’re planning to pull the board out and modify for music sensitivity, I opted for convenience over beauty. If anybody has any cool Arduino code that gets an Adafruit auto-gain mic and NeoPixels jamming via FFT, I’d love to see it. There are some great color organ projects out there, but I can’t seem to find this particular combo. So we may have to write it ourselves!

Plug the 9v wall wart into the Arduino and BOOM. You got yourself a classic party light that’s mesmerizing to look at, throws patterns on the ceiling that look like Hubble images of distant nebulae, a fine conversation piece, and a bunch of cast off junk transformed into a thing of beauty.

Intrigued? You can check out the entire project on Instructables, as well as see it in action below.


Interfacing 4-wire resistive touch screen with arduino

To interface the 4-wire resistive touch screen with arduino check out my instructables. Here is the link


Check out the video:


Maker installs an Android tablet in his car’s dashboard

Unlike many cars today, Aykut Celik’s 2014 Volkswagen Polo didn’t have Bluetooth connectivity or an elaborate touchscreen navigation system. So, the Maker decided to take matters into his own hands and swapped out his “useless” radio for a Samsung tablet, putting Google Maps, Spotify and other apps right in his vehicle’s dashboard.

In order to accomplish this, Celik needed an amplifier (to replace the one attached to the prior radio), a CAN bus shield from Seeed (so he could use the steering wheel’s volume buttons), a Bluetooth module, and an Arduino Mega 2560 (for parsing data and sending it over to the Android device).

A CAN-BUS shield is necessary to be able to read CAN-BUS commands from the CAN bus line… I used this shield for detecting wheel button commands like volume up, mute and volume down. Behind the car radio there are two CAN bus cables. One of them is CAN bus – HIGH and the other is CAN bus – LOW. These cables must be connected to green sockets on the shield.

Using the SeeedCAN bus shield, you can sniff you car’s CAN bus data.

The info which is gathered from CAN bus is transferred to the Android tablet via Bluetooth. There is a little app which is responsible, for example, reducing volume whenever the wheel volume button is clicked. And a menu activity to open other apps.

You can watch the elaborate project below, and read more about it on Celik’s blog. The Maker has also made the software and other information available on GitHub.

Motorized Music Box Cranks Out Stairway to Heaven

[Bokononestly] found a lil’ music box that plays Stairway to Heaven and decided those were just the kinds of dulcet tones he’d like to wake up to every morning. To each his own; I once woke up to Blind Melon’s “No Rain” every day for about six months. [Bokononestly] is still in the middle of this alarm clock project right now. One day soon, it will use a *duino to keep track of the music box’s revolutions and limit the alarm sound to one cycle of the melody.

[Bokononestly] decided to drive the crank of the music box with a geared DC motor from an electric screwdriver. After making some nice engineering drawings of the dimensions of both and mocking them up in CAD, he designed and printed a base plate to mount them on. A pair of custom pulleys mounted to the motor shaft and the crank arm transfer motion using the exact right rubber band for the job. You can’t discount the need for a hig bag ‘o rubber bands.
In order to count the revolutions, he put a wire in the path of the metal music box crank and used the body of the box as a switch. Check out the build video after the break and watch him prove it with the continuity function of a multimeter. A clever function that should at some point be substituted out for a leaf switch.

We’ve covered a lot of cool clock builds over the years, including one or two that run Linux. And say what you will about Stairway; it’s better than waking up to repeated slaps in the face.

[via r/engineering]


Filed under: 3d Printer hacks, Arduino Hacks

Real-world 'Pong' might just beat the video game

If you miss the days of playing Pong with old-school dial controllers but would rather not track down a vintage console or arcade cabinet, today's your lucky day. Daniel Perdomo and crew have built a real-world Pong machine that replicates the pioneering game with physical parts. Despite what it looks like, it's not just an Atari-themed air hockey table. Instead of letting physics take over, the machine maps virtual ball and paddle movements to objects. All the eccentricities of Pong gameplay are intact, just in a more tangible (and arguably, far more immersive) form. LEDs track the score, while the controllers are rejiggered hard drives.

Engadget 30 May 18:00
arduino  gadgetry  gadgets  games  gaming  gear  pong  video  videogames