Posts with «arduino» label

Puzzlingly Simple Tutorial On GPS Time Corrected Clock

We’re not sure if [Derek Lieber] is messing with us or proving a point. Why are you doing this [Derek]? We know there’s technically enough information to build the clock. You even included the code. Couldn’t you have at least thrown in a couple of words? Do we have to skip straight to mediaglyphics?

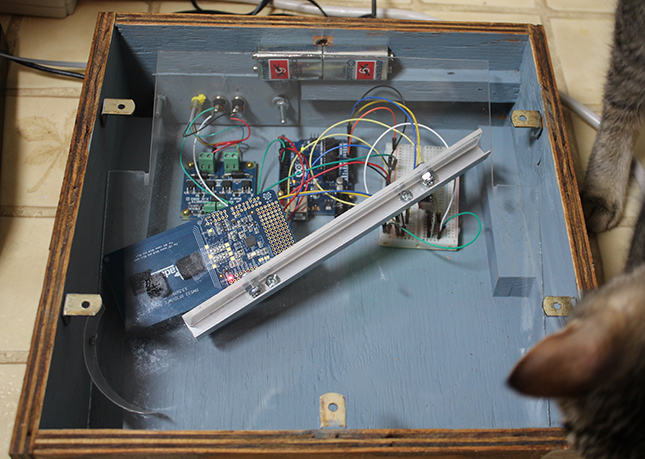
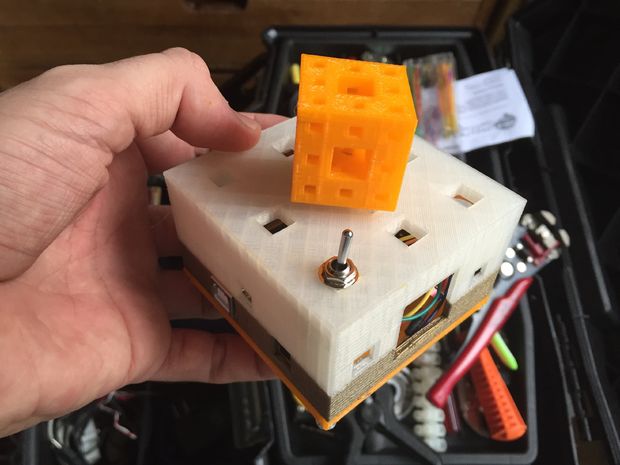
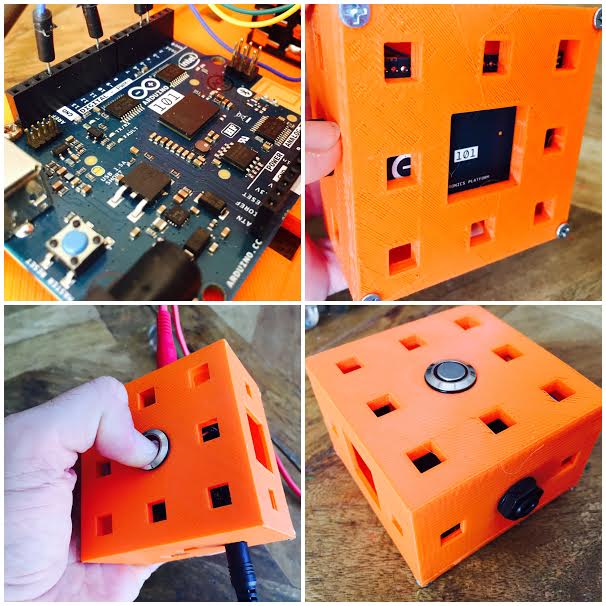
Anyway, if we follow the equation. The equation… If you take a gps module, a 7 segment display with an HT16K33 backpack, a digital potentiometer, a piezo, and a boarduino we suppose we could grudgingly admit that these would all fit together to make a clock. We still don’t like it though, but we’ll admit that the nice handmade case was a nice touch, and that the pictures do give us enough details to do it ourselves.

It was also pretty cool when you added the Zelda theme song as an alarm sound. Also pretty neat that, being GPS corrected, there’s no need to ever set the time. We may also like the simplicity of the only inputs being the potentiometer, which is used to set the alarm time. It’s just. Dangit [Derek]. Nice clock build, we like it.


Filed under: clock hacks

The Robotic Voice Activated Word Kicking Machine

The brainchild of artist Neil Mendoza, the Robotic Voice Activated Word Kicking Machine is described as the “ideal device for anyone that feels that their verbal communication needs a little extra kick.”

The piece consists of four bells of baritone horns, tubing, microphone, speakers, a mechanical foot and a projector, while its software is written in openFrameworks. When the software starts, it launches a web browser and creates a WebSocket connection to it. As soon as someone starts speaking, the software sends a message to the browser to tell it to start speech recognition. Once the person finishes talking, the browser sends words back as text back over the WebSocket connection. Each word is then added to a Box2D physics simulation as a series of rectangles linked together with springs. There’s a mesh for each letter and shadows are created in GLSL with a shadow map.

When a word is near the foot, the computer sends a message to an Arduino telling it to kick. The foot is actuated with a linear actuator driven by a Pololu Dual VNH5019 Motor Driver Shield. There is also a foot polygon in the physics simulation. Every time the mechanical foot starts to kick, the virtual foot in the physics engine is animated with a timeline that has been matched to the actual movement of the mechanical foot.

Intrigued? Be sure to check out its official page here.

Maker builds feeding machine that lets his cat ‘hunt’ for food

Although automated pet feeders seem to be a dime a dozen these days, Benjamin Millam’s project is on a whole ‘nother level. Last year, the Maker created a system that caters to the primal instincts of his indoor cat, Monkey, by training him to look for plastic balls hidden around the house and then drop them into the machine. Once the apparatus recognizes the RFID-tagged balls, food gets dispensed into the bowl.

The system is comprised of a modified Super Feeder, an Adafruit RFID reader, a remote antenna, a few relays and an Arduino Uno. Millam writes that he conceived the idea after learning why cats repeatedly scour the same area.

What if my cat, while out on patrol, actually found its prey? Surely this would bring him one step closer towards a more fulfilled and self-actualized indoor kitty existence. I imagined hiding little bowls of food around the house… then I imagined me actually refilling these bowls. Then I imagined having to move them around to different hiding spots, spilling, forgetting, and every so often, perhaps only after following a trail of ants, finding one undiscovered and rancid. Hmmm, maybe there’s a way to hide something else, a way to hide something other than food, a way to make something not-food = food…

Throughout the day, the feline seeks out a series of embedded balls and plops them into a blue bowl on top of the makeshift device. From there, gravity takes over. As the ball makes its way down the shoot, the RFID tag is scanned and and the program is initiated. The Arduino switches on the relay that closes the feeder’s power circuit, and voila!

The Maker does note, however, that a little training is needed in order for this method work. While we’ll have to wait and see if this becomes an actual product, you can watch Monkey go after some Wiffle Balls right meow!

Maker Spotlight: Tim Deagan

Tim Deagan does seemingly everything — fire effects, metalworking, painting, leatherworking... Is there anything this man doesn't make?

Read more on MAKE

The post Maker Spotlight: Tim Deagan appeared first on Make: DIY Projects and Ideas for Makers.

Home Pool Added to Home Automation

Anyone who owns their own pool knows it’s not as simple as filling it up with water and jumping in whenever you want. There’s pool covers to deal with, regular cleaning with the pool vacuum and skimmers, and of course, all of the chemicals that have to be added to keep the water safe. While there are automatic vacuums, there aren’t a whole lot of options for automating the pool chemicals. [Clément] decided to tackle this problem, eliminating one more task from the maintenance of his home. (Google Translate from French.)

The problem isn’t as simple as adding a set amount of chemicals at a predetermined time. The amount of chemicals that a pool owner has to add are dependent on the properties of the water, and the amount of time that’s elapsed since the previous chemical treatment, and the number of people who have been using the water, and whether or not the pool cover is in use. To manage all of this, [Clément] used an ORP/Redox probe and a pH probe, and installed both in the filtration system. The two probes are wired to an Arduino with an ethernet shield. The Arduino controls electrically actuated chemical delivery systems that apply the required amount of chemicals to the pool, keeping it at a nice, healthy balance.

[Clément] has all of the Arduino code available on his project page, as well as information about all of the various sensors he used. This should make this project re-createable for anyone who is tired of dealing with their own pool or paying a pool maintenance company to do it for them. [Clément] is no stranger to home automation projects, either, and we look forward to his next (often unconventional) project to automate something we might not have thought of before.


Filed under: Arduino Hacks

Animated Progress Bar Shows LCD New Tricks

A small LCD screen can be extremely helpful with small microcontroller projects. Not everything needs to communicate to a fancy server using an ESP8266. However, if the simplicity of the character displays irks you, it’s possible to spice them up a little bit with custom characters and create animations, like [Fabien] did with his animated Arduino progress bar. (Google Translate from French)
The project started out simply enough: all [Fabien] needed was a progress bar. It’s easy enough to fill in the “characters” on the 2×16 character LCD screen one-by-one to indicate progress, and the first version of this did exactly that. The second version got a little bit fancier by adding a border around the progress bar and doubling its resolution, but the third version is where knowing the inner machinations of the microcontroller really paid off. Using a custom charset reuse optimization, [Fabien] was able to use 19 custom characters at a time when the display will normally only allow for eight. This was accomplished by placing the custom characters in memory in the correct order, to essentially trick the microcontroller into displaying them.
These types of microcontroller hacks get deep into the inner workings of the microcontroller and help expose some tricks that we can all use to understand their operation on a deeper level. Whether you’re using PWM to get a microcontroller to operate a TV, or creating the ATtiny-est MIDI synth, these tricks are crucial to getting exactly what you want out of a small, inexpensive microcontroller.

Filed under: Microcontrollers

Arduino Replaces Bad AC Thermostat, Hacker Stays Cool

Most of North America has been locked in a record-setting heat wave for the last two weeks, and cheap window AC units are flying out of the local big-box stores. Not all of these discount units undergo rigorous QC before sailing across the Pacific, though, and a few wonky thermostats are sure to get through. But with a little sweat-equity you can fix it with this Arduino thermostat and temperature display.

We’ll stipulate that an Arduino may be overkill for this application and that microcontrollers don’t belong in every project. But if it’s what you’ve got on hand, and you’re sick of waking up in a pool of sweat, then it’s a perfectly acceptable solution. It looks like [Engineering Nonsense] got lucky and had a unit with a low-current power switch, allowing him to use a small relay to control the AC. The control algorithm is simple enough – accept a setpoint from an encoder, read the temperature sensor, and turn the AC on or off accordingly. Setpoint and current temperature are displayed on an OLED screen. One improvement we’d suggest is adding a three-minute delay between power cycles like the faceplate of the AC states.

This project bears some resemblance to this Arduino-controlled AC, but it seems more hackish to us. And that’s a good thing – hackers have to keep cool somehow.


Filed under: Arduino Hacks, home hacks

Relive the ‘80s with a MIDI-controlled Scanjet keytar

The ‘80s may be long gone, but James Cochrane is bringing the keytar back with the help of an old HP Scanjet. For this, the Maker has taken an Arduino, a stepper motor shield, an optocoupler and an off-the-shelf MIDI keyboard for input, and integrated it into the flatbed scanner’s original features. The end result: the world’s first (and only) MIDI-controlled HP Scanjet keytar.

As he describes in his YouTube video:

This scanner had a hidden command set within the Scanner Control Language which allows you to send musical notes directly to the stepper motor. This is a tedious method where you have to enter the notes and durations manually into a text file (similar to G-code on a CNC machine). I have always used and will always use this method for my old school music videos; however, I wanted to try and build a MIDI-controlled stepper motor.

One day I had one of my HP Scanjets sitting on its side and for some reason it resembled a Roland SH-101 and that’s when I came up with the idea for the HP Scanjet Keytar. What a great way to merge both into a musical instrument.

Those wishing to relive the days of classic yet quirky keytar are in luck. Cochrane has provided a detailed breakdown of the device in the video below, and has shared its code on GitHub.

Catch ‘em all with an Arduino Pokéball

Like the rest of humanity, Arduino Sweden’s interaction designer Marcus Johansson has been glued to the Pokémon GO app. However, as fun as flicking a digital ball with your finger to catch ‘em all may be, he wanted something a bit more realistic. Enter the Arduino Pokéball.

Based off an Arduino CTC project, an Arduino 101 housed inside some protective casing allows him to physically throw the ball, which is then mimicked within the game. It uses the 101’s IMU and Bluetooth track the toss and then send it to the phone.

See it in action below!

Experimental sound generating boxes for Makers, by Makers

The brainchild of Tomás de Camino Beck, Polymath Boxes are experimental sound boxes. Using a Genuino Uno and 101 along with some 3D printing, these units enable young Makers and adults to experiment with programming and math to produce noises and tunes, from square and triangular waves to sample players and interactive sound generators.

The boxes were originally conceived by Camino Beck as part of an open-source experimental art project with the goal of stimulating STEAM in education, from high school to college, and to allow artists, engineers and computer scientists, or pretty much anyone interested, to explore programming and digital fabrication. They were developed and fabricated in “Inventoria”–Costa Rica’s own idea of a Makerspace.

More than just a finished project, these boxes are designed to be hacked and to help move away from more conventional ways of thinking when it comes to sound.

These boxes use coding as a way to “write music,” and to take advantage of the diversity of physical low cost sensors to trigger sound. Some of the boxes play with basic waves, just creating basic  PWM, and others go from there to create arpeggiator and interactive. They will be used in several workshops and experimental music concerts in Costa Rica.