Posts with «arduino» label

G.E.A.R. 2

Primary image

What does it do?

Navigate around via ultrasound

My Goal was to come up with a design where all the speciality parts could be ordered  for under $20US.

The bill of matirels (BOM) looks like this:

2 ea 9g CR Servos

2 ea Wheels for the Servos

1 ea 4xAAA battery box with switch

1 ea SR-04 ultrasonic range sensor  

1 ea Arduino IDE compatable ATTINY85 based controller board.  Such as a Digispark, Iteaduino or any one of the similar devices. 

Cost to build

$20, 00

Embedded video

Finished project

Number

Time to build

Type

wheels

URL to more information

Weight

read more

The MR-808 is a robotic drum “synthesizer”

The MR-808 robotic drum machine looks like a gigantic Roland synthesizer, but plays with real instruments!

The Roland TR-808 was released in 1981 and was meant to replace a human drummer for practice purposes, but was instead used to produce music itself, helping to birth the electronic, techno, and hip hop genres. Moritz Simon Geist and the Sonic Robots collective, however, decided to turn this on its head, with a machine made to look like a gigantic ‘808, but containing real instruments.

With a variety of hardware, including an Arduino Uno and Mega, an audience can program the MR-808 using a tablet and get down to the grooves they create themselves!

In 2013 I [Geist] found Sonic Robots a loose group of friends, hackers, technicians and artists and we had the idea of reversing the concept of the ‘808 and putting the physical aspect back into this gorgeous drum machine. For the Installation MR-808 we began to replaced eleven sound with mechanical actuators like motors and solenoids, so that reals drums (snare, BD ..) could be played live.

You can read all about the device on the Sonic Robots page, as well as find more information on how it works here.

Analyze your world with the WiSci portable spectrometer

Spectroscopy is an incredible tool for chemical analysis–and now you can make your own Bluetooth-enabled device with an Arduino Pro Mini.

If you took advanced chemistry classes, you may have had the opportunity to work with a spectrometer. It probably seemed like a magical gadget, identifying the chemicals in a substance through its light characteristics unlike the experimental methods you previously had to use.

Using off-the-shelf components–including an Arduino, a Bluetooth module, an LED, optical filters, and a LiPo battery–housed inside a 3D-printed case, the WiSci aims to take this tool out of the lab, and into the “real world.” By following the instructions on its project page, you can build one for just under $250.

What’s really neat is that the portable spectrometer can even scan a fruit and then wirelessly send the data over to an accompanying Android app to tell you whether or not the fruit is ripe. (You can view its IEEE Spectrum article for a little more background on that!)

A spectrometer is a very powerful tool. By analysing intensity/wavelength pairs of the interacted EM radiation with the material under study, detailed information like its chemical composition, crystal structure and other elemental information can be extracted. It can also be used for food analysis. For example, it can reveal adulteration in milk or oil and analyse toxins to understand causes of food poisoning to name a few uses.

To create your own, check out its Hackaday.io page here.

A community-made, Arduino-powered interactive town map

A group of students from Farmington, Connecticut partnered with artist Balam Soto and master teachers Earl Procko and Jim Corrigan to create a community-based sculpture project that allows people to explore the sights, sounds and history of their town through new media.

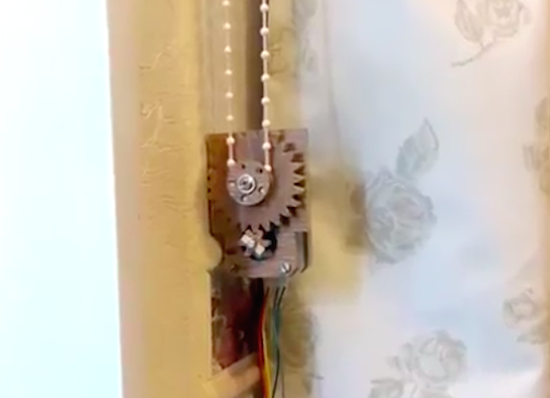
The installation runs on Arduino Uno and XBee, and is comprised of two panels which act as viewing screens for multiple visual projections. Visitors can interact with the display and manipulate the images using 24 buttons placed on the physical map. Plus, they are encouraged to record and add their own stories and memories of Farmington to the ever-growing multimedia library.

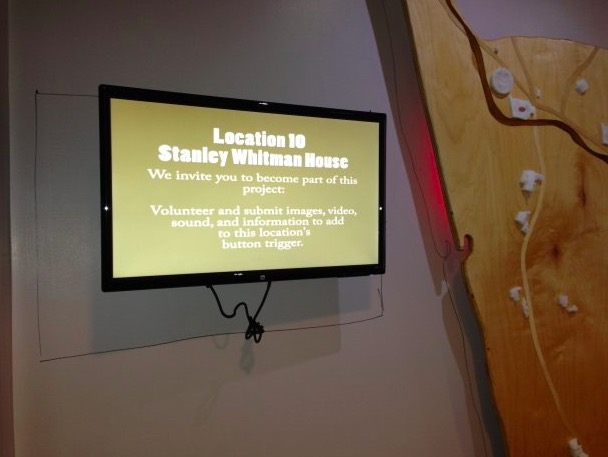
Permanently exhibited in Farmington’s public library, the Farmington Map Project was also the opportunity to introduce the students to physical computing, digital fabrication, woodworking, Arduino programming, and to the potential that Makerspaces have to offer for bringing ideas to life.

The project was created with the support of an Arts in Education Mini-Grant, funded by the Connecticut State Department of Education, the Department of Economic and Community Development, the Connecticut Office of the Arts, and the Connecticut Association of Schools, Farmington High School’s Fine and Applied Arts.

Interested? Check it out on Hackster.

PyroGraph is a plotter that burns images on paper

Inspired by the traditional thermal printers, the PyroGraph is an experimental plotter that uses a soldering iron to burn images onto paper.

Created by the team of Bjørn Karmann, Lars Kaltenbach and Nicolas Armand, PyroGraph works by analyzing any picture and then converting it into dots that are scorched onto a piece of paper with a 450 °C tip. The time of contact between the iron and the paper determines the grayscale of the dot?—?the longer it presses against the paper, the darker the dots get.

The machine uses a paper roll (so the length of the printed piece can then be up to 100m) and a head moving on a fixed x-axis, controlled by servo motors and a custom software developed by the group of Copenhagen Institute of Interaction Design students.

But that’s not all. The PyroGraph will also listen to the ambient noise within its environment to make a connection between the space and the printer. The drawings will be distorted depending on the sound activity of the room in which it will be displayed.

You can read more about the project here, and see it in action below!

(Photos: CIID)

Arduino Blog 15 Sep 19:39

Build your own robotic arm out of cardboard

From our Chairigami Maker Faire booth furniture to Google VR headsets, we’ve seen various use cases for cardboard. Added to that list is a robotic arm, courtesy of Uladz Mikula.

According to the Maker, the design can be replicated in two hours using Arduino and four servo motors. Aside from the electronics, the project also calls for a piece of hardboard for the base and three clips.

The arm, which Mikula calls “CARDBIRD,” can be controlled in one of two ways: either from a PC using a Processing program or remotely via an IR pult/receiver. Ready to build your own? Check over to its Instructables page!

Play the guitar on a guitar bag

While exploring new tangible interfaces, designer Martin Hertig wanted to do something a bit different. He chose to transform the zippers on a guitar bag into a fully-functional instrument. Rather than strum the strings of the guitar, he simply pulls the bag’s zippers to jam: one zip for playing notes or chords, another for changing the bar, and a third for the vibrato.

As Hertig explains, the case was converted into a MIDI controller using an Arduino and conductive thread stitched along the zipper, while a Raspberry Pi synthesizer hidden inside produces the guitar sounds.

Intrigued? Head over to Zippy’s project page, and be sure to see it in action below!

Arduino Blog 14 Sep 16:34

Staring at the Sun: Erasing an EPROM

Flash memory is the king today. Our microcontrollers have it embedded on the die. Phones, tablets, and computers run from flash. If you need re-writable long term storage, flash is the way to go. It hasn’t always been this way though. Only a few years ago EPROM was the only show in town. EPROM typically is burned out-of-circuit in a programming fixture. When the time comes to erase the EPROM, just pop it under an ultraviolet (UV) bulb for 30 minutes, and you’re ready to go again. The EPROM’s quartz window allows UV light to strike the silicon die, erasing the memory.

The problem arises when you want to use an EPROM for long term storage. EPROM erasers weren’t the only way to blank a chip. The sun will do it in a matter of weeks. Even flourescent light will do it — though it could take years.

[TechEkspert] wanted to learn about the nature of erasing an EPROM with the sun, so he got out an old EPROM and started hacking. (translated link) [TechEkspert] programmed the EPROM with a known pattern of ones and zeros. A pair of 74HC4040 counters would address the entire 32 KB memory of the EPROM. An Arduino Mini read the data out, storing it in an SD card. A bit of python code translated the data to PNG files, which were then combined to render a video.

The whole setup was placed on the roof in full sun. Then the waiting began. Nothing much happened for two weeks. Then some bits started to flicker. This means that sometimes they would read as a 0, and other times a 1. The sun was starting to destroy the stored data. Right at the 3 week mark, all the remaining data quickly started to disappear. In the end the entire chip was erased.

While [TechEkspert’s] chip could be re-programmed, that’s not always the case with EEPROM and flash. Check out this EEPROM killer which calculated how many cycles it took to destroy the electronically erasable storage in an Atmel ATmega328.


Filed under: classic hacks
Hack a Day 14 Sep 12:01

Complex, Beautiful Device is Limited to Text-speak and Cat Pictures (WTF, LOL)

Beautifully documented, modular, and completely open-source, this split flap display project by [JON-A-TRON] uses 3D printing, laser cutting and engraving, and parts anyone can find online to make a device that looks as sharp as it is brilliantly designed. Also, it appears to be a commentary on our modern culture since this beautifully engineered, highly complex device is limited to communicating via three-letter combos and cat pictures (or cat video, if you hold the button down!) As [JON-A-TRON] puts it, “Why use high-resolution, multi-functional devices when you can get back to your industrial revolution roots?” Video is embedded below.

The only limitation is that the device has no way of knowing the state of individual displays, so it’s unable to spell out specific messages – an operator simply holds a button to scroll through letters, and stops when the correct letter is displayed. For a similar project that has serious control hardware (but none of the cheeky commentary) check out this scratch-built alphanumeric split flap display.

[via Adafruit Blog]


Filed under: classic hacks

Arduino-powered roller blinds

Tired of adjusting your blinds depending on outside lighting conditions? YouTuber “Dial” has the solution!

Perhaps you’ve seen hacks where people hook a servo up to blinds to flip them open and shut. If, however, you have the kind of blinds that need to be pulled all the way up to let light in, things become a little more tricky. Dial serves up an incredible solution in the video below, with a servo fixture that holds the balls on a blind’s roll up rope in a setup that could be described as the inverse of how a bicycle sprocket works.

This is interesting enough, but after finding that the rope needed 4x the force that the stepper was capable of, a gear train system was devised using Matthias Wandel’s gear generator. Making it even more impressive, only hand tools were used to complete this build, and it employs an Arduino Uno to automatically raise and lower the blinds depending on lighting conditions.

More info on the project’s parts as well as other useful websites are listed in the video description found here.