Posts with «arduino» label

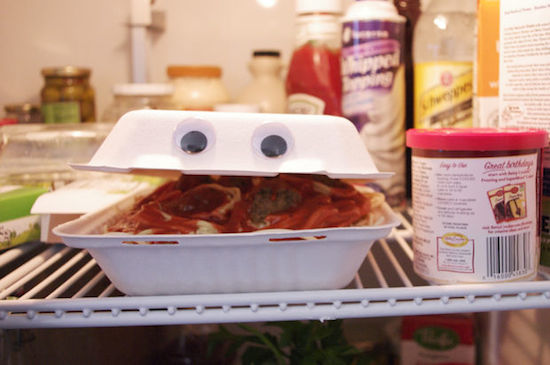
An animatronic talking takeout container

An Arduino plus fake food and audio capabilities equals something truly unique!

Randy “randofo” Sarafan had an idea when he was in college: a takeout container that talked. To the world’s great benefit, now that he knows about electronics, he finally made this dream a reality. Using an Arduino Mega with a Seed Studio Music Shield, he was able to coordinate the movements of a servo and thus the lid of a box with the audio coming out of a speaker. After attaching googly, or “googily” eyes, and modifying a fake serving of spaghetti, he had something that should be quite entertaining!

This idea came about after having taken a special effects film class when I was in college. While in the class, I made a short film of myself talking to a takout container with a face drawn on it. However, not having the know-how to do anything with electronics, the initial version was being controlled by a friend pulling upon and releasing a thin fishing line. While I do not doubt that my friend was skilled at controlling the lid in this manner, I couldn’t help but thinking that it would be great if I could automate the whole thing — at the very least — less embarrasing.

You can find more info on how to build this “foodie” contraption on the project’s Instructables page!

Build your own Lego drone with these affordable kits

Lego bricks have been the foundation of so many awesome and elaborate creations, it's no wonder people have already had the idea to send them skyward in drone form. But while there are plenty of DIY tutorials around, as well as the odd prebuilt model, we haven't seen anything quite as accessible and affordable as these new Lego UAV kits from Flybrix.

Engadget 22 Sep 17:00

Build your own Lego drone with these affordable kits

Lego bricks have been the foundation of so many awesome and elaborate creations, it's no wonder people have already had the idea to send them skyward in drone form. But while there are plenty of DIY tutorials around, as well as the odd prebuilt model, we haven't seen anything quite as accessible and affordable as these new Lego UAV kits from Flybrix.

Source: Flybrix

Engadget 22 Sep 17:00

IDE 1.6.12 released with Sierra support and more

A new version of the Arduino IDE (1.6.12) supporting OSX Sierra is available for download! All OSX users updating to Sierra are invited to also update the IDE to avoid crashes when uploading sketches.

This update includes an experimental integration with Arduino Cloud API already used by Arduino Create. The Arduino Cloud is simple tool to connect your Arduinos to the Internet and to each other. From now on, when you insert for the first time an Arduino/Genuino or AtHeart board which needs an additional core, you will be prompted to automagically install its bundled software.

You’ll notice that the example menu has been reorganized, making it much more consistent and easier to navigate.

We’ve released version 1.0.7 of Curie core as well, which is a transitional release guiding us towards 2.0.0 with BLE central role and a lot of other goodies. You can read all the details on the forum.

Arduino Sketch: The Next Generation

What was your first Arduino program? Probably an LED blinker — that seems to be the “hello world” of microcontrolllers. You probably moved on to things a little more complicated pretty quickly. At some point, things get harder because the Arduino lacks an operating system.

There are operating systems that will run on the Arduino. They aren’t full-featured like Windows or Linux, but they allow you to run multiple tasks that are both isolated from each other (to some degree) and have a way to cooperate (that is, synchronize, share data and resources, and so on). One such operating system is ChibiOS. It will run on AVR- and ARM-based devices. You can find documentation about the entire project on the home page along with other ports.

The problem with adopting a new operating system is always getting started. [ItKindaWorks] has started a video series on using ChibiOS and has posted three installments so far (see below; one is about getting started, the other two cover messaging, mutexes, and priorities).

If you want to follow along with the videos, the code is available on GitHub. We aren’t sure if he’s planning more videos, but these will be more than enough to get you started.

According to the ChibiOS project, they are better than many common similar operating systems because of their static design (you can put the processor to sleep without causing problems). They also support true threads instead of simple tasks, meaning that you can dynamically create and destroy threads and synchronize threads easily.

If you are building sophisticated software that needs multiple things occurring at once, having an operating system can make life a lot easier. We’ve seen examples of using ChibiOS ranging from motor control to MIDI players. There are quite a few choices other than ChibiOS, too, if you look around.


Filed under: Arduino Hacks

Arduino Detects Pants on Fire

Hard as it is to imagine, lie detectors have been sold as children’s toys for a number of years. A simple battery-operated device clipped to your fingers and would show the conductivity of your skin. The concept — which is probably not very reliable — observers that lying causes you to imperceptibly sweat which causes a sudden increase in your skin’s conductivity. These cheap toys would have a meter and you’d note the meter deflection to determine if the subject was lying.

You can debate the amusement value of interrogating your friends, perhaps, but they were pretty common and still exist (including some that shock you if they detect you are lying). Seventeen-year-old [BuildIt] has his own modern take on this classic device using — what else? — an Arduino. You can see a video of the device below.

Of interest is how he used the latest version of the Arduino IDE to visualize the data graphically (see right). This is easier than interpreting a bunch of numbers scrolling by on the serial terminal or having to import the data into a spreadsheet. You can find the graph under the Tools menu listed as Serial Plotter.

You don’t need a lot of external parts for this project, although the finger clips and the cardboard box will take a little mechanical skill to complete.

We’ve looked at galvanic skin response and other biosignal processing before. You can do a lot more if you build a little more hardware.


Filed under: Arduino Hacks, Medical hacks

PIXIE is an Arduino-based NeoPixel watch

Not looking for a smartwatch? PIXIE is an Arduino-based NeoPixel wearable device that not only keeps time, but will also keep your geek cred intact.

You won’t find any numbers on this watch; instead, PIXIE uses LEDs to reveal the time–hours in blue, minutes in red, and seconds in green. Beyond that,  a capacitive touch switch on its strap will activate a flashlight mode.

In terms of electronics, PIXIE is equipped with an Arduino Pro Mini, an Adafruit NeoPixel Ring, a real-time clock module, and a few other components–all housed inside a simple cardboard box with a piece of transparent plexiglass.

Sound like you’d like around your wrist? Check out its Instructables page here.

Capture time-lapses with a steel and aluminum camera slider

Using an Arduino, along with a stepper motor and ball bearings, YouTuber GreatScott! has created a very smooth camera slider.

Time-lapse sequences can be interesting on their own, but if you can add motion to the camera, this adds a really neat element. To give a little extra flair to his video production, GreatScott! built his own motorized slider using stainless steel and aluminum parts. Movement is accomplished via an Arduino Nano controlling a stepper motor, and ball bearings are used to keep the shots smooth. You can see the results and process in the two-part video sequence below.

In this project, I will show you how I repurposed two old camera tripods in order to create a motorized camera slider. The mechanical system consist mostly of aluminium and stainless steel which makes the slider sturdy and pretty decent looking. The electrical system consists of an Arduino Nano with LCD, rotary encoder, limit switches and stepper motor.

Besides the videos seen here, check out GreatScott!’s Instructables writeup as well.

G.E.A.R. 2

Primary image

What does it do?

Navigate around via ultrasound

My Goal was to come up with a design where all the speciality parts could be ordered  for under $20US.

The bill of matirels (BOM) looks like this:

2 ea 9g CR Servos

2 ea Wheels for the Servos

1 ea 4xAAA battery box with switch

1 ea SR-04 ultrasonic range sensor  

1 ea Arduino IDE compatable ATTINY85 based controller board.  Such as a Digispark, Iteaduino or any one of the similar devices. 

Cost to build

$20, 00

Embedded video

Finished project

Number

Time to build

Type

wheels

URL to more information

Weight

read more