Posts with «arduino» label

81 7-segment displays combine to form mega Sudoku game

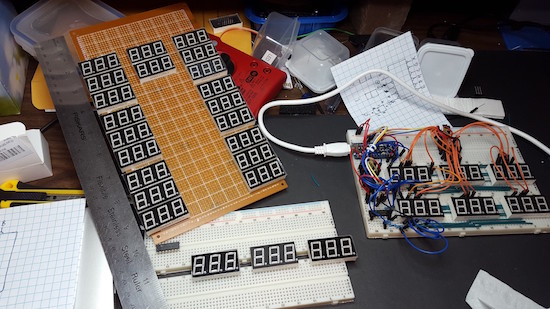
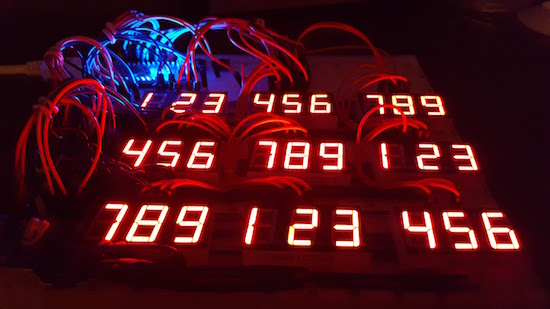
Using a rather large custom PCB, Hari Wiguna made a Sudoku board using discreet LED displays and a physical keypad.

Most people, buy a book and play Sudoku with a pencil or perhaps just get an app. Those that are really dedicated buy a standalone game, but this wasn’t good enough for Wiguna, who made his own electronic board not out of a normal LCD screen, but from 27 three-character LED modules to display the game on a glowing grid. Input is done via a keypad, which uses the grid layout to allow for two-button selection of any square.

Though extremely impressive, it doesn’t yet have a puzzle generator. Wiguna would welcome any contributions for this code-wise!

You can find out more about this project on his pageon GitHub, as well as in his detailed YouTube videos below.

Arduino Blog 26 Oct 18:41
arduino  featured  makers  sudoku  

Dad builds a ‘Princess Cumulus’ costume for his daughter

Maker dad Royce Husain and his daughter Zoey have made it an annual Halloween tradition to build fun and exciting new costumes. Following in the footsteps of last year’s El Niño project and the incredibly popular Minnie Mouse stick figure from 2014, the duo is back with another elaborate getup: a Princess Cumulus thunderstorm that is admittedly “a bit impractical for actual trick-or-treating.” (But cool nevertheless!)

The costume itself consists of a cotton-covered inflatable suit along with LED strips connected to an Arduino programmed to produce a flashing lightning effect.

Be sure to check it out below!


Arduino motor control problems!


Update 06/11/2016

Hey guys,

I sort of got the motor working. Adding a small resistance(about 2-3ohms) in series with the motor seemed to stop the Atmega reseting whenever Pin 3 was pulled HIGH (still don't know for sure what was causing this!). I'll still continue t troubleshoot this problem and completely figure out what exaclty was causing the Atmega to reset, since the resistor is not a permanent solution (wasteful energy loss). I'm really grateful for the huge amount of help from here guys!! Thanks alot! :)

Cheers!

read more

Let's Make Robots 26 Oct 12:06
arduino  avr  motor  noise  power supply  

Arduino motor control problems!

Hey guys,

I'm having trouble regarding motor control in a project I'm working on.

It uses an ATMega328 DIP package on a PCB. The motors I'm using are small coreless motors and I'm trying to control them using Si2302ds N-MOS FETs. For the power supply I'm using a 3.7V(4.2V on full charge) Lipo. I've tested this setup on a promini before and the motors turned on and off just fine.

read more

Let's Make Robots 26 Oct 12:06
arduino  avr  motor  noise  power supply  

Arduino motor control problems!


Update 06/11/2016

Hey guys,

I sort of got the motor working. Adding a small resistance(about 2-3ohms) in series with the motor seemed to stop the Atmega reseting whenever Pin 3 was pulled HIGH (still don't know for sure what was causing this!). I'll still continue t troubleshoot this problem and completely figure out what exaclty was causing the Atmega to reset, since the resistor is not a permanent solution (wasteful energy loss). I'm really grateful for the huge amount of help from here guys!! Thanks alot! :)

Cheers!

read more

Let's Make Robots 26 Oct 12:06
arduino  avr  motor  noise  power supply  

Dual-boot Your Arduino

There was a time, not so long ago, when all the cool kids were dual-booting their computers: one side running Linux for hacking and another running Windows for gaming. We know, we were there. But why the heck would you ever want to dual-boot an Arduino? We’re still scratching our heads about the application, but we know a cool hack when we see one; [Vinod] soldered the tiny surface-mount EEPROM on top of the already small AVR chip! (Check the video below.)

Aside from tiny-soldering skills, [Vinod] wrote his own custom bootloader for the AVR-based Arduino. With just enough memory to back up the AVR’s flash, the bootloader can shuffle the existing program out to the EEPROM while flashing the new program in. For more details, read the source.

While you might think that writing a bootloader is deep juju (it can be), [Vinod]’s simple bootloader application is written in C, using a style that should be familiar to anyone who has done work with an Arduino. It could certainly be optimized for size, but probably not for readability (and tweakability).

Why would you ever want to dual boot an Arduino? Maybe to be able to run testing and stable code on the same device? You could do the same thing over WiFi with an ESP8266. But maybe you don’t have WiFi available? Whatever, we like the hack and ‘because you can’ is a good enough excuse for us. If you do have a use in mind, post up in the comments!


Filed under: Arduino Hacks, Microcontrollers

A custom-made interactive condo for your entertainment

For those living in a high-rise, have you ever wondered what was going on behind the closed blinds of your neighbor’s home directly across from you?

Caretaker is a concept project that explores just that. It consists of a custom-made switch board with which you can control the lights of the flats opposite of yours, providing active entertainment that stimulates your senses better than passive media consumption.

If you want one of your own, simply take a picture of the building that you see from your window and Caretaker will design a laser-cut scale model of it for your use. The prototype runs on an Arduino and is battery-powered, allowing you to freely move it around.

The project is the work of Moholy-Nagy University of Art and Design Budapest (MOME) student, Máté Varga, in collaboration with Barbara Sterk, Miklos Erhardt, Adam Polhodzik, and FabLab Budapest.

You can see it in action below!

Minecraft Sword Lights Up When Nearby Friends

With All Hallow’s Eve looming close, makers have the potential to create some amazing costumes we’ll remember for the rest of the year. If you’re a fan of the hugely addict-*cough* popular game Minecraft, perhaps you’ve considered cosplaying as your favorite character skin, but lacked the appropriate props. [Graham Kitteridge] and his friends have decided to pay homage to the game by making their own light-up Minecraft swords.

These swords use 3D-printed and laser-cut parts, designed so as to hide the electronics for the lights and range finder in the hilt. Range finder? Oh, yes, the sword uses an Arduino Uno-based board to support NewPixels LEDs and a 433Mhz radio transmitter and receiver for ranged detection of other nearby swords that — when they are detected — will trigger the sword to glow. Kind of like the sword Sting, but for friendlies.

All of the files for the parts are available on the project’s Thingverse page and the board setup can be purchased here. If you want to have some fun controlling the real world from inside Minecraft, check out how this fan uses it to turn on lamps in their home.


Filed under: 3d Printer hacks, Arduino Hacks, weapons hacks