Posts with «arduino» label

Parts Bin Bonanza Leads to Arduino FM Radio

Trolling eBay for parts can be bad for your wallet and your parts bin. Yes, it’s nice to be well stocked, but eventually you get to critical mass and things start to take on a life of their own.

This unconventional Arduino-based FM receiver is the result of one such inventory overflow, and even though it may take the long way around to listening to NPR, [Kevin Darrah]’s build has some great tips in it for other projects. Still in the mess-o-wires phase, the radio is centered around an ATmega328 talking to a TEA5767 FM radio module over I²C. Tuning is accomplished by a 10-turn vernier pot with an analog meter for frequency display. A 15-Watt amp drives a pair of speakers, but [Kevin] ran into some quality control issues with the amp and tuner modules that required a little extra soldering as a workaround. The longish video below offers a complete tutorial on the hardware and software and shows the radio in action.

We like the unconventional UI for this one, but a more traditional tuning method using the same guts is also possible, as this retro-radio refit shows.


Filed under: Arduino Hacks, misc hacks

Colorful, Touch-Sensitive Light Table is Ready for Gaming

It’s an ambitious build for sure — you don’t start with $500 worth of wood if you don’t intend for the finished product to dazzle. And this 240-pixel touch-sensitive light box coffee table does indeed dazzle.

Sometimes when we see such builds as these, fit and finish take a back seat to function. [dasdingo89] bucks that trend with a nicely detailed build, starting with the choice of zebrawood for the table frame. The bold grain and the frosted glass top make for a handsome table, but what lurks beneath the glass is pretty special too. The 240 WS2812 modules live on custom PCBs, each thoughtfully provided with connectors for easy service. There’s also an IR transmitter-receiver pair on each board to detect when something is placed over the pixel. The pixel boards are connected to custom-built shift register boards for the touch sensors, and an Arduino with Bluetooth runs the whole thing. Right now the table just flashes and responds to hand gestures, but you can easily see this forming the basis of a beautiful Tetris or Pong table.

This build reminds us a little of this pressure-sensitive light floor we featured recently, which also has some gaming possibilities. Maybe [dasdingo89] and  [creed_bratton_] should compare notes and see who can come up with the best games for their platform.

[via r/DIY and a tip from emptycanister]


Filed under: Arduino Hacks, led hacks

LittleArm Is a Little Robot with a Little Price Tag

If you're looking for a robotic arm, you wouldn't do badly to et LittleArm.

Read more on MAKE

The post LittleArm Is a Little Robot with a Little Price Tag appeared first on Make: DIY Projects and Ideas for Makers.

Bluetooth Speaker With Neopixel Visual Display!

Finding a product that is everything you want isn’t always possible. Making your own that checks off all those boxes can be. [Peter Clough] took the latter route and built a small Bluetooth speaker with an LED visualization display that he calls Magic Box.

A beefy 20W, 4Ohm speaker was screwed to the lid of a wooden box converted to the purpose. [Clough] cut a clear plastic sheet to the dimensions of the box, notching it 2cm from the edge to glue what would become the sound reactive neopixel strip into place — made possible by an electret microphone amplifier. There ended up being plenty of room inside the speaker box to cram an Arduino Pro Mini 3.3V, the RN-52 Bluetooth receiver, and the rest of the components, with an aux cable running out the base of the speaker. As a neat touch, neodymium magnets hold the lid closed.

We gotta say, a custom speaker with LED visualization makes for a tidy little package — aside from the satisfaction that comes from building it yourself.

Depending on your particular situation, you may even opt to design a speaker that attaches to a magnet implanted in your head.

[via /r/DIY]


Filed under: Arduino Hacks, hardware, led hacks, musical hacks

Ceiling Tiles Give it Up for Christmas LED Ornaments

The great thing about holidays is that they always seem to require some shiny things. The modern version of shiny things seems to be LEDs and advances in technology being what they are, we now have amazing programmable LEDs. And programmable LEDs mean animated shiny things! Years ago, [wpqrek] made an LED ornament using discrete components. This year he revisited his ornament and decided to make a new, animated, RGB ornament.

[Wpqrek]’s build is based around five WS2812b strips connected to an Arduino Pro Mini. The ornament itself is a thick styrofoam ceiling tile cut into a star shape with a red-painted wooden frame. Decorated with baubles and stars, the LED strips start in the center and end up at each point in the star. With each strip connected in parallel to the Pro Mini, [wpqrek] used the Arduino Light Animation library to handle the animations.

[Wpqrek] says the result is too big for his tree, so he uses it as a stand-alone ornament. Perhaps using lighter materials would help — or getting a bigger tree! Check out the Arduino lighting controller or the Trompe-l’oeil Menorah for more holiday hacks.


Filed under: Holiday Hacks

Raspberry Pi and Alexa Make Teddy Ruxpin Smarter than the Average Bear

Behold the unholy union of Amazon’s Alexa and that feature-limited animatronic bear from the 80s, Teddy Ruxpin. Alexa Ruxpin?

As if stuffing Alexa inside a talking fish weren’t bad enough, now Amazon’s virtual assistant can talk to you through the creepy retro plush thanks to [Tinkernut]’s trip down memory lane. Having located a Teddy Ruxpin on eBay for far less than the original $70 that priced it out from under his childhood Christmas tree, [Tinkernut] quickly learned that major surgery would be necessary to revive the Ruxpin. The first video below shows the original servos being gutted and modern micro servos grafted in, allowing control of the mouth, eyes, and nose via an Arduino.

With the bear once again in control of its faculties, [Tinkernut] embarked on giving it something to talk about. A Raspberry Pi running AlexaPi joined the bear’s recently vacated thorax with the audio output split between the bear’s speaker and the analog input on the Arduino. The result is a reasonable animation, although we’d say a little tweaking of the Arduino script might help the syncing. And those eyes and that nose really need to get into the game as well. But not a bad start at all.

This isn’t the first time that Teddy Ruxpin has gone under the knife in the name of hacks, and it likely won’t be the last. And the way toy manufacturers are going, they might just beat us hackers to the punch.


Filed under: toy hacks

New IDE for all Arduino boards!

Following the announcement at this year’s World Maker Faire, we’re excited to reveal the release of Arduino IDE 1.8.0—the new official desktop editor for all Arduino boards, both .org and .cc alike.

This should come as great news to the entire Arduino community, representing a key milestone in our journey moving forward.

You will now be able to use the desktop IDE 1.8.0 when working with any Arduino board from .org or .cc family. The latest and greatest unified Arduino Software can be downloaded here.

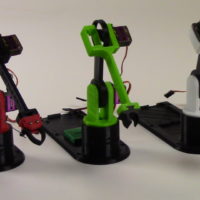
Arduino IDE 1.8.0 works out of the box with AVR boards, like the Uno, Mega, Yun, and Micro, among the most popular. Additionally, it supports the Leonardo Ethernet, Yun Mini, Industrial 101, and Uno WiFi.

The updated SAMD core will provide support for the M0, M0 PRO, and Tian, completing the product line that includes the Zero, MKR1000, and the newly-launched Primo and MKRZero.

More tech notes: You can run the IDE on Linux directly in command line, no longer requiring the X11 display. Also on the Arduino Builder paths with strange UTF8 chars are now correctly handled.

Release after release, the community continues to play an integral role in our development. Be sure to check the entire revision log for a complete list of changes and credits. As always, don’t forget to report any issues you may find, either on the Arduino Forum or by writing to support@arduino.cc and support@arduino.org. Your help is very much appreciated. And while in the holiday giving spirit, please consider supporting the Arduino Software by contributing to its progress!

A special thanks to all developers and management team for their efforts in making this big step forward. Happy Holidays!

A DIY hexagonal Bluetooth speaker with sound-reactive LEDs

Imgur user Peter Clough recently created his own colorful “Magic Box” Bluetooth speaker assembly with a NeoPixel visual display.

If you need a speaker (or rather a speaker with an enclosure) the easiest way is usually to just buy one. On the other hand, if you want something really awesome and unique, why not build it yourself? Clough did just that using an Arduino Pro Mini and a Bluetooth receiver along with a strip of programmable LEDs that react to the emitted sounds–made possible by an electret microphone amp.

Cleverly, the case was sourced from a hobby supplies store, while neodymium magnets were used to keep the lid in place. Clough also employed a “really beefy” 20W 4Ohm speaker, as well as a rotary encoder with push button for volume and play/pause control.

You can find more details, including a schematic, on the project’s Imgur page.

Hack your Teddy Ruxpin with Alexa, Arduino and Raspberry Pi

If you had a Teddy Ruxpin in the ’80s and ’90s, you probably remember inserting special tapes and hearing him read stories to you. Whether you loved or hated the little bear, it was hard to forget his weirdly moving mouth and eyes. Today though, with small and cheap development boards readily available, this mechanical system is just begging for a retrofit.

In this project, hacker “Tinkernut” employed an Arduino to sense the intensity of a sound input, and in turn used it to allow Ruxpin to lip sync to any audio source. This could be a song, story, or even output from a virtual assistant.

He chose the latter option, and after installing Alexa on a Raspberry Pi, used the two boards in tandem to control the retro toy. With this setup, he can ask it such questions as “how tall is the empire state building?” and have it answer back with audio and a semi-synced bear mouth.

Have an old Ruxpin lying around? Give new life to it by following Tinkernut’s instructions here.

Control this Ohio home’s Christmas lights over the Internet

If you don’t want to bother putting up your own lights this year, you can just control Tom Hammond’s!

As seen on Good Morning America, Hammond recently put up a Christmas display that can be controlled via a simple online interface between the hours of 5pm and midnight (EST). The setup consists of an Arduino Mega along with a Raspberry Pi running Falcon Player, while the animations were created using xLights.

The website offers nine lighting options that anyone can select and play. Thanks to a webcam on Hammond’s property, the page even features a live stream that lets users see the animation they chose in real-time. However, due to the number of people trying to access it, the video is not always available.

Hammond, who lives in Akron, Ohio, told ABC News:

“I wanted people outside of my community to enjoy it. The nicest thing I got was an email from an older lady who lives with her mother who said they couldn’t decorate their house this year and she showed her mom my website and said that was one of the best gifts, that she got to decorate.”

Want a fun holiday distraction? Check out the Internet-connected lights here! You can also look at these other Arduino-powered dazzling displays to help get you in the festive spirit!