In the mid-1970s, if you had your own computer, you probably built it. If you had a lot of money and considerable building skill, you could make an Altair 8800 for about $395 — better than the $650 to have it built. However, cheaper alternatives were not far behind.
In 1976, Popular Electronics published plans for a computer called the COSMAC Elf which you could build for under $100, and much less if you had a good junk box. The design was simple enough that you could build it on a piece of perf board or using wire wrap. We featured the online archive of the entire Popular Electronics collection, but hit up page 33 of this PDF if you want to jump right to the article that started it all. The COSMAC Elf is a great little machine built around a 40-pin RCA 1802 processor, and for many was the first computer they owned. I lost my original 1802 computer in a storm and my recent rebuild in another completely different kind of storm. But there is a way to reclaim those glory days without starting from scratch. I’m going to repurpose another retro-computing recreation; the KIM-1.
I’ll admit it, Rewiring a real KIM-1 to take an 1802 CPU would be difficult and unnecessary and that’s not what this article is about. However, I did have a KIM UNO — [Oscar’s] respin of the classic computer using an Arduino mini pro. Looking at the keyboard, it occurred to me that the Arduino could just as easily simulate an 1802 as it could a 6502. Heck, that’s only two digits different, right?
The result is pretty pleasing. A “real” Elf had 8 toggle switches, but there were several variations that did have keypads, so it isn’t that far off. Most Elf computers had 256 bytes of memory (without an upgrade) but the 1802 UNO (as I’m calling it) has 1K. There’s also a host of other features, including a ROM and a monitor for loading and debugging programs that doesn’t require any space in the emulated 1802.
Repurpose
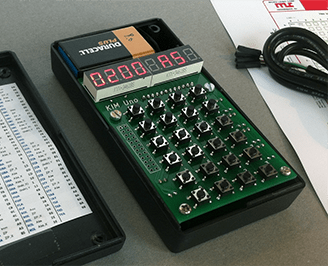 The KIM UNO has 24 switches. There are 16 for the hex digits, of course. The top two rows mimic functions from the original KIM-1. A real Elf had a way to input a byte (usually 8 toggle switches), a load switch, a run switch, a memory protect switch, and a push button wired to a CPU pin. That means the hardware has more than enough switches.
On the display side, a normal Elf had a single-byte hex display although some clones had more. There was also the Q LED that a program could light or extinguish. The KIM UNO hardware has many 7-segment displays so it is possible to put those digits to use like an Elf clone. There isn’t an LED, however, except for the Arduino’s built in LED which is not normally visible in operation. However, the digital displays have decimal points and they are connected to the Arduino. So if you don’t mind using those, you have plenty of LEDs, too.
The hardware is open source and easy to duplicate. [Oscar] sometimes has kits as well and they are very inexpensive (about $20).
The KIM UNO software is open source, so I started there. I first stripped all the code out of the main file other than the parts that drove the display and the keyboard, then built up everything need to suppot 1802 emulation. You can find all the code in my 1802UNO GitHub repository.
Inside the 1802
The 1802 instruction set is very regular and quite simple. Most instructions use the top 4 bits as an op code and the bottom 4 bits to select one of sixteen 16-bit registers. So 0x12 increments register 2 and 0x15 increments register 5. There are only a handful of op codes that don’t follow this pattern. There’s also an 8-bit accumulator called “D” (not to be confused with register D).
One unique feature in the 1802 architecture is the program counter. There isn’t one. Well, more precisely, there are up to 16. Any of the registers can be the program counter and a subroutine call can be as simple as switching the program counter. Unfortunately, that isn’t very reentrant (or good for recursion). If you want a proper subroutine call, you had to code it yourself. RCA provided the “standard call and return technique” that had the unfortunate downside of destroying the accumulator.
With so few instructions, the emulator turns out to be a few switch statements and some pretty simple code. Although it is made to run with the KIM UNO hardware, like the KIM UNO, you should be able to use it with just about any Arduino via the serial port. It isn’t quite as fun as having the real hardware, but it is simpler.
Unreal

The emulator is reasonably accurate except it doesn’t simulate interrupts (since there is no source of them). However, it doesn’t faithfully reproduce the 1802’s load mode which used DMA. Instead, load mode is just completely custom code that enters data into memory. It does not simulate the cycle and register manipulations that go on in a real 1802 using DMA in load mode.
In addition to loading a program with the ersatz load mode, you can also move RAM back and forth to EEPROM or a PC via the serial port.
Serial and Push Buttons
The serial port is just the usual Arduino serial port set for 9600 baud. By default, the serial input will mimic the hardware keys. However, you can use the pipe character (‘|’) to shift the serial port into terminal mode. Then the 1802 code can read data from the serial port. You lose the front panel functions and there’s no way to go back until you cycle the power unless you make the 1802 code release the port.
A few of the push buttons have special functions if you hold them down for more than one second. For example, the AD button writes the EEPROM data into RAM. This is useful for storing a self-contained demo, for example.
You can find a summary of the keyboard and serial commands on the GitHub site. The serial port can do things you can’t do from the front panel, like set a trace mode, dump the CPU registers, and more.
Building
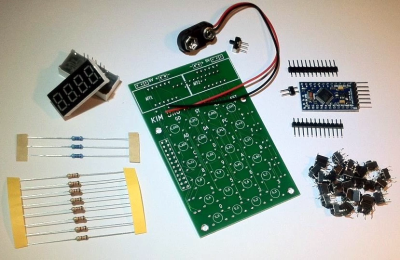 The hardware doesn’t require any changes to the stock KIM UNO kit. There’s a lot to solder and once you solder the displays on, it would be hard to get the Arduino back off the board.
You could probably build the software using the Arduino IDE, but I used Platform IO. That lets me use the editor of my choice, but you ought to be able to get the code to work in the IDE, as well. There is enough memory to make the RAM slightly bigger, but I didn’t do it. Since one way to save and load the RAM is to EEPROM, I didn’t want the RAM to be larger than the EEPROM. In addition, the RAM “maps” like a real Elf (that is, RAM at location 0x0 also appears at 0x4000, 0x8000, etc). This would be more difficult if you added a little bit more than 1K of RAM.
There are a few other options at the top of 1802config.h. You can select how often the screen and keyboard refresh. Higher values are slower to refresh but faster to execute code. You can change the I/O ports associated with the keyboard, displays, and serial port. You can also change the serial escape character.
Examples
There are some examples provided that blink the LEDs and manipulate the serial port. If you look around, there’s a lot of 1802 code on the web. However, be aware that most 1802s don’t have a hardware UART. They emulate serial ports using the Q output and one of the EF inputs. That’s fine for a real device even though it takes lots of code, but for this virtual device, it isn’t practical. You’ll need to rip out any code that does serial I/O and replace it with single I/O instructions.
If you have a binary file (or a format you can convert to binary) I have a converter written in C included on GitHub. You can compile it on nearly any platform and use it to convert. It always assumes address. If that’s not right, you can always open the output in a text editor and adjust.
In addition, there are three ROMs included that you can try. By default, there is a simple high-low game. There are also two monitors, one for use with the built-in keyboard and another for use with a serial port. To select a ROM, edit 1802rom.h and change the comments so the ROM you want is not commented and the others are.
Practical?
Emulators are fun, but as the song goes, there’s nothing like the real thing. If that’s not authentic enough for you, it is possible to build a very authentic looking Elf, even today. The reason real 1802s are still around is they had several desirable characteristics, namely low power consumption and resistance to radiation.
The Arduino simulation has neither of those features. However, it is a fun retrocomputing toy, inexpensive, and a great learning tool. The CPU is simple enough to program directly in machine code and the portability is better than most other old school computers.
If you want to learn more about the 1802 there are several sites dedicated to it and a very helpful Yahoo group. One site has a very prolific software author, but most of the code won’t fit in the 1802 UNO’s 1K RAM. Maybe a version with more memory is in the future.
Filed under:
Arduino Hacks,
classic hacks,
computer hacks,
Hackaday Columns