Posts with «arduino hacks» label

Cybercube Makes a Great Computing Companion

Oh, sure, there have been a few cube-shaped PCs over the years, like the G4 and the NeXT cube. But can they really be called cubes when the display and the inputs were all external? We think not.

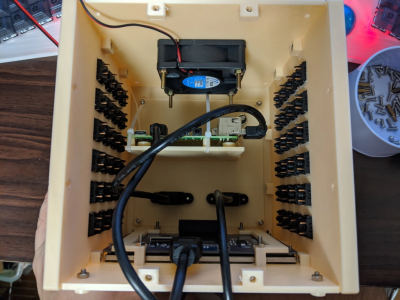
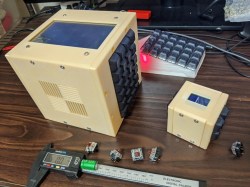
[ikeji] doesn’t think so either, and has created a cube PC that puts them all to shame. Every input and output is within the cube, including our favorite part — the 48-key ortholinear keyboard, which covers two sides of the cube and must be typed on vertically. (If you’ve ever had wrist pain from typing, you’ll understand why anyone would want to do that.) You can see a gif of [ikeji] typing on it after the break.

Inside the 3D printed cube is a Raspberry Pi 4 and a 5″ LCD. There’s also an Arduino Pro Micro for the keyboard matrix, which is really two 4×6 matrices — one for each half. There’s a 6cm fan to keep things cool, and one panel is devoted to a grille for heat output. Another panel is devoted to vertically mounting the microcontrollers and extending the USB ports.

Don’t type on me or my son ever again.

When we first looked at this project, we thought the tiny cube was a companion macro pad that could be stored inside the main cube. It’s really a test cube for trying everything out, which we think is a great idea and does not preclude its use as a macro pad one of these days. [ikeji] already has plenty of plans for the future, like cassette support, an internal printer, and a battery, among other things. We can’t wait to see the next iteration.

We love a good cyberdeck around here, and it’s interesting to see all the things people are using them for. Here’s a cyberduck that quacks in Python and CircuitPython.

Upgraded Infotainment Options on a 14 Year Old Mercedes

It used to be that upgrading a car stereo was fairly simple. There were only a few mechanical sizes and you could find kits to connect power, antennas, and speakers. Now, though, the car stereo has interfaces to steering wheel controls, speed sensors, rear-view cameras, and more. [RND_ASH] was tired of his 14-year-old system so he took an Android head unit, a tablet, and an Arduino, and made everything work as it was supposed to.

The key is to interface with the vehicle’s CAN bus which is a sort of local area network for the vehicle. Instead of having lots of wires running everywhere, today’s cars are more likely to have less wiring all shared with many devices.

[RND_ASH] has several videos describing the whole project and we expect there will be some more upcoming. You can see part one, below.

The project also reverse engineers how to display on the tiny screen in the dashboard. The code for the CAN bus interface is on GitHub. There’s also a written narrative on what he learned about the Mercedes interface in a different repository.

We’ve seen other cars get similar treatment, of course. If you want a gentle introduction to CAN hacking, we’ve done that, too.

Automatic Arduino Bicycle Shifter

One of the keys to efficient cycling performance is a consistent pedalling cadence. To achieve this the cyclist must always be in the correct gear, which can be tricky when your legs are burning and you’re sucking air. To aid in this task, [Jan Oelbrandt] created Shift4Me, an open-source Arduino powered electronic shifter.

The system consists of a hall effect sensor at the pedals to measure cadence, an Arduino controller, and a servo mechanism to replace the manual shifter. Everything is mounted in a small enclosure on the frame. The only way to get one is to build your own, so a forum is available for Shift4Me builders, where the BOM, instructions, code and other documentation is available for download. Most bikes should be easy to convert, and [Jan] invites builders to post their modifications and improvements.

Since the only input is the cadence sensor, we wonder if the system will interfere more than help when the rider has to break cadence. It does however include allowance to hold on the current gear, or reset to a starting gear by pushing a button. One major downside is that you will be stuck in a single gear if the battery dies since the manual shifter is completely removed.

As one of the oldest continuously used forms of mechanical transport, there is no shortage of bicycle-related hacks. Some of the more recent ones we’ve seen on Hackaday include e-bike with a washing machine motor, and a beautifully engineered steam-powered bicycle.

Over-Engineered Single Button Timer

Feature creep is typically something to be avoided, since watching a relatively simple project balloon into a rat’s nest of complexity often leads to ineffective, or even abandoned, projects. On the other hand, if you can maintain a tight focus, it’s not always a bad thing. [cbm80Amiga] shows us how to drill down and add specific features in this single-button timer without losing focus on what the original project was all about.

The timer is based on an Arduino Pro Mini and an HX1230 LCD with a simple piezo speaker for audible alerts. A single button controls operation of the timer, with short presses incrementing each digit and long presses moving on to the next digit. Controlling button presses this finely is a project in its own, but then [cbm80Amiga] moves on to other features such as backlight control, low power modes which allow it to operate for around two years on a single battery charge, preset times for various kitchen uses, and different appearance settings.

Honestly we aren’t sure how you could cram any more features on this timer without fundamentally altering the designed simplicity. It doesn’t fall into the abyss of feature creep while being packed with features, and it’s another example of how keeping things simple is often a recipe for success.

Thanks to [Hari] for the tip!

New Arduino JPEG Library Focuses On Speed

Working with graphics on microcontrollers has always meant focusing on making the most of limited resources. Particularly in the 8-bit era, all manner of tricks were used to get low-performance chips to achieve feats beyond their lowly station. However, these days, we’re blessed with 32-bit workhorses with clock speeds in the tens, or even hundreds, of MHz and many kilobytes of RAM to match. It’s these higher performance chips [Larry] had in mind when writing his JPEGDEC library.

As [Larry] discusses in a blog post on the topic, JPEG libraries already exist for the Arduino platform. However, many of these are aimed at 8-bit platforms with tiny amounts of RAM. While it’s possible to decode JPEGs piece by piece with some intelligent code under these conditions, it’s possible to go much faster when you’ve got a little more headroom. [Larry] does a great job of explaining the variety of optimizations he’s developed in the two decades since writing his first JPEG decoder back in 1994. From eliminating unnecessary marker checks to ignoring unneeded data for scaled-down output, it all adds up to get the job done faster. The library targets the Cortex-M0+, or any chip with a minimum of 20K of RAM, as its bare minimum to operate. Faster chips with higher clock rates naturally do better, and [Larry] provides benchmark decoding times for various common hardware using the library.

We’ve featured [Larry]’s GIF decoder for the Arduino platform before, again a useful library that’s optimised for good performance. If you’ve got your own neat tricks for image processing on microcontrollers, you know how to call!

Hack a Day 26 Aug 12:00

Sunrise, Sunset, Repeat

Sunrises and sunsets hardly ever disappoint. Still, it’s difficult to justify waking up early enough to catch one, or to stop what you’re doing in the evening just to watch the dying light. If there’s one good thing about CCTV cameras, it’s that some of them are positioned to catch a lovely view of one of the two, and a great many of them aren’t locked down at all.

[Dries Depoorter] found a way to use some of the many unsecured CCTV cameras around the world for a beautiful reason: to constantly show the sun rising and setting. Here’s how it works: a pair of Raspberry Pi 3B + boards pull the video feeds and display the sunrise/sunset location and the local time on VFD displays using an Arduino Nano Every. There isn’t a whole lot of detail here, but you can probably get the gist from the high-quality pictures.

If you wanted to recreate this for yourself, we might know where you can find some nice CCTV camera candidates. Just look through this dystopian peephole.

Thanks for the tip, [Luke]!

Optimizing GIF Playback For Microcontrollers

Despite being cooked up by Compuserve back in the late 1980s, GIFs have seen a resurgence on the modern internet, mostly because they’re fun. However, all our small embedded systems are getting color screens these days, and they’d love to join in the party. [Larry Bank] has whipped up a solution for just that reason, letting embedded systems play back short animated GIFs with limited resources.

[Larry] does a great job of explaining how the GIF format works, using LZW compression and variable-length codes. He talks about how the design of the format presents challenges, particularly when working with microcontrollers. Despite this, the final code works well, and is able to work with most animated GIFs of the right dimensions and construction. 24K of RAM is required, and image width is limited to 320 pixels. Images can be loaded from flash, memory, or SD cards, and he notes that best performance is gained with a microcontroller with fast SPI for writing to screens quickly.

It’s a great piece of software that promises to add a lot of charm, or silliness, to microcontroller projects. It also simplifies the use of animations, which can now be designed on computers rather than by using onboard graphics libraries. GIF really is the format that never seems to die; we’ve featured cameras dedicated to the form before. Video after the break.


Hack a Day 04 Aug 03:00

Tiny Circuit Sculpture Keeps the Night Watch

If you’re planning to get into circuit sculpture one of these days, it would probably be best to start with something small and simple, instead of trying to make a crazy light-up spaceship or something with a lot of curves on the first go. A small form factor doesn’t necessarily mean it can’t also be useful. Why not start by making a small automatic night light?

The circuit itself is quite simple, especially because it uses an Arduino. You could accomplish the same thing with a 555, but that’s going to complicate the circuit sculpture part of things a bit. As long as the ambient light level coming in from the light-dependent resistor is low enough, then the two LEDs will be lit.

We love the frosted acrylic panels that [akshar1101] connected together with what looks like right angle header pins. If you wanted to expose the electronics, localize the light diffusion with a little acrylic cover that slips over the LEDs. Check it out in the demo after the break.

There’s more than one way to build a glowing cuboid night light. The Rubik’s way, for instance.

Hex Matrix Clock is Spellbinding

Just when we think we’ve seen all possible combinations of 3D printing, microcontrollers, and pretty blinkenlights coming together to form DIY clocks, [Mukesh_Sankhla] goes and builds this geometric beauty. It’s kaleidoscopic, it’s mosaic, and it sorta resembles stained glass, but is way cheaper and easier.

The crucial part of the print does two jobs — it combines a plate full of holes for a string of addressable RGB LEDs with the light-dividing walls that turn the LEDs into triangular pixels. [Mukesh] designed digits for a clock that each use ten triangles. You’d need an ESP8266 to run the clock code, or if you’d rather sit and admire the rainbow light show unabated by the passing of time, just use an Arduino Uno or something similar.

Most of the aesthetic magic here is in the printed pieces and the FastLED library. It has a bunch of really cool animations baked in that look great with this design. Check out the demo video after the break. The audio is really quiet until the very end of the video, so be warned. In our opinion, the audio isn’t necessary to follow along with the build.

The humble clock takes many lovely forms around here, including pop art.

Skee-Ball Scoring with Coin Slot Switches

Bowling is great and all, but the unpredictability of that little ball jump in Skee-Ball is so much more exciting. You can play it straight, or spend a bunch of time perfecting the 100-point shot. And unlike bowling, there’s nothing to reset, because gravity gives you the balls back.

In one of [gcall1979]’s earlier Skee-Ball machines, gravity assisted the scoring mechanism, too: each ball rolls back to the player and lands in a lane labeled with the corresponding score, which is an interesting engineering challenge in its own right. He decided to build automatic scoring into his newest Skee-Ball machine.

At the bottom of each cylinder is an arcade machine coin door switch with a long wire actuator. These had to be mounted so they’re close enough to the hole, but out of the way of the balls.

Each switch is wired up to an Arduino Mega along with four large 7-segments for the score, and a giant 7-segment to show the number of balls played. Whenever the game is reset, a servo drops a door to release the balls, just like a commercial machine.

The arcade switches work pretty well, especially once he bent the wire into hook shape to cover more area. But they do fail once in a while, maybe because the targets are full-size, but the balls are half regulation size. For the next one, [gcall1979] is planning to use IR break-beam targets which ought to work with any size ball. If you prefer bowling, you won’t strike out with break-beam targets there, either.