Posts with «3d printed» label

SimpleSumo Bots Teach More than Fighting

[MechEngineerMike] wrote in to share the enthusiasm over SimpleSumo, a series of open source, customizable robots he designed for mini-sumo battling and much more. For the unfamiliar, mini-sumo is a sport where two robots try to push each other out of a ring. [Mike]’s bots are simplified versions designed for education.

[Mike] was inspired by a video of some kids building mini-sumo bots who were doing anything and everything to personalize them. He vowed to make his own affordable, easy-to-build bots with education firmly in mind. His other major requirement? They had to be as easily customizable as that one potato-based toy that eventually came with a bucket of parts. As of this writing, there are 34 interchangeable accessories.

[Mike]’s first idea was to build the bots out of custom 3D-printed building blocks. He soon found it was too much work to print consistent blocks and switched to a modular cube-like design instead. SimpleSumo bots can do much more than just fight each other. [Mike] has written programs to make them flee from objects, follow lines, find objects and push them out of the ring, and beep with increasing frequency when an object is detected.

The bots are completely open source, but [Mike] sells kits for people who can’t print the parts themselves. He’s made a wealth of information available on his website including links to outside resources about mini-sumo, Arduino, programming, and 3D design. How about a complete series of assembly videos? First one is after the break.  Don’t know how to build a battle ring? He’s got that covered, too.

For a sumo bot that’s more brains than brawn, check out Zumo Red, the smart sumo.


Filed under: how-to, robots hacks

Design and 3D Print Robots with Interactive Robogami

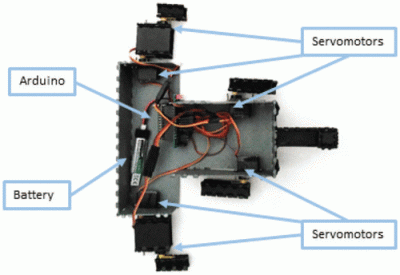
Internals of 3D printed “print and fold” robot. [Image source: MIT CSAIL]
Robot design traditionally separates the body geometry from the mechanics of the gait, but they both have a profound effect upon one another. What if you could play with both at once, and crank out useful prototypes cheaply using just about any old 3D printer? That’s where Interactive Robogami comes in. It’s a tool from MIT’s Computer Science and Artificial Intelligence Laboratory (CSAIL) that aims to let people design, simulate, and then build simple robots with a “3D print, then fold” approach. The idea behind the system is partly to take advantage of the rapid prototyping afforded by 3D printers, but mainly it’s to change how the design work is done.

To make a robot, the body geometry and limb design are all done and simulated in the Robogami tool, where different combinations can have a wild effect on locomotion. Once a design is chosen, the end result is a 3D printable flat pack which is then assembled into the final form with a power supply, Arduino, and servo motors.

A white paper is available online and a demonstration video is embedded below. It’s debatable whether these devices on their own qualify as “robots” since they have no sensors, but as a tool to quickly prototype robot body geometries and gaits it’s an excitingly clever idea.

Perhaps there’s an opportunity to enhance the “3D print, then fold” approach Robogami uses with this concept for making flexible prints out of non-flexible material, or incorporating simple 3D printed circuitry.

Thanks to [Adam] for the tip!


Filed under: robots hacks

DIY Syringe Pump Saves Big Bucks for Hacker’s Lab

If you had a choice between going to your boss and asking for funds for a new piece of gear, would you rather ask for $3000 to buy off-the-shelf, or $200 for the parts to build the same thing yourself? Any self-respecting hacker knows the answer, and when presented with an opportunity to equip his lab with a new DIY syringe pump for $200, [Dr. D-Flo] rose to the challenge.

The first stop for [Dr. D-Flo] was, naturally, Hackaday.io, which is where he found [Naroom]’s syringe pump project. It was a good match for his budget and his specs, but he needed to modify some of the 3D printed parts a little to fit the larger syringes he intended to use. The base is aluminum extrusion, the drive train is a stepper motor spinning threaded rod and a captive nut in the plunger holders, and an Arduino and motor shield control everything. The drive train will obviously suffer from a fair amount of backlash, but this pump isn’t meant for precise dispensing so it shouldn’t matter. We’d worry a little more about the robustness of the printed parts over time and their compatibility with common lab solvents, but overall this was a great build that [Dr. D-Flo] intends to use in a 3D food printer. We look forward to seeing that one.

It’s getting so that that you can build almost anything for the lab these days, from peristaltic pumps to centrifuges. It has to be hard to concentrate on your science when there’s so much gear to make.


Filed under: chemistry hacks, tool hacks

Complex, Beautiful Device is Limited to Text-speak and Cat Pictures (WTF, LOL)

Beautifully documented, modular, and completely open-source, this split flap display project by [JON-A-TRON] uses 3D printing, laser cutting and engraving, and parts anyone can find online to make a device that looks as sharp as it is brilliantly designed. Also, it appears to be a commentary on our modern culture since this beautifully engineered, highly complex device is limited to communicating via three-letter combos and cat pictures (or cat video, if you hold the button down!) As [JON-A-TRON] puts it, “Why use high-resolution, multi-functional devices when you can get back to your industrial revolution roots?” Video is embedded below.

The only limitation is that the device has no way of knowing the state of individual displays, so it’s unable to spell out specific messages – an operator simply holds a button to scroll through letters, and stops when the correct letter is displayed. For a similar project that has serious control hardware (but none of the cheeky commentary) check out this scratch-built alphanumeric split flap display.

[via Adafruit Blog]


Filed under: classic hacks

HardWino Takes The Effort Out of Happy Hour

A personal bartender is hard to come by these days. What has the world come to when a maker has to build their own? [Pierre Charlier] can lend you a helping hand vis-à-vis with HardWino, an open-source cocktail maker.

The auto-bar is housed on a six-slot, rotating beverage holder, controlled by an Arduino Mega and accepts drink orders via a TFT screen. Stepper motors and L298 driver boards are supported on 3D printed parts and powered by a standard 12V DC jack. Assembling HardWino is a little involved, so [Charlier]  has provided a thorough step-by-step process in the video after the break.

[Charlier] has also kindly included his Arduino code to further facilitate your happy hour. The best part? This is isn’t even the final product; and yet — this functional prototype can already turn the tables on a long day. Whatever your beverage of choice, make sure it stays as hot or cool as you want with the help of this handy coaster.


Filed under: 3d Printer hacks, Arduino Hacks

A Robot In A Day

While building a robot (nearly) from scratch isn’t easy, it needn’t be a lengthy process.  Is it possible to build a bot in a single day? With some musical motivation (a 10 hour loop of the A-Team theme song), [Tyler Bletsch] answers with a resounding ‘yes’ in the shape of his little yellow robot that he built for a local robotics competition.

Designing and fabricating on the fly, [Bletsch] used Sketchup to design the chassis, and OpenSCAD to model the wheels while the former was being 3D printed. Anticipating some structural weakness, he designed another version that could bolt to wood if the original failed, but the addition of some metal support rods provided enough stability. Mouse pad material gave the wheels ample traction. An Arduino with the L298 control module receives input via an HC-06 Bluetooth board. Eight AA batteries provide 12V of power to two Nextrox mini 12V motors with an integrated voltmeter to measure battery life.

Lacking a proper drive belt provided a bit of a challenge, so [Bletsch] — in an ingenious expression of resourcefulness — cobbled together an effective solution with some superglue and 3D printing filament packaging; the heat pressed parts proved to be strong and flexible. Waste not maker skills in action!

Arduino code was borrowed from a TerrorBytes student — the organization hosting the competition — and adapted by [Bletsch]. A python script combined with a joystick emulator he made in Google App inventor and some control equations from WPILiB allowed him to control his new robot from his phone.

Whether they are expressing your maker skills, assisting with your luggage or with your board meetings, robots can be a valuable inclusion in everyday life — or just a fun way to spend one day of it.


Filed under: robots hacks

Improved Digital Caliper Interfacing, Including 3D Printed Connector

[MakinStuff] wrote in to let us know about a project he did for new and improved interfacing to the ubiquitous cheap Chinese digital calipers. Interfacing to this common caliper model is well-trod ground, but his project puts everything about interfacing and reading the data in one place along with some improvements: a 3D printed connector that makes mating to the pads much more stable and reliable, a simple interface circuit for translating the logic levels, and an interrupt-driven sample Arduino sketch to read the data. Making the sketch interrupt-driven means the Arduino never sits and waits for input from the calipers, making it easier have the Arduino do other meaningful work at the same time, ultimately making it easier to incorporate into other projects.

The connector has spaces to insert bare wires to use as contacts for the exposed pads inside the calipers. Add a little hot glue and heat shrink, and you’ll never have to fiddle with a hacked-together connection again.

This common caliper model has been hacked and re-purposed in interesting ways. We’ve seen them used as a Digital Read Out (DRO) on a lathe as well as being given the ability to wirelessly log their data over Bluetooth.


Filed under: tool hacks

Progress Report: Secretive Club Designing, 3D Printing a Full-Size BB-8

A BB-8 Builders Club has created plans for creating your own 3D printable full-size BB-8 droid.

Read more on MAKE

The post Progress Report: Secretive Club Designing, 3D Printing a Full-Size BB-8 appeared first on Make: DIY Projects, How-Tos, Electronics, Crafts and Ideas for Makers.

Upcycle a Microwave into a Spot Welder

Long-time Maker Matthew Borgatti recently completed work on a homemade spot welder, built from a scrapped microwave and a few other parts.

Read more on MAKE

The post Upcycle a Microwave into a Spot Welder appeared first on Make: DIY Projects, How-Tos, Electronics, Crafts and Ideas for Makers.