There’s no limit to the amount of work some people will put into avoiding work. For instance, why bother to get up from your YouTube-induced vegetative state to adjust the volume when you can design and build a remote to do it for you?
Loath to interrupt his PC streaming binge sessions, [miroslavus] decided to take matters into his own hands. When a commercially available wireless keyboard proved simultaneously overkill for the job and comically non-ergonomic, he decided to build a custom streaming remote. His recent microswitch encoder is prominently featured and provides scrolling control for volume and menu functions, and dedicated buttons are provided for play controls. The device reconfigures at the click of a switch to support Netflix, which like YouTube is controlled by sending keystrokes to the PC through a matching receiver. It’s a really thoughtful design, and we’re sure the effort [miroslavus] put into this will be well worth the dozens of calories it’ll save in the coming years.
Hackday regular [Akiba] is working on a series of video tutorials guiding newbies into the world of the 802.15.4 wireless protocol stack — also known as ZigBee. So far, his tutorials include a “getting started with chibiArduino”, his own Arduino-based wireless library, as well as a more basic tutorial on how radio works.
[Akiba] already made a name for himself though a large number of wireless projects, including his Saboten sensor boards, which are ruggedized for long-term environmental monitoring. The Saboten boards use the same wireless stack as his Arduino-compatible wireless development boards, his Freakduino products. The latest version features an ATmega 1284P with 8x the RAM and 4x the flash of the older, 328P-based Freakduinos. It comes in both 900 MHz and 2.4 GHz and there’s also a special 900 Mhz “Long Range” variant. The boards include some great power-saving features, including switchable status LEDs and on-board battery regulation circuity allowing one to run a full year on two AA cells while in sleep mode. They also have a USB stick configuration that is great for Raspberry Pi projects and for running straight from the PC.
For more [Akiba] goodness, check out our colleague [Sophi]’s SuperCon interview with him as well as our coverage of his Puerto Rico lantern project.
We can’t decide if [MertArduino’s] robotic hand project is more art or demonstration project. The construction using springs, fishing line, and servo motors isn’t going to give you a practical hand that could grip or manipulate anything significant. However, the project shows off a lot of interesting construction techniques and is a fun demonstration for using nRF24L01 wireless in a project. You can see a video of the contraption, below.
A glove uses homemade flex sensors to send wireless commands to the hand. Another Arduino drives an array of servo motors that make the fingers flex. You don’t get fine control, nor any real grip strength, but the hand more or less will duplicate your movements. We noticed one finger seemed poorly controlled, but we suspect that was one of the homemade flex sensors going rouge.
The flex sensors are ingenious, but probably not very reliable. They consist of a short flexible tube, an LED and a light-dependent resistor. We’re guessing a lot of factors could change the amount of light that goes around a bent tube, and that may be what’s wrong with the one finger in the video.
So you’ve had your first child. Congratulations; your life will never be the same again. [Dusan] was noticing how the introduction of his children into his life altered it by giving him less time for his hobbies in his home laboratory, and decided to incorporate his children into his hacks. The first one to roll out of his lab is a remote-controlled baby stroller.
After some engineering-style measurements (lots of rounding and estimating), [Dusan] found two motors to drive each of the back wheels on a custom stroller frame. He created a set of wooden gears to transfer power from the specialized motors to the wheels. After some batteries and an Arduino were installed, the stroller was ready to get on the road. At this point, though, [Dusan] had a problem. He had failed to consider the fact that children grow, and the added weight of the child was now too much for his stroller. After some adjustments were made (using a lighter stroller frame), the stroller was eventually able to push his kid around without any problems.
This is an interesting hack that we’re not sure has much utility other than the enjoyment that came from creating it. Although [Dusan]’s kid certainly seems to enjoy cruising around in it within a close distance to its operator. Be sure to check out the video of it in operation below, and don’t forget that babies are a great way to persuade your significant other that you need more tools in your work bench, like a CNC machine for example.
If you’ve been in a university class of a certain size, with a professor who wants to get live feedback from the students, you’ve probably been forced to buy a Turning Point “clicker”. Aside from the ridiculousness of making students pay for their professor’s instructional aides (do the make you pay extra for the chalk too?!?!) these clickers are a gauntlet thrown down to any right-minded hacker because they supposedly contain secrets.
That’s it, really. [Nick] hooked up an Arduino to an nRF24, sent the decoded output from the clicker to his computer, and wrote a Python routine that would play whatever music he wanted over MIDI to a baseline synthesizer. The whole shooting match is available on GitHub. If you have one of these clickers collecting dust somewhere, pull it out and do something with it.
If you are a regular Hackaday reader, you’ve probably seen plenty of ESP8266 projects. After all, the inexpensive device is a workhorse for putting a project on WiFi, and it works well. There is a processor onboard, but, most often, the onboard CPU runs a stock firmware that exposes an AT command set or Lua or even BASIC. That means most projects have a separate CPU and that CPU is often–surprise–an Arduino.
It isn’t a big leap of logic to imagine an Arduino with an integrated WiFi subsystem. That’s the idea behind the MKR1000. But the real question you have to ask is: is it better to use an integrated component or just put an Arduino and ESP8266 together?
[Andreas Spiess] not only asked the question, but he answered it in a YouTube video (see below). He examines several factors on the MKR1000, the Arduino Due and Uno, and several other common boards. The examination covers performance, features, and power consumption.
We’ve covered a slew of ESP8266 projects. We’ve also seen at least two MKR1000 projects, one for an automotive project and the other controls a shower.
This simple WiFi serial port monitor would have saved us a lot of trouble. We can’t count how many times where being hooked into an Arduino with USB just to get the serial out has nearly been more trouble than it’s worth. Times where we sat cross-legged on the floor and could choose comfort or accidentally shifting the set-up and ruining everything, but not both.
[Frenky]’s set-up is simple and clever. The Ardunio’s serial out is hooked to an ESP8266. The Arduino spams serial out to the ESP8266 in its usual way. The ESP8266 then pipes all that out to a simple JavaScript webpage. Connect to the ESP8266’s IP with any device in your house, and get a live stream of all the serial data. Neat.
As simple as this technique is, we can see ourselves making a neat little box with TX, RX, GND, and VCC screw terminals to free us from the nightmare of tethering on concrete floors just for a simple test. Video after the break.
In the dark ages, you had to use a key to lock and unlock your car doors. Just about every car now has a remote control on the key that lets you unlock or lock with the push of a button. But many modern cars don’t even need that. They sense the key on your person and usually use a button to do the lock or unlock function. That button does nothing if the key isn’t nearby.
[Pierre Charlier] wanted that easy locking and unlocking, so he refitted his car with a Keyduino to allow entry with an NFC ring. What results is a very cool fistbump which convinces your car to unlock the door.
Keyduinio is [Pierre’s] NFC-enabled project, but you can also use a more conventional Arduino with an NFC and relay shield. The demo also works with a smartphone if you’re not one for wearing an NFC ring. Going this round, he even shows how to make it work with Bluetooth Low Energy (BLE).
In the video below, you can see how he removed the car’s internal lock switch and modified the wire harness to take the connection to the Arduino. He’s also included all the code. About the only tricky part is doing the actual wiring in your car and finding a suitable source of power. That varies from car to car, so it isn’t easy to give specific instructions.
Opening doors of one kind or another is a popular project theme. While [Pierre’s] project might open the door on a coupe, we’ve seen another project that works on a coop.
In August of 2014, something new started showing up in the markets of Shenzen, the hi-tech area of China where the majority of the world’s electronics components are made. This is the ESP8266, a WiFi SoC (System on a Chip) that can connect to 802.11b/g/n networks on the 2.4GHz band. It can be addressed with SPI or a serial connection, and has an AT command set that makes it behave rather like an old-style modem. Basically, it has everything you would need to connect a device to a WiFi network, with the ESP8266 chip itself handling the complicated business of finding, joining and transmitting/receiving over a WiFi network.
That’s nothing particularly new in itself: WiFi connection devices like the TI CC3000 have been around for longer, and do much the same thing. The difference was the price. While the TI solution costs about $10 if you buy several thousand of them, the ESP8266 costs less than $7 for an individual board that can plug straight into an Arduino or similar. Buy the chip in bulk, and you can get it for less than $2.
The ESP8266 is more than just a WiFi dongle, though: it is a fully fledged computer in itself, with a megabyte of flash memory and a 32-bit processor that uses a RISC architecture. This can run applications, turning the ESP8266 into a standalone module that can collect and send data over the Internet. And it can do this while drawing a reasonably low amount of power: while receiving data, it typically uses just 60mA, and sending data over an 802.11n connection uses just 145mA. That means you can drive it from a small battery or other small power source, and it will keep running for a long time.
It wasn’t an easy ship to write applications for in the early days, though: it was poorly documented and required a dedicated toolchain to work with. This made it more of a challenge than many hackers were comfortable with. That changed earlier this year, though, when the Arduino IDE (Integrated Development Environment) was ported to the chip. This meant that you could use the much easier to write Arduino functions and libraries to write code for the chip, bringing it within reach of even the most casual hacker.
A decapped ESP8266, with area of interest marked by Reddit user swimmerdude. The big area on the right is memory
Why Is the ESP8266 Important?
The ESP8266 almost achieves the holy trifecta of electronics: cheap, powerful and easy to work with. Before this, if you wanted to add a wireless connection to a project, you had to use more power-hungry devices like USB WiFi dongles, or squish everything into a serial connection and use a wireless serial link. Either way added to the complexity of the project: you either needed a system that supported USB and had WiFI OS support, or you had to put up with the limitations of wireless serial links, which typically offer very limited bandwidth. The advent of WiFi SoCs removed these limitations because the SoC did the heavy lifting, and WiFi offered much more bandwidth. And the ESP8266 did this all at a very low cost: do some digging on eBay and you can get an ESP8266 board for less than $2. So, it is no surprise that we are starting to see the ESP8266 showing up in commercial products.
How Can I Use the ESP8266?
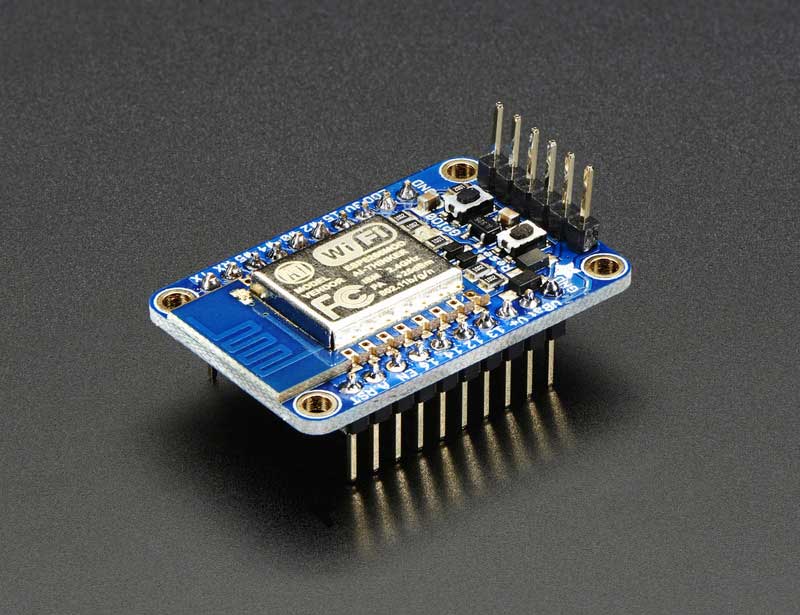
With the popularity of the ESP8266 for adding WiFi to projects, it is no surprise that there are a lot of options for trying it out. On the hardware side, ESP8266 development boards are available from a number of places, including Seeedstudio, Sparkfun and Olimex. Adafruit also has a nice ESP8266 board that breaks out all of the signals for easy breadboard use, and adds a 3.3V output, so it can drive an external device. It is also FCC approved, which is important if you are looking to sell or use the devices you build commercially. Some users have also been building their own development boards, which add features such as LCD displays and buttons.
The Adafruit Huzzah ESP8266 dev board
On the software side, the easiest way to get into the ESP8266 is to use the Arduino compatible mode. This involves loading custom firmware that turns the chip into a mid-range Arduino board, which makes for much easier programming. The people behind this project have produced a list of supported ESP8266 boards: buying one of these will make the installation process easier, as they have noted which data lines in the Arduino SDK correspond to the physical pins on the board. These boards also provide easy access to the reset lines that you have to use to install the Arduino compatible firmware.
The third option is to flash NodeMCU to the ESP8266 module. This turns it into a Lua interpreter. Scripting can be done in real-time to prototype your program, then flashed to the EEPROM to make your program persistent and remove the need for a serial connection.
Beginners will be comfortable with both the Arduino and NodeMCU approaches, but experienced users should be able to wade straight in and start writing code for this cheap, powerful and fairly easy to use chip.
[jmilldrum] really gets a lot of use out of his Si5351A breakout board. He’s a ham [NT7S], and the Si5351A can generate multiple square waves ranging from 8 kHz to 160 MHz, so it only stands to reason that it is going to be a useful tool for any RF hacker. His most recent exploit is to use the I2C-controllable chip to implement a Fast Simple QSO (FSQ) beacon with an Arduino.
FSQ is a relatively new digital mode that uses a form of low rate FSK to send text and images in a way that is robust under difficult RF propagation. There are 32 different tones used for symbols so common characters only require a single tone. No character takes more than two tones.
The Si5351A can easily handle the encoding job. Since the output is a square wave, you do need a low-pass filter to put it on the air. [jmilldrum] also used some relatively small amplifiers to get the output up to 20 watts.