Posts with «wireless hacks» label

Build a Sensor Network Around a Weather Station

[Yveaux] had a problem. The transmitter on his outdoor weather station had broken, rendering the inside display useless. He didn’t want to buy a new one, so, like the freelance embedded software designer that he is, he decided to reverse engineer the protocol that the transmitter uses and build his own. He didn’t just replace the transmitter module, though, he decided to create an entire system that integrated the weather system into a sensor network controlled by a Raspberry Pi. That’s a far more substantial project, but it gave him the ability to customize the display and add more features, such as synching the timer in the display with a network clock and storing the data in an online database.

Fortunately for [Yveaux], the transmitter itself was fairly easy to replace. The weather station he had, like most, transmitted on the 868MHz frequency, which is a license-free ISM (Industrial, Scientific and Monitoring) spot on the spectrum. After some poking around, he was able to figure out the protocol and teach the Pi to speak it. He then added a Moteino and an nRF2401+ transmitter to the weather station, so it can send data to the Pi, which then sends it to the display. It is a more complicated setup, but it is also much more flexible. He’s had it running for a couple of years now and has collected more than a million sensor readings.


Filed under: Arduino Hacks, wireless hacks

Tracking Bitcoin With The ESP8266

[Kendrick] was looking for something to do with an ESP8266 WiFi module, and since he loves Bitcoin and Arduino, the obvious solution was to make a Bitcoin price tracker.

The ESP8266 is a complete microcontroller with a WiFi chip and a few pins for a serial connection. It’s certainly possible to write some firmware for the ESP to get the current conversion rate of Bitcoin, but for simplicity’s sake, [Kendrick] chose to use an Arduino for this project. He’s using a 5V Arduino, and the ESP operates on 3.3V logic, but a few Zeners take care of the logic level conversion.

The code running on the Arduino checks the CoinDesk API minute, parses the JSON coming from the API, and prints the current Bitcoin price to the serial port. For tracking the current conversion rate of Bitcoin, it’s vastly overkill. This project could have a few interesting applications, from hooking up a few seven-segment displays, to an RGB LED mood lamp that keeps track of this magic Internet money.


Filed under: Microcontrollers, wireless hacks

Switch Mains Power with an ESP8266

Before we begin, we must begin with an obligatory disclaimer: handling mains voltage can be very dangerous. Do not do so unless you are qualified! You could burn your house down. (Without the lemons.) That being said, [TJ] has created an interesting dev board for controlling mains voltage over WiFi with the now-ubiquitous ESP8266 module. At only 50mm x 25mm, it is easily small enough to fit inside a junction box!

Called the MPSMv2, the core of the project is the ESP8266 module. The dev board itself can support anything with GPIO pins, whether it’s an Arudino, Raspberry Pi, or anything else with those features. Flashing the NodeMCU firmware is pretty much all that needs to be done in order to get the device up and running, and once you get the device connected to your WiFi you’ll be able to control whatever appliances you want.

The device uses a triac to do the switching, and is optically isolated from mains. Be sure to check out the video after the break to see the device in action. All in all, this could be a great way to get started with home automation, or maybe just do something simple like build a timer for your floor lamp. Anything is possible!


Filed under: home hacks, wireless hacks

Arduino IDE Support for the ESP8266

Despite a wealth of tutorials for setting up and writing code for the ESP8266 WiFi module, there has not been much of anything on programming this cheap wireless module with the Arduino IDE. Finally, this has changed. After many months of coding, the Arduino IDE supports the ESP8266 module.

The Arduino IDE support was announced on the ESP8266 community forum. Setup is fairly simple with downloads for Linux, OS X, and Windows. This isn’t an ESP8266 shield, either: you can write code for the ESP module, connect the serial pins, and hit the program button.

The basic functions of the Arduino IDE – pinMode, digitalRead, digitalWrite, and analogRead – are available. Most of the WiFi functions work just like the WiFi shield library.

There are a few things that aren’t written yet; PWM doesn’t work, as the ESP8266 only has one hardware PWM source. SPI and I2C slave mode aren’t done yet, and uploading sketches via WiFi needs a little bit of thought. That said, this is a great introduction to programming the ESP module. If the Arduino IDE isn’t your thing, you could always do it the cool way with [CNLohr]’s programming tutorial we featured last week.


Filed under: Arduino Hacks, wireless hacks

Control Anything with an Apple Remote

If you’re like us, you probably have more than one Apple Remote kicking around in a parts drawer, and if you’re even more like us, you’re probably really annoyed at Apple’s tendency to use proprietary hardware and software at every turn (lightning connector, anyone?). But there’s hope for the Apple Remote now: [Sourcery] has completed a project that allows an Apple Remote to control anything you wish.

The idea is fairly straightforward: A device interprets the IR signals from an Apple Remote, and then outputs another IR signal that can do something useful on a non-Apple product. [Sourcery] uses an Arduino to do the IR translation, along with a set of IR emitters and detectors, and now the Apple Remote can control anything, from stereos to TVs to anything you can imagine. It also doesn’t remove the Apple Remote’s capability to control Apple products, in case you need yours to do that as well.

[Sourcery] notes that sometimes working with RAW IR signals can be a little difficult, but the information on their project and in their 25-minute video discusses how to deal with that, so make sure to check that out after the break. Don’t have an Apple Remote? You can do a similar thing with a PS3 controller.


Filed under: wireless hacks

Bluetooth-Enabled Danger Sign for Lab

[A Raymond] had some free time at work, and decided to spend it on creating a wireless warning sign. According to his blog profile, he is a PhD student in Applied Physics. His lab utilizes a high-powered laser system. His job is to use said system, but only after it’s brought online by faculty scientists. The status of the laser system is changed by a manual switchbox that controls the warning signs wired around the lab entrances. Unfortunately, if you were in the upstairs office, you only knew this after running downstairs to check. [A Raymond's] admitted laziness finally got the better of him – he wanted a sign that displayed the laser’s status from the comfort of the office. He had an old sign he could use, but he wanted a way for it to communicate with the switchbox downstairs. After some thought, he decided Bluetooth was the way to go, using a pair of BlueSMiRF Bluetooth modules from Sparkfun and Arduino Uno R3’s.

He constructed a metal box that intercepted the cable from the main switchbox, mounting one BlueSMiRF and Uno into it. Upon learning that the switchbox sends 12V AC signals over three individual status wires, he half-wave rectified the wires and divided their voltages so that the Uno wouldn’t fry. Instead, it determined which status wire that had active voltage. and sent a “g(reen)”, “y(ellow)”, or “r(ed)” signal continuously via Bluetooth. On the receiving end, [A Raymond] gutted the sign and mounted the other BlueSMiRF and Uno into it along with some green, yellow, and red LEDs. The LEDs light up in response to the corresponding Bluetooth signal.

The result is a warning sign that is always up-to-date with the switchbox’s status. We’ve covered projects using Bluetooth before, from plush birds to cameras- [A Raymond's] wireless sign is in good company. He notes that it’s “missing” a high pitched whining noise when the “Danger” lights are on. If he decides to add an accompanying (annoying) sound, he couldn’t go wrong with something like this. Regardless, we’re sure [A Raymond] is happy that he no longer has to go back and forth between floors before he can use the laser.


Filed under: Arduino Hacks, wireless hacks

Internet-Connected TI-84

Just before the days where every high school student had a cell phone, everyone in class had a TI graphing calculator. In some ways this was better than a cell phone: If you wanted to play BlockDude instead of doing trig identities, this was much more discrete. The only downside is that the TI calculators can’t easily communicate to each other like cell phones can. [Christopher] has solved this problem with his latest project which provides Wi-Fi functionality to a TI graphing calculator, and has much greater aspirations than helping teenagers waste time in pre-calculus classes.

The boards are based around a Spark Core Wi-Fi development board which is (appropriately) built around a TI CC3000 chip and a STM32F103 microcontroller. The goal of the project is to connect the calculators directly to the Global CALCnet network without needing a separate computer as a go-between. These boards made it easy to get the original Arduino-based code modified and running on the new hardware.

After a TI-BASIC program is loaded on the graphing calculator, it is able to input the credentials for the LAN and access the internet where all kinds of great calculator resources are available through the Global CALCnet. This is a great project to make the math workhorse of the classroom even more useful to students. Or, if you’re bored with trig identities again, you can also run a port of DOOM.


Filed under: wireless hacks
Hack a Day 07 Oct 12:00

The ESP8266 Becomes a Terrible Browser

The ESP8266 are making their way over from China and onto the benches of tinkerers around the world for astonishing web-enabled blinking LED projects and the like. [TM] thought he could do something cooler with his WiFi to UART module and decided to turn one into a web browser.

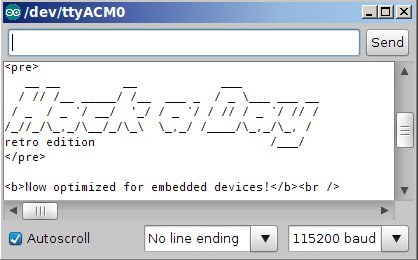
There’s no new code running on the ESP8266 – all the HTML is being pushed through an Arduino Mega, requesting data from a server (in this case our fabulous retro edition), and sending the data to the Arduino serial console. The connection is first initiated with a few AT commands to the ESP module, then connecting to the retro server and finally dumping everything received to the console.

It’s not much – HTML tags are still displayed, and images are of course out of the question. The result, however, isn’t that much different from what you would get from Lynx, meaning now the challenge is open for an Arduino port of this ancient browser.


Filed under: Arduino Hacks, wireless hacks

Atmel and Arduino Announce Wi-Fi Shield 101 at World Maker Faire

Atmel and Arduino teamed up at World Maker Faire to introduce the Wi-Fi shield 101. [Gary] from Atmel gave us the lowdown on this new shield and its components. The shield is a rather spartan affair, carrying only devices of note: an Atmel WINC1500 WiFi module, and an ATECC108 crypto chip.

The WINC1500 is a nifty little WiFi module in its own right. WINC handles IEEE 802.11 b/g/n at up to 72 Mbps. 72Mbps may not sound like much by today’s standards, but it’s plenty fast for most embedded applications. WINC handles all the heavy lifting of the wireless connection. Connectivity is through SPI, UART or I2C, though on the Arduino shield it will be running in SPI mode.

The ATECC108 is a member of Atmel’s “CryptoAuthentication” family. It comes packaged in an 8-pin SOIC, and is compatible with serial I2C EEPROM specifications. Internally the similarities to serial EEPROMs end. The ‘108 has a 256-bit SHA engine in hardware, as well as a Federal Information Processing Standards (FIPS) level random number generator. Atmel sees this chip as being at the core of secure embedded systems. We think it’s pretty darn good, so long as we don’t hear about it at the next DEFCON.

The Wi-Fi shield 101 and associated libraries should be out in January 2015. We can’t wait to see all the new projects (and new ways to blink an LED) the shield will enable.


Filed under: Arduino Hacks, wireless hacks
A Tweeting Litter Box

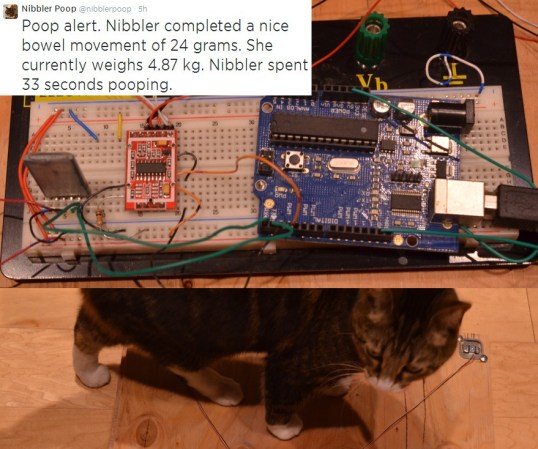
How can you not be interested in a project that uses load cells, Bluetooth, a Raspberry Pi, and Twitter. Even for those of our readers without a cat, [Scott's] tweeting litter box is worth the read.

Each aspect of this project can be re-purposed for almost any application. The inexpensive load cells, which available from eBay and other retailers, is used to sense when a cat is inside the litter box. Typically sensors like the load cell (that contain a strain gauge) this use a Wheatstone bridge, which is very important for maximizing the sensitivity of resistive sensor. The output then goes to a HX711, which is an ADC specifically built for load cells. A simple alternative would be using an instrumentation amplifier and the built-in ADC of the Arduino. Now, the magic happens. The weight reading is transmitted via an HC-06 Bluetooth module to a Raspberry Pi. Using a simple Perl script, the excreted weight, duration, and the cat’s resulting body weight is then tweeted!

Very nice work! This is a well thought out project that we could see being expanded to recognize the difference between multiple cats (or any other animal that goes inside).


Filed under: Arduino Hacks, Raspberry Pi, wireless hacks