Posts with «wifi» label

Monitor A Serial Port From Anywhere

This simple WiFi serial port monitor would have saved us a lot of trouble. We can’t count how many times where being hooked into an Arduino with USB just to get the serial out has nearly been more trouble than it’s worth. Times where we sat cross-legged on the floor and could choose comfort or accidentally shifting the set-up and ruining everything, but not both.

[Frenky]’s set-up is simple and clever. The Ardunio’s serial out is hooked to an ESP8266. The Arduino spams serial out to the ESP8266 in its usual way. The ESP8266 then pipes all that out to a simple JavaScript webpage. Connect to the ESP8266’s IP with any device in your house, and get a live stream of all the serial data. Neat.

As simple as this technique is, we can see ourselves making a neat little box with TX, RX, GND, and VCC screw terminals to free us from the nightmare of tethering on concrete floors just for a simple test. Video after the break.


Filed under: Arduino Hacks, wireless hacks
Hack a Day 08 Mar 03:00

Cricket Scoreboard is a Big Win for Novice Hackers

The game of cricket boggles most Americans in the same way our football perplexes the rest of the world. We won’t even pretend to understand what a “wicket” or an “over” is, but apparently it’s important enough to keep track of that so an English cricket club decided to build their own electronic scoreboard for their – pitch? Field? Help us out here.

This scoreboard build was undertaken by what team member [Ian] refers to as some “middle-aged blokes from Gloucestershire” with no previous electronics experience. That’s tough enough to deal with, but add to it virtually no budget, a huge physical size for the board, exposure to the elements, and a publicly visible project where failure would be embarrassingly obvious, and this was indeed an intimidating project to even consider. Yet despite the handicaps, they came up with a great rig, with a laser-cut acrylic cover for a professional look. A Raspberry Pi runs the LED segments and allows WiFi connections from a laptop or phone in the stands. They’ve even recently upgraded to solar power for the system.

And we’ll toot our own horn here, since this build was inspired at least in part by a Hackaday post. The builders have a long list of other links that inspired or instructed them, and we think that says something powerful about the hacker community that we’ve all been building – a group with no previous experience manages a major build with the guidance of seasoned hackers. That’s something to feel good about.


Filed under: misc hacks, Raspberry Pi
Hack a Day 24 Jan 12:01

Hackaday Links: November 22, 2015

There’s a new documentary series on Al Jazeera called Rebel Geeks that looks at the people who make the stuff everyone uses. The latest 25-minute part of the series is with [Massimo], chief of the arduino.cc camp. Upcoming episodes include Twitter co-creator [Evan Henshaw-Plath] and people in the Madrid government who are trying to build a direct democracy for the city on the Internet.

Despite being a WiFi device, the ESP8266 is surprisingly great at being an Internet of Thing. The only problem is the range. No worries; you can use the ESP as a WiFi repeater that will get you about 0.5km further for each additional repeater node. Power is of course required, but you can stuff everything inside a cell phone charger.

I’ve said it before and I’ll say it again: the most common use for the Raspberry Pi is a vintage console emulator. Now there’s a Kickstarter for a dedicated tabletop Raspi emulation case that actually looks good.

Pogo pins are the go-to solution for putting firmware on hundreds of boards. These tiny spring-loaded pins give you a programming rig that’s easy to attach and detach without any soldering whatsoever. [Tom] needed to program a few dozen boards in a short amount of time, didn’t have any pogo pins, and didn’t want to solder a header to each board. The solution? Pull the pins out of a female header. It works in a pinch, but you probably want a better solution for a more permanent setup.

Half of building a PCB is getting parts and pinouts right. [Josef] is working on a tool to at least semi-automate the importing of pinout tables from datasheets into KiCad. This is a very, very hard problem, and if it’s half right half the time, that’s a tremendous accomplishment.

Last summer, [Voja] wrote something for the blog on building enclosures from FR4. Over on Hackaday.io he’s working on a project, and it’s time for that project to get an enclosure. The results are amazing and leave us wondering why we don’t see this technique more often.


Filed under: Hackaday Columns, Hackaday links

help needed. looking for somone local to Phx, AZ - 2 servo's, controlled via wifi

i'm trying to develop a device that is controlled with 2 servo's. i want the servos to be controlled independently over wifi with either a joystick or c# application. i have the project started with the following. i am looking for someone to help me complete this project, 

c# applications

Audrino uno

cc3300 wifi shield

Audrino 1.0.5-r2 sketch pad

2 Futaba s3305 servo's

DC 5V Stepper Motor 28BYJ-48 + ULN2003 Driver Test Module Board for Arduino


Let's Make Robots 15 Oct 16:34
arduino  ideas  servo  wifi  

2 servo's, controlled via wifi

i'm trying to develop a device that is controlled with 2 servo's. i want the servos to be controlled independently over wifi with either a joystick or c# application. i have the project started with the following

c# applications

Audrino uno

cc3300 wifi shield

Audrino 1.0.5-r2 sketch pad

2 Futaba s3305 servo's

DC 5V Stepper Motor 28BYJ-48 + ULN2003 Driver Test Module Board for Arduino

i am looking for someone to help me complete this project, 


Let's Make Robots 15 Oct 16:34
arduino  ideas  servo  wifi  

help needed. looking for somone local to Phx, AZ - 2 servo's, controlled via wifi

i'm trying to develop a device that is controlled with 2 servo's. i want the servos to be controlled independently over wifi with either a joystick or c# application. i have the project started with the following. i am looking for someone to help me complete this project, 

c# applications

Audrino uno

cc3300 wifi shield

Audrino 1.0.5-r2 sketch pad

2 Futaba s3305 servo's

DC 5V Stepper Motor 28BYJ-48 + ULN2003 Driver Test Module Board for Arduino


Let's Make Robots 15 Oct 16:34
arduino  ideas  servo  wifi  

Arduino’s Long-Awaited Improved WiFi Shield

Announced at the 2014 Maker Faire in New York, the latest Arduino WiFi shield is finally available. This shield replaces the old Arduino WiFi shield, while providing a few neat features that will come in very handy for the yet-to-be-developed Internet of Things.

While the WiFi Shield 101 was announced a year ago, the feature set was interesting. The new WiFi shield supports 802.11n, and thanks to a few of Atmel’s crypto chip offerings, this shield is the first official Arduino offering to support SSL.

The new Arduino WiFi Shield 101 features an Atmel ATWINC1500 module for 802.11 b/g/n WiFi connectivity. This module, like a dozen or so other WiFi modules, handles the heavy lifting of the WiFi protocol, including TCP and UDP protocols, leaving the rest of the Arduino free to do the actual work. While the addition of 802.11n  will be increasingly appreciated as these networks become more commonplace, the speed offered by ~n isn’t really applicable; you’re not going to be pushing bits out of an Arduino at 300 Mbps.

Also included on the WiFi shield is an ATECC508A CryptoAuthentication chip. This is perhaps the most interesting improvement over the old Arduino WiFi shield, and allows for greater security for the upcoming Internet of Things. WiFi modules already in the space have their own support for SSL, including TI’s CC3200 series of modules, Particle‘s Internet of Things modules, and some support for the ESP8266.


Filed under: Arduino Hacks

Arduino WiFi Shield 101 is now available in the US store!

We are excited to announce Arduino Wifi Shield 101 developed with Atmel is now available for purchase on the Arduino Store US (49.90$).

Arduino WiFi Shield 101 is a powerful IoT shield with crypto-authentication that connects your Arduino or Genuino board to the internet wirelessly. Connecting it to a WiFi network is simple, no further configuration in addition to the SSID and the password are required. The WiFI library allows you to write sketches which connect to the internet using the shield.

The shield is based on the Atmel SmartConnect-WINC1500 module, compliant with the IEEE 802.11 b/g/n standard. The WINC1500 module provided is a network controller capable of both TCP and UDP protocols.  The main feature is an hardware encryption/decryption security protocol provided by the ATECC508A CryptoAuthentication chip that is an ultra secure method to provide key agreement for encryption/decryption, specifically designed for the IoT market.

Last year, Massimo Banzi introduced the shield:

“In this increasingly connected world, the Arduino Wi-Fi Shield 101 will help drive more inventions in the IoT market. Expanding our portfolio of Arduino extensions, this new shield can flawlessly connect to any modern Arduino board giving our community more options for connectivity, along with added security elements to their creative projects.”

The WiFi Shield 101 is the first Arduino product fully supporting SSL and all the communication between your board and our secured server. With the power of the Arduino Zero and the WiFi Shield 101 it is possible to make secure IoT applications simply and just using the Arduino Language.

A working example and instructions on how to get started are available on Arduino Cloud, a work-in-progress project that gives you access to a pre-configured MQTT server for your IoT sketches using only your Arduino account. More examples and features will be available in the next months.

Feel like knowing more about the shield? Explore the  Getting Started guide.

Review: HUZZAH is the ESP8266 WiFi Setup You Need

A little board that adds WiFi to any project for a few hundreds of pennies has been all the rage for at least half a year. I am referring to the ESP8266 and this product is a marrige of one of those WiFi modules with the support hardware required to get it running. This week I’m reviewing the HUZZAH ESP8266 Breakout by Adafruit Industries.

If you saw the article [cnlohr] woite for us about direct programming this board you will know that a good chunk of that post covered what you need to do just to get the module into programming mode. This required adding a regulated 3.3V source, and a way to pull one of the pins to ground when resetting the power rail. Not only does the HUZZAH take care of that for you, it turns the non-breadboard friendly module into a DIP form factor while breaking out way more pins than the most common module offers. All of this and the price tag is just $9.95. Join me after the break for the complete run-down.

The Hardware

This board is about 1.5 inches by 1 inch… like two postage stamps side-by-side. It hosts the FCC and CE approved module which we first heard about in December. These modules need a 3.3v supply and there is a regultor on board which can supply up to 500mA (the module can consume as much as 250mA) and can be fed by a battery, USB power, or any other 5V supply. As I mentioned earlier you need to pull a pin low during reset to put the module in programming mode. There are two switches on the board that facilitate this, hold the user button down and press reset and you’re ready to flash.

On a breadboard you’ll have two rows not covered by the board on one side, and one row on the other. The board doesn’t have a USB-to-UART bridge but we’re fine with that. On one end of the board you’ll find the common pinout for a USB-to-serial programming cable. Above you can see the programming cable Adafruit sent me with these samples. 
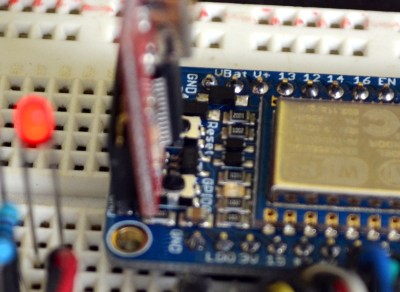
To the right I tried out my 5V Sparkfun FTDI board and as advertised, the HUZZAH can be programmed with either 3.3v or 5V logic levels.

The one thing I noticed is that the two buttons are a bit tricky to get at with the programmers connected, especially the FTDI board. For the second module I may supply my own right-angle header to get around that. Of course doing so would cover part of the breadboard so this is probably six of one, half dozen of the other.

I love it that they supply the pin headers but don’t solder them. Sometimes I prefer pin sockets or unpopulated pads, and this makes it easy for me to make that choice like the right-angle one I mentioned above. It’s something small but I also appreciate that the pinheaders in the package were not the minimum number necessary for this board — there were a few extra pins. You need to break them off and sometimes they can break one pin over from where you expected. If it were the minimum number you would either start over or solder a single pin at the end of the row (not ideal). If you screw up snapping these you could conceivably use a set of three pins and the rest as one unit to fix your mistake. Maybe I’m weird but it’s the small things in life!

Programming Options: NodeMCU and Lua

The board ships with this firmware on it. I was up and running with the Lua interpreter within three minutes of the package arriving at my door. Seriously, it took me longer to figure out if the USB-to-serial was green or white for TX/RX than it did to connect to my local WiFi Access point. Adafuit’s ‘Hello World’ walkthrough gets you going if you haven’t given this a try before.

Programming Options: Arduino IDE

Adafruit has a Board Manager for Arduino IDE. Perhaps this is common knowledge but I don’t often work with this IDE and it’s the first time I’ve run into it. What can I say, it kicks ass!

I hate setting up tool chains for new chips. With this you add a web address and port number, restart the IDE, and use the board manager to add support for this board. Sweet!

That turns this into an Arduino compatible board which solves something that has long bothered me. I’ve seen a ton of really simple Arduino projects that use the ESP8266 externally. Last month’s porting of the Arduino framework for these chips, coupled with this ready-to-go hardware does away with that nonsense. Seriously, the vast majority of those projects need little to no computing power and will work like a dream when directly programmed onto this chip.

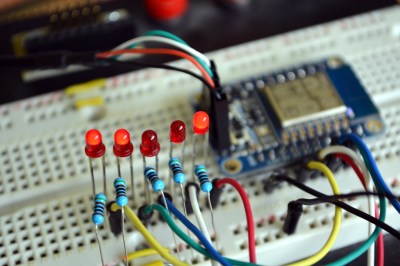
To prove my point, I knocked out this quick binary counter that uses five LEDs as outputs. I’m not leveraging any of the WiFi features on this, but the compiled binary is 174,358 bytes and the Arduino IDE reports this board has a max capacity of 524,288 bytes. It five I/O used for LEDs there are still four more digital pins, the two UART pins, and an ADC input.

Programming Options: esptool

Arduino will overwrite NodeMCU but that’s easy to reflash. I followed [cnlohr’s] direct programming guide to write the binary using esptool. Both this method and the Arduino method are directly programming the EEPROM on the module. This is exactly the same method you’d use if you wanted to develop natively using the Espressif or the Open Source SDKs. Here’s the commands I used to reflash the NodeMCU firmware:

sudo python esptool.py --port /dev/ttyUSB0 write_flash 0x0000 /home/mike/Downloads/nodemcu_latest.bin

Get the NodeMCU binary from their “latest” folder of github repo.

Conclusion

“Buy as many of these as [Phil] will make for us.” That’s what I’ve asked [Julian], the Hackaday Store manager to do. You should be able to get the Hackaday black version of this in a few weeks. Adafruit is currently sold out but I’m sure they’re racing to remedy this.

These are amazing little boards. The price of $9.95 is crazy considering what you get for it. I’m talking about the entire ecosystem which gives you multiple flavors of programming environments. Adafruit has done a lot to contribute to the code and knowledge base here, but a mammoth portion of this is community developed and I think coming in low on the price is one more way Adafruit has chosen to be a good guy in this ecosystem. The board has a ton of I/O for what it is, and if that’s not enough just, implement I2C, SPI, or UART to couple a beefy uC to the connectivity this one brings to the party. I see zero downside on this board. It’s as close to perfect as you can get.


Filed under: Arduino Hacks, Hackaday Columns, reviews

Switch Mains Power with an ESP8266

Before we begin, we must begin with an obligatory disclaimer: handling mains voltage can be very dangerous. Do not do so unless you are qualified! You could burn your house down. (Without the lemons.) That being said, [TJ] has created an interesting dev board for controlling mains voltage over WiFi with the now-ubiquitous ESP8266 module. At only 50mm x 25mm, it is easily small enough to fit inside a junction box!

Called the MPSMv2, the core of the project is the ESP8266 module. The dev board itself can support anything with GPIO pins, whether it’s an Arudino, Raspberry Pi, or anything else with those features. Flashing the NodeMCU firmware is pretty much all that needs to be done in order to get the device up and running, and once you get the device connected to your WiFi you’ll be able to control whatever appliances you want.

The device uses a triac to do the switching, and is optically isolated from mains. Be sure to check out the video after the break to see the device in action. All in all, this could be a great way to get started with home automation, or maybe just do something simple like build a timer for your floor lamp. Anything is possible!


Filed under: home hacks, wireless hacks