Posts with «wifi» label

Hackaday Links: April 12, 2015

Everyone loves Top Gear, or as it’s more commonly known, The Short, The Slow, And The Ugly. Yeah, terrible shame [Clarkson] ruined it for the rest of us. Good News! A show featuring drones will be filling the Top Gear timeslot. And on that bombshell…

More Arduino Drama! A few weeks ago, Arduino SRL (the new one) forked the Arduino IDE from Arduino LLC’s repo. The changes? The version number went up from 1.6.3 to 1.7. It’s been forked again, this time by [Mastro Gippo]. The changes? The version number went up to 2.0. We’re going to hold off until 2.1; major releases always have some bugs that take a few weeks to patch. Luckily the speed of the development cycle here means that patch should be out soon.

Need an ESP8266 connected to an Arduino. Arachnio has your back. Basically, it’s an Arduino Micro with an ESP8266 WiFi module. It also includes a Real Time Clock, a crypto module, and a solar battery charger. It’s available on Kickstarter, and we could think of a few sensor base station builds this would be useful for.

[Ben Heck] gave The Hacakday Prize a shoutout in this week’s episode. He says one of his life goals is to go to space. We’re giving that away to the project that makes the biggest difference for the world. We’re not sure how a [Bill Paxton] pinball machine fits into that category, but we also have a Best Product category for an opportunity to spend some time in a hackerspace… kind of like [Ben]’s 9 to 5 gig…

[Jim Tremblay] wrote a real time operating system for a bunch of different microcontrollers. There are a lot of examples for everything from an Arduino Mega to STM32 Discovery boards. Thanks [Alain] for the tip.

45s – the grammophone records that play at 45 RPM – are seven inches in diameter. Here’s one that’s 1.5 inches in diameter. Does it work? No one knows, because the creator can’t find a turntable to play it on.

Are we betting on the number of people who don’t get the joke in the first paragraph of this post? Decide in the comments.


Filed under: Hackaday Columns, Hackaday links

Arduino IDE Support for the ESP8266

Despite a wealth of tutorials for setting up and writing code for the ESP8266 WiFi module, there has not been much of anything on programming this cheap wireless module with the Arduino IDE. Finally, this has changed. After many months of coding, the Arduino IDE supports the ESP8266 module.

The Arduino IDE support was announced on the ESP8266 community forum. Setup is fairly simple with downloads for Linux, OS X, and Windows. This isn’t an ESP8266 shield, either: you can write code for the ESP module, connect the serial pins, and hit the program button.

The basic functions of the Arduino IDE – pinMode, digitalRead, digitalWrite, and analogRead – are available. Most of the WiFi functions work just like the WiFi shield library.

There are a few things that aren’t written yet; PWM doesn’t work, as the ESP8266 only has one hardware PWM source. SPI and I2C slave mode aren’t done yet, and uploading sketches via WiFi needs a little bit of thought. That said, this is a great introduction to programming the ESP module. If the Arduino IDE isn’t your thing, you could always do it the cool way with [CNLohr]’s programming tutorial we featured last week.


Filed under: Arduino Hacks, wireless hacks

Solar Charge Controller Improves Efficiency of Solar Panels

The simplest and easiest way to charge a battery with a solar panel is to connect the panel directly to the battery. Assuming the panel has a diode to prevent energy from flowing through it from the battery when there’s no sunlight. This is fairly common but not very efficient. [Debasish Dutta] has built a charge controller that addresses the inefficiencies of such a system though, and was able to implement maximum power point tracking using an Arduino.

Maximum power point tracking (MPPT) is a method that uses PWM and a special DC-DC converter to match the impedance of the solar panel to the battery. This means that more energy can be harvested from the panel than would otherwise be available. The circuit is placed in between the panel and the battery and regulates the output voltage of the panel so it matches the voltage on the battery more closely. [Debasish] reports that an efficiency gain of 30-40% can be made with this particular design.

This device has a few bells and whistles as well, including the ability to log data over WiFi, an LCD display to report the status of the panel, battery, and controller, and can charge USB devices. This would be a great addition to any solar installation, especially if you’ve built one into your truck.

This is [Debasish]’s second entry to The Hackaday Prize. We covered his first one a few days ago. That means only one thing: start a project and start documenting it on hackaday.io


Filed under: solar hacks, The Hackaday Prize

Adding WiFi and SMS to an Alarm System

[Don] wanted to bring his alarm system into the modern age. He figured that making it more connected would do the trick. Specifically, he wanted his alarm system to send him an SMS message whenever the alarm was tripped.

[Don] first had to figure out a way to trigger an event when the alarm sounds. He found a screw terminal that lead to the siren. When the alarm is tripped, this screw terminal outputs 12V to enable the siren. This would be a good place to monitor for an alarm trip.

[Don] is using an Arduino nano to monitor the alarm signal. This meant that the 12V signal needed to be stepped down. He ran it through a resistor and a Zener diode to lower the voltage to something the Arduino can handle. Once the Arduino detects a signal, it uses an ESP8266 WiFi module to send an email. The address [Don] used is the email-to-SMS address which results in a text message hitting his phone over the cell network.

The Arduino also needed power. [Don] found a screw terminal on the alarm system circuit board that provided a regulated 12V output. He ran this to another power regulator board to lower the voltage to a steady 5V. This provides just the amount of juice the Arduino needs to run, and it doesn’t rely on batteries. [Don] provides a good explanation of the system in the video below.


Filed under: Android Hacks, security hacks
Hack a Day 17 Jan 00:01

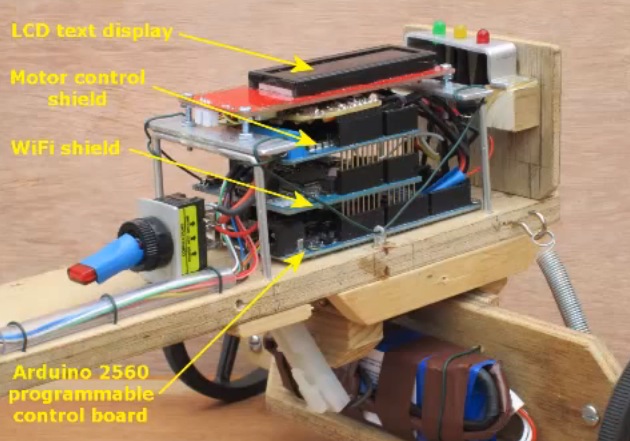
Wood Lizzie is a DIY Soap Box Cart controlled via Wi-Fi

In the following 10-minute video, the Currah team is showing us all the details of Wood Lizzie, a project experimenting with Arduino Mega and Wi-Fi Shield, a very flexible steering system and the virtually unlimited control range afforded by WiFi and Internet Protocol:

The original plan was to construct one of the two-wheeled robots very popular with hobbyists but it was eventually decided that the resulting vehicle would be of very limited application and capable only of traversing smooth surfaces. However, note that the current design can be viewed as the drive of a two-wheeled robot coupled with a trailer by means of a 360 degree pivot. A slip ring capsule within the pivot enables the heavy battery and bulky control system to be separated from the drive and located on the trailer thereby distributing weight evenly between the four wheels.

DIY soap-carts were pretty common among kids in the first part of the 20th century and built from old pram wheels, scrap wood and, typically, soap boxes. They could provide a lot of fun for the family at very low cost and in recent years there’s a new interest in them especially to those appreciating their vintage look!


The ESP8266 Becomes a Terrible Browser

The ESP8266 are making their way over from China and onto the benches of tinkerers around the world for astonishing web-enabled blinking LED projects and the like. [TM] thought he could do something cooler with his WiFi to UART module and decided to turn one into a web browser.

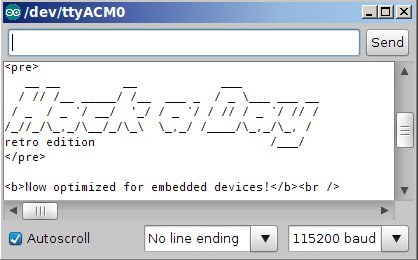
There’s no new code running on the ESP8266 – all the HTML is being pushed through an Arduino Mega, requesting data from a server (in this case our fabulous retro edition), and sending the data to the Arduino serial console. The connection is first initiated with a few AT commands to the ESP module, then connecting to the retro server and finally dumping everything received to the console.

It’s not much – HTML tags are still displayed, and images are of course out of the question. The result, however, isn’t that much different from what you would get from Lynx, meaning now the challenge is open for an Arduino port of this ancient browser.


Filed under: Arduino Hacks, wireless hacks

Atmel and Arduino Announce Wi-Fi Shield 101 at World Maker Faire

Atmel and Arduino teamed up at World Maker Faire to introduce the Wi-Fi shield 101. [Gary] from Atmel gave us the lowdown on this new shield and its components. The shield is a rather spartan affair, carrying only devices of note: an Atmel WINC1500 WiFi module, and an ATECC108 crypto chip.

The WINC1500 is a nifty little WiFi module in its own right. WINC handles IEEE 802.11 b/g/n at up to 72 Mbps. 72Mbps may not sound like much by today’s standards, but it’s plenty fast for most embedded applications. WINC handles all the heavy lifting of the wireless connection. Connectivity is through SPI, UART or I2C, though on the Arduino shield it will be running in SPI mode.

The ATECC108 is a member of Atmel’s “CryptoAuthentication” family. It comes packaged in an 8-pin SOIC, and is compatible with serial I2C EEPROM specifications. Internally the similarities to serial EEPROMs end. The ‘108 has a 256-bit SHA engine in hardware, as well as a Federal Information Processing Standards (FIPS) level random number generator. Atmel sees this chip as being at the core of secure embedded systems. We think it’s pretty darn good, so long as we don’t hear about it at the next DEFCON.

The Wi-Fi shield 101 and associated libraries should be out in January 2015. We can’t wait to see all the new projects (and new ways to blink an LED) the shield will enable.


Filed under: Arduino Hacks, wireless hacks

A Proof of Concept Project for the ESP8266

It’s hardly been a month since we first heard of the impossibly cheap WiFi adapter for micros, the ESP8266. Since then orders have slowly been flowing out of ports in China and onto the workbenches of tinkerers around the world. Finally, we have a working project using this module. It might only be a display to show the current weather conditions, but it’s a start, and only a hint of what this module can do.

Since the ESP8266 found its way into the storefronts of the usual distributors, a lot of effort has gone into translating the datasheets both on hackaday.io and the nurdspace wiki. The module does respond to simple AT commands, and with the right bit of code it’s possible to pull a few bits of data off of the Internet.

The code requests data from openweathermap.org and displays the current temperature, pressure, and humidity on a small TFT display. The entire thing is powered by just an Arduino, so for anyone wanting a cheap way to put an Arduino project on the Internet, there ‘ya go.


Filed under: Arduino Hacks, hardware
Hack a Day 18 Sep 03:00

When WiFi imitates art

For most of us, the only way we can see the strength of a WiFi network is by the familiar signal icon on any given device. Newcastle University School of Architecture doctorate student Luis Hernan, however, has a different method: spirit photography. He's using the new age-y method of capturing someone's aura via electric coronal discharges -- a Kirlian Device -- with a few geeky augmentations (an Arduino Uno board and WiFi Shield, for example) to illustrate how strong a wireless broadcast is with colors. As Wired notes, these components take account of the nearby signal and convert it into color information that's then beamed onto an LED strip; red being the strongest and blue being weaker sections of the network. To create the pictures like what you see above and at the source, Hernan swung the home-made device around after setting up long-exposure shots with a camera. While we can't know for sure, we'd imagine that something with no signal would look a lot like this.

Filed under: Wireless, Science, Alt

Comments

Via: Wired

Source: DigitalEthereal (1), (2)

Mirobot—a WiFi robotics kit at Maker Faire UK

The Mirobot, the brain child of Ben Pirt, brings long buried memories of the Logo Turtle flooding back. It's a Wi-Fi robot designed kit help children learn about technology and programming.

Read more on MAKE