Posts with «wifi» label

adding wifi control input to a robot running Arduino

I would like to add wifi control to my robot.  Right now it uses an Arduino Mega2650 to run the main control program.  I'd like to add to this contol inputs from an Android smartphone app over Wifi.  What do you recommend to do this?  

adding wifi control input to a robot running Arduino

I would like to add wifi control to my robot.  Right now it uses an Arduino Mega2650 to run the main control program.  I'd like to add to this contol inputs from an Android smartphone app over Wifi.  What do you recommend to do this?  

adding wifi control input to a robot running Arduino

I would like to add wifi control to my robot.  Right now it uses an Arduino Mega2650 to run the main control program.  I'd like to add to this contol inputs from an Android smartphone app over Wifi.  What do you recommend to do this?  

Make a WiFi-controlled mini robot using the new MKR2UNO

A few days ago, we launched the MKR2UNO Adapter, which enables you to easily turn an Arduino Uno form factor project into a MKR1000-based one. Simply mount your IoT board to the adapter, plug in any Uno shield and have a wireless device in no time.

Our newly-published tutorial provides a step-by-step overview of how to build a WiFi-controllable robot using the MKR2UNO Adapter with a MKR1000 and an Arduino Motor Shield.

This project combines the Arduino MKR1000’s web server and Arduino Motor Shield’s capabilities to drive a pair of different DC motors. A basic interface is hosted and hard-coded in the MKR1000, allowing the user to maneuver the robot up, down, left or right.

Check out all of the schematics and code here!

Arduino Blog 11 Nov 15:08

oCat is a real-time tracker for popular cat videos

Over the last couple of years, cat videos have become the undisputed champions of the web. Whether it’s kittens playing with their shadows to failed jump attempts to giving each another massages, we’re all guilty of watching a few of these clips from time to time (yes, even at work). Built with this in mind, oCat is a real-time tracker for feline-related activity on the Internet.

oCat consists of two parts: the oCat News Distractor and the Kitty o’Cat Twitter bot. Using Google’s YouTube API, the system works by continuously monitoring for new uploads, the number of new views each day, or a specific video that has received a remarkable amount of attention. It then tweets these stats and prints them out on thermal paper, stamping a paw print on the timeline for every 1,000 views.

Created by Annika Engelhardt, a digital media design master’s student at the University of the Arts in Bremen, oCat uses an Arduino along with an ESP Wi-Fi module, a servo, and an LCD screen. The aim of the project is to increase and reveal the amount of hours people spend watching cat videos online.

The cat is an altered Maneki-neko, holding a stamp using welding wire and hot glue. Even though I filled the stamp with extra ink, it did not work properly and I had to cut out the paw-shape from a sponge and glue it onto the original stamp.

The thermal printer used in the device needs a USB connection, so I used a Raspberry Pi to control it. I wrote a Python script that checks four different RSS news feeds for new posts every 15 minutes and prints one headline with a timestamp every minute.

The Twitter bot was programmed using Python and a library called tweepy. Most of the script is reading JSON files, juggling and comparing data and text files and in the end mixing up parts of a sentence to form a tweet. The bot will be enhanced in the future

Engelhardt exhibited the project at Galerie Flut in Bremen back in October. You can find more pictures and information on the project here.

Arduino Blog 09 Nov 05:49
api  arduino  cat  esp8266  featured  genuino  lcd  servo  wifi  youtube  

Simple Clock from Tiny Chip

If you haven’t jumped on the ESP8266 bandwagon yet, it might be a good time to get started. If you can program an Arduino you have pretty much all of the skills you’ll need to get an ESP8266 up and running. And, if you need a good idea for a project to build with one of these WiFi miracle chips, look no further than [Ben Buxton]’s dated, but awesome, NTP clock.

While the ESP8266 started out as an inexpensive, reliable way to get WiFi capability on essentially anything (and paving the way for a plethora of Internet of Things projects), it was quickly hacked to become a fully programmable development board that can stand on its own. To that end, [Ben] has recognized its capability to run a very minimalistic NTP clock. The standard C++/Arduino environment is available, so he didn’t have to learn any new skills. The parts list is stripped down as well: besides the ESP8266, there’s little more than the four-part seven-segment display. There’s even an Arudino library for these chips that [Ben] made great use of. From there, it’s just a matter of wiring it all up and syncing it with an NTP server.

While it’s not the most involved hack ever, it’s good to be reminded that these chips are cheap and readily available for literally anything that you could imagine. If you haven’t started yet, there’s no reason not to. You can use them to control something like an irrigation system, or if you’re even more adventurous, they can run a 3D printer, too.

Thanks [Itay] for the tip!


Filed under: clock hacks
Hack a Day 11 Sep 15:00

Hackaday Prize Entry: Smart USB Hub And IoT Power Meter

[Aleksejs Mirnijs] needed a tool to accurately measure the power consumption of his Raspberry Pi and Arduino projects, which is an important parameter for dimensioning adequate power supplies and battery packs. Since most SBC projects require a USB hub anyway, he designed a smart, WiFi-enabled 4-port USB hub that is also a power meter – his entry for this year’s Hackaday Prize.

[Aleksejs’s] design is based on the FE1.1s 4-port USB 2.0 hub controller, with two additional ports for charging. Each port features an LT6106 current sensor and a power MOSFET to individually switch devices on and off as required. An Atmega32L monitors the bus voltage and current draw, switches the ports and talks to an ESP8266 module for WiFi connectivity. The supercharged hub also features a display, which lets you read the measured current and power consumption at a glance.

Unlike most cheap hubs out there, [Aleksejs’s] hub has a properly designed power path. If an external power supply is present, an onboard buck converter actively regulates the bus voltage while a power path controller safely disconnects the host’s power line. Although the first prototype is are already up and running, this project is still under heavy development. We’re curious to see the announced updates, which include a 2.2″ touchscreen and a 3D-printable enclosure.


Filed under: The Hackaday Prize

WiFiChron with ATmega1284

The WiFiChron code, with support for ESP8266, nearly reached the program memory limit of ATmega328, yet still missing a few features, the most important being the much needed debugging capability.

Naturally, the next step in 
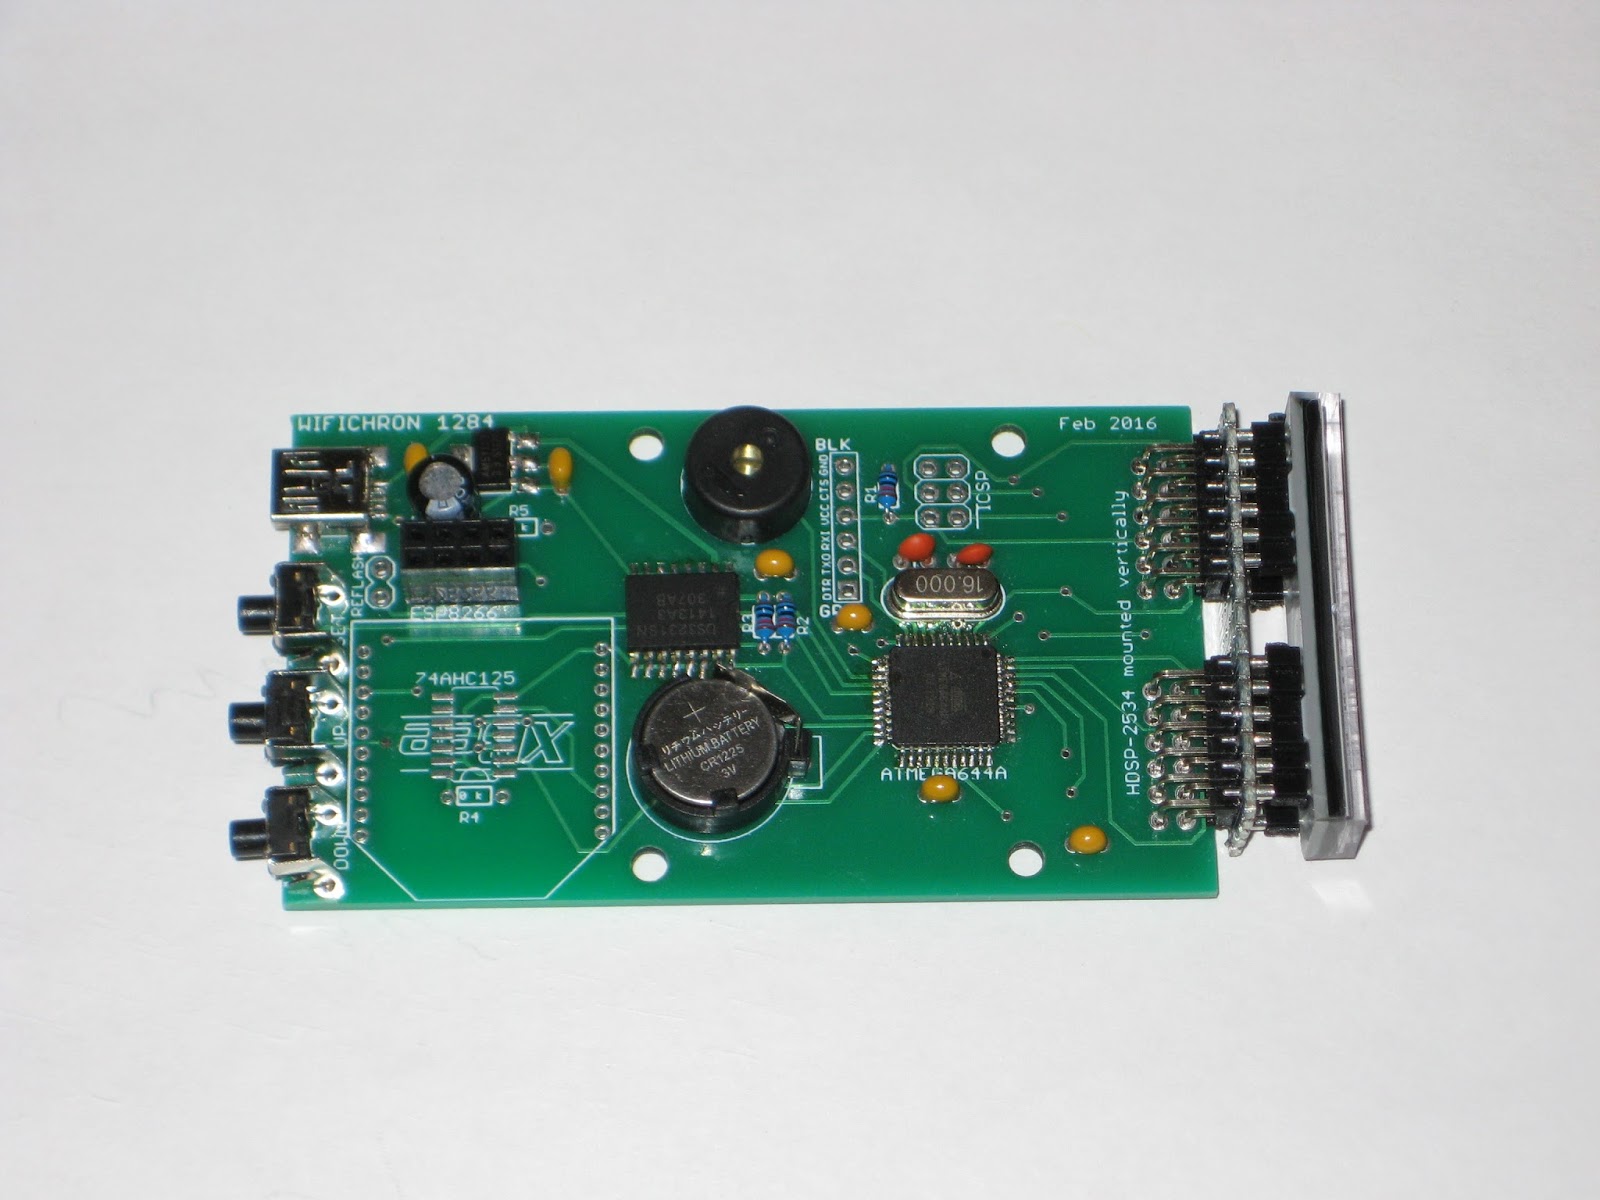
WiFiChron's evolution was to upgrade to Atmega644P/1284P. Since there was no room on the board for the 40-pin DIP package, we settled for the SMD version.


The schematic is shown below.


Although functional, the board I designed is far from perfect:
  • requires pull-up resistors for buttons; I relied on software pull-up, but that does not work in the current Sanguino library;
  • requires a couple of more decoupling capacitors;
(I soldered all these extra parts on the bottom side of the PCB, as shown in the next photo. The 595 shift-register is soldered on the bottom by design. The next revision will have the currently missing parts in the SMD package.)


I burned the bootloader using the on-board ICSP header.

Thanks again to MikeM, who contributed the code (Arduino 1.6.7 - compatible), featuring:
- proverb display;
- moon phases;
- a few new menu options for user settings;
- improved support for ESP8266;
- integrated support for GPS module.

Wise time with Arduino 19 Jul 02:50
software  wifi  

How To Keep An Unruly Dryer In Line

If necessity is the mother of invention, then inconvenience is its frustrating co-conspirator. Faced with a finicky dryer that would shut down mid-cycle with a barely audible beep if its load was uneven (leaving a soggy mass of laundry), [the0ry] decided to add the dryer to the Internet of Things so it could send them an email whenever it shut itself down.

After opening a thinger.io account, adding the soon-to-be device, and setting up the email notification process, [the0ry] combined the ESP8266 Development Board, a photosensitive resistor, and a 5V power supply on a mini breadboard. All that was left was to mount it on the dryer and direct the LDR (light-dependent resistor) to the machine’s door lock LED to trigger an email when it turned off — indicating the cycle had finished or terminated prematurely. A little tape ensured the LDR would only be tripped by the desired light source.

If you’re an apartment-dweller have WiFi in the wash area it would be awesome to see a battery-powered version you take with you. But in general this is a great hardware blueprint as many device have status LEDs that can be monitored in a similar way. If you want to keep the server in-house (literally in this case) check out the Minimal MQTT series [Elliot Williams] recently finished up. It uses a Raspberry Pi as the center server and an ESP8266 is one of the limitless examples of hardware that plays nicely with the protocol.

We love seeing hacks like this because not only does it conserve water and energy by reducing instances of rewashing, but it’s also a clever way to extend the life of an appliance and potentially save hundreds of dollars in replacing it. Add this to the bevvy of hacks that add convenience to one’s home — some of which produce delicious results.


Filed under: Arduino Hacks, home hacks

ESP8266 or MKR1000?

If you are a regular Hackaday reader, you’ve probably seen plenty of ESP8266 projects. After all, the inexpensive device is a workhorse for putting a project on WiFi, and it works well. There is a processor onboard, but, most often, the onboard CPU runs a stock firmware that exposes an AT command set or Lua or even BASIC. That means most projects have a separate CPU and that CPU is often–surprise–an Arduino.

It isn’t a big leap of logic to imagine an Arduino with an integrated WiFi subsystem. That’s the idea behind the MKR1000. But the real question you have to ask is: is it better to use an integrated component or just put an Arduino and ESP8266 together?

[Andreas Spiess] not only asked the question, but he answered it in a YouTube video (see below). He examines several factors on the MKR1000, the Arduino Due and Uno, and several other common boards. The examination covers performance, features, and power consumption.

We’ve covered a slew of ESP8266 projects. We’ve also seen at least two MKR1000 projects, one for an automotive project and the other controls a shower.


Filed under: Arduino Hacks, wireless hacks