Posts with «tutorials» label

Arduino Starter Kit is here to Rock

We are eager to announce the launch of the official Arduino Starter Kit! We have been working hard together in developing a complete selection of 15 projects that will let you become a true arduino tinkerer!

But that’s more:

The new starter kit has been developed together with a series of ten video tutorials hosted by Arduino co-founder Massimo Banzi, which can be viewed at www.rs-components.com/arduino. Ideally used in conjunction with the videos, the kit provides an open-source electronics prototyping platform based on flexible, easy-to-use hardware and software. It contains all of the essential components required to start programming with the Arduino Uno board, and a guidebook featuring 15 different projects, which are designed to evolve the user from beginner to professional level. Comprising a motor, servomotor and driver, the kit also offers particular benefits to users wishing to apply mechatronics to their designs.

read through for the whole components and projects list

We are aware this kit will let a lot of people step in the Arduino world: for this reason we opened a brand new category of the arduino forum. You can buy the Kit on RS Components and will soon be available on the Arduino Store and the other distributors [notify me when this happen]


MIDI with Arduino

We have already mentioned the fantastic work of Amanda Ghassei for Instructables in this post.
I would like to report two other very useful documents.

The first is What is MIDI? and explain in detail how MIDI protocol works. The second, even more important is Send and Receive MIDI with Arduino. Please note, regarding the Midi input schematic, the use of  the 6N138 opto-isolator. Some MIDI interface schematics show the 4N25 opto-isolator which is a single transistor type, but the 6N138 shown there produces a much better output signal.

Via:[Instructables]


A simple Arduino-based tachometer


Chris, from PyroElectro.com, proposes a comprehensive tutorial on how to make a simple, yet effective, Arduino-based tachometer.
The circuit is very simple: an IR led is coupled with an IR phototransistor to detect possible interruptions of the light beam, while the Arduino is responsible to calculate the time interval between two such events. Finally, a LCD is used to display the current RPM to the user.
To validate his project, a typical computer fan has been used in the set-up and the outcomes have demonstrated to be very close to the true RPM value (2600 +/- 100 RPMs).
The bill of materials, as well as the schematic, the source code and a detailed tutorial on how to build the circuit is available here.

[Via: PyroElectro.com]


Arduino Blog 06 Sep 20:10

RC remotes and Arduino: a tutorial

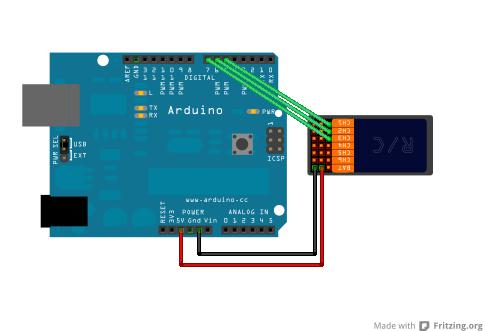
Nick Poole, from SparkFun, proposes this nice tutorial, where detailed instructions on how to connect a radio-controlled (RC) remote to an Arduino board are described in great details.

RC remotes are very simple controller, typically used to wirelessly control electrical rovers, cars and planes. Depending on the number of degrees of freedom required by the application (e.g., X and Y movement), an equivalent number of channels is provided by the remote, that can be easily connected to Arduino’s digital pins.

More information and some sample sketches can be found here.

[Via: SparkFun]


Massimo Introduces Arduino Leonardo

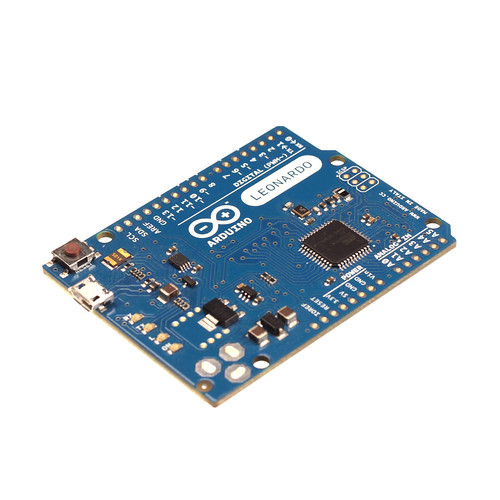
In this video Massimo explains the Arduino Leonardo, talking about its differences with Arduino UNO and playing around with its mouse & keyboard features.

If you want to have a closer look to the latest arrival in the Arduino Family click here, if you want to follow Massimo’s project click here. Arduino Leonardo comes in two different flavours: with headers and without headers.

Arduino and the LTC2440 24bit ADC

Have you ever wondered how to improve the resolution of analog readings of your Arduino board? If yes, this is for you.

John Beale, discussing on the Dangerous Prototypes’ forum, quickly describes how to connect a Linear’s LTC2440 ADC to an Arduino board, which will provide you with an amazing 24 bit resolution.

The ADC, which is available in a SSOP package, can be connected to the Arduino via the SPI bus. Here John provides a brief sketch and some very useful comments to make it working properly.

[Via: Dangerous Prototypes]

Arduino Blog 11 Jul 14:56
24 bit  adc  hardware  ic  ltc2440  tutorials  

New in the Maker Shed: Arduino Robot Shield Kit

My first hands-on experience with robotics and microcontrollers came from using a Parallax Boe-Bot kit with a Basic Stamp. I had no programming experience but using the included documentation and my PC, I was able to figure out how to build a robot that would react to obstacles and navigate its environment. Since then I’ve switched over to the Arduino but I still miss the experience I received from the Boe-Bot. Parallax must have read my mind because they released the Robotics Shield Kit for Arduino which is now available in the Maker Shed. They’ve taken their excellent Board of Education and transformed it into a shield (also available separately) which fits on top of an Arduino. The rest of the kit remains largely unchanged from the original Boe-Bot, which I consider a good thing.  Full documentation with over 40 activities is available online so you’ll be learning in no time. Simply add your own Arduino and a USB cable and enter into the fascinating world of robotics and Arduino!

Features

  • Board of Education Shield PCB
  • High-quality aluminum robot chassis, continuous rotation servos, and wheels
  • Boe-Boost Module
  • All the assembly hardware needed (nuts, screws standoffs)
  • Parallax screwdriver
  • Detailed online documentation and tutorials
  • All the electronic components and sensors needed for the tutorials
  • Note: Requires Arduino and USB cable

Quick tutorial: current sensing for DC motors

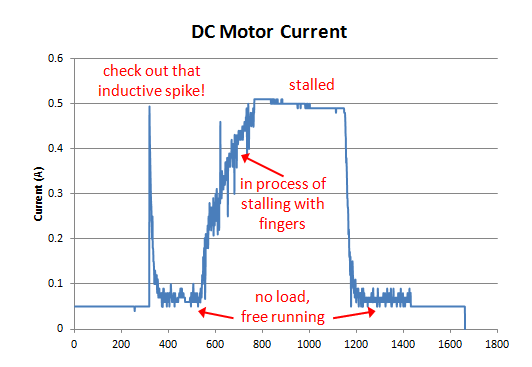
On her blog, Dustyn Roberts presents her own experience on current sensing for controlling DC electric motors with an Arduino board and an Arduino Motor Shield. This shield, based on a L298 H-bridge, provides two current sensing pins to the user, which can be used to measure the instantaneous current absorpion by each H-bridge. After some trials, Dustyn managed to have a quite clear picture of the absorption behavior of the DC motor:

Sample code and updates can be found on Dustyn’s blog.

[Via: Dustyn's blog]

Tutorial: accurate ADC readings

Hardware Hacking guys propose this quick tutorial on how to improve the accuracy of Arduino’s ADC readings, by measuring the actual voltage rail used to supply the onboard microcontroller. At a glance, this can be done by measuring the internal 1.1V reference voltage (it is available for ATMega 168 and ATMega 328 only) and, then, by normalizing the ADC readings.

More details can be found here.

[Via: Hardware Hacking]

Arduino based Quadrotor on a PCB

There are many Quadrotor Projects out there. But, they require a hobbyist to deal with the Frame Designing (Mechanical), a bit of Microcontroller knowledge as well as dealing with the Motor Control (Power Electronics). You may purchase a commercial Radio and a readymade Kit for flying. But, to Do-It-Yourself, is an achievement in itself.

Here is a picture of a Quadrotor designed by Shane Colton using Arduino Pro mini as its flying brain. Shane is a Ph.D Student at Massachusetts Institute of Technology. On being asked about the Project, he replied:

I heard about Arduino some time in 2007/2008 and have used it for a few projects since then. I built the quadrotor for fun / hobby (not related to research). I wanted to build my own (quadrotor) from scratch because I could integrate all the parts onto a single circuit board, and because I like designing the control system myself.

When he says he build the quad from scratch, he literally did it. Neither did he use any commercially available Radio Control, nor did he use any Electronic Speed Controllers (ESCs). Instead he went for creating his own Brushless DC Motor Controller, that too, on the same PCB which acts as the Quadrotor’s Frame.

He spent a lot of time researching about propellor balancing as well as vibrations in the PCB. Here is a video:

Now, that is called a hobby. In a detailed Instructable, he shows how you too can build a Quadrotor on a PCB. He has a project blog at http://scolton.blogspot.com with documentation on most of his projects.

Enjoy the ride:

Arduino Blog 06 Jun 07:47