Posts with «the hackaday prize» label

Hackaday Prize Entry: PICs and Arduinos, Cats and Dogs Living Together

Half of our little corner of the Internet complains about the Arduino, how the pin headers of the Arduino standard don’t make any sense, how the Arduino IDE is rubbish, gives well-reasoned arguments why the Arduino language is hindering the next generation of embedded programmers, and laments the fact that everything is commoditized into Arduino-compatible packages. The other half of our little corner of the Internet uses Microchip PICs.

[Jarrett] is stubborn, and he wants to use a PIC with the distinctive Arduino pin layout. Thus was born PIC-On-The-Go. It’s a PIC18F4520 in the familiar goofy-pin package, made specifically for everyone who just wants to buckle down and get some work done.

This isn’t the only PIC-become-Arduino board out there; the Fubarino is a great board that speaks Arduino, but that doesn’t take advantage of our favorite Arduino shields. Either way, we’re surprised something like [Jarrett]’s project doesn’t exist yet, making it a great entry for The Hackaday Prize.

The 2015 Hackaday Prize is sponsored by:


Filed under: The Hackaday Prize

Hackaday Prize Entry: An Arduino Alarm System

The last few years have seen an incredible increase in the marketing for home automation devices. Why this tech is just picking up now is something we’ll never understand – home automation systems have been around for decades, mostly in the form of security systems. For his Hackaday Prize entry, [IngGaro] is building an Arduino-based security system that does everything you would expect from a home automation system, from closing the shutters to temperature monitoring.

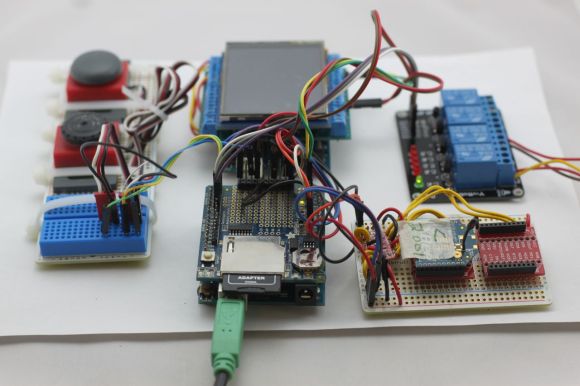
[IngGaro]’s system is built around a shield for an Arduino Mega. This shield includes connections to an alarm system, a GSM modem, temperature and humidity sensors, an Ethernet module, and IR movement sensors. This Arduino Mega attaches to a control box mounted near the front door that’s loaded up with an LCD, an NFC and RFID reader, and a few buttons to arm and disarm the system.

This project has come a long way since it was featured in last year’s Hackaday Prize. Since then [IngGaro] finally completed the project thanks to a change in the Ethernet library. It’s much more stable now, and has the ability to completely control everything in a house that should be automated. Now all [IngGaro] needs to do is create a cool PCB for the project, but in our opinion you can’t do much better than the mastery of perfboard this project already has.

The 2015 Hackaday Prize is sponsored by:


Filed under: The Hackaday Prize

Solar Charge Controller Improves Efficiency of Solar Panels

The simplest and easiest way to charge a battery with a solar panel is to connect the panel directly to the battery. Assuming the panel has a diode to prevent energy from flowing through it from the battery when there’s no sunlight. This is fairly common but not very efficient. [Debasish Dutta] has built a charge controller that addresses the inefficiencies of such a system though, and was able to implement maximum power point tracking using an Arduino.

Maximum power point tracking (MPPT) is a method that uses PWM and a special DC-DC converter to match the impedance of the solar panel to the battery. This means that more energy can be harvested from the panel than would otherwise be available. The circuit is placed in between the panel and the battery and regulates the output voltage of the panel so it matches the voltage on the battery more closely. [Debasish] reports that an efficiency gain of 30-40% can be made with this particular design.

This device has a few bells and whistles as well, including the ability to log data over WiFi, an LCD display to report the status of the panel, battery, and controller, and can charge USB devices. This would be a great addition to any solar installation, especially if you’ve built one into your truck.

This is [Debasish]’s second entry to The Hackaday Prize. We covered his first one a few days ago. That means only one thing: start a project and start documenting it on hackaday.io


Filed under: solar hacks, The Hackaday Prize

THP Semifinalist: Farmbot

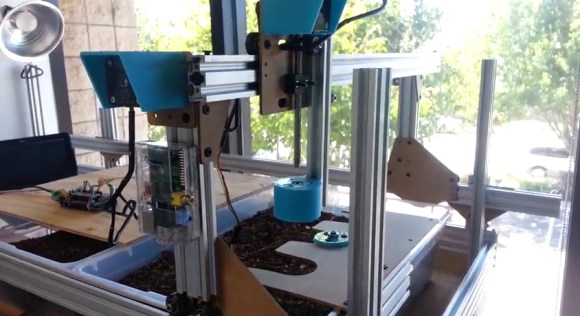
The FarmBot team has been pretty busy with their CNC Farming and Gathering machine. The idea is to automate the farming process with precise deployment of tools: plows, seed injection, watering, sensors, etc. An Arduino with an added RAMPS handles the movement, and a Raspi provides internet connectivity. Their prototype has already experienced four major iterations: the first revision addressed bigger issues such as frame/track stability and simplification of parts. Now they’re locking down the specifics on internet-of-things integration and coding for advanced movement functions.

The most recent upgrade provides a significant improvement by overhauling the implementation of the tools. Originally, the team envisioned a single, multi-function tool head design that carried everything around all the time. Problem is, the tool that’s in-use probably works best if it’s lower than the others, and piling them all onto one piece spells trouble. The solution? a universal tool mounting system, of course. You can see them testing their design in a video after the break.

If the FarmBot progress isn’t impressive enough—and admittedly we’d have called project lead [Rory Aronson] crazy for attempting to pull this off…but he did it—the FarmBot crew started and successfully funded an entire sub-project through Kickstarter. OpenFarm is an open-source database set to become the go-to wiki for all things farming and gardening. It’s the result of [Rory] encountering an overwhelming amount of generic, poorly written advice on plant growing, so he just crowdsourced a solution. You know, no sweat.


The project featured in this post is a semifinalist in The Hackaday Prize.


Filed under: Crowd Funding, The Hackaday Prize

Hacklet #10 Cryptography and Reverse Engineering

In honor of DEFCON, this week we’re looking at some cryptography and reverse engineering projects over at Hackaday.io

Every hacker loves a hardware puzzle, and [Tom] has created a tool to make those puzzles. His Hardware Reverse Engineering Learning Platform consists of a shield with two ATmega328 chips and an I2C EEPROM. The two Atmel chips share a data bus and I2C lines. Right in the middle of all this is an ST Morpho connector, which allows an ST Nucleo board to act as a sniffer. The platform allows anyone to create a reverse engineering challenge!

To successfully reverse engineer a board, it sure helps to have good tools. [coflynn] is giving that to us in spaces with The ChipWhisperer. ChipWhisperer is an open source security research platform. The heart of the system is a Xilinx Spartan 6 FPGA. The FPGA allows very high speed operations for things like VCC and clock glitching. ChipWhisperer is an entire ecosystem of boards – from LNA blocks to field probes. The entire system is controlled from an easy to use GUI. The end result is a powerful tool for hardware attacks.

On the Encryption side of the house, we start by keeping the Feds at bay. The [Sector67] hackerspace has collectively created NSA AWAY. NSA AWAY is a simple method of sending secure messages over an insecure medium – such as email. A one-time use pad is stored on two SD cards, which are used by two Android devices. The message sender uses an Android device to encrypt the message. On the receive side, the message can be decoded simply by pointing an android device’s camera at the encrypted data. So easy, even a grandparent could do it!

Next up is [Josh's] Bury it under the noise floor. “Bury it” is an education for cryptography in general, and stenographic software in particular. [Josh] explains how to use AES-256 encryption, password hashing, and other common techniques. He then introduces stenography  by showing how to hide an encrypted message inside an image. Anyone who participated in Hackaday’s ARG build up to The Hackaday Prize will recognize this technique.

[yago] gives us encrypted voice communications with his ZRTP Hardphone. The hardphone implements the ZRTP, a protocol for encrypted voice over IP communications. The protocol is implemented by a Raspberry Pi using a couple of USB sound cards. User interface is a 16×2 Line character LCD, a membrane keypad, and of course a phone handset. Don’t forget that you need to build two units,or  whoever you’re trying to call will  be rather confused!

Finally we have the Mooltipass. Developed right here on Hackaday by [Mathieu Stephan] and the community at large, Mooltipass is a secure password storage system. All your passwords can be stored fully AES-256 encrypted, with a Smart Card key. Under the hood, Mooltipass uses an Arduino compatible ATmega32U4 microcontroller. UI is through a OLED screen and touch controls.


That’s it for this week! Be sure to check out next week’s Hacklet, when we bring you more of the best from Hackaday.io!


Filed under: Hackaday Columns

THP Entry: Cut Energy Consumption by 30 percent with this WiFi XBee Setup

Let’s be honest. Paying electricity bills sucks. The amount paid is always too much, and the temperatures in the building are rarely set at a comfortable level. But now, with the help of this DIY Climate Control system, power-users can finally rejoice knowing that the heating and cooling process of their home (or commercial space) can be easily controlled through the utilization of an XBee Remote Kit and a process called zoning.

The team behind the project is [Doug], [Benjamin] and [Lucas]. They hope to solve the inconsistent temperature problems, which are caused by a moving sun, by open-sourcing their work into the community.

Their XBee system runs on a mesh network making it a perfect tool for sensing and communicating which areas in the house are too hot or too cold. Once the data is collected, XBee modules route the information wirelessly to each other until it reaches a central Arduino gatekeeper; which then decides if it wants to heat, ventilate, or air condition the room.

Not to mention all the added benefits posted below:

For one, you can hook-up temperature ICs like the TMP36 (PDF) without the need to buy extra parts. Better yet, the XBee can be programmed to fall asleep thus saving battery life. This means that the whole module can run on rechargeable AAA batteries.

Even further, it can be coded at its various ports to read other devices. This is great because it gives the setup the potential to turn on and off devices that are hooked to the module, transforming it into a networked hub of interconnected devices.

This approach not only allows you to be involved in saving the planet, but it keeps your home, warehouse, or office building at a much more comfortable level in the process, a real win-win.


The project featured in this post is an entry in The Hackaday Prize. Build something awesome and win a trip to space or hundreds of other prizes.


Filed under: home hacks, The Hackaday Prize

Long Range Wireless Sensors for the Home-Area-Network

In the near future, we will all reside in households that contain hundreds of little devices intertwingled together with an easily connectable and controllable network of sensors. For years, projects have been appearing all around the world, like this wireless sensor system that anyone can build.

[Eric] hopes his work will help bring the truly expansive Home-Area-Network (HAN) into fruition by letting developers build cheap, battery-powered, long-range wireless sensors. His method integrates with the pluggable OSGI architecture and home automation platform openHAB along with using an Arduino as the lower power, sensor node that is capable of utilizing many types of cheap sensors found online.

[Eric]’s tutorial depicts a few examples of the possibilities of these open-source platforms. For instance, he shows what he calls a ‘Mailbox Sentinel’ which is a battery-powered mail monitoring device that uses a Raspberry Pi to play the infamous, and ancient AOL sound bite “you’ve got mail.” It will also send an email once the postman cometh.

In addition, he lists other ideas such as a baby monitoring sentinel, a washer/dryer notification system, water leak detectors, and security implementations that blast a loud alarm if someone tries to break in. All of this potential for just around $20.

The key to making this project work, as [Eric] states, is the MQTT binding that ties together the Ardiuno and openHAB platform. This allows for simple messages to be sent over the Ethernet connection which is often found in IoT devices.

So all you developers out there go home and start thinking of what could be connected next! Because with this system, all you need is a couple of ten-spots and an internet plug, and you have yourself a strong foundation to build on top of. The rest is up to you.

This open, connected device is [Eric's] entry for The Hackaday Prize. You can see his video demo after the break. We hope this inspires you to submit your own project to the contest!


Filed under: home hacks, The Hackaday Prize